
Fixing the Auto Correct on Android
Do you keep cursing your Android phone all the time because it keeps “correcting” words it shouldn’t? You’re not alone. While there are times the auto-correct functionality on your phone comes in very handy, the utility is far from perfect. More often than not, auto-correct ends up correcting words it shouldn’t – and you then have to spend your precious time assuring your friends and family that wasn’t what you meant to send!
This is especially true if there are lots of proper nouns in the text or if you are interspersing your text with words from another language (try mixing Spanish words with an English text, the result is hilarious).
Luckily for you, the Android system will let you disable auto-correct. You don’t have to turn it off entirely, though – you can modify it instead. Auto-correct can be modified, for example, to ignore minor errors and fix only the glaring ones.
In this article, we’re going to show you how to modify or disable the auto-correct feature on your stock Android Keyboard in a few easy steps.
How to Disable Auto Correct on Your Android Keyboard
Autocorrect settings depend on the keyboard you are using. If you’re using a third-party keyboard, it may not support auto-correct modification like the stock keyboard does.
First, we’ll show you how to disable auto-correct entirely.
To open autocorrect settings, go to your messaging app (or any other app where the keyboard pops up) and hold down the “,” button (next to your spacebar).
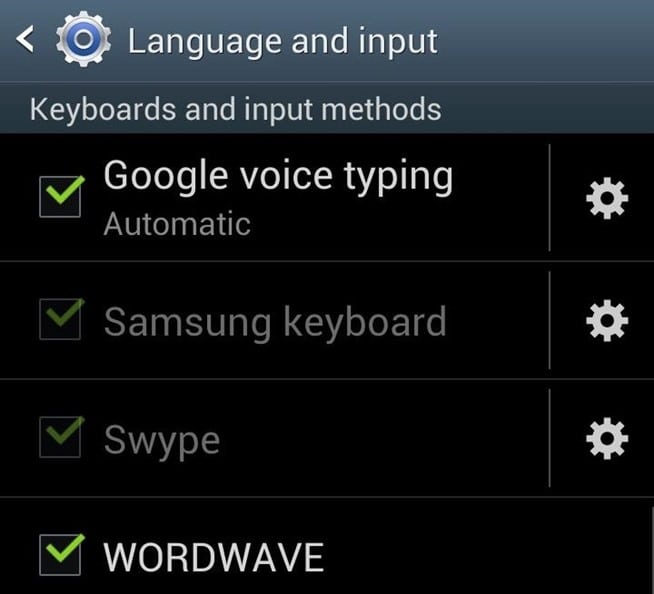
Tap the gear icon to enter settings, and then tap “Language and input”. Please note you can also enter keyboard settings from the main menu by tapping the “Settings” app located there.
In the “Language and input” menu, tap on the “Google Keyboard” that you’re using. In the “Google Keyboard” submenu, find the “Text correction” option.
Tap it and, in the submenu that appears, tap on “Auto-correction”. Here, you can slide auto-correct on and off.
How to Modify Auto Correct on Your Android Keyboard
We think it’s more useful if you customize the auto-correct feature on your Android keyboard instead of turning it off entirely. That way, it will still correct all those small spelling mistakes that you probably make sometimes.
You can modify several aspects of the auto-correct feature. In the “Google Keyboard Settings” menu, you will find the following options:
“Preferences”, “Appearance & layouts”, “Gesture Typing”, “Text Correction” and “Advanced”
The one that’s of most interest to us is the “Text Correction” submenu. In the “Text Correction” submenu, you will find several options. We’ll go over these, one at a time.
Auto Correction Option
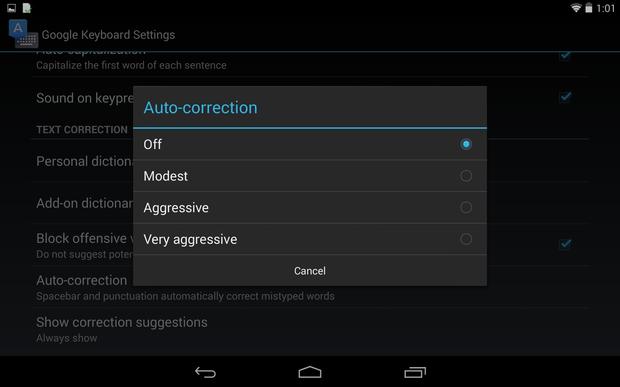
This option lets you choose the intensity of the auto-correction function on your keyboard. It can be turned up from “Modest” to “Aggressive” and even “Very aggressive”. We think “Modest” is perfect for everyday use, though you might want to try “Aggressive” if you write a lot of work emails on your phone.
Blocking Offensive Words
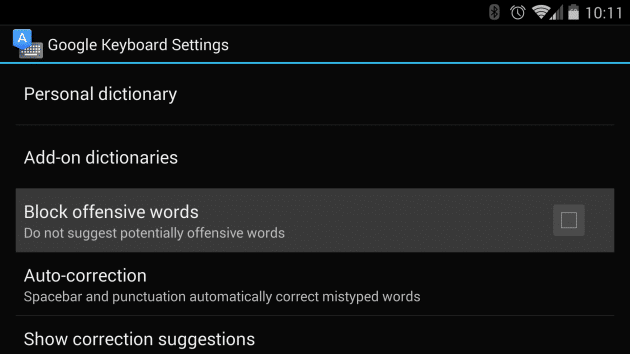
The “Block offensive words” option here should be of interest to you, if you’re an adult and like to rail at your friends occasionally. By default, “Block offensive words” is turned to on. By turning it off, auto-correct will no longer replace offensive words with other ones.
Correction Suggestions
We recommend you keep the “Show correction suggestion”, “Personalized suggestion”, “Suggest contact names” and “Next-word suggestions” options on. Your keyboard will suggest changes (correction suggestion), learn words from you as you type (personalized suggestions), leave the names of your friends and family as they are (contact names) and predict words as you type the first few letters (Next-word suggestions).
The Dictionary Option
The dictionary option is where you can really improve your Google Keyboard experience, we think.
The first option is the “Personal dictionary” option. You can add custom words, idioms and colloquialisms that you often use here. That way, auto-correct will just skip over your custom words the next time it encounters them and you’ll be able to type faster too.
You don’t have to navigate all the way into the “Personal dictionary” menu to add words to it – you can do it while typing too. If a word you have spelled out has a red line underneath it, auto-correct hasn’t encountered the word before and thinks it’s a mistake. You can add the word to your personal dictionary by tapping on it and then choosing the “Add to dictionary” option that pops up.
The “Personal dictionary” will also let you add shortcuts for frequently used words/phrases. If, for example, you type “on my way” or “be right there” a lot, you can add “omw” and “brt” as shortcuts to these phrases in your dictionary to make it easier for you to type. The “Add-on dictionaries” option, as the name suggests, will let you add other dictionaries for auto-correct to reference.
Do you often talk to your friends and family in your native language, like Italian or German? No problem, just choose the corresponding dictionary in the list and install it on your phone. Next time, not only will auto-correct not attempt to change words in your native language, it will also give you word suggestions as you type.
Third Party Keyboard: Swype
To speed up your typing experience, you could try switching to a gesture keyboard like Swype. With Swype, all you have to do is slide your fingers over the keyboard to make full words.
Auto-correct isn’t such a problem with Swype, as the gesture typing ensures that the words you get are almost always right. However, Swype does take a while getting used to and it may not be for everyone.
The Last Word
If you follow these suggestions, we think you’ll have a better typing experience on your Android. You will find it is rewarding to stick with Google’s stock keyboard, as it’s free, powerful, and already installed on your phone.
Do remember, though: the next time you send something to your friends and family that you shouldn’t have, you will no longer be able to blame auto-correct for it.


