The CMOS Checksum error can show up when you boot your computer. Windows users can experience the CMOS checksum error when there is a conflict between CMOS (Complementary Metal Oxide Semiconductor) and BIOS (Basic Input Output System) data.
Whenever you shut down the PC, CMOS writes a number, and when CMOS values do not match with the BIOS number during startup, you can experience a CMOS Checksum Error in Windows 10. If the fault is in the hardware, none of the solutions will help you fix this error on your computer. However, trying some initial fixes has helped many users resolve the CMOS Checksum bad error in Windows 10.
What Causes CMOS Checksum Error in Windows 10?
The main reason to experience the CMOS Checksum error message is the issue with CMOS. Either the CMOS is corrupt, or the CMOS battery is not working. Some other reasons include:-
- Outdated BIOS
- Power Surges
- A sudden power failure resulted in the PC turning off abruptly
- Issues with power supply
- Virus infecting BIOS
- Damaged motherboard
If your motherboard or Complementary Metal Oxide Semiconductor battery is damaged, you need to replace it. If the CMOS battery has any issues, you may also face incorrect time with Windows 10. However, the other reasons are resolvable with few changes to the computer.
9 Solutions to Resolve CMOS Checksum Error
You may need a little technical expertise to try out some of the solutions below, especially one with BIOS and hardware. However, you can still try out other solutions and check if they work for you.
1. Restart your Computer
At times, simply restarting your computer can resolve the CMOS Checksum error. If the issue is just because of a power surge or improper booting, a quick reboot can be helpful. As you are not able to enter your system, you need to hard reboot it.
Press and hold the physical power button on your laptop or CPU until the system turns off. You can then press the power button again to turn on the PC.

Check if you get the checksum error message when the operating system boots or not.
2. Press Function Keys
If you are still getting the CMOS Checksum error while booting your computer, you can try pressing the F1 function key. The F1 key will resume the boot process. If the F1 key is not resolving the issue, you can try the F2 key as well. This solution’s chances to resolve the CMOS Checksum error are low, but it is worth trying.
3. Perform Automatic Startup Repair
You can run Startup Repair to resolve the CMOS Checksum error. To run the Startup Repair, you need to enter Windows 10 Advanced startup options.
You can enter Advanced options via Windows Recovery Environment. And from Windows Recovery Environment, you can go to Troubleshoot ➜ Advanced options.
Once you reach the Advanced options, click on Startup Repair to start the process.
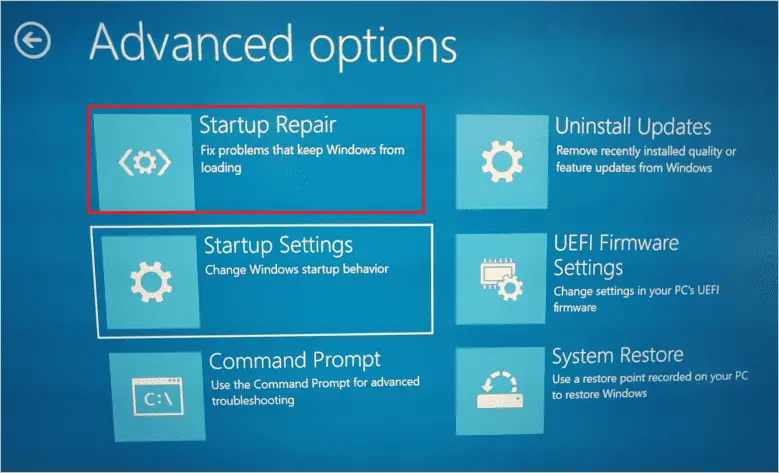
You can follow the instructions on your screen to complete the Startup Repair. In many cases, the Startup Repair will resolve the error on its own unless there are hardware issues.
4. Update BIOS
The outdated BIOS can also cause many issues and errors on your computer. You can manually update BIOS by downloading the latest BIOS version from the manufacturer’s site. However, make sure you do so very carefully. If wrong changes are made to the BIOS, the PC can be damaged beyond repair. Also, an incorrect BIOS update can cause many other PC problems.
Every manufacturer has different ways of entering BIOS and updating them. Therefore, you can refer to the instruction manual that came along with the PC or check out the manufacturer’s website to get detailed instructions to perform the BIOS update.
5. Check for the Hardware Faults
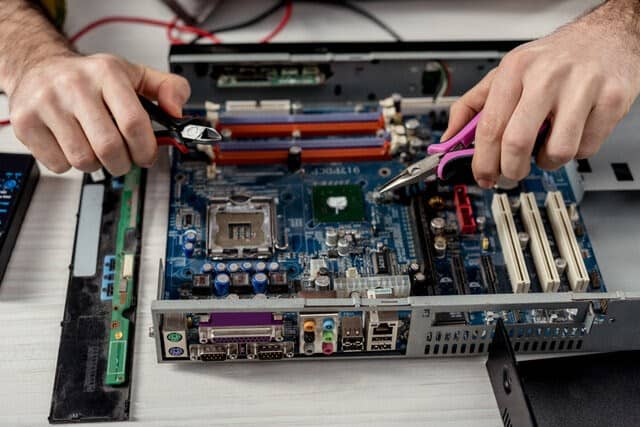
You can experience the CMOS Checksum error if there are hardware defects or damage to your computer. For example, if the computer’s motherboard is damaged, the CMOS battery won’t function properly, resulting in corrupt CMOS data.
You can dismantle your PC and check if all the circuits, motherboard, and other components are working as expected and there are no signs of physical damage. If you have not done it before, you can take the help of an expert in the field. Sometimes, dismantling the laptop or CPU incorrectly can land you in more trouble, so make sure you do it carefully and correctly.
If there are any hardware defects, you may need to replace the component or get it repaired. You can check with the motherboard manufacturer if they can replace the damaged component.
6. Reset BIOS
Many users resolved the CMOS Checksum invalid error by resetting the BIOS. This solution can be helpful if you have recently made any new changes to the BIOS and that didn’t go well. However, resetting the BIOS will not delete your files, folders, settings, and applications.
Step 1: Enter the BIOS setup on your computer. You can refer to the manufacturer manual for instructions to enter BIOS as the way is different for each model and manufacturer.
Step 2: You have to find the option to load default settings in the BIOS menu. In most cases, you will find the Restore Settings button at the bottom of the screen.
Step 3: If asked for confirmation, saying, ‘Load BIOS Defaults,’ click on Yes or OK to confirm. The confirmation message may differ from system to system.
Step 4: Save changes and exit the BIOS screen. This will reset the BIOS to correct BIOS settings.
Now, try rebooting your PC normally and check if it boots without any error or not.
7. Fix CMOS Battery Terminals
If the CMOS battery is loosely connected to the motherboard, you can experience a CMOS error. You need to check if the negative and positive pins of the battery are correctly connected and there are no other loose connections.
You may need to access the motherboard of your PC. Again, you can take help from an expert in the field to access the hardware part.
8. Replace the CMOS Battery
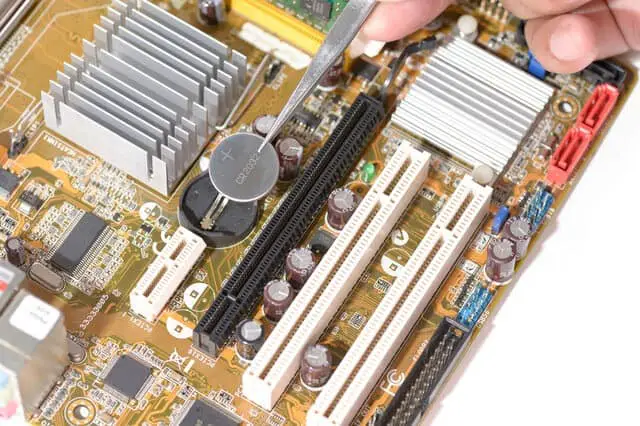
Even after checking for a loose connection, if the checksum error is not resolved and you still have failed restarts, there might be some CMOS battery issue. It can be a dead battery issue. You can replace the CMOS battery with a new fresh battery on your own if you have sound knowledge about computer hardware.
In most cases, the CMOS battery needs replacement after five years. So, if five years have passed since you last changed the battery, it is better to get it changed now instead of finding the workarounds for the error.
9. Visit a PC Repair Center
If your computer or laptop is still in the warranty period, we recommend visiting the manufacturer’s shop before opening it yourself. Many manufacturers discard the warranty if PCs are opened and hardware parts are changed. So, make sure you visit them before making any hardware changes to your PC.
And if the computer is not in the warranty period, you can still visit the repair center to get it fixed. Make sure you visit the authorized center instead of the local ones.
Conclusion
The error that appears while booting prevents you from logging into the system, thus creating more panic and frustration. CMOS Checksum error is one such error that can be experienced when your system is booting. You can resolve this error by updating and resetting the BIOS, changing the CMOS battery, and running Startup Repair. Well, this is only possible if there are no faults in the hardware.
One of the main reasons for checksum error is hardware defects in the motherboard, and this can only be resolved by replacing the damaged components. You can check out the fixes in the above article and try if those help you resolve the CMOS Checksum error in Windows 10.
FAQs
What does the CMOS Checksum error mean?
A checksum value is stored in CMOS when the computer is shut down. You can get a CMOS Checksum error when the CMOS checksum values do not match the BIOS number during the startup process.
What causes CMOS Checksum error in Windows 10?
Outdated BIOS, viruses, power surges and loss, bad power supply, hardware failure, and CMOS battery issues can cause CMOS Checksum error in Windows 10.
How do I fix the CMOS Checksum error?
You can press function keys, reset or update BIOS, perform automatic repair, and replace damaged hardware components to fix the checksum error.
How do I fix CMOS battery failure?
If there is a CMOS battery failure, the only way to fix it is by replacing it with a new working battery.


