TPM 2.0 is an important system requirement for Windows 11 upgrade. Even If the hardware or firmware TPM is present on your system but is not enabled, your PC won’t meet the Windows 11 minimum requirements. So if you are not sure how to enable TPM 2.0, don’t worry, as we have covered you with this detailed guide.
TPM stands for Trusted Platform Module. It is a secure cryptoprocessor chip that provides hardware-level security and protection to your computer, making it difficult for hackers. It comes in 2 versions; one is TPM 1.2, and the other is TPM 2.0.
Difference Between TPM 1.2 and TPM 2.0
Initially, Microsoft would keep TPM 1.2 as a minimum system requirement, but later it switched to TPM version 2.0. So now, what made Microsoft change its mind? Well, TPM 2.0 is the latest version of TPM, thus more features and security.
TPM 1.2 only allows the SHA-1 hashing algorithm and RSA. On the other hand, TPM 2.0 enables greater crypto agility. In addition, it supports new cryptographic algorithms, thus taking your device security a notch higher.
Also, TPM 2.0 is more consistent compared to TPM 1.2, thus increasing Windows security. So, therefore, the compatible TPM version for Windows 11 is 2.0. So now, you know the difference between the two versions of TPM, you can move on to how to enable the TPM section to enable it on your PC.
How to Enable TPM 2.0 in Windows?
There are two ways to enable TPM 2.0 in Windows 10. You can either use BIOS or use boot sequence to activate TPM 2.0. Well, both the options will require a little technical expertise, as you need to modify the BIOS settings of your computer.
You can follow the below steps carefully to avoid any issues while modifying BIOS or boot sequence. Also, if you don’t want to enter BIOS by using the Settings app, you can refer to the instructions manual that came along with your PC.
The manual will correctly guide you with steps to enter the BIOS interface as well as with a dedicated key for boot sequence. You can install Windows 11, after enabling TPM 2.0 on your computer.
1. Use BIOS to Enable TPM 2.0
Windows 10 has made it easy to enter BIOS by giving the Advanced Startup option in the Settings app. Follow the simple steps given below to enable TPM on your Windows device.
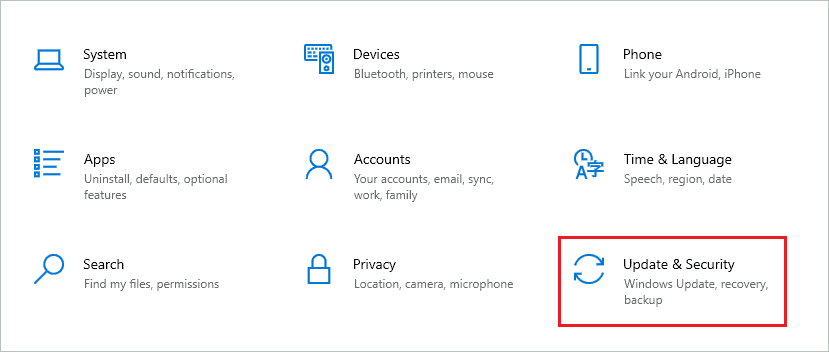
Step 1: Press Windows key + I to open the Settings app and go to the “Update & Security” section.
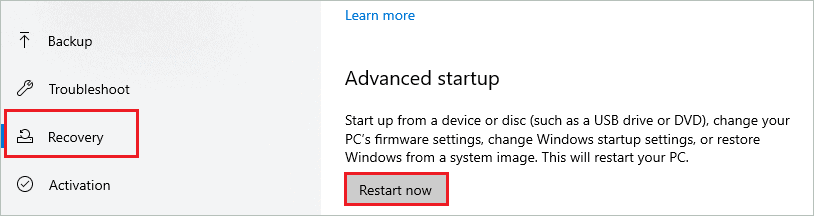
Step 2: Now, from the left pane, go to “Recovery” and click on the “Restart now” button under Advanced startup.
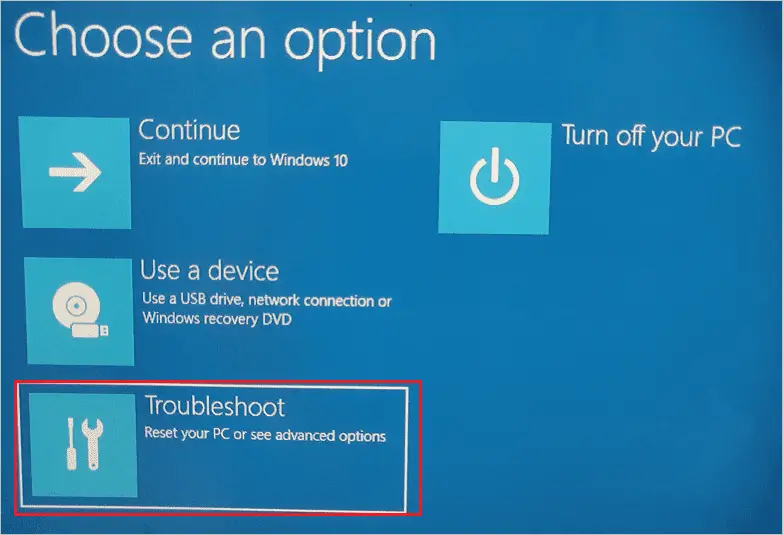
Step 3: Wait till your system reboots and you see a blue screen.
Step 4: In Choose an option screen, select “Troubleshoot.”
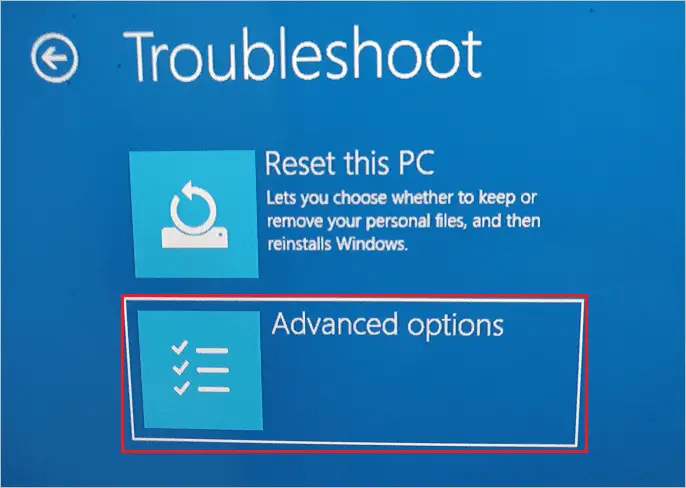
Step 5: On the next screen, select “Advanced options.”
Step 6: In the Advanced options, select “UEFI Firmware Settings.”
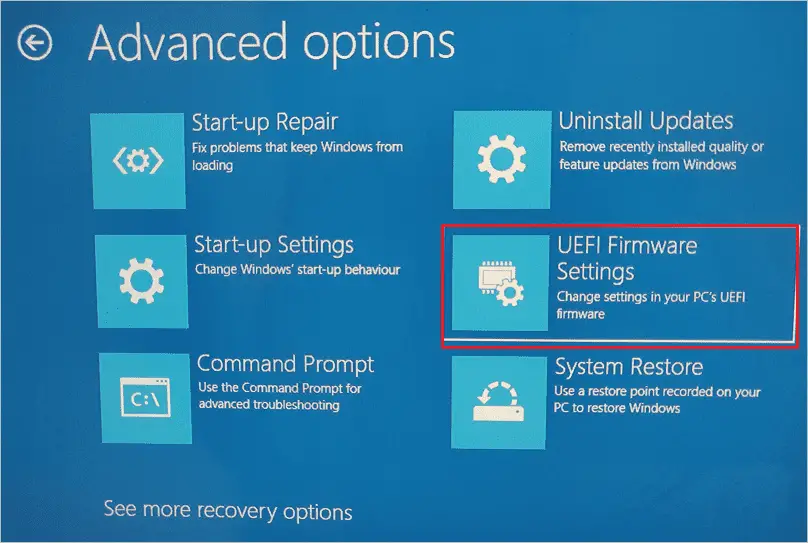
Step 7: Click on the “Restart button” to enter system BIOS.

Step 8: Once you enter the BIOS menu, go to “Settings.”

Step 9: Now, in the Settings sub-menu, select “Security.” On your device, it can be Advanced or Trusted Computing, depending on your manufacturer.
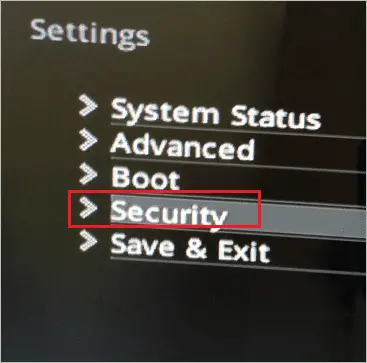
Caption: Select Security
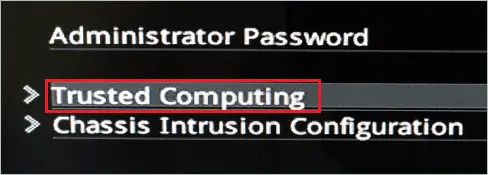
Step 10: In Security, click on “Trusted Computing.” Again, the label can differ from system to system.
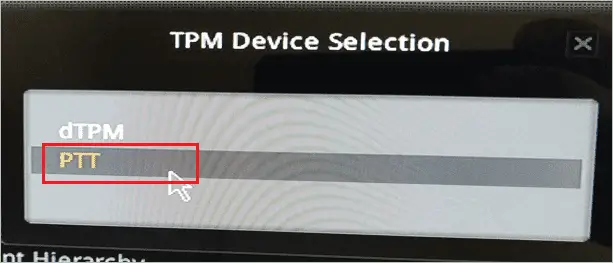
Step 11: Now, select the “TPM Device Selection” option and select the device you want to use. In our case, we didn’t install the hardware chip and therefore selected PTT as our TPM device. The TPM device selection option depends on the TPM available on your computer.
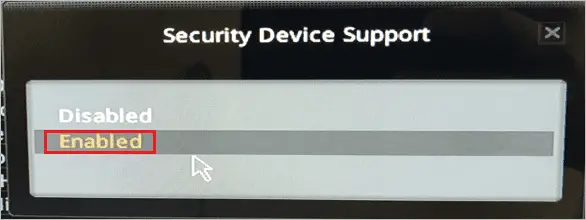
Step 12: To enable TPM, select “Security Device Support” and click on “Enabled” from the popped-up menu.
Some of the other common options to enable TPM are Security Device, TPM State, AMD PSP fTPM, AMD fTPM switch, Intel PTT, or Intel Platform Trust Technology.
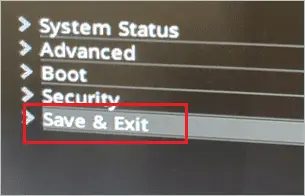
Step 13: After making the required changes, select “Save & Exit” to exit the BIOS. If you simply exit without saving the changes, the TPM won’t be enabled on your system.
Now, you know how to enable TPM via BIOS. Once you enter BIOS, the process may change depending on the manufacturer and model number.
2. Use Boot Sequence
If you don’t wish to use the Settings app, you can use a dedicated key to enter the BIOS/UEFI on your computer. This will save you from the extra steps required to enter Advanced startup options. However, finding a dedicated key can be time-consuming at times.
You can check the motherboard model and manufacturer to find the dedicated key to enter the boot sequence.
Step 1: Firstly, if your system is on, shut it down.
Step 2: Now, press the Power button again and keep on pressing the dedicated key to enter BIOS. In our case, it was an MSI motherboard, so we used the “Delete” key.
The dedicated keys for common motherboards are given below. You can try pressing these keys to enter UEFI firmware.
Dell: F2 or F12
MSI: Delete
Lenovo: F1 or F2
ASUS: F2 or Delete
Toshiba: F2
HP: ESC or F10
Samsung: F2
Microsoft Surface: Press and hold the Volume Up button
Acer: F2 or Delete
Step 3: You will directly enter the system BIOS without any blue screen or Advanced startup option.
Step 4: Now, from the BIOS menu, go to Settings ➜ Security ➜ Trusted Computing.
Step 5: Select the TPM device in the “TPM Device Selection” option.
Step 6: Next, click on “Security Device Support” and select “Enabled” to enable TPM on your PC.
Step 7: Save and Exit the BIOS.
The process of enabling TPM in both ways is the same; the only difference is entering BIOS. You can enable it on any computer once you know how to enable TPM, irrespective of the motherboard manufacturer.
Confused between dTPM and PTT! What to Enable?
Many Windows users get confused when there are multiple TPM device selection options. For example, if you have multiple options like discrete TPM and PTT or dTPM and fTPM, there can be confusion on what to select.
Now, the choice depends on the availability of hardware TPM on your device. For example, suppose your computer has a hardware TPM chip, select dTPM. However, if the hardware chip is not present, you have to go with firmware TPM, like PTT or fTPM, depending on your processor.
There are chances to be unsure of a TPM hardware chip. In this case, you can select dTPM and then run the PC Health Check app to see if there is a green checkmark next to TPM or not. If TPM still does not meet minimum system requirements, the hardware chip is not present, and you need to select the firmware option.
Final Thoughts On How To Enable TPM 2.0
TPM makes your system more secure and reliable by providing hardware-level security measures. And because of this, Microsoft made it an important system requirement for Windows 11 operating system. Many PCs have TPM on their PC, but it is not enabled by default. In this case, you need to know how to enable TPM 2.0 manually via BIOS.
You can enter BIOS via the Settings app and via boot sequence. However, the Settings app way is common to all Windows 10 users, irrespective of the device manufacturer and model number. However, if you want fewer steps to enter BIOS, you can use the boot sequence.
Once you know how to enable TPM 2.0 on Windows 10, you can start with the Windows 11 upgrade process. If secure boot is not enabled on your computer, we recommend doing it before moving to upgrade.
FAQs
How do I know if TPM 2.0 is enabled?
You can enter BIOS and check if TPM is enabled or disabled. If you don’t wish to use BIOS, you can use the “get-tpm” command on PowerShell to know the TPM status.
How do I enable TPM in BIOS?
You can go to Settings ➜ Security ➜ Trusted Computing in BIOS and select “Enabled” for “Security Device Support.” Also, make sure the right TPM device is selected in BIOS; otherwise, enabling it won’t make any difference.
Is it safe to enable TPM?
It is absolutely safe to enable TPM on your Windows device. Nevertheless, your device will be more secure and safe from hackers/attackers as it provides in-built security protection.


