VRAM, also known as Video RAM, contributes to the overall performance of your computer. The graphics processing of your computer is handled by GPU (Graphics Processing Unit) with the help of VRAM. If there is no sufficient VRAM available, the GPU uses part of the RAM to work with graphics, which decreases the overall speed of processing graphics.
However, if you know how to increase VRAM in Windows 10, you can conveniently handle this issue. There are two types of graphics cards on laptops/PCs as per different configurations; one is dedicated with its VRAM, and the other is integrated that uses system memory.
Dedicated and Integrated Graphics Card
Many systems come with an integrated graphics card, where the GPU is a part of the CPU (Central Processing Unit). In such systems, the GPU does not have its video RAM; instead, it uses 1 to 5 percent of RAM to process graphics. Here the overall performance is compromised, especially while playing heavy graphics games on your computer/laptop. Your system can also crash owing to this situation.
In a dedicated graphics card, there is a separate memory known as dedicated Video RAM used by the GPU to process images and graphics-related tasks. The performance of such computers is much better compared to systems with integrated GPU. However, dedicated cards can take more space on your computer and also consume more power.
Let’s see how to increase VRAM using different ways on Windows PC.
How to Increase VRAM in Windows 10?
You can increase the size of your VRAM by using BIOS, Registry Editor, and Settings app. Before proceeding with increasing your RAM, you should know what the current VRAM size is.
Check Current Video RAM Size
To check the currently allocated VRAM size, follow the steps given below.
Step 1: Press Windows key + I to open the Settings app and go to the System section.
Step 2: Navigate to the Display from the left panel of System settings.
Step 3: Click on Advanced display settings.
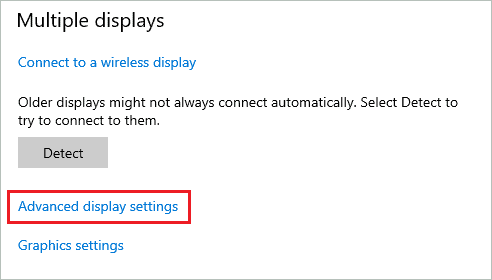
Step 4: Click on Display adapter properties for Display 1 under Display information.

Step 5: In the Properties dialog box, make sure you are in the Adapter tab and check the number next to the Dedicated Video Memory.
It is the size of VRAM your computer currently has.
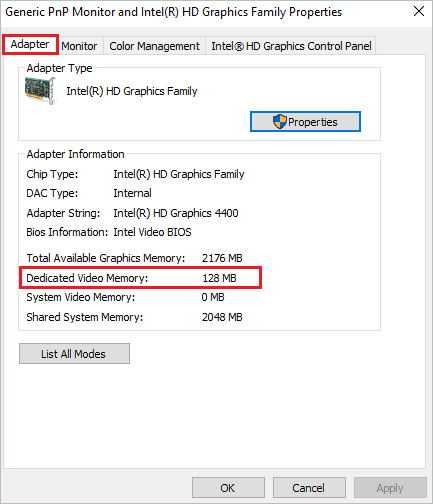
The Shared System Memory is also used for graphical purposes in case of need. Once you know the size of VRAM, you can use any of the below-mentioned ways to increase its size.
1. Use BIOS
If you are thinking about how to increase VRAM using BIOS, the below section will answer your query.
You can enter BIOS by referring to the instructions manual that came along with your PC. In most cases, it is pressing the Delete, F2, or F10 key when the system is turning on. You can also find a way to enter BIOS online, depending on your manufacturer.
Each manufacturer and model has different ways to enter BIOS settings. Once you enter BIOS, go to the Advanced settings from the BIOS menu and then open Graphics Configuration.
Now change the DVMT pre-allocated option to 128M, 256M, 512M, and 1024M as per your wish.
It is recommended to set 256 MB for 2 GB RAM, 512 MB for 4 GB RAM, and 1024 MB for 8 GB. However, you can make changes as per your requirements. After changing the VRAM size, check if graphical performance is boosted or not.
Well, not all manufacturers have these settings. If you don’t have an option to change VRAM size via BIOS, you can use the other ways mentioned below. However, if you have the settings mentioned above in your RAM, we recommend using the above-mentioned way to increase VRAM size.
2. Use Registry Editor
Another way to increase VRAM is to use a Registry Editor. Well, this way of increasing VRAM won’t help you fix the PC’s performance issues. You can use this way to install an application or software that is asking for more VRAM than your system has.
In other words, this process is more for faking the VRAM size for heavy software installation.
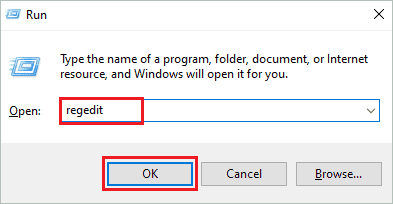
Press Windows key + R to open Run and type regedit there. Click OK or press Enter to open the Registry Editor.
In the Registry Editor, go to –
HKEY_CURRENT_USER\SOFTWARE\IntelIn the case of AMD or Nvidia graphics card, change the last location to AMD or Nvidia instead of Intel.
Now, right-click on the Intel folder from the left pane and select New ➜ Key from the context menu. Name the new key as GMM.
Go to the newly created GMM folder and right-click on the empty space. Select New ➜ DWORD (32-bit) Value.
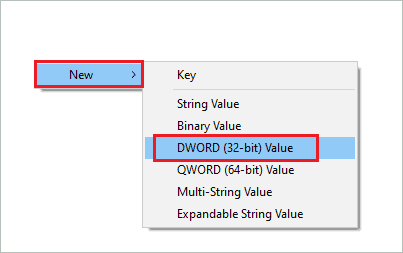
Name the new DWORD as DedicatedSegmentSize and double-click on it. Change the Base to Decimal and give the Value data as per your requirements.
Now, reboot your computer and check the size of the allocated VRAM as mentioned above.
3. Use System Settings
You can increase the paging file size for your hard drive. This will increase the virtual memory and, in turn, VRAM. We recommend trying the first two ways first and then try this as a last resort of increasing your VRAM.
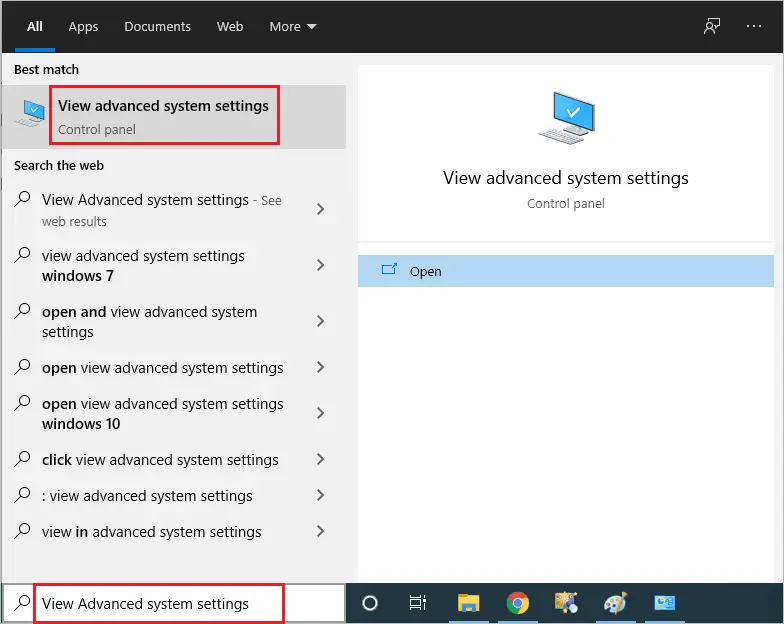
Press Windows key + S and search for View advanced system settings in the Start menu. Open the same from the search results.
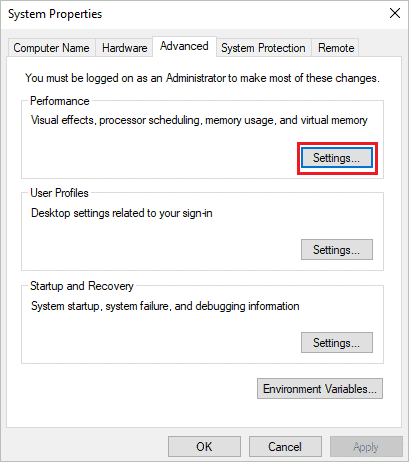
In the System Properties dialog box, click on Settings under Performance.
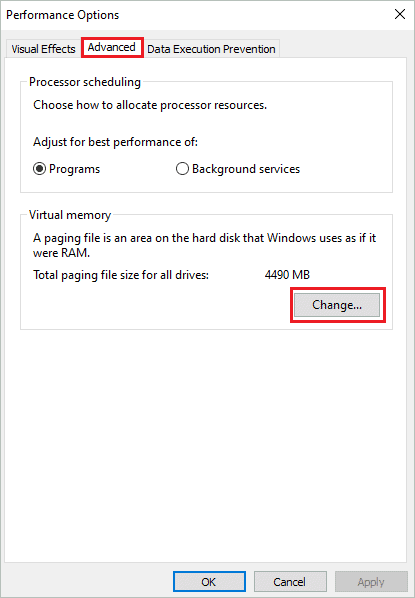
In the Performance Options window, go to the Advanced tab and click on the Change button under Virtual memory.
Now, uncheck the checkbox next to ‘Automatically manage paging file size for all drives’ and select Custom size.
Add the custom size for initial size and maximum size. Click OK once done.
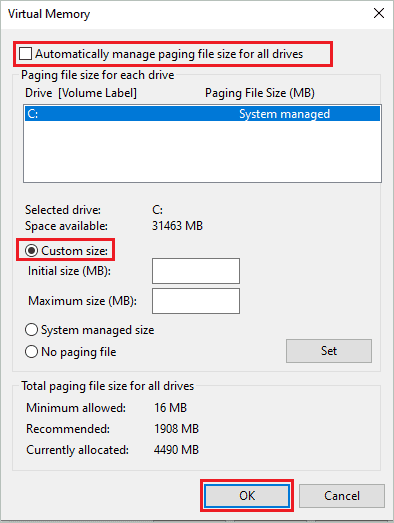
It is recommended to keep virtual memory no less than 1. 5 times and no more than 3 times the size of your system RAM.
Once done, restart your computer and check if applications crashing because of insufficient VRAM are working now. You now know how to increase VRAM using System Settings.
4. Use Dedicated GPU
If none of the above ways could help you with how to increase VRAM and upgrade your computer’s performance, you must try upgrading to a dedicated GPU. However, if you are already using a dedicated graphics card with a dedicated VRAM and still having issues with VRAM, you must look for a new GPU with the increased VRAM size.
You can search for a preferable VRAM size as per your needs online or contact the manufacturer’s support team to inquire about the same. If you are using an integrated GPU, you can upgrade to a dedicated one.
You can buy a dedicated graphics card from Amazon or a trusted local repair shop.
Conclusion
VRAM helps to process graphical tasks faster, and therefore it is vital to have sufficient VRAM as per your usage. In many cases, your system performs the graphical tasks on the amount of VRAM available, but sometimes when it fails to do so, the heavy games and graphical software crashes.
With the help of the above guide, you can know how to increase VRAM in Windows 10 in an easy and convenient way. You can use any of the four ways mentioned above to increase VRAM based on your feasibility and requirements. However, if the issue is a constant crash of heavy graphics software, we recommend upgrading to a dedicated GPU.


