Windows 10 gives you many customization options that can help you touch your PC and adjust it as per your needs. You can hide the taskbar, change the monitor refresh rate, modify background images, and make other such changes on Windows 10 computers. There is also an option to change icon size in Windows 10.
You can change the size of the Desktop, taskbar, and File Explorer icons in Windows 10. There are different ways to change icon size, and you can go through this guide to do it.
How To Change Icon Size in Windows 10
You can refer to the quick steps mentioned below to change the size of Desktop icons in Windows 10.
How to Change Icon Size in Windows 10?
1. Right-click on the empty space on the Desktop.
2. Select View from the context menu.
3. Choose Large icons, Medium icons, and Small icons option as per your requirement.
If you are looking for detailed steps or additional ways of changing Desktop icon size, you can go through the below guide. You will also know how to change the size of the taskbar and File Explorer icons.
How To Change Desktop Icon Size in Windows 10
You can choose any of the ways mentioned below to change icon size in Windows 19.
1. Use Context Menu
To change the Desktop icon size, right-click on the empty space on the Desktop and select View from the context menu to see different sizing options.
Now, click on the icon size you want; it can be Large, Medium, or Small.
The default icon size is medium size for all the computers. You can see the changes immediately on your Desktop. There will be some changes in desktop icon spacing as well, so make sure you use the right icon size for your computer.
2. Use Settings App
You can use the Settings app to change icon size in Windows 10 computer.
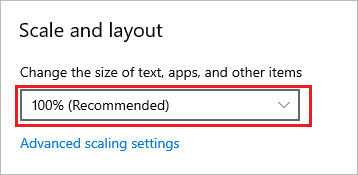
Press Windows key + I to open the Settings app and go to System. Click on Display from the left panel of the System settings.
In the Display settings window, scroll down to Scale and layout and change the size by selecting an option from the drop-down menu.
Well, the changes will be applied immediately to all the Windows 10 icons, texts, and apps. Also, the font size will be changed. So, if you want large or small icons for all the applications on your device, this is the right way of doing it.
However, if you only want to change the size of Desktop icons, we recommend using another way.
If the size you want is not available in the drop-down menu, click on the Advanced scaling settings link below.
Now, under Custom scaling, enter the size you want for your texts and icons and click on Apply.
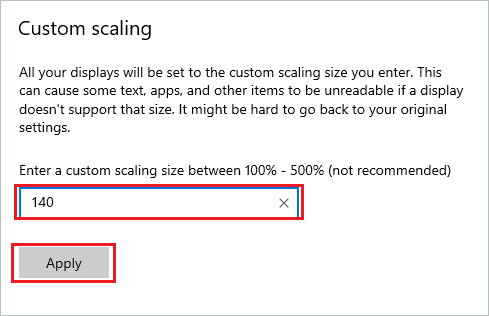
The changes won’t be applied immediately after applying the custom scaling. You need to sign out from your account by clicking on the Sign out now link under Custom scaling settings.
Note: The Sign out now link will only appear after you click on Apply.

Custom scaling is fun and helpful when you want a specific size on your Windows computer.
3. Use Keyboard Shortcut
If you are more comfortable with keyboard shortcuts, you will find this way of sizing Windows Desktop icons helpful. Two keyboard shortcuts can be used to change the Windows 10 icon size.
You can press the following keys to change the Desktop icon size –
Shift + Ctrl + 1/2/3/4Make sure you press these hotkeys when you are on the Desktop. Here, pressing 1 will give you the largest icon, and 4 will provide you with a small icon. If you want a medium icon, you need to press Shift + Ctrl + 3.
Another shortcut involves keyboard and mouse both. You need to press the Ctrl button and move the mouse scroll wheel to change your desktop’s icon size. Move the mouse wheel upwards for the larger size and downwards for the smaller size. Make sure you do both things simultaneously; otherwise, the icons won’t change their size.
4. Use Registry Editor
You can use the Registry Editor to change the Desktop icon’s size. Press Windows key + S to open the Start menu and search for Registry Editor. Open the same from the search results.
Once you open the Registry Editor, go to the below-mentioned path.
HKEY_CURRENT_USER\SOFTWARE\Microsoft\Windows\Shell\Bags\1\DesktopNow, keep the Registry Editor as it is and open Command Prompt terminal.
You can search for Command Prompt in the Start menu. Before typing any command in the terminal window, maximize the Registry Editor window and restore down the Command Prompt window.
In the terminal window, type the command and press Enter.
taskkill /f /im explorer.exe 
Once the explorer.exe is forced to stop, the taskbar and Desktop will be blank; do not panic; it will be normal as soon as you start the process again.
However, before starting the process, make changes in the Registry Editor.
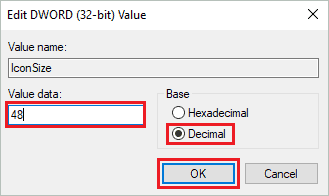
In the registry path mentioned above path, double-click on IconSize to edit the Value data. Now, change the Base to Decimal and give the Value data as per your wish.
The value 48 is for medium icon size.
You can now come to the terminal window again and execute the start explorer.exe command.

This will restore all the icons and Desktop background. You will also see a change in the size of Desktop icons.
How To Change Icon Size In Windows 10 On Taskbar
If you want your taskbar buttons smaller, you can do so via the Settings app.
Right-click on the empty space on the taskbar and click on Taskbar settings.
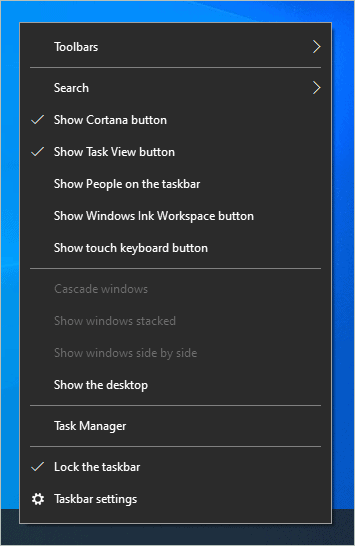
Alternatively, you can go to –
Settings app ➜ Personalization ➜ TaskbarNow, toggle the switch below to turn on ‘Use small task buttons.’
You can disable the same button to make the taskbar icons of normal size again.
Change File Explorer Icons Size In Windows 10
You can change the size of the File Explorer icons and set them as per your wish. There are two different ways of doing so; both are pretty straightforward and easy but have a slight difference.
1. Use File Explorer Context Menu
Press Windows key + E to open the File Explorer window. Now, head to the specific folder where you want to change icon size in Windows 10.
Right-click on the empty space and click on View from the context menu. Select the size of the folder icon you want.
The change will only be applied to the folder where the context menu was opened. If you want to change the icon size in all the folders, you need to use the second method explained below.
2. Use View Tab
Open File Explorer and go to the View tab from the menu bar.
Under the Layout section, select the icon size you want for the File Explorer folders.
You will be able to see the applied change immediately on File Explorer.
Conclusion
Windows 10 allows you to change icon size on your computer at your convenience. You can make it small for more space on the Desktop or increase its size for better readability. Well, you can modify the size of the taskbar and File Explorer icons as well. You now know the different ways to ways to change icon size in Windows 10 Desktop along with taskbar and File Explorer.
You can conveniently change the size of icons to large, medium, or small with a simple and straightforward explanation given above. The choice of way can depend on your comfort level and feasibility.


