Key Takeaways:
- The network drive can be mapped in Windows 10 using File Explorer
- You need to turn on network discovery before mapping Network-attached storage
- The network drive and computer needs to be connected to same router for successful mapping
Network drive, also known as Network-attached storage (NAS), is a storage device that can be accessed via the network. You can connect it to your local router and access it by configuring it on your computer. Once you know how to map a network drive, you can connect any NAS to your computer.
Most of us are running out of storage space on our computers; the network drive and cloud storage make it possible to have more storage space. However, if you think of a network drive as a device just for tech-savvy people, you are wrong. This drive can be easily configured with a few steps on your Windows 10 computer.
How to Map a Network Drive
It is easy to map a network drive on your Windows 10 computer. However, some prerequisites need to be followed if you want to know how to map a network drive without any errors and issues.
Prerequisite – Turn on Network Discovery
You need to turn on network discovery via the Control Panel if you want to know how to map a network drive on your Windows computer. Follow the steps given below to turn on network discovery on your computer. If you don’t allow network discovery, you will get an error message while adding a network drive to your PC.
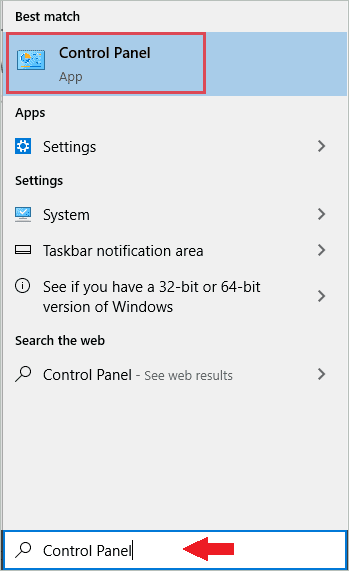
Step 1: Press Windows key + S to open the Start menu and search for the Control Panel. Open the same from the search results.
Step 2: In the Control Panel window, click on “View network status and tasks” under “Network and Internet.”

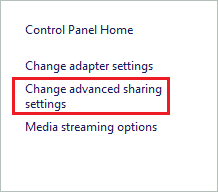
Step 3: From the left frame of the window, click on “Change advanced sharing settings.”
Step 4: Your current profile should be Private so that you can connect to NAS easily. If you are using a home router, it is entirely safe to change the Public to Private network on your computer.
Now, when you see the current profile next to Private, select “Turn on network discovery” and also check the checkbox next to “Turn on automatic setup of network connected devices.”
Step 5: Click on the “Save changes” button to save your changes.

You can now close the Control Panel window and move on to mapping the network drive.
Map Network Drive
Once the network sharing is enabled, you can check out how to map a network drive. It is easy to map the network drive using File Explorer/Windows Explorer. First, make sure the network drive is connected to your router. Then, you can check the instruction details that came along with the network drive to know how to turn it on correctly.
Step 1: Press Windows key + E to open the “File Explorer” window. Alternatively, you can open it directly from the taskbar.
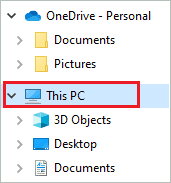
Step 2: In Windows Explorer, click on “This PC” from the left panel.
Step 3: Make sure you are in the “Computer” tab and click on “Map network drive” from the ribbon menu.

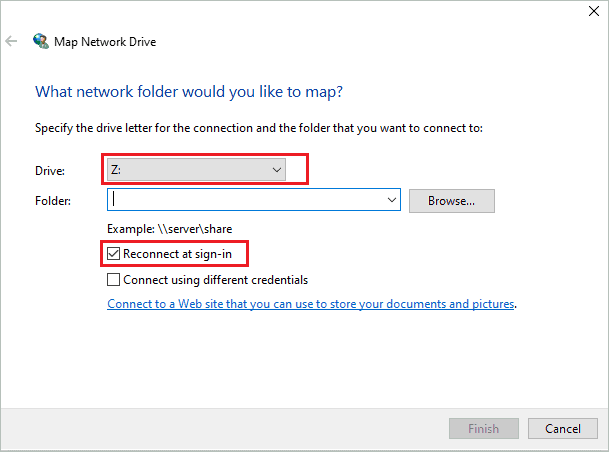
Step 4: Select a drive letter from the drop-down list next to “Drive.” Here, you need to ensure that the drive letter is not taken by any other internal or external drive on your computer.
Step 5: In the Folder field, you need to mention the shared network folder. You can enter \server_namefolder_name manually or click on the “Browse” button and find the shared folder.
The server_name is the network drive that you wish to connect. It won’t be an issue if you only have one network drive. However, if there are multiple network drives, you need to find the one you wish to connect to.
If you don’t find the required folder or server (network drive), you can contact the system administrator or network administrator as there might be some access issues in such cases.
Step 6: If you wish to connect to the network drive whenever you log in to your computer, check the checkbox next to “Reconnect at sign-in.”
Step 7: Once you add the details, click on the “Finish” button.
You will now find the mapped network drive in This PC under “Network locations.” If you have multiple drives under Network locations, click on the drive letter you configured for NAS.
If you wish to disconnect the mapped drive in the future, right-click on it and select “Disconnect” from the context menu.
Final Thoughts On How To Map A Network Drive
Windows allows you to connect to cloud storage, external storage, and network storage. You can use any storage device depending on your requirements and feasibility. Using the cloud storage and an external hard drive is easy compared to the network drive, as you don’t need to configure them manually.
However, the network drive can be used by many people at once. And it is a feasible option to share data in the office as well as at home. You can follow the simple steps thoroughly to set up a network drive on your Windows computer. The article explains how to map a network drive on Windows PC simply and straightforwardly.


