When you connect to any new network, Windows set it to the public by default. This is because Windows is more careful when in Public networks and takes more protective measures. In some cases, Windows 10 asks you to select the network as public or private when you connect for the first time. However, sometimes you may need to change network from public to private in Windows 10 to enable a specific service.
You can do it easily with the ways mentioned below. But before we venture into those details, let us understand and know what is a public and private network, and when to use public networks, and when to avoid it.
Understanding Private and Public Networks
Private Network
Private networks are the network you trust, and your system can connect without any fear of putting your system in the wrong hands. When you set the network to private only devices that are present in your network can discover your PC. It, therefore, becomes easier to share files and use other networked features.
Public Network
Public networks are networks that are not safe and you don’t trust. When the network type is public, the system is not discoverable by any others in the same network. Hence, the features like file and device sharing along with other network-related features are blocked by Windows when in the public network.
When to Use Public Network?
Windows 10 system is protected from malicious attacks by blocking its discoverability when the network type is public. We recommend you keep the network type public in locations like airports, coffee shops, and other public places.
In other places, like your home and workplace, you can keep the network private and enjoy all the network-related features. Well, if you wish to share any specific file or use printers on public networks, then you can connect your system directly to the printer and other devices using cables.
In case of emergencies, you can change the network from public to private in Windows 10 and switch it immediately after finishing the required task. Also, at times users complain of the computer not showing up on network.
How to Change Network from Public to Private in Windows 10?
In Windows 10 system, there might be instances where you need to change network from public to private. You can again change it to the public whenever you want.
Let’s see the detailed procedure to change network from public to private in Windows 10.
Note: Make sure you are logged in as admin; otherwise, you may not be able to change network from Public to Private.
Change Network from Public to Private of Wireless Network
All wireless networks have names, and some people have really funny wi-fi names. You need to follow the steps below to change your network type if you have a wireless network.
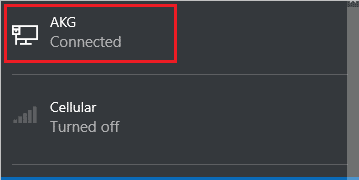
Step 1: Click on the Wi-Fi icon seen on the right corner of the taskbar.
Step 2: Under the currently connected Wi-Fi network, click on Properties.
If you don’t see the Wi-Fi icon in the right corner, click on the UP ‘∧’ arrow in the taskbar and then click on the Wi-Fi icon.

Step 3: Click on Private to make your network private.

Close the Settings window.
You have been able to successfully change network from public to private in Windows 10 and you can now enjoy all the network-related features.
Change Network from Public to Private of Wired Network
If you have a wired connection, then also you can change the network from public to private easily.
Follow the steps below to change your network type.
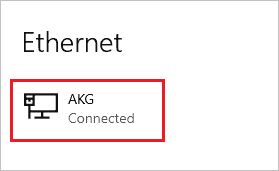
Step 1: Click on the wired network connected icon seen on the right bottom of the taskbar.

Step 2: Click on the name of your connected network.
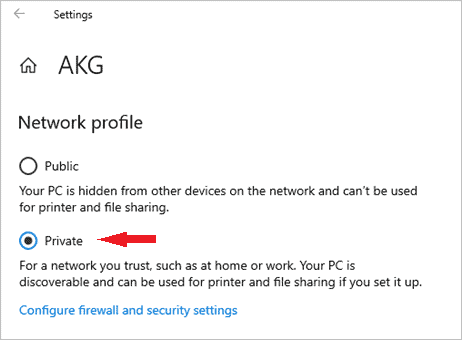
Step 3: When the Settings window opens, again, click on the name of your connected network.
Step 4: In the Network profile, click on Private to change the network type. You need to have admin account credentials to change the network profile type.
Once done, you can enjoy all the discoverable features in Windows 10.
Permanently Keeping New Connected Networks as Private
If you frequently connect to a new network and wish to have them private, then you can make the required changes in the group policy editor. As many of you know, Local Group Policy Editor is available only in Enterprise and Professional versions of Windows. The Windows 10 home users can refer to the guide on how to use the local group policy editor on their Windows system.
Step1: Search for gpedit.msc in the search menu. Click on the Edit group policy from the search results.
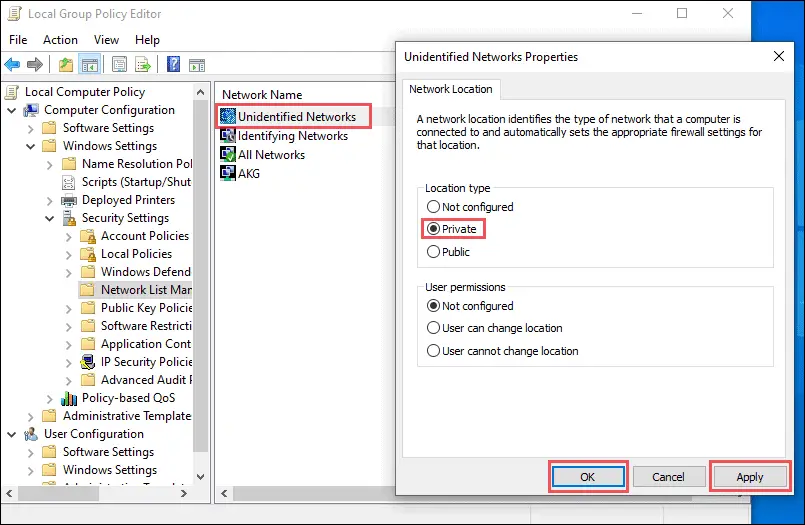
Step 2: Once Local Group Policy Editor opens, navigate to Computer Configuration ➜ Windows Settings ➜ Security Settings ➜ Network List Manager Policies.
Step 3: Click on Unidentified Networks in the right panel. When the Unidentified Networks Properties window opens, change the Location type from Not configured to Private.
Step 4: Click on Apply and then on OK.
Now onwards, whenever you connect to a new network location, your connection will be private.
Caution: After making the changes mentioned above, whenever you connect to a new network, the devices on the network type will be private. This means your Windows 10 system will be discoverable, making it vulnerable to attacks.
If you wish to keep the network location, Not configured again, follow the same steps, and select Not configured in the Location type.
Conclusion
The choice of the network, be it public or private, depends on the location you are present. The details given above will help you make better choices while selecting the network location. And once you wish to change network from public to private in Windows 10, you can follow the instructions given above.
If you change your mind and wish to make your network public again, then perform the same steps mentioned above and do it in an easy way.
(Article Updated on 19th April 2021)


