The Chromebook has taken over from the humble netbook as a small, cheap portable computer than can be popped in a bag and taken anywhere. Anyone looking for a low cost laptop that can be used for surfing the web and other everyday tasks will find that a Chromebook is ideal — and there are now plenty to choose from.
If you’ve picked up one of these handy machines, here are ten quick tips to help you to get more from it.
Tips and Tweaks fo Chromebook
Chromebook is a little different to Windows and OS X, and at first glance it may appear to be a little limited as a platform. But scratch beneath the surface and you’ll find that it is as customizable and as versatile as just about anything else you may have used.
1. Try Betas and Alphas
Just as with other operating systems, updates are pushed out for Chrome OS from time to time. But if you’d prefer to get ahead of the game and get a sneak peak of what’s coming up in future versions, you might want to consider getting off the stable channel and trying out the beta or developer channels. This will give you access to more up to date features ad options.
You can only do this if you are signed into the device owner account, and once you’re in, click the Chrome menu in the browser and select Settings. Click the Help link to the left hand side of the page and then click the More Info link to the right.
In the new section that appears, click Change channel button and you can then choose between the Stable, Beta and Developer channels. While neither the Beta nor Developer channels offer completed version of Chrome OS, the Beta channel is the more stable of the two.
Choose the channel you want and any available updates will be immediately downloaded. Bear in mind, should you decide that you would like to downgrade from Developer to Beta, or Beta to Stable at some point in the future, you will need to completely reset your device.

2. Access Terminal
Chrome OS includes a terminal tool that is great for advanced users. To access Crosh (Chrome Shell), press Ctrl + Alt + T. Once you’re there, there are various commands available to you such as ‘ping’. Server administrators can also take advantage of Secure Shell by typing ssh at the terminal.

3. Gain More Screen Space
You can make the most the screen space you have available to you by opting to hide the app shelf. This is a simple tweak, but it’s one that’s easily forgotten yet incredibly useful. Tap with two fingers on the shelf and select the Autohide shelf option. To access your shortcuts, just move your mouse to the bottom of the screen and the shelf will slide back into view ready to use.

4. Monitor Available Storage
Chromebook is all about storing data in the cloud, but downloads will usually be stored locally and you’ll need to keep an eye on the amount of space you have left.
The easiest way to do this is to click the gear icon in the Files app but you can view a slightly more detailed breakdown by typing chrome://quota-internals/ into Chrome’s address bar.

5. Discover Keyboard Shortcuts
There are lots of very useful keyboard shortcuts that you can use to speed up all sorts of everyday operations. But there is one keyboard shortcut that everyone should know: press Ctrl + Alt + ? and you’ll see an on-screen keyboard that can be used to discover all of the available shortcuts. Just press a key, such as Ctrl or Shift, and as you press keys you’ll be shown what tasks they perform.
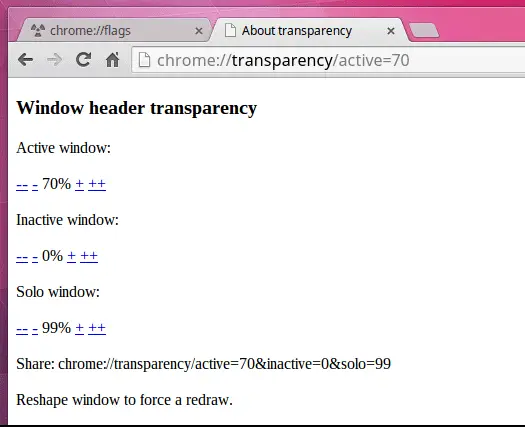
6. Adjust Windows Transparency
There may not be a huge number of options when it comes to changing the look and feel of your Chromebook, but if you fire up Chrome and pay a visit to chrome://transparency. Hre you can use the controls to adjust the transparency of window titlebars — it’s a small things, but it makes a difference.
7. Create a Recovery Disk
If you’re lucky you may find that your Chromebook comes with recovery media, but this is probably not the case. But panic not! You can create your own with little more than a USB drive.
Grab yourself a drive of at least 4GB in size — create a backup of anything you have stored on it as it will be lost — and pay a visit to chrome://imageburner in Chrome. You will then be guided through the process of creating a recovery drive which you can use whenever the need arises.

8. Perform a Powerwash
An alternative to recovery your computer is to perform a factory reset — also known as a powerwash. This can be useful if you want to change the device owner; by default, the first account that is created becomes the device owner and this cannot be changed. To wipe out settings and start again, launch Chrome, click the menu to the upper right and select Settings.
Scroll down to the bottom and click the Show advanced settings link before clicking the Powerwash button. Click Restart and everything will be wiped out ready for you to start all over again.

9. Remotely Access Another Computer
While your Chromebook is a great tool, there are going to be times when you wish you could take advantage of some of the apps you have installed on your Mac or PC. There’s no need to switch machines — all you need to do it installed Chrome Remote Desktop.
Click the Extensions link to the left of the Settings page in Chrome and click Get more extension before performing a search. Once installed, you can use the extension to remotely log into your other computer and use it as if you were sitting in front of it.

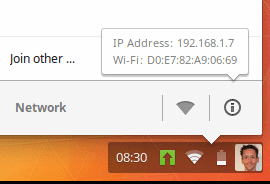
10. Check your IP Address
If you need to quickly check your IP address, you may wonder how to go about finding it — it’s certainly not immediately obvious. Click your profile picture in the lower right hand corner of the screen and then click the name of the network you are currently connected to. To the bottom of this popup menu, click the ‘i’ button and a tooltip will appear displaying your IP and Mac addresses.
Have you got any top tips for Chromebook? Share them in the comments.


