You must have used Snap layouts in Windows 10, but Windows 11 Snap layouts feature makes it more user-friendly with predetermined layouts. Depending on the current screen size and orientation, you will get up to six different layouts to choose from. Once you have selected the layout and placed an app, the Snap Assist feature takes care of the rest by snapping all open apps to different positions selected by you.
The available layouts allow placing up to four active apps on your desktop screen space. With multiple windows in a single view, you can efficiently multitask and hop from one app to another without wasting much time. Whether you want to arrange two windows or three side-by-side windows, the Snap layout in Windows 11 is all yours.
What Is A Snap Group
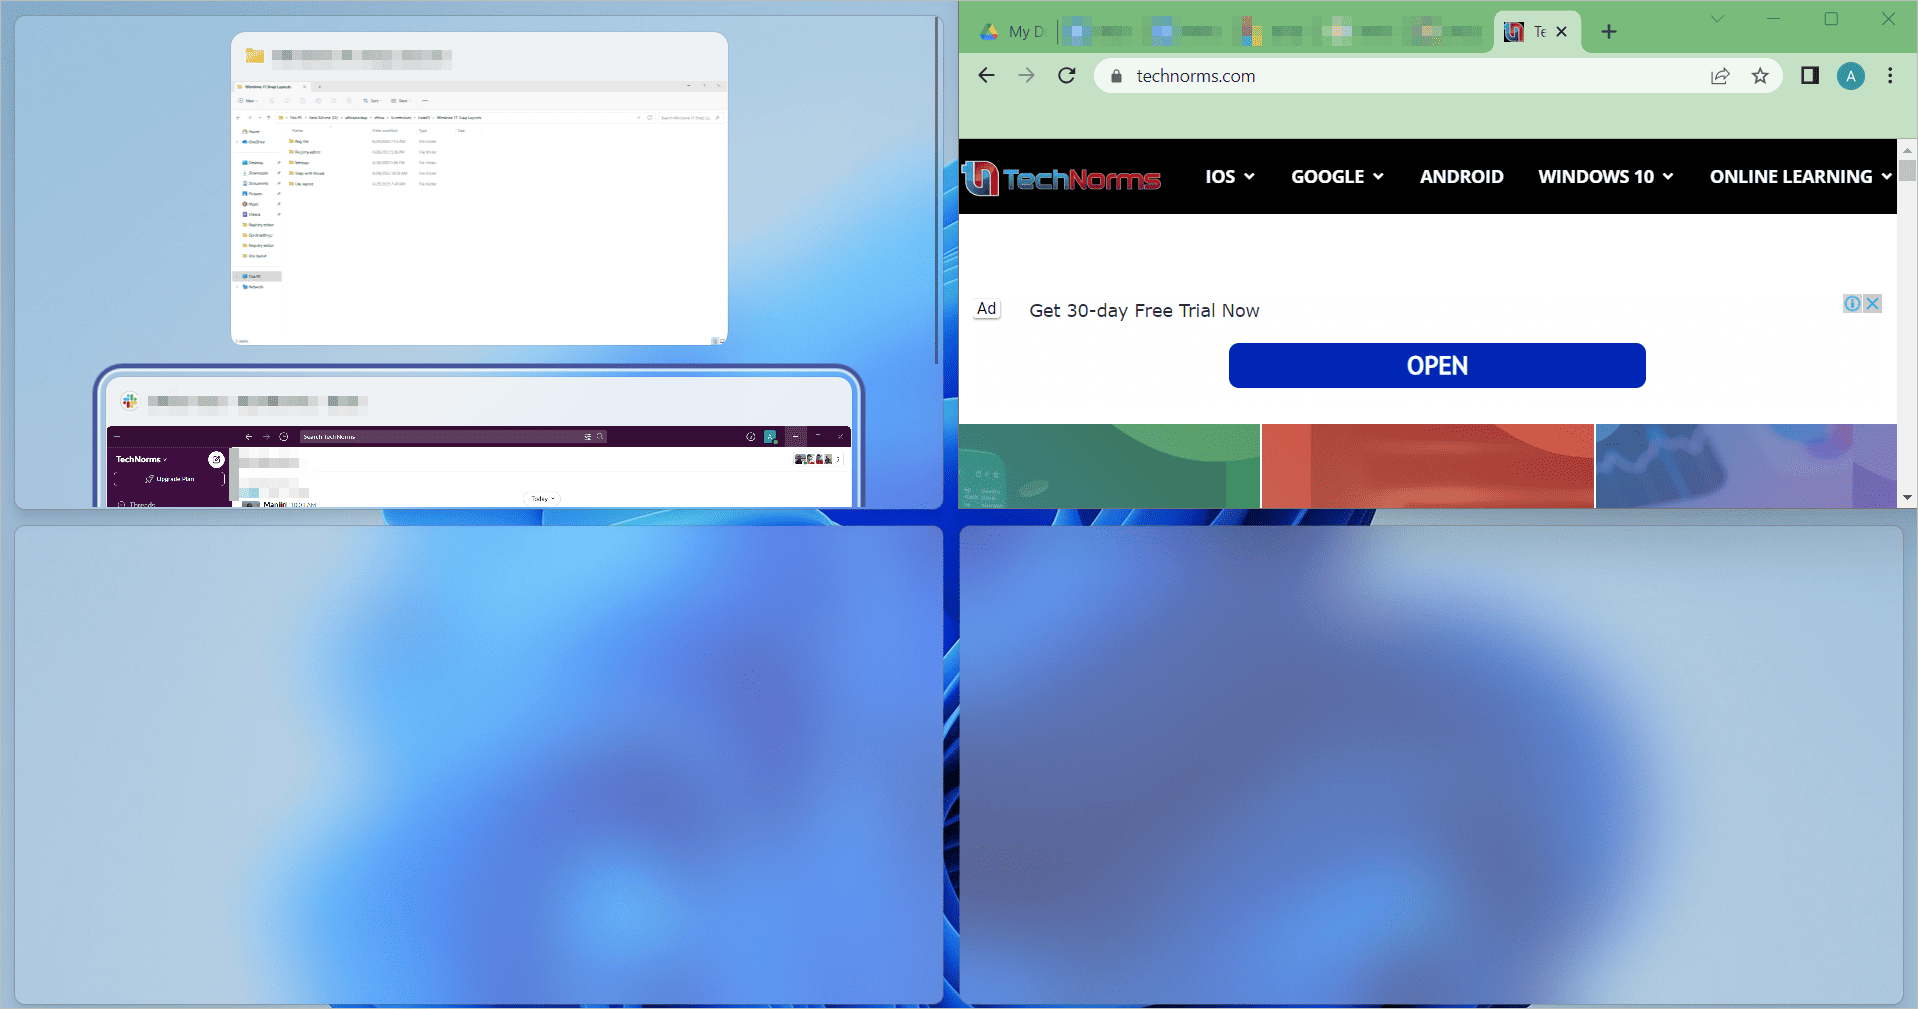
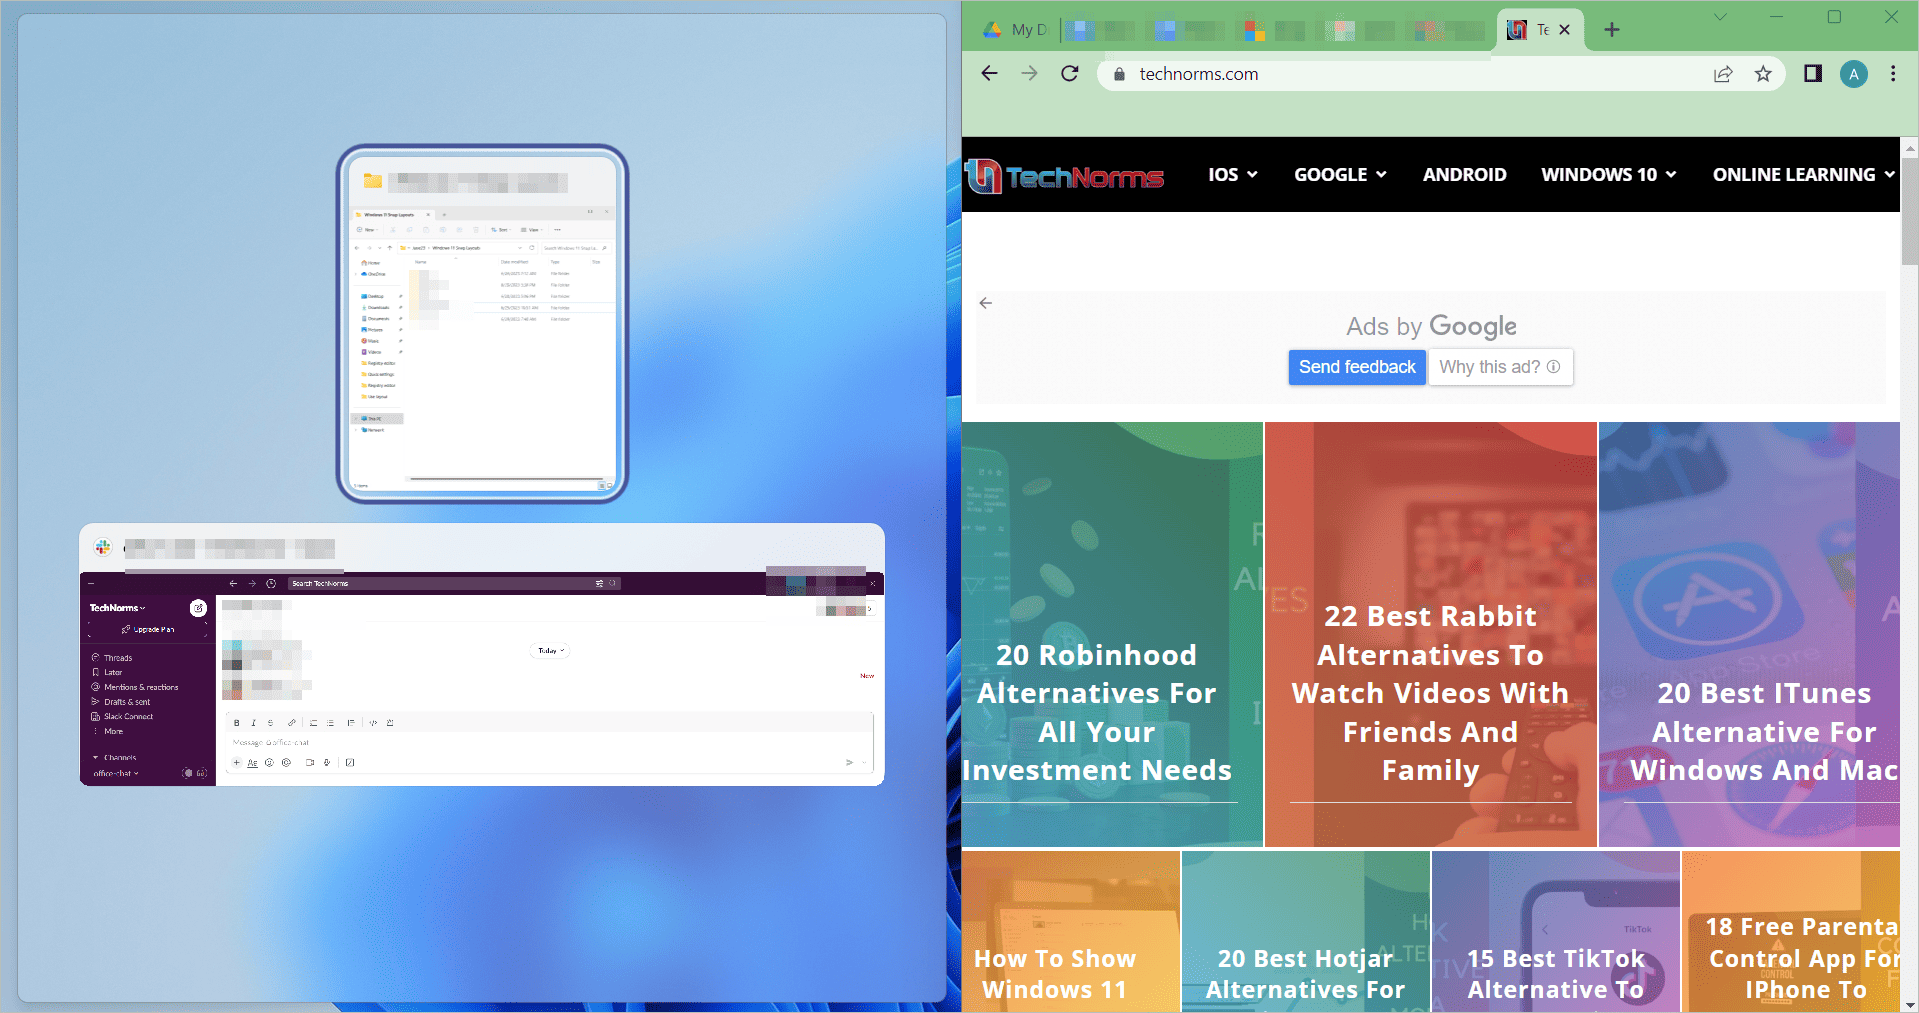
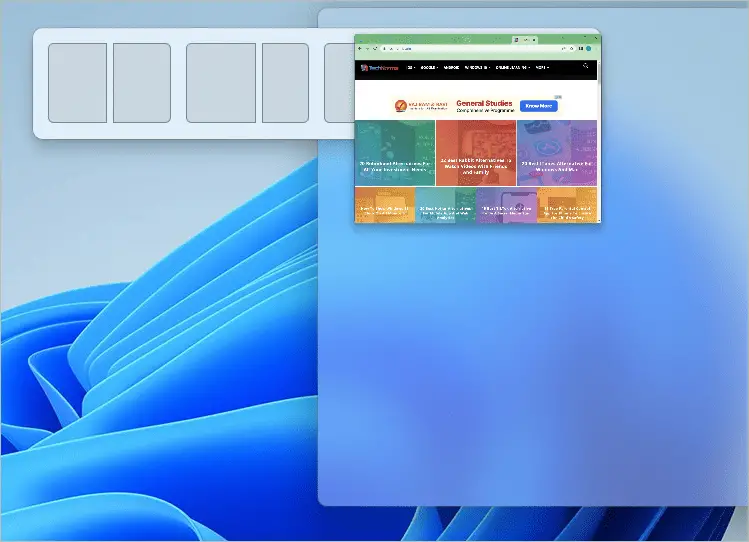
When you group together your apps into a layout, it constitutes a Snap group. When you hover over an app in the Windows taskbar, you can view the thumbnails of the individual app and its Snap layout group it is part of. So, you can open it either way you want.
Snap layout app group is a handy feature if you often open an app outside the group. Once you finish the work on that app, you can return to the Snap group. You need not rearrange the apps like before, as the layout remains as it is. If you have upgraded to Windows 11 version 22H2, you can use Alt + Tab shortcut to open the layout again.
How To Use Windows 11 Snap Layouts
If you want to snap a window into a particular position using Windows 11 Snap layouts, you must enable the feature using any of the methods given here. Once enabled, you can use the Snap feature by hovering over the Maximize button, using the mouse or keyboard shortcuts. You will learn everything about the Snap layouts menu in the coming paragraphs. So, keep reading.
Enable Windows 11 Snap Layouts Using Settings
You can choose a snap layout only if your device’s Windows 11 Snap layouts feature is enabled. Below the enable button, you will also see a few settings you can configure for further customizations.
Press the Windows key + I to open Settings and select System > Multitasking.
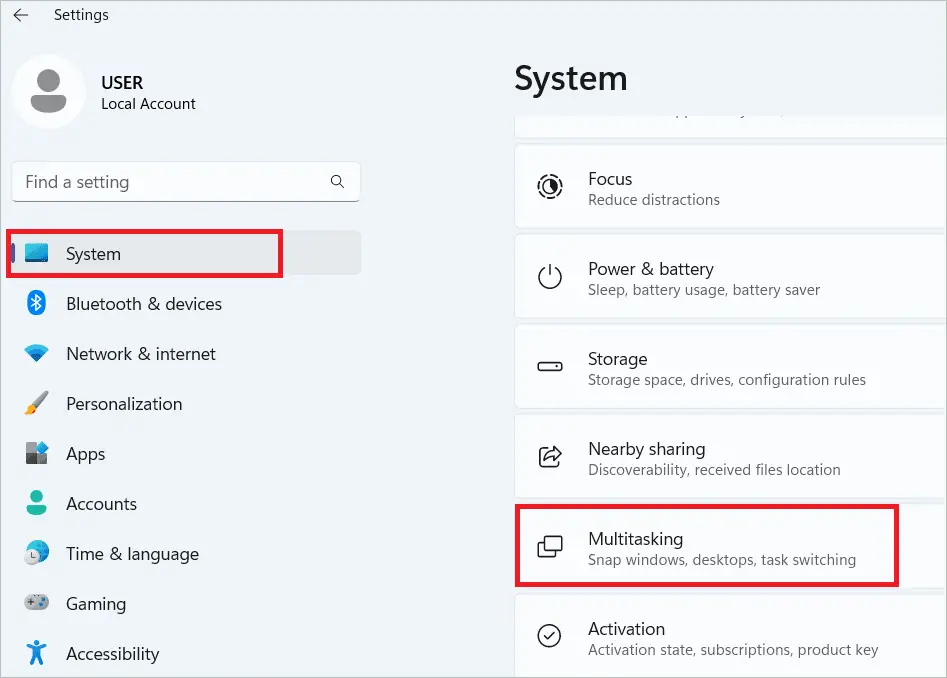
Toggle on the “Snap windows” button to enable the Snap feature.
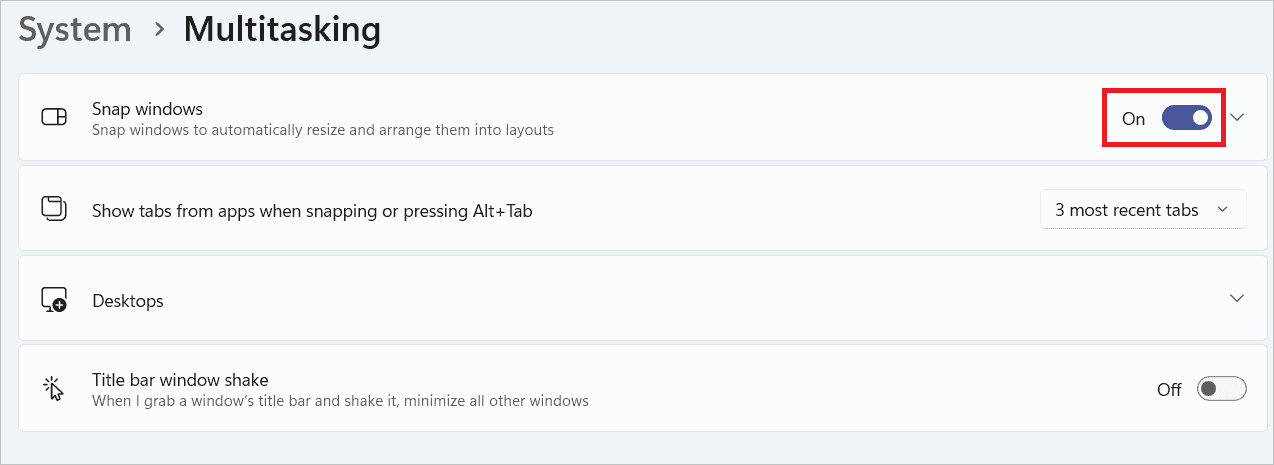
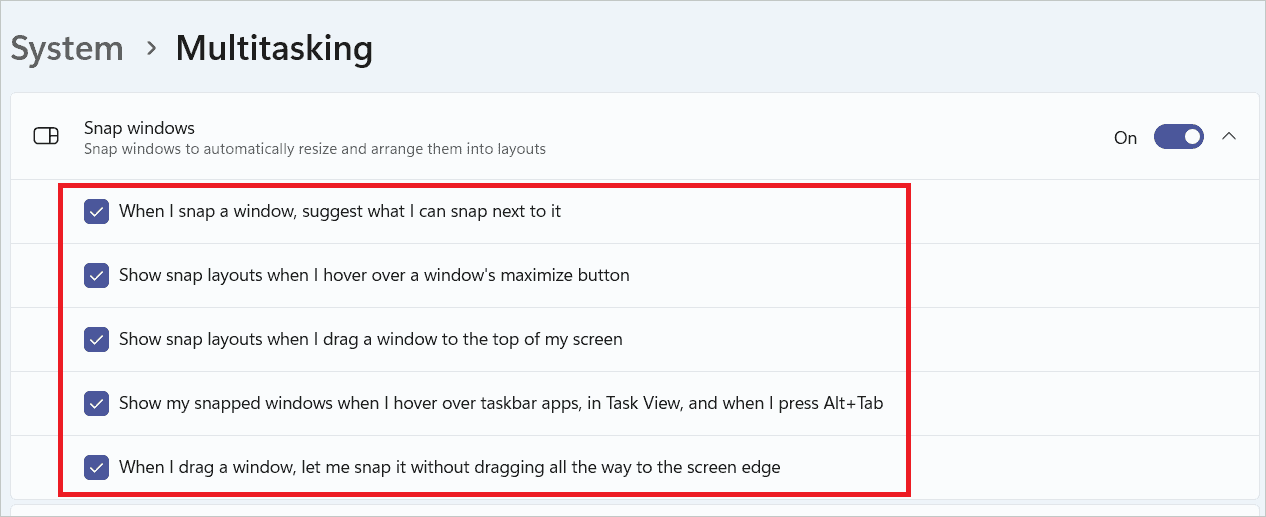
Once enabled, click the down arrow near the button to see more customization options. Check or uncheck the six options based on how you want to customize the feature.
To disable the feature, toggle off the “Snap windows” button.
Enable Windows 11 Snap Layouts Using Windows Registry
Most features in Windows can be enabled and disabled using the Registry editor. You can enable or disable Windows 11 Snap layouts by changing the Registry entries. But remember to take a backup of the Registry, so you can use it if something goes wrong.
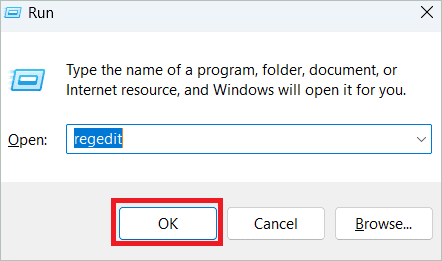
Press the Windows key + R to open the Run dialog box. Type “regedit” and click “OK” to open the Registry Editor.
Paste the following path in the address bar and press Enter.
HKEY_CURRENT_USER\Software\Microsoft\Windows\CurrentVersion\Explorer\Advanced
Right-click on “Advanced” , select New > DWORD (32-bit) Value and name it SnapAssist.
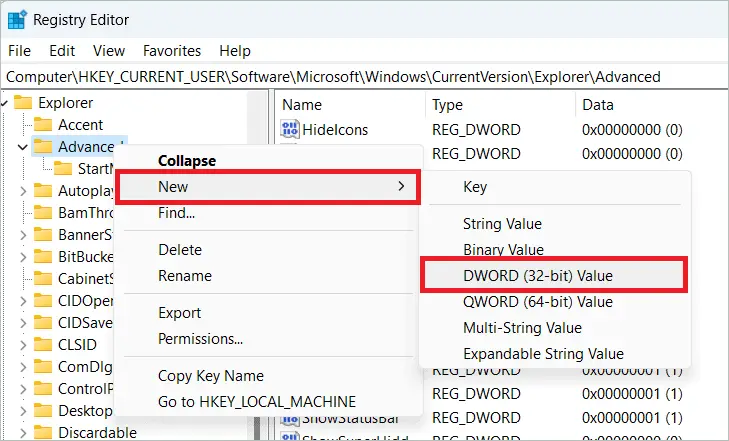
Double-click SnapAssist, enter 1 in the Value data field and click “OK” to enable the feature. You can change the value to 0 to turn it off.
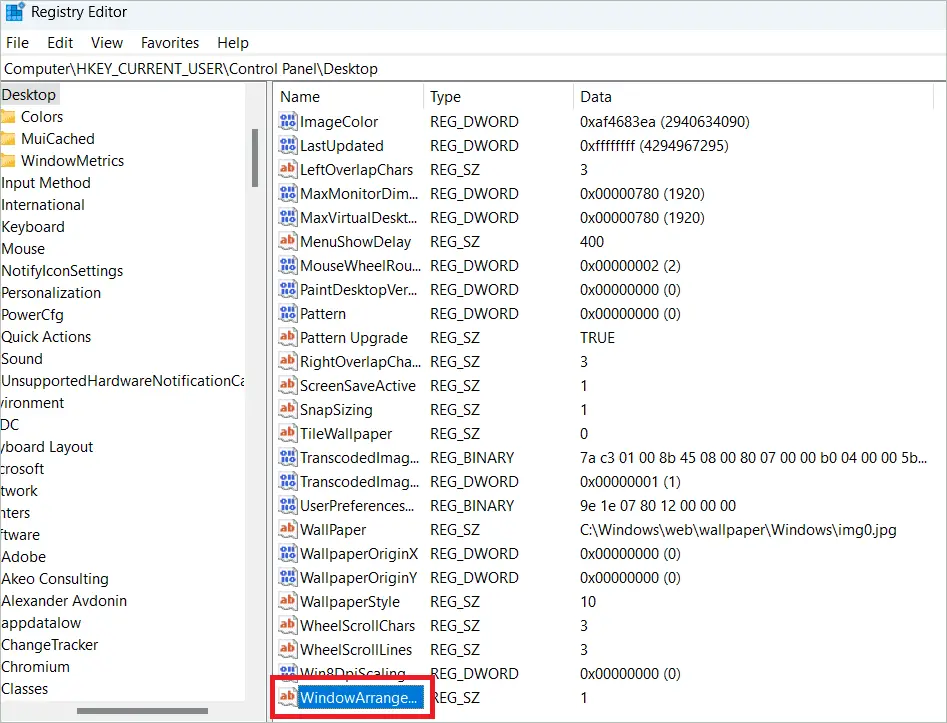
Now, paste the following path in the address bar and press Enter.
HKEY_CURRENT_USER\Control Panel\Desktop
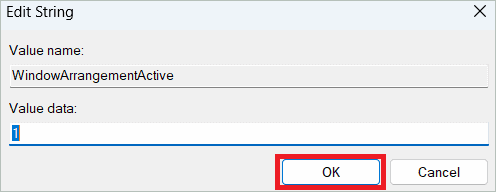
Double-click WindowArrangementActive on the right side.
Enter 1 in the Value data field and click “OK”.
Enable Windows 11 Snap Layouts Using Reg File
You can use a Reg file to enable Windows 11 Snap layouts if you don’t want to tweak the Registry entries manually. You can create a Reg file and run it so that the Registry is changed accordingly. Here are the steps.
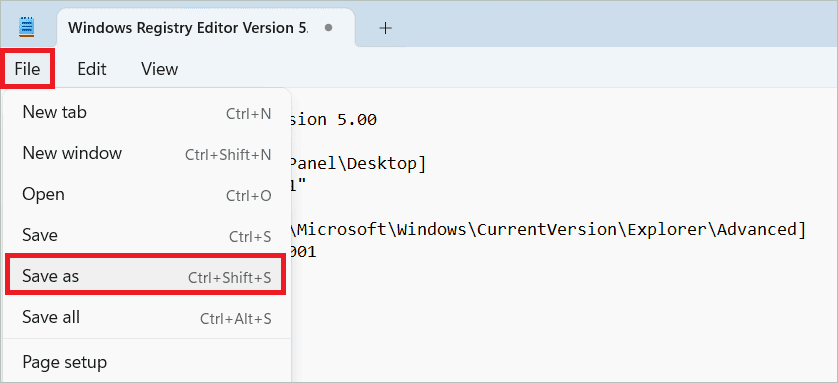
Open Notepad and copy the following code into it.
Windows Registry Editor Version 5.00
[HKEY_CURRENT_USERControl PanelDesktop]
“WindowArrangementActive”=”1”
[HKEY_CURRENT_USERSoftwareMicrosoftWindowsCurrentVersionExplorerAdvanced]
“EnableSnapBar”=dword:00000001
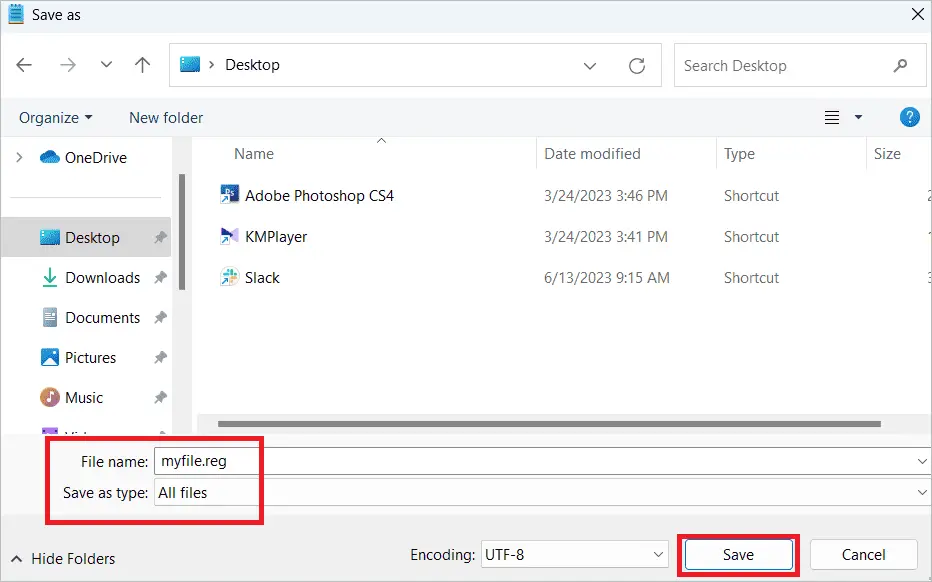
Select File > Save as.
Choose a location you want to save the file, give a filename with .reg extension and select “All files” in the Save as type drop-down box. Then, click the “Save” button.
Go to the location where the file is saved and run it by double-clicking.
Restart the computer to apply the changes.
If you want to disable the feature, paste the following code in the Notepad and do the same steps as above.
Windows Registry Editor Version 5.00
[HKEY_CURRENT_USERSoftwareMicrosoftWindowsCurrentVersionExplorerAdvanced]
“EnableSnapBar”=dword:00000000
Use Windows 11 Snap Layouts
You can use Windows 11 Snap layouts to get a neat view of all your apps together. To get this, you need first to open the Snap layouts, select one and place the apps in the correct position. We will see the steps here.
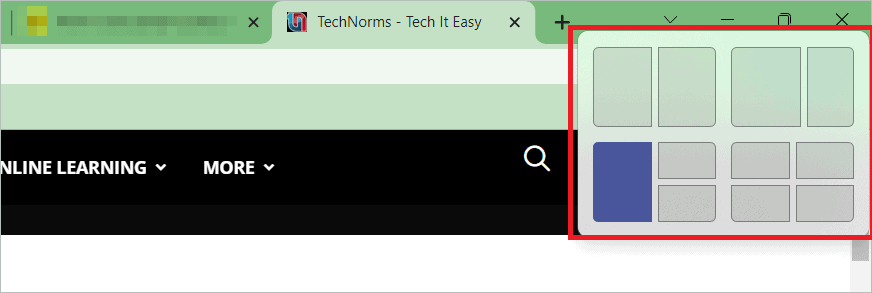
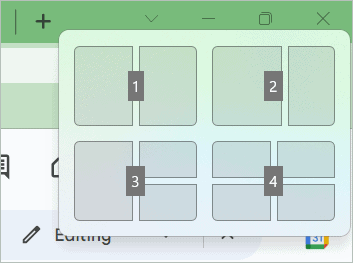
Hover the cursor over the Maximize button in an app window to view the Snap layouts.
You can see four layouts here. A larger screen will give you six layouts to choose from. Hover over a layout and place the mouse pointer on a desired pane where you want to place the current app. The pane will appear in a color matching the theme color.
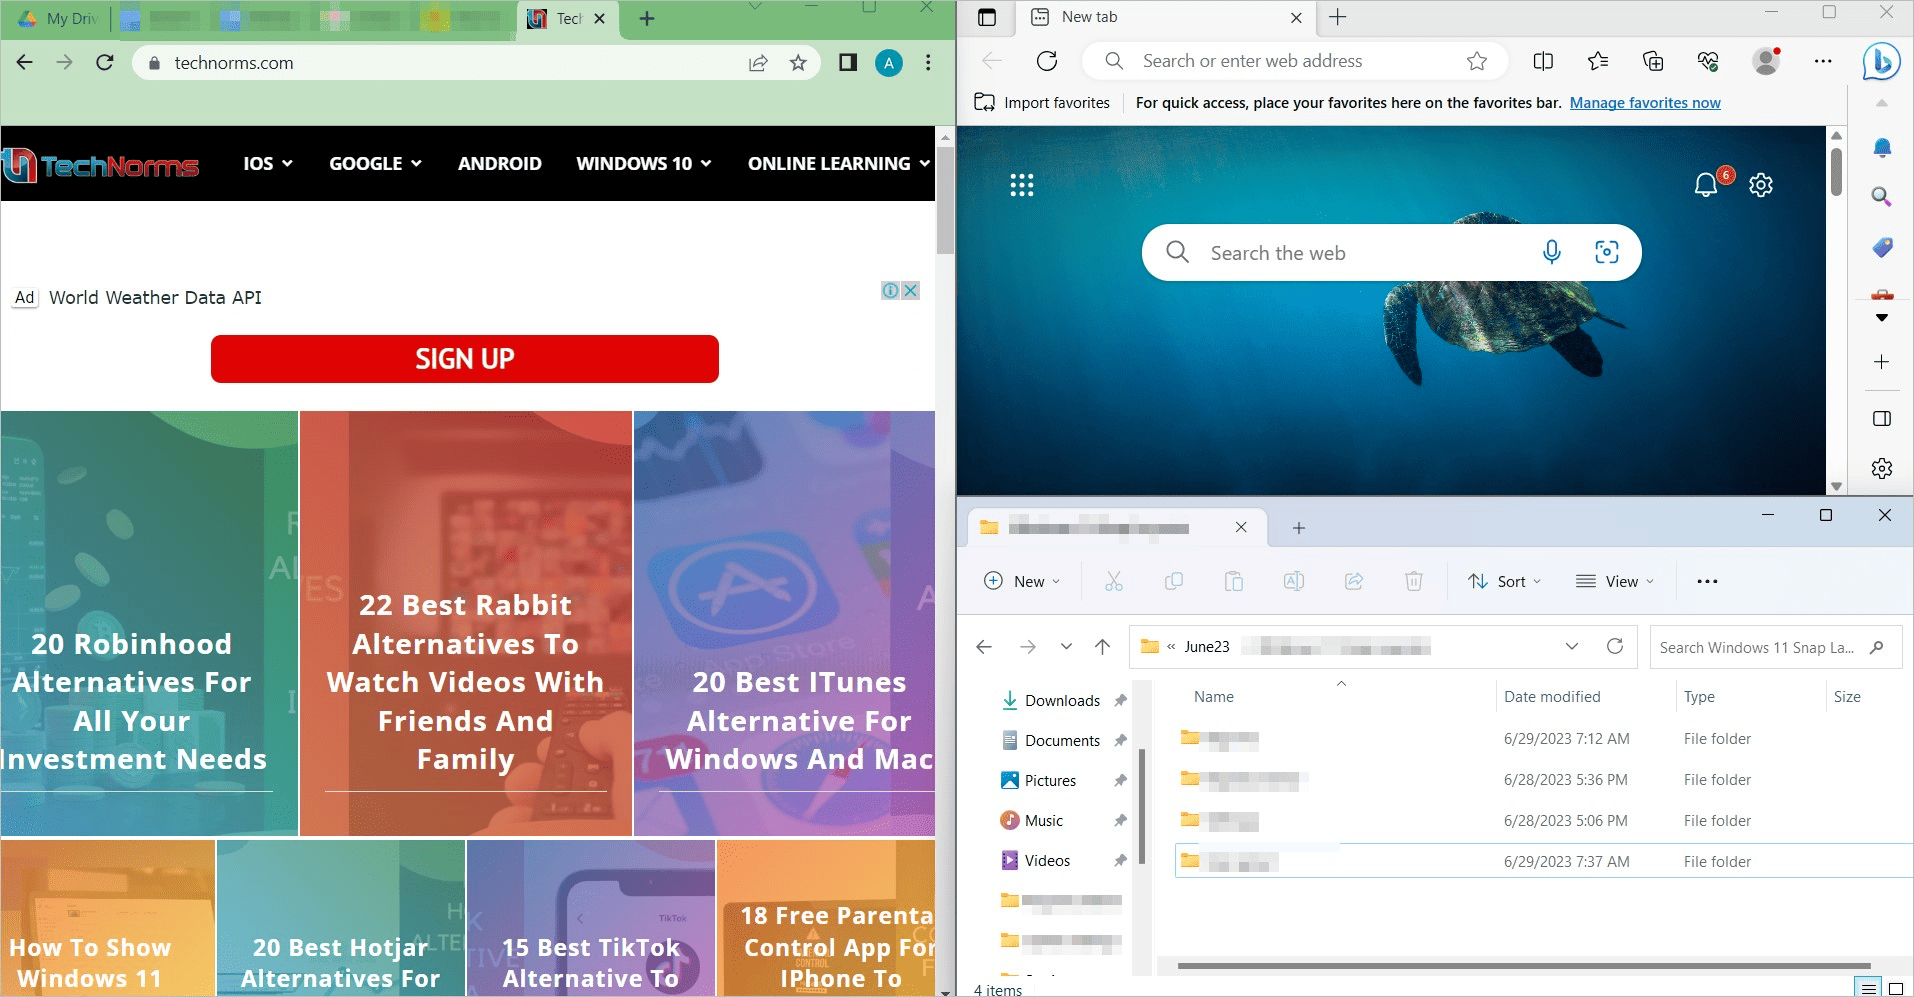
Click on the pane, and the app will snap into the selected position on your desktop.
The Snap Assist appears, and the other apps that are open will present themselves as large thumbnails in the other panes of the layout. Click on one app you want to position in the particular pane, and it will snap into the selected pane.
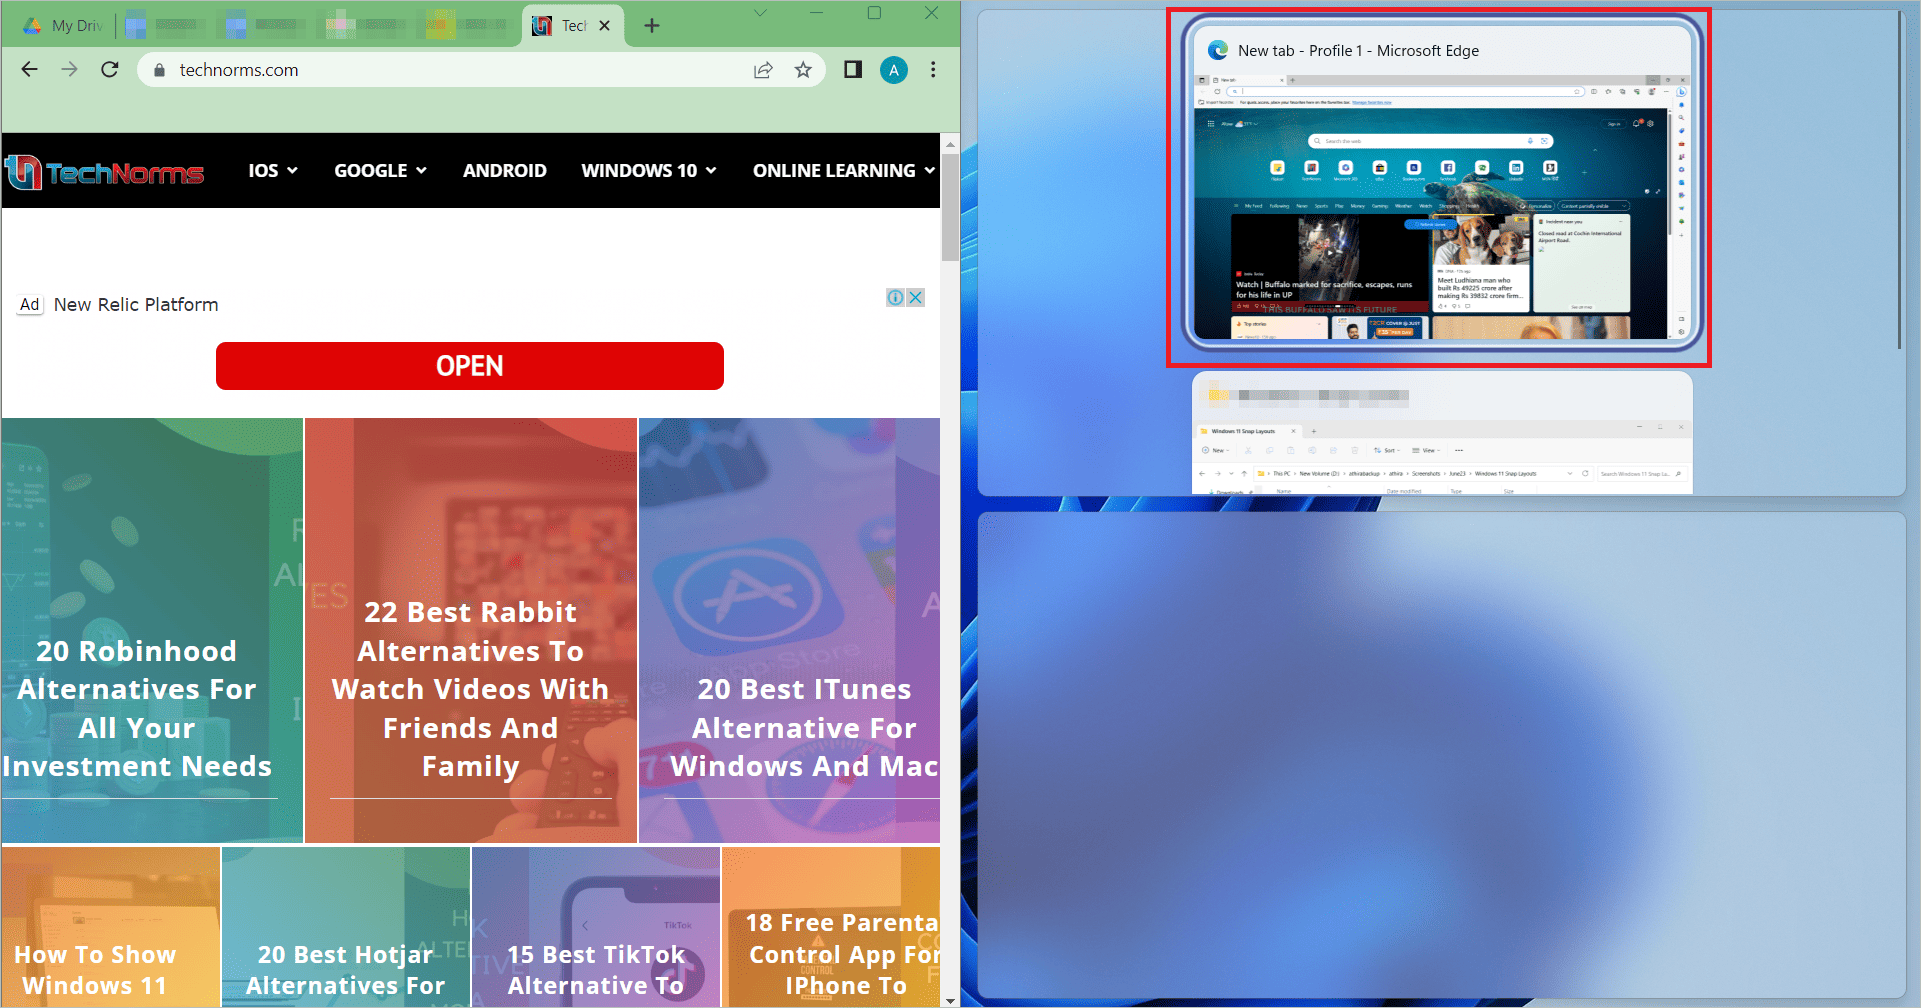
Do it for all the apps using Snap Assist, and you are good to go.
If you want to resize a window on your desktop, drag the app borders left, right, up or down. Once you get the correct size, release the mouse button and the adjacent window will resize itself to fit alongside the first window.
Snap With A Mouse
Instead of choosing Windows 11 Snap layouts from the Maximize button, you can drag and drop the apps to the desired positions with your mouse. Whether you want to split the screen into two, three, or four, you can use this method.
Click on the app window’s title bar and drag it to the edge or side of the screen.
The app will automatically snap into position. Like the above method, you can use Snap Assist to place the other apps in the correct places.
To create a side-by-side snap, you can drag the app to the screen’s middle left or right.
Similarly, you can drag the windows to the top middle of the screen. The Snap layouts will appear, and you can drop the app into a position to make it snap into it.
Then using Snap Assist, the other apps can be positioned.
Snap With A Keyboard
The next method is to choose the Windows 11 Snap layouts using your keyboard instead of the mouse. Here, we use different key combinations on the keyboard to get varying results. Go through the steps to get more clarity.
Press the Windows key + Z to view the Snap layouts. The layouts will be numbered, and you can press a number to select the corresponding layout.
Now, press the number corresponding to the position where you want to place the app. Here, we select 1, and the app snaps into the correct position.
You can fill in the other apps using Snap Assist.
Alternatively, you can snap apps into different places with a few key combinations.
Windows Key + Left Arrow key: The app positions on the screen’s left side
Windows Key + Right Arrow key: The app positions on the screen’s right side
Windows Key + Up Arrow key: The app positions on the top of the screen
Release the Windows key once you have the correct position, and the app will snap into it. You can then use Snap Assist to complete the steps of filling in other parts.
Final Thoughts
Microsoft introduced Windows 11 Snap layouts as a new feature that makes multitasking incredibly easy. It offers up to six layouts that you can choose to arrange all your open windows. When you place your apps and fill the screen space, the whole arrangement becomes a Snap group.
The Snap Assist feature of Windows helps users place the apps in the selected layout. The article explains how you can enable the Snap layouts feature before you can use it. It is also important to know how to snap windows on desktops using different methods, so you can choose the one that is easy for you.


