We plug USB devices like keyboards, monitors, smartphones, and cameras into our computers. Most of the time, everything works out smoothly without any issues. However, sometimes when you plug in the USB peripheral, there can be an error message saying ‘USB device is not recognized.’
You can experience this USB device driver error because of the device driver and compatibility issues, missing essential Windows updates, or hardware failures. When the computer doesn’t recognize USB, you cannot use that particular device; hence it becomes difficult to work. If your DVD drive is not working as well, it can become difficult to manage external storage. Well, some solutions can quickly fix USB device not recognized error.
19 Solutions To Fix USB Device Not Recognized Error
You may find the list of solutions long, but this is because there is not one specific reason Windows users face the USB device not recognized error on their computer. You can go through all the solutions one by one and check what works for you.
1. Restart your Computer
Whenever Windows is having trouble, you can try restarting your computer to fix it. Sometimes, the temporary glitches can cause USB drives issues. A quick restart can fix it.
Make sure you unplug the device before restarting your computer.
Press the Windows key from your keyboard and then click on the Power icon in the Start menu. Click on the Restart option.
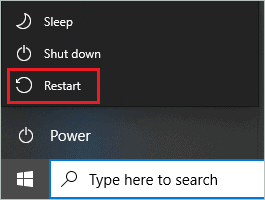
After restarting your PC, plug the device again and check if you got rid of the error or not.
2. Update Windows 10 Operating System
Microsoft rolls out updates that carry the driver software update as well. If the USB device is not recognized because of outdated device drivers, a Windows update can probably fix it.
Press Windows key + I to open the Settings app and click on Update & Security. Make sure you are in the Windows Update section.
Click on Check for updates button.
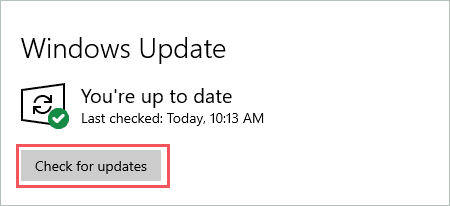
If there are any new updates, download and install them. You will need a stable internet connection to download the update.
The USB device will be recognized after the update.
3. Try Changing USB Port and Cable
If the USB port is damaged, the device cannot be connected properly. You can try using a different USB port on your PC. Also, ensure the USB cable is not damaged from anywhere. You can connect your device to another port using a different USB cable and check if it gets recognized. If it does, either port or cable is damaged, and you need to replace it.
4. Check USB Device Compatibility
Many USB devices are not compatible with particular system configurations. You can check the device’s manual or website to check if it is compatible with your PC.
If it is incompatible, you can get it replaced from the store. However, if the device is compatible and you are experiencing a USB device not recognized error, you need to check out the solutions below.
5. Unplug all Other USB Devices
If you have connected USB devices to all the USB slots available on your PC, you need to unplug some of them. You can unplug the devices which are not required at the moment and then check if the device giving issue is getting recognized or not.
Some computers cannot take a load of multiple devices together and therefore cause unwanted errors. At times, various devices also conflict and cause trouble for each other. Consequently, you can plug in limited devices and check if they work without any problems.
6. Unplug the Computer from Power Supply
This solution can work if you are not able to use a USB device on a desktop computer. You can simply unplug the computer from the power supply to fix the USB device not recognized error.
First, shut down the computer and then unplug the power supply cord from the power source. This will make the motherboard reboot all the device drivers, including the one for USB devices. Make sure you unplug the power cord and not switch off the supply button.
You can wait for some time and then plug the power supply cord again. Once the power supply is turned on, plug the USB device into the computer and check if it is working correctly or not.
7. Run Hardware and Devices Troubleshooter
You can run Windows built-in troubleshooter to fix the USB-related problems. The hardware and devices troubleshooter is not available in the Settings app from version 1809. However, you can still run the troubleshooter via Command Prompt terminal.
Type cmd in the Start menu’s search box and open Command Prompt from the search results. In the terminal window, type in the below command and press Enter.
msdt.exe -id DeviceDiagnostic
You may be asked to enter administrator credentials; enter them. In the Hardware and Devices troubleshooter window, click on Advanced and then check the checkbox next to ‘Apply repairs automatically.’
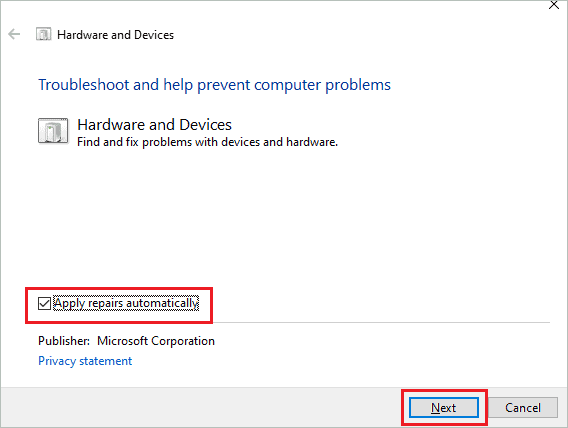
Click on Next to start the troubleshooting. Let the scanning process finish and let Windows fix the issues with the USB device; if found.
8. Uninstall and Reconnect the USB Device
Users fixed the issues with the external USB flash drive and hard drive with this solution. You can also try it for other USB devices and check if it helps.
Press Windows key + X and click on Device Manager to open it. In the Device Manager window, expand Universal Serial Bus controllers and right-click on the USB device that is giving issues.
Click on Uninstall device from the context menu.
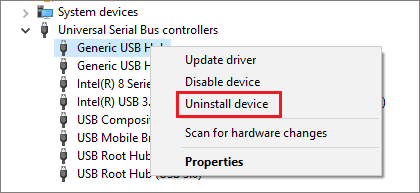
Now, unplug the device from your computer and wait for a few minutes. You can then plug the device again. Windows will install the USB driver software again for that device, and you can use it without any errors.
9. Disable USB Selective Suspension
USB devices can shut down because of power issues. You can disable USB selective suspension to fix the USB device not recognized in Windows 10.
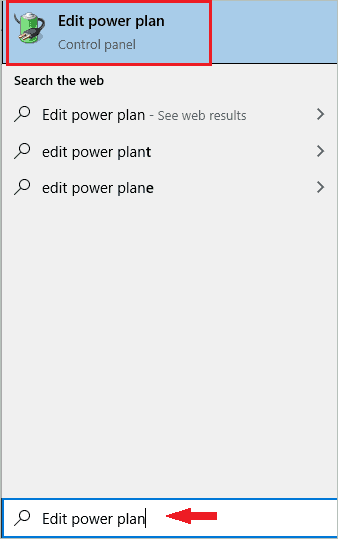
Type Edit power plan in the Start menu and open the same from the search results.
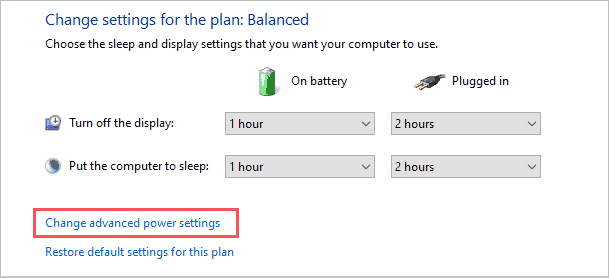
In the Control Panel window, click on Change advanced power settings.
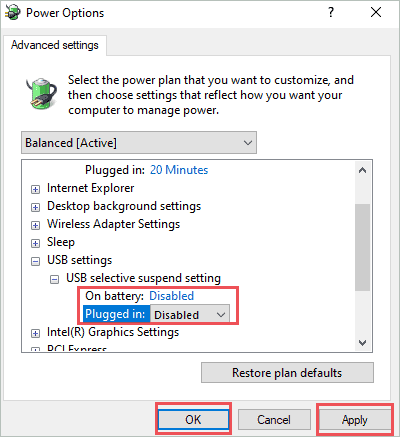
When the Power Options dialog box opens, search for USB settings and expand it. Also, expand the USB selective suspend setting.
Now, set the On battery and Plugged in option to Disabled.
Click on Apply and OK.
Now, once you resolve the USB problem, plug the USB device again and check if it is recognized or not.
10. Connect USB Device directly to PC
If you connect the USB device to the USB hub, we recommend connecting it directly to the PC’s USB slot. Sometimes, the hub cannot provide enough power to the USB device, causing a USB device not recognized error on your computer.
The temporary glitch and faulty hub are other reasons that can cause USB-related problems on your computer. You can unplug the USB hub and connect the USB device to the available slot on your PC.
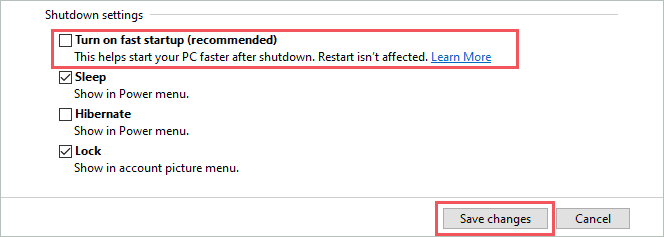
11. Disable Fast Startup
The fast startup starts your PC quickly, but sometimes this can cause issues while loading drivers. You can disable fast startup temporarily to fix the USB device not recognized error message.
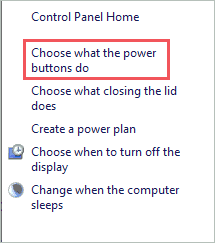
Search for the Control Panel in the Start menu and open it. In the Control Panel search box, search for power options and open the same from the search results.

Now, click on Choose what the power buttons do from the left frame of the Control Panel window.
On the next window, click on Change settings that are currently unavailable to enable the fast startup option.

You will be prompted to enter administrator credentials, enter them. Uncheck the checkbox next to Turn on fast startup (recommended).
Click on Save changes.
Restart your PC and check if you can use the USB device without any issues or not.
12. Uninstall Hidden Devices
Some device drivers are present on your computer even when the device is no longer connected. You can uninstall such ghost USB devices from the Windows Device Manager, as these devices can cause issues when you connect new USB devices.
Open Command Prompt by searching for it in the Start menu. In the Command Prompt terminal, type in the following commands one by one and press Enter after each command to execute it individually.
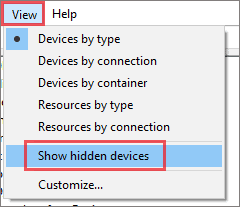
set DEVMGR_SHOW_DETAILS=1set DEVMGR_SHOW_NONPRESENT_DEVICES=1start devmgmt.mscThe last command will open the Device Manager. Click on View in the menu bar and select Show hidden devices.
You will now see all the old device drivers in the Device Manager, expand Imaging Devices, Unknown Device, and Universal Serial Bus controllers. Now, right-click on the devices that are not connected to your computer and click on Uninstall device.
Such device drivers will be greyed out or will have some sign next to it in most cases. After this, reboot your Windows device and check if the external USB device not recognized issue is fixed or not.
13. Reinstall USB Controller
You can reinstall all the USB drivers under the Universal Serial Bus controller in Device Manager. If there are some issues with any of the controllers, reinstalling them will fix it.
Type Device Manager in the Start menu and open the same. Expand Universal Serial Bus controller in Device Manager. Now, right-click on the first device driver and click on Uninstall device from the context menu.

Repeat this step for all the devices under USB Controllers. You can then reboot your computer to install the device drivers again.
14. Change Power Management Settings
You can try modifying the USB root hub’s power management settings to fix the USB device not recognized in Windows 10.
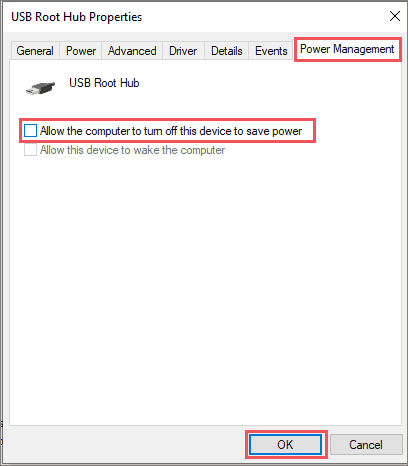
Open Device Manager and right-click on the USB Root HUB under Universal Serial Bus controllers. Select Properties from the context menu.
Navigate to the Power Management tab and uncheck the checkbox next to ‘Allow the computer to turn off this device to save power.’
Click OK.
If you have any other USB Root Hub device in the USB controller, repeat the same step for it as well.
Reboot the computer and check if the connected device is recognized by your computer or not.
15. Update Generic USB Driver
If you are still experiencing USB device not recognized error messages when you connect a USB device to your computer, you can update Generic USB Hub. The updated driver could resolve the issue.
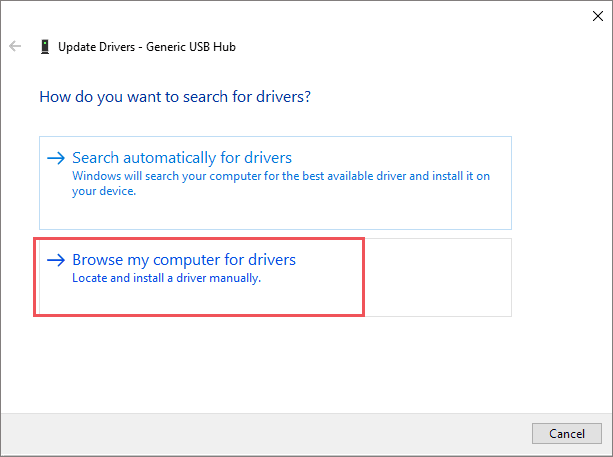
Open Device Manager and go to Universal Serial Bus controller. Next, right-click on the Generic USB Hub and click on Update device.
Select Browse my computer for drivers.
Now, click on Let me pick up from the list of available drivers on my computer.
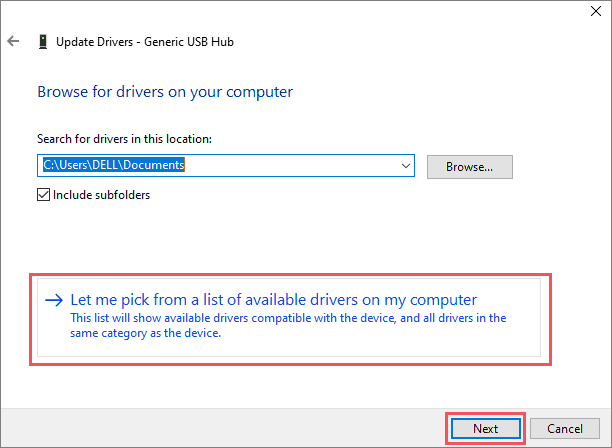
Click on Generic USB Hub and click on Next.
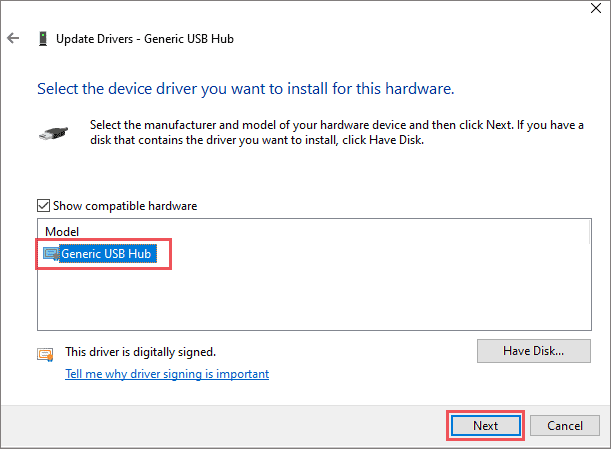
Follow the instructions wizard on the screen to complete the process to update the driver. You can then reboot your PC and check if the USB issue is resolved. If you are still experiencing the error, repeat the process for other Generic USB Hubs.
16. Partition and Assign the Letter to your USB Storage
If you cannot see the USB hard drive when connected to your computer, you can try creating a new partition for it.
Search for Computer Management in the Start menu and open the same by clicking on it from the search results.
In the Computer Management window, click on Disk Management from the left panel.

Now, find the USB storage device in the Disk Management. If the USB external hard drive is Unallocated, right-click on it and click on New Simple Volume from the context menu to create a partition for it. Make sure you either select NTFS or FAT32 as the partition type.
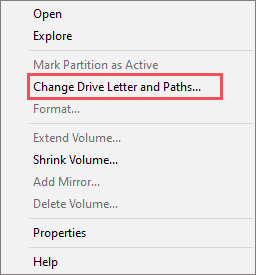
After creating the partition, if you still see a USB device not recognized, then right-click on the USB storage device again from the Disk Management and click on Change Drive Letter and Paths.
Now, go back to File Explorer and check if you can access your USB storage.
17. Update Motherboard’s Chipset Driver
If a USB device is still not recognized by your PC, you need to update the motherboard’s chipset driver with the latest version. You need to check the manufacturer manual to know which motherboard your computer has and where you can download the newest version of the chipset driver.
The related information can also be found on the official website of the motherboard manufacturer.
If you don’t know how to install the motherboard’s latest chipset drivers, you can contact the manufacturer’s support team for help. Make sure you do it correctly, as it can damage your device if done incorrectly.
18. Manually Add the Printer
You can manually add the printer to the computer to fix the USB device not recognized in the case of the printer. Follow the steps given below to connect the printer and use it without errors.
Step 1: Open the Settings app and go to the Devices section.
Step 2: Click on Printers & scanners from the left panel of the Settings window.
Step 3: Click on Add a printer or scanner.

Step 4: Click on ‘The printer I want isn’t listed.’
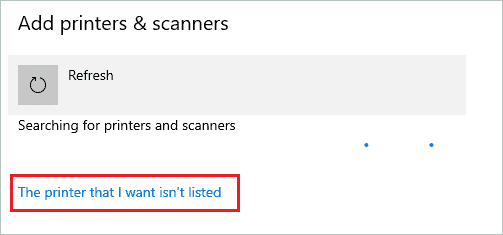
Step 5: Select ‘Add a local printer or network printer with manual settings’ and click on Next.

You can now follow the instructions on the screen to connect your wired printer to your PC.
19. Disable USB3 from BIOS
Some USB devices don’t work on USB3, so if your PC supports USB3, you need to disable it via BIOS. Making changes in the BIOS settings is the crucial step; hence proceed only if you know how to handle BIOS. An incorrect change in the BIOS can damage your PC beyond repair.
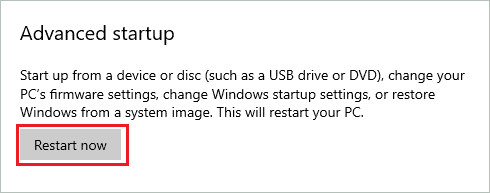
You can enter BIOS via Settings app. Open the Settings app and go to Update & Security. Click on Recovery in the left frame of the window and then click on Restart now button under Advanced startup.
From the blue screen, go to Troubleshoot ➜ Advanced options ➜ UEFI Firmware Settings. Alternatively, you can check the manufacturer’s website to know how to enter BIOS using function keys.
In the BIOS, go to Advanced Settings and then to USB configuration. Now, disable USB3 and save the changes.
Exit the BIOS and reboot your computer. You can now connect the USB stick or other device again and start using it.
Final Thoughts On USB Device Not Recognized Error
You cannot connect the most required devices when the USB slots are not working. You can miss out on the keyboard and mouse if your computer does not recognize the USB device. However, sometimes the issue is only with one slot or one device, and it can be for several reasons.
The solutions mentioned above can help you fix the USB device not recognized error message in Windows 10. Also, the list of solutions is high because the solution that may work for you may not work for your friend experiencing the same problem. If the issue is only with a printer or USB drive, you can check the individual solutions that can help you connect them without any errors and trouble.


