Windows Firewall has been part of the Windows operating system since 2003, and it is continued in all versions till now. It has been improved a lot since it was launched, but it can sometimes cause issues with your Windows 10 computer. If you wish to disable Windows firewall, you can do it easily.
We recommend disabling Windows Firewall only if you have another security software that handles firewalls. Your system cannot be safe without the firewall feature, as it provides advanced security to your computer network and blocks the incoming traffic that can cause any cyber attacks.
The unauthorized users are restricted from entering your network and computer with the help of a firewall.
How to Disable Windows Firewall in Windows 10
There are different ways to disable the firewall feature in Windows 10. You can go through all the ways mentioned below and perform the one you are comfortable with.
1. Use Windows Security
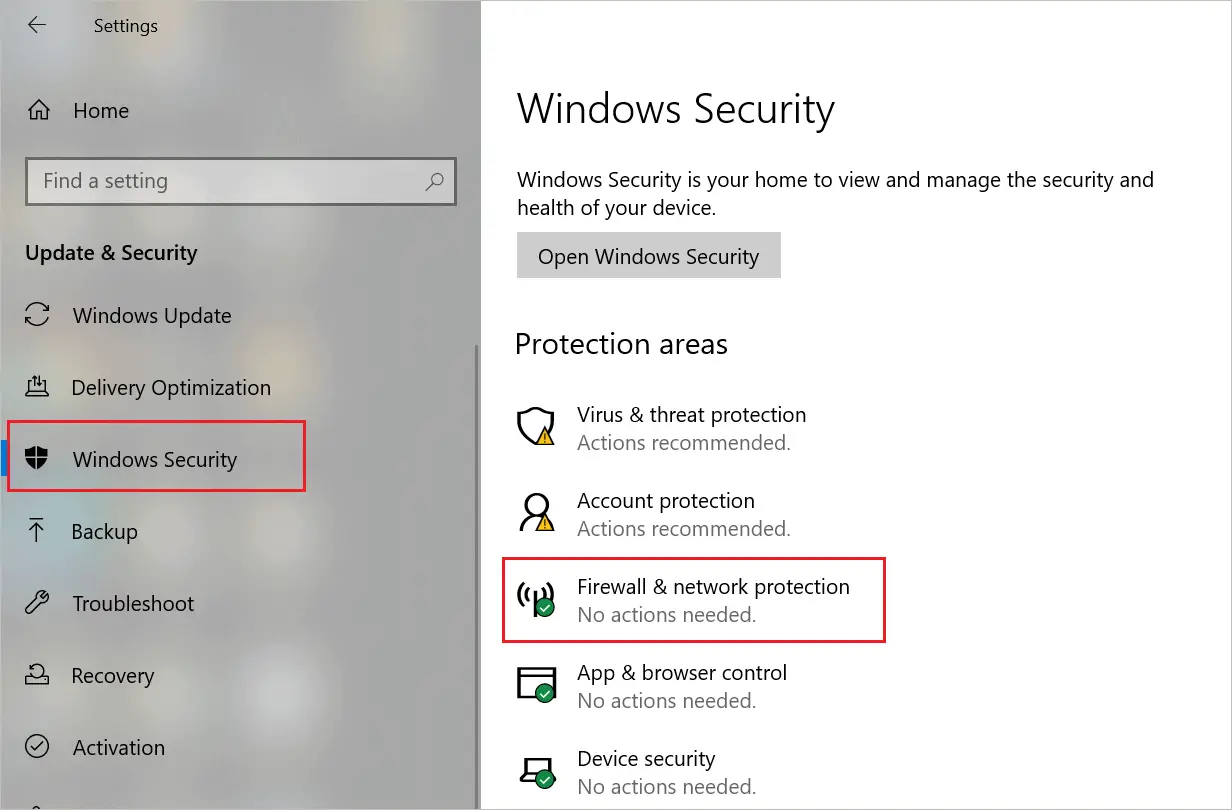
You can use the Windows Security app from Settings to disable Windows firewall.
Press Windows key + I to open the Settings app and go to the Update & Security section.
Navigate to the Windows Security from the left pane of the Windows and then click on Firewall & network protection.
On the Windows Security window, you will see a firewall is on for all the networks, that is, domain, private, and public.
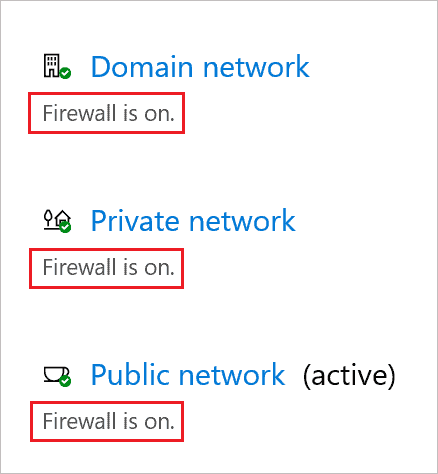
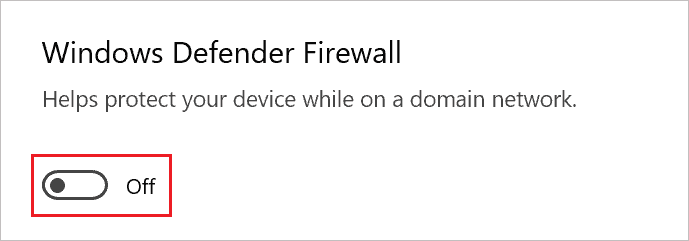
You can turn it off one by one for each network. First, click on the Domain network and then toggle the switch below Windows Defender Firewall towards the left, such that it is turned off.
You can go back to the Firewall & network protection window and disable firewall for the Private network and Public network in the same way.
Once the firewall is disabled for all the networks, you are no longer using the Windows firewall on your computer.
2. Use Windows Defender Firewall
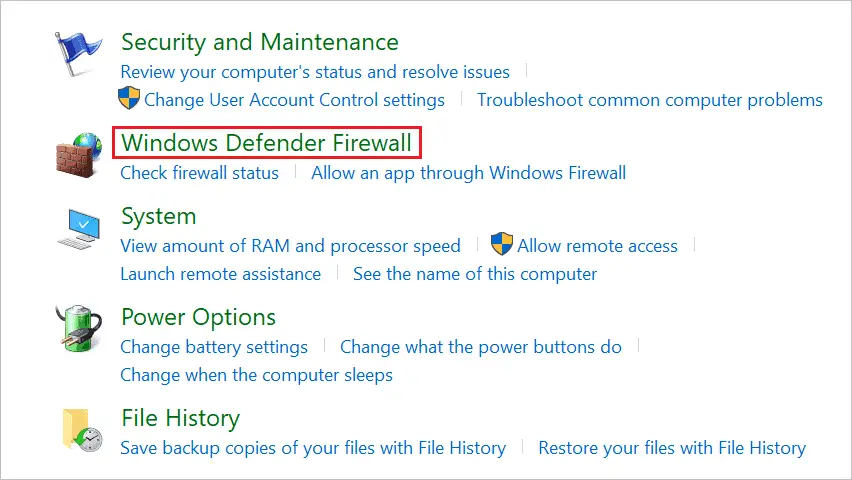
Suppose you don’t want to disable the Windows firewall for each network separately. In that case, you can use Windows Defender Firewall via Control Panel to do it under one window for all networks.
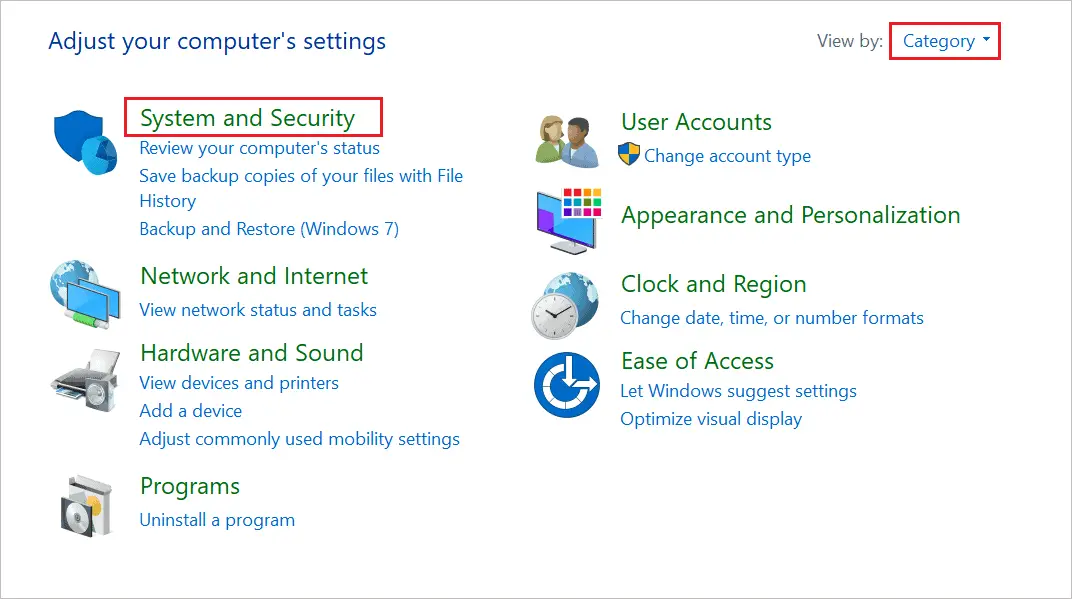
Press Windows key + S and type Control Panel in the Start menu’s search box. Open Control Panel from the search results.
In the Control Panel window, click on System and Security. Make sure that the View by option is set to Category to find System and Security easily.
Next, click on Windows Defender Firewall.
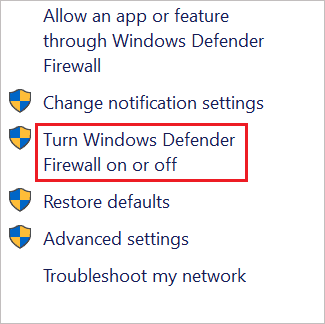
From the left panel, click on ‘Turn Windows Defender Firewall on or off.’
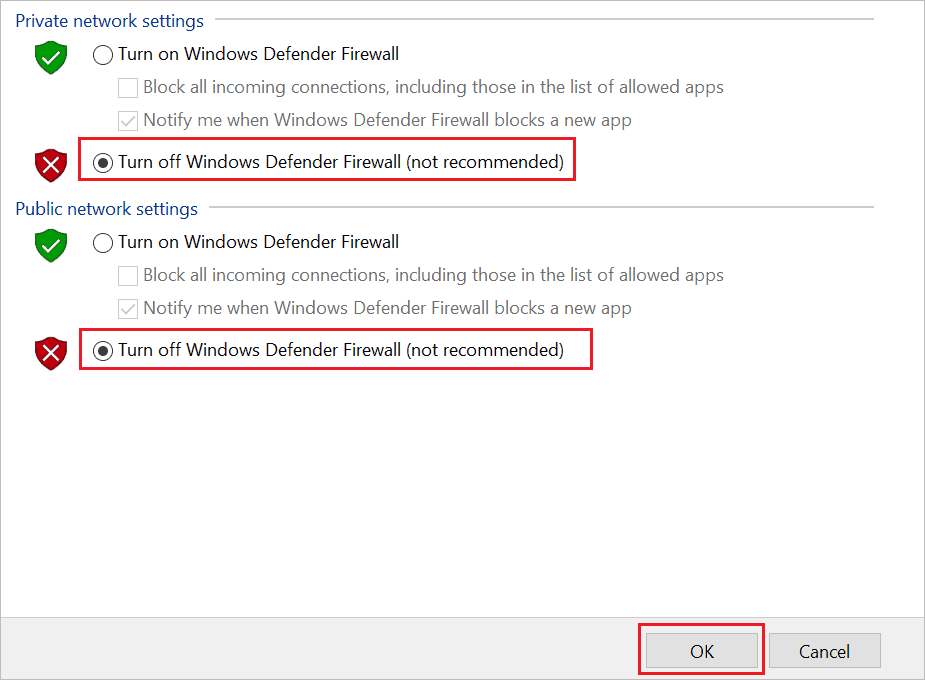
Now, select ‘Turn off Windows Defender Firewall (not recommended)’ under both Private network settings and Public network settings.
Click OK to save the changes.
The firewall will be disabled for your computer. You can enable it again by following the above process and selecting Turn on instead of off.
3. Use Command Prompt to Disable Windows Firewall
If you are more comfortable with command line arguments, you can use Command Prompt to disable the firewall in Windows 10.
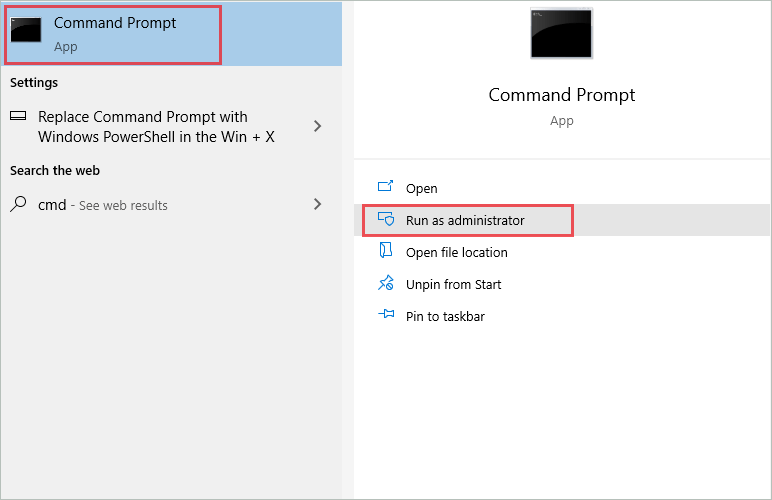
Type cmd in the Start menu and click on Run as administrator for Command Prompt.
In the terminal window, type in the below command and press Enter key to execute it.
netsh advfirewall set allprofiles state offThe above command will disable the firewall for the domain, public, and private networks. If you want to disable the firewall for a specific network, you can execute the below commands accordingly.
Command to disable the firewall for the current profile in use.
netsh advfirewall set currentprofile state off Command to disable the firewall for domain network profile.
netsh advfirewall set domainprofile state offCommand to disable the firewall for public network profile.
netsh advfirewall set publicprofile state offCommand to disable the firewall for private network profile.
netsh advfirewall set privateprofile state offIf you wish to enable a firewall in the future, you can change the ‘off’ to ‘on’ in the above commands.
4. Use Windows PowerShell
You can disable the Windows firewall using the PowerShell terminal as well. The commands for Command Prompt and PowerShell terminal are different.
Press Windows key + X and click on Windows PowerShell (Admin) from the quick link menu. Alternatively, you can search for PowerShell in the Start menu and open it from search results.
In the PowerShell window, execute the below command to disable the firewall for all the networks.
Set-NetFirewallProfile -Enabled False You can disable the firewall for specific networks in PowerShell as well.
To disable Windows firewall for domain network profile.
Set-NetFirewallProfile -Profile Domain -Enabled FalseTo disable Windows firewall for public network profile.
Set-NetFirewallProfile -Profile Public -Enabled FalseTo disable Windows firewall for private network profile.
Set-NetFirewallProfile -Profile Private -Enabled FalseIf you wish to enable the firewall in the future, you can change the ‘False’ word in the above commands to ‘True.’
How To Disable Windows Firewall For A Specific Application
If you wish to disable the firewall only for one application because of issues while using it, you can do so conveniently. A few changes in Windows firewall settings can help you whitelist an application.
Go to Settings app ➜ Update & Security ➜ Windows Security and click on Firewall & network protection.
Scroll down and click on Allow an app through the firewall.
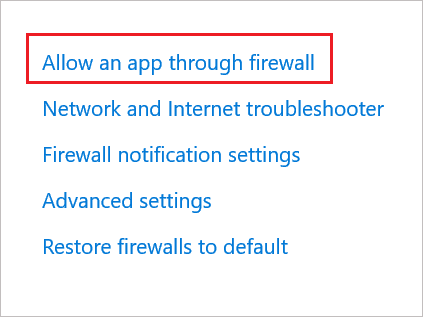
On the next window, click on Change settings. If asked for administrator credentials, add them.

Now, you can make changes to allow specific applications via the firewall. Check the checkbox next to the application you wish to allow through the firewall. Also, check the boxes for the public and private network columns.
Click OK.
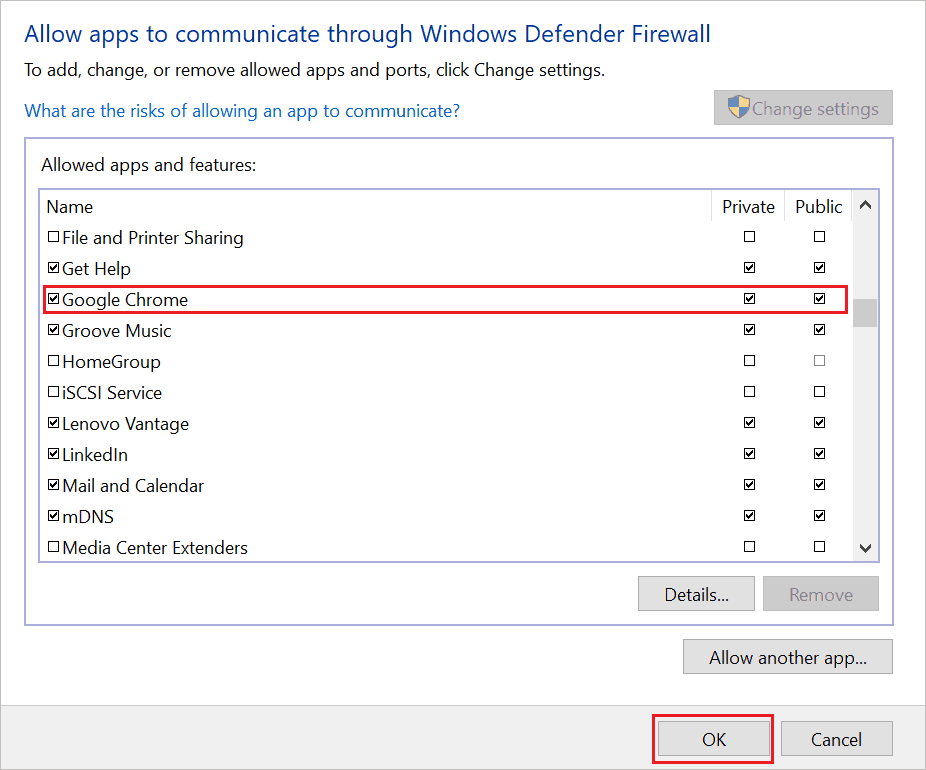
If an application cannot perform specific functions because of a firewall, you can disable the firewall for that application by following the above process. In other words, you will be whitelisting the app.
The Windows Defender Firewall will no longer block its function and feature. However, be careful while doing so and make sure you don’t disable Windows firewall for untrusted applications.
How To Disable The Firewall For Computers In Domain
You can create and deploy a GPO in the Group Policy Management Console on the server to disable the firewall for computers in the domain. This way is applicable for domain networks; if you are a regular user, you can skip this section.
Note: This is a complex way of disabling a firewall and requires technical expertise, so proceed cautiously. A wrong step can cause issues with all the computers in the domain.
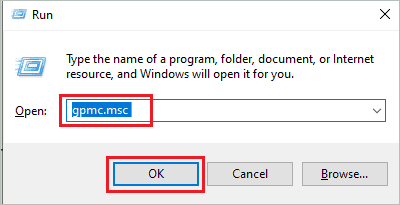
Press Windows key + R to open Run and type gpmc.msc in the text box. Press Enter or click OK to open Group Policy Management Console.
Now, in the Group Policy Management Console window, expand forest. You need to right-click on the domain where you wish to create a GPO, select ‘Create a GPO in this domain, and Link it here…’ from the context menu.
In the New GPO dialog box on your screen, type Disable Windows Firewall under Name and set Source State GPO as none. Click OK.
Right-click on the Disable Windows Firewall GPO (new GPO) and select Edit. This will open the Group Policy Management Editor window.
Navigate to Computer Configuration ➜ Policies ➜ Administrative Templates ➜ Network ➜ Network Connections ➜ Windows Defender Firewall ➜ Domain Profile
Next, in the right frame of the window, double-click on ‘Windows Defender Firewall: Protect all network connections’ under the Setting list.
Once the Windows Defender Firewall: Protect all network connections dialog box opens, select Disabled and click OK.
You can repeat this for Standard Profile settings and close the Group Policy Management Editor window.
The Disable Windows Firewall GPO is finally created, and this GPO needs to be deployed to domain computers. Follow the steps given below to do so.
Step 1: Come back to the Group Policy Management Console and select the Disable Windows Firewall GPO.
Step 2: Go to the Scope tab and click on the Add button below Security Filtering.
Step 3: You will see the Select User, Computer, or Group dialog box on your screen. In that dialog box, enter Domain Computers as the object name and click on OK.
And you now have GPO deployed for all the computers in the domain network you selected. You can run gpupdate /force in the PowerShell window on the client computer to disable the firewall for domain computers. This will help you test whether the GPO is created and deployed correctly or not.
The policy is updated every time you restart your computer, so you don’t need to run the command every now and then.
Conclusion
Many third-party antivirus software provides the firewall feature to protect your computer from cyber-attacks. Windows has also been providing an inbuilt firewall option since 2003 from Windows XP. You can also find Windows firewall in Windows Vista, Windows 7, and Windows 8.
The firewall feature provided by Windows has been enhanced a lot in Windows 10. However, sometimes you can experience issues while installing an application or using some features because of the Windows firewall. In such scenarios, you can disable the Windows firewall for all your network.
Users also disable the firewall if they are using any other firewall software on their computers. You can refer to the ways mentioned above to disable Windows firewall. If you are looking to whitelist one particular application, the above article will help you with that as well.


