Key Takeaways:
- The XPS files on Windows app can be created using Microsoft XPS Document Writer
- XPS files is similar to PDF and was launched as its replacement
- You can install and remove XPS Document Writer from your Windows 10 computer
Microsoft XPS Document Writer is a print-to-file driver that creates XPS (XML Paper Specification) files on Windows applications. It is available from Microsoft Windows XP with Service Pack 2. Microsoft launched XPS Document Writer as an alternative to PDF. However, the features of Microsoft XPS Document Writer are similar to PDF, including digital signatures and DRM.
The file cannot be modified once created in OXPS (Open XML Paper Specification) format, just like PDF. However, it didn’t make that impact, and many Windows users don’t even know about it. If you are not fond of PDF editors, you can use Microsoft XPS Document Writer and save documents in OXPS format.
What is Microsoft XPS Document Writer?
Microsoft XPS Document Writer can help you create XPS file format, and this format is in easily viewable form, just like PDFs. You can create XPS files in all the programs which allow you to print. And the OXPS file can be viewed from the XPS Viewer application that is preinstalled on your Windows 10 computer.
How to Use Microsoft XPS Document Writer?
It is always fun to explore unknown features on your computer. If you have never used Microsoft XPS Document Writer before, you can use it now and check if it serves a better purpose than PDF or not.
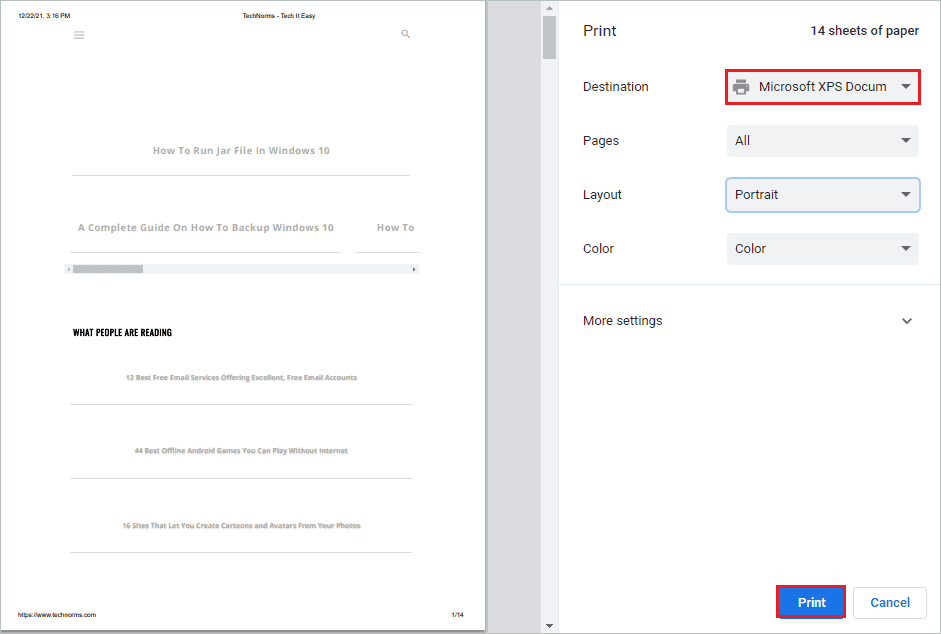
Step 1: Press Ctrl + P key to open the Print dialog box and select “Microsoft XPS Document Writer” from the drop-down menu next to Destination.
Step 2: Click on “Print” to open the save the OXPS file dialog box.
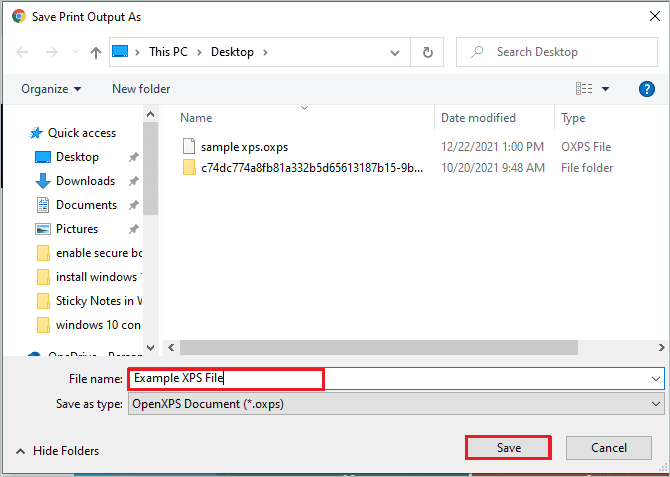
Step 3: You can go to the location where you want to save the file and then give a name to that file. Also, make sure that “OpenXPS Document (*.oxps)” is selected in the “Save as type:” as a drop-down menu.
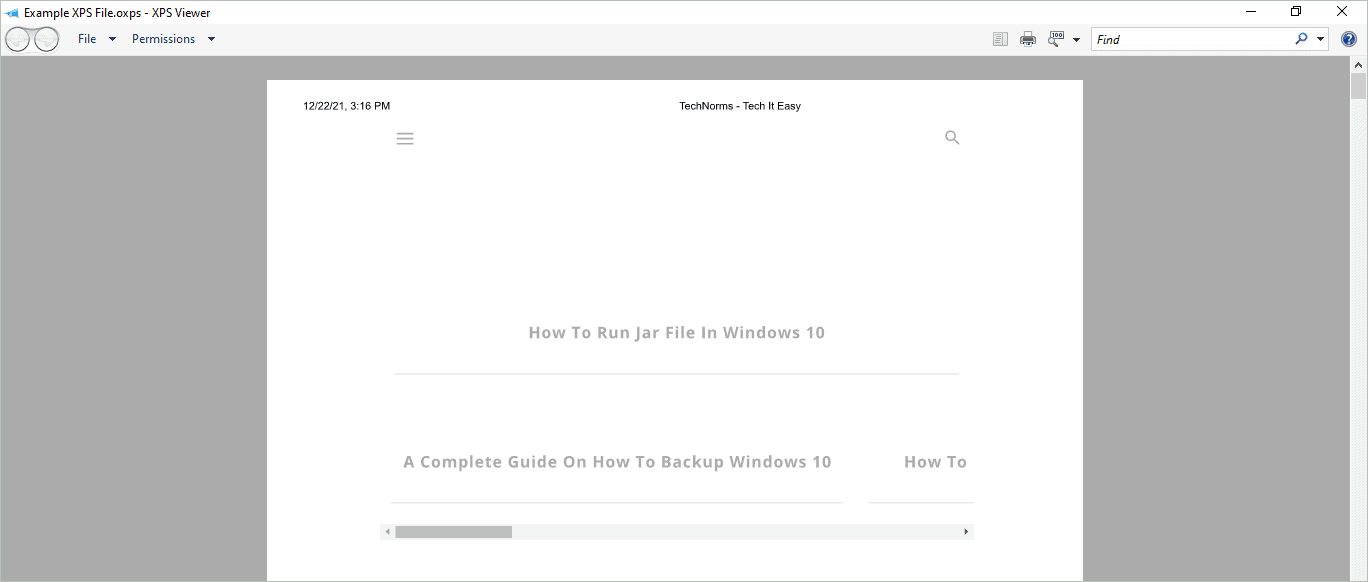
Step 4: You can simply double-click on the saved file to open it in XPS Viewer. Here, you can digitally sign and change the permissions.
If you don’t find XPS Viewer on your Windows 10 computer, you can refer to the sections below to install it. In most cases, it is bundled with your operating system, but sometimes it won’t exist, and you won’t be able to open the OXPS file.
How to Install Microsoft XPS Document Writer in Windows 10?
If you didn’t get an option of Microsoft XPS Document Writer in the Printer dialog, there are chances you don’t have the Microsoft XPS Writer feature installed. You need to enable the Microsoft XPS Document Writer feature and install XPS Viewer.
Enable Microsoft XPS Document Writer Feature
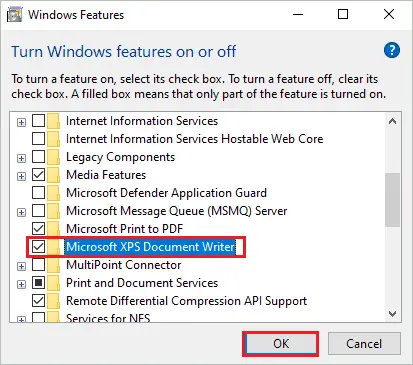
Step 1: Press Windows key + R to open the “Run” window.
Step 2: Type “optionalfeatures” in the Run dialog box and click “OK” to open Windows Features.

Step 3: Scroll down and check the checkbox next to “Microsoft XPS Document Writer”
Step 4: Lastly, click on “OK” to enable the feature and save the changes.
Once the feature is enabled, you can install the XPS Viewer to view the OXPS format.
Install Microsoft XPS Document Writer
If you don’t find the Microsoft XPS Document Writer in the Windows Features box, you need to reinstall the printer driver. Then, follow the detailed steps below to install the Microsoft XPS Document Writer printer.
Step 1: Open the “Settings” app and go to “Devices”
Step 2: Go to “Printers & scanners” from the left pane.
Step 3: Click on “Add a printer or scanner.”
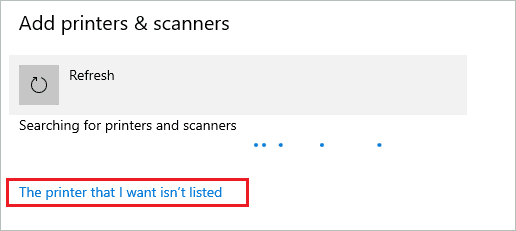
Step 4: After searching for some time, you will see the “The printer that I want isn’t listed” link; you need to click on it.
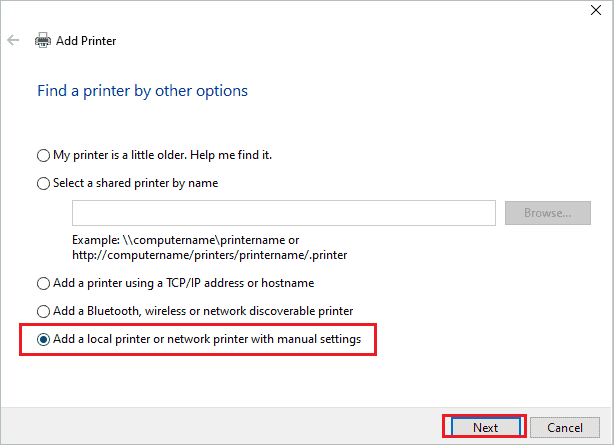
Step 5: Select “Add a local printer or network printer with manual settings” in the Add printer window and click on “Next.”
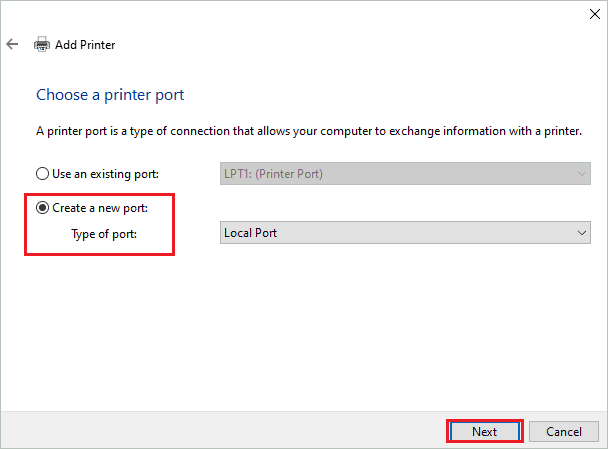
Step 6: Next, select “Create a new port” and select “Local Port” from the drop-down menu in Type of port.
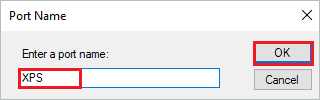
Step 7: Name a port as “XPS” or “XPS Port” and click on “OK.”
Step 8: On the next window, select “Microsoft” and then choose “Microsoft XPS Document Writer.”
If you don’t find Microsoft XPS Document Writer, you can download XPS essential pack from Microsoft’s download page.
You can follow the instructions on your screen to install the driver and use it on your computer.
Install Microsoft XPS Viewer
You will have Microsoft XPS Document Writer in many cases but won’t have XPS Viewer installed on your computer to view the OXPS file. It is an optional feature that you can install on your computer through an administrator account.
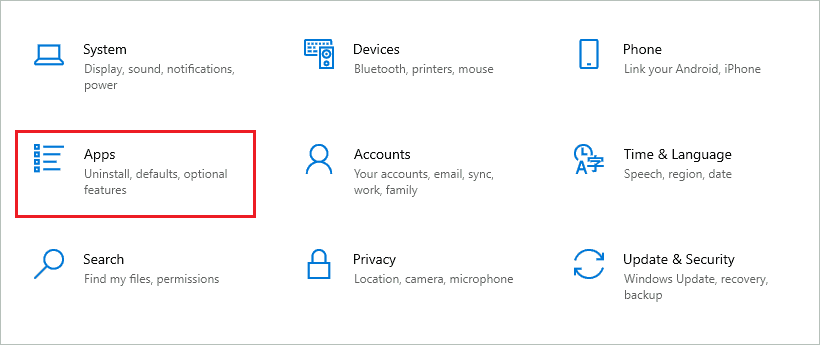
Step 1: Press Windows key + I to open the “Settings” app and go to the “Apps” section.
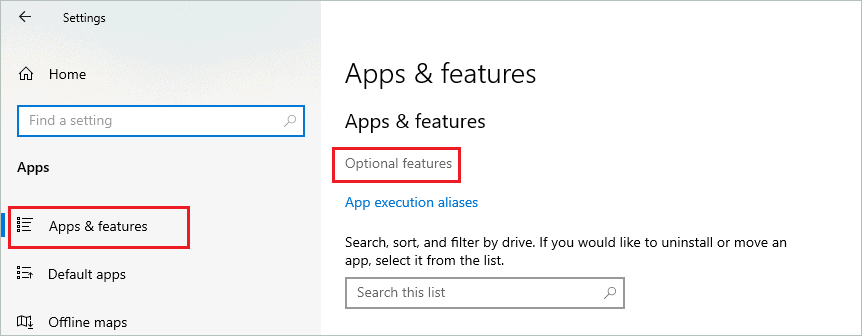
Step 2: Go to “Apps & features” in the Apps settings and click on “Optional features.”
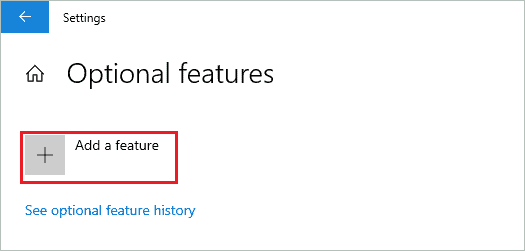
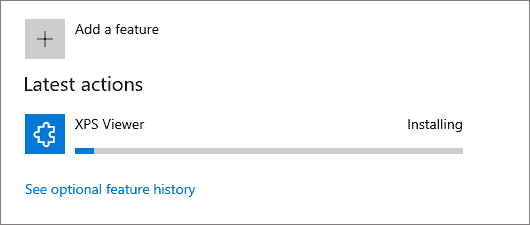
Step 3: On the next screen, click on “Add a feature.”
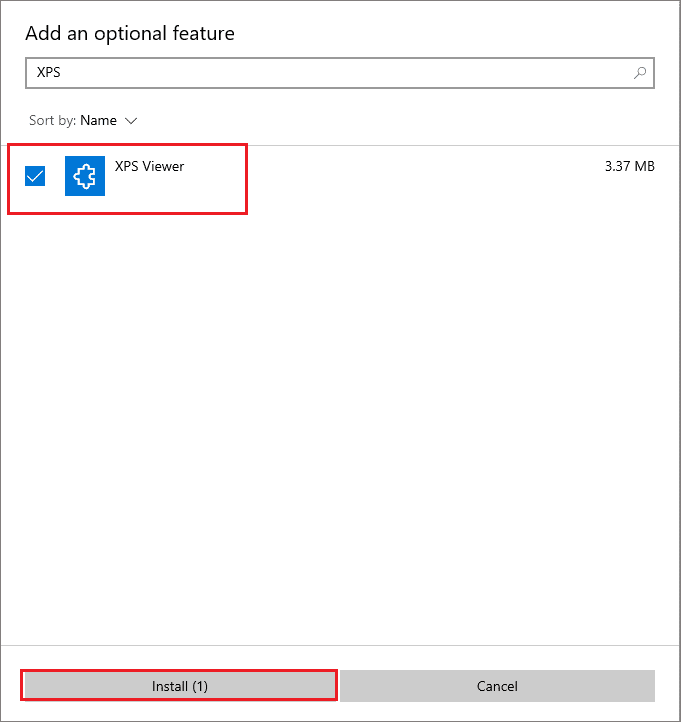
Step 4: Search for “XPS” in the search bar and check the checkbox next to “XPS Viewer.”
Step 5: Click on the “Install” button to install it.
Step 6: You can check the installation progress in the Settings window.
Once the XPS Viewer is installed, you can view the OXPS file format on your computer.
How to Remove Microsoft XPS Document Writer?
If you don’t wish to use Microsoft XPS Document Writer, you can remove it from your computer. You can also uninstall XPS Viewer from the Apps section of the Settings app. Let’s see how to remove XPS Document Writer and Viewer from Windows 10.
Remove Microsoft XPS Document Writer
Step 1: Press Windows key + R to open the Run window and type “optionalfeatures” there. Click “OK” to open Windows Features.
Step 2: Uncheck the checkbox next to “Microsoft XPS Document Writer” and click on “OK” to save the changes.
This will disable Microsoft XPS Document Writer. However, if you wish to use it in the future, you can enable it again.
If you have no desire to use it in the future, you can simply uninstall it completely by using the instruction below.
Navigate to the Settings app ➜ Devices and click on “Printers & scanners” from the left pane.
Now, click on the “Microsoft XPS Document Writer” from the list of printers and click on the “Remove device” button.
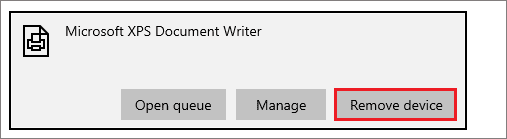
If asked for confirmation, confirm the removal of the device. However, if you need it again in the future, you need to reinstall it as a new printer device.
Remove XPS Viewer
You can uninstall XPS Viewer as well.
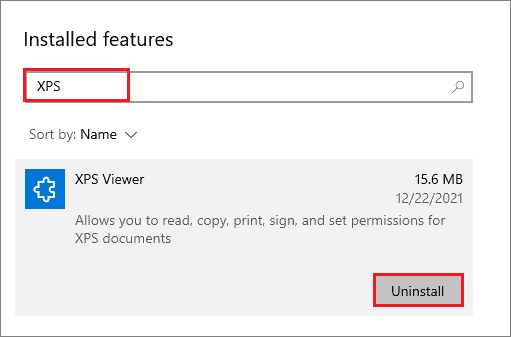
Go to Settings app ➜ Apps ➜ Apps & features and click on “Optional features.” Then, under the Installed features search box, search for “XPS” and then click on “XPS Viewer.”
Lastly, click on the “Uninstall” button to remove XPS Viewer from your computer.
You can install it again from the optional features section if you want an XPS Viewer.
Conclusion
Microsoft XPS Document Writer was initially launched to take the place of PDF format. However, it failed to attract many users, and therefore we still rely on PDFs. You can find Microsoft XPS Document Writer from Windows XP with SP2 to Windows 10. The XPS Document Writer saves the file in the OXPS format, and you can view it in XPS Viewer.
The above guide can help you with detailed steps to use, install and remove Microsoft XPS Document Writer and Viewer on your Windows 10 computer. You can either disable it temporarily or remove it completely from your computer. If you go for the latter option, you will need to install drivers again for future use.
FAQs
Is Microsoft XPS Document Writer a printer?
Microsoft XPS Document Writer is a virtual printer that comes along with your Windows operating system. It is used to save files in XPS format, which is similar to PDF.
Can I turn off Microsoft XPS Document Writer?
Yes, you turn off Microsoft XPS Document Writer on your computer using Windows Feature.
What program opens an .XPS file?
XPS Viewer application can open the .XPS file in Windows OS.
Is Microsoft XPS Document Writer the same as PDF?
Microsoft XPS Document Writer created OXPS format, which has a fixed layout like PDF. This format also supports all the features you will find in PDF. In simpler words, XPS is Microsoft’s or Windows’s PDF version.
Do I need a Microsoft XPS document Writer?
If you use XPS file format, you will need Microsoft XPS Document Writer. However, you can simply remove it from your Windows 10 computer if you don’t use it. Microsoft just bundles it with Windows OS; it is not required to keep it on your PC unless required.


