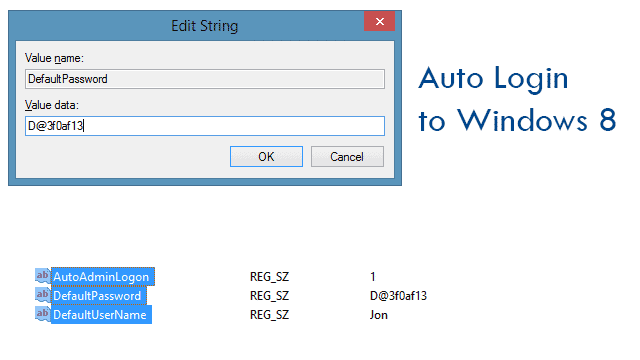
Many computers are only used by one person. This person needs to type in their password and username absolutely every time the computer boots, awakes from sleep or is locked. This can get annoying and pointless. A few simple registry changes in Windows 8 can be put in place to set the default login credentials to any desired set of characters. Though this will result in being logged on automatically, there are security risks involved. Read our guide below to find out more.
Set up auto login to Windows 8 in the registry
Begin by opening “regedit” from the start menu. Begin typing it and select it from the search results.

Navigate to “HKEY_LOCAL_MACHINE\SOFTWARE\Microsoft\Windows NT\CurrentVersion\Winlogon” and ensure the “Winlogon” folder is highlighted.

Find and double-click the name in the right pane that says “DefaultUserName.” Enter the username of the account that should auto login. If the currently logged on user is accessing this registry item it should auto-populate.

Now we need to specify a password. Look for the “DefaultPassword” string in the right pane and enter the corresponding password that goes with the above username.

It’s possible this string may not be present in the registry. If this is the case, go to the “Edit” menu, “New > String Value.”

A blank string will now open on the right side similar to when a new folder is created in Windows Explorer. Enter the password in the “Value data” field.

Now that the username and password are set we need to enable the auto logon string. This is also found in the same set of strings in the right pane. Find the “AutoAdminLogon” string. Again, if this string isn’t present use the above method to create a new one and name it appropriately.

Either double-click the newly created string or choose to right-click it and select “Modify…” Enter a value of “1” to enable this in the “Value data” field. To remove this feature of auto logon in the future, simply change this value to a zero.

All that’s left now is a reboot. Many, though not all, registry changes requires a system reboot. Upon the logon screen, the account that was just set up will automatically log in.
Something to take note of To enter a different account upon logon without disabling the “AutoAdminLogon” by entering a zero in the field instead of a one, hold the “Shift” key as the logon screen loads.
This tweak is great for single users in Windows 8. Of course, if you have others using your computer you don’t want them to have complete and easy access to your account with a simple boot of the computer. Also, if another user is logged in they can easily see your password if they navigate to the registry themselves and view it. Aside from these two downfalls, the registry change is quick and painless, making entering a password a thing of the past.


