Chrome has so many ingenious features, and their auto-complete feature is one of the better implemented features when compared to other browsers. Auto-complete allows users to quickly login to a site without having to type in their entire username and password. It also fills in other form fields which can get a bit tedious over time. Handy? Without question.
Chrome however is a bit too over-zealous on the saving part, saving any and all username and passwords ever entered into a specific site. If you accidentally type in the wrong username or password, that too will be saved. Thankfully, you can delete these entries in a few quick steps, forever getting rid of that pesky typo or entry.
In this guide we will outline how to remove specific auto-complete field entries in Google Chrome.
Must Read: The 6 Most Useful Experimental Features in Google Chrome
Open Chrome, Visit Sites in Question
Removing auto-complete entries you don’t want any more can be done in two quick steps. To begin, first open Chrome, and then visit the site that has the auto-complete entries you’d like to delete.
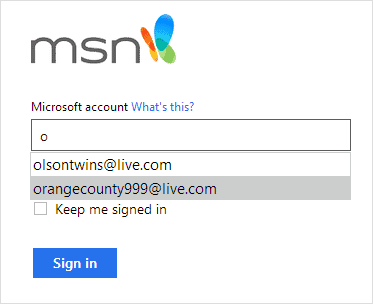
Next, navigate to the username and password fields and enter the first letter of the auto-complete entry you want to delete. If you have several entries that begin with the same letter, they will all appear.

Remove Entries Using Shift + Delete
Use the down arrow key on your keyboard to highlight the entry you want to delete, and then hit “Shift + Delete.” When you do, the entry will be instantly deleted from the list. Yup, it’s really that easy.

Note: Mac-users can also take advantage of this slick feature. To delete auto-complete entries in Chrome, highlight the entry you want using the arrow keys as well, but instead press “Fn + Shift + Delete” to remove the entry.
See Also: 10 Extensions to Control the Memory Usage in Google Chrome
Conclusion
Being able to delete auto-complete entries like this is a great feature, but if deleting one entry here or there isn’t enough and you’d like to remove all auto-complete entries in Chrome, this can be done in one fell swoop using “Clear all browser history…” in the Settings.
And remember, for auto-complete entries to be permanently deleted, using Shift while pressing Delete is now required.
For information on how to auto-login to Windows 8, check out our post – Auto Login to Windows 8 with This Nifty Registry Hack.


