Windows 8 and Windows 8.1 both utilize a lot of space on your PC before, during and after the upgrade and installation process. Most Windows users don’t even know the WinSXS folder exists. It’s where Windows system components are stored. Links to component files are often just that, they link to where the components are stored within the WinSXS folder. This is an important folder, but it’s also a bloated one.
The problem lies that when you perform a Windows Update, those updates are stored within the WinSXS folder. Once installed, you don’t need the update anymore, but it still stays there. This increases the size of the WinSXS folder rather quickly, and it’s a good idea to remove the unnecessary files to get more space on your hard drive. In this guide we’ll show you how to reduce its size and reduce wasted space.
Reduce WinSXS Folder Size in Windows 8/8.1
These steps will work in Windows 8 as well as Windows 8.1. In this article we’ll be working with Windows 8.1.
The first step to reducing the WinSXS folder size in Windows 8.1 is to run the built-in Windows clean-up tool.

We’ve outlined how to do that here. Pay particular attention to the Windows Update Cleaner option and make sure that is checked before running the tool.
You can also bypass some of the restrictions on cleaning up the WinSXS with the following elevated Command Prompt commands. Make sure you run the Command prompt with Administrator privileges.
Cool Tip: Bypass the Command Prompt by Using the Windows Explorer Address Bar
Uninstall components before the 30 day window is up:
DISM.exe /online /Cleanup-Image /StartComponentCleanup
Remove files to uninstall service packs:
DISM.exe /online /Cleanup-Image /SPSuperseded
Keep in mind, the above command will make it impossible to ever uninstall a service pack if need be.
Removes old versions of all components:
DISM.exe /online /Cleanup-Image /StartComponentCleanup /ResetBase
Have you ever used the Add/Remove Features function in Windows?
Did you know those features are actually already on your computer. When you install Windows, they’re downloaded and ready to be “installed” individually. This can take up a lot of space depending on what version of Windows 8.1 you’re using.

Once again, from an elevated Command Prompt, you want to enter the following command:
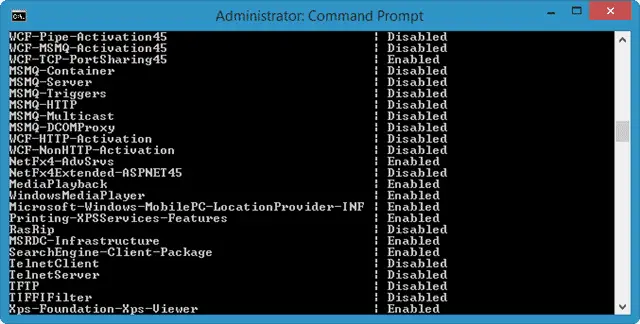
DISM.exe /Online /English /Get-Features /Format:Table

This will breakdown all the features physically stored on your computer in the WinSXS folder. From there, you can use the following command to individually uninstall them:
DISM.exe /Online /Disable-Feature /featurename:NAME /Remove
Where NAME is, you’ll replace it with the name of the feature in the previous command list.
When running the breakdown again, you’ll see that the features you’ve removed are now listed as disabled with payload removed. This means that if you ever want to install these features down the line, you’ll be prompted to download them first from Microsoft before continuing. Once downloaded, they’ll remain in the WinSXS folder until you clean it up again.
Conclusion
While space might not be that big a concern for most people using Windows 8.1, if you’ve upgraded an older desktop or laptop computer, cleaning out the WinSXS folder can make a significant difference.
By following the above steps, you can clean out the WinSXS folder and reclaim some of that wasted space in Windows 8 and 8.1.
Further Reading: How to Use Disk Check to Detect and Fix Data Corruption in Windows 8.1


