Google Photos is an exceptional picture organizing app from the search giant Google. It allows you to take a backup of your photos and arrange your pictures and videos into albums. What more, Google Photos slideshow is an in-built function, too.
There is no denying the fact that a picture tells a thousand words. So, what can be better than creating a slideshow of your favorite pictures and sharing those memories with your loved ones? Irrespective of whether it is a business presentation, birthday, or wedding, a well-made photo sequence can do wonders. Or, how about sharing images of your new-born baby or pet dog by making a simple slideshow?
However, as of now, the slideshow function works on PC and Mac only, and not on mobile devices. We will show you how to create albums from your Google Photos on the computer and mobile devices and how to create a slideshow from Google Photos.
How to Create an Album for the Slideshow
Before we jump onto showing you how to create a photo slideshow with Google Photos, let us show us how to create an album for the slideshow. In order to make a Google photo slideshow, you either need to choose from an already existing album or create one.
How to Create an Album for the Slideshow on Computer
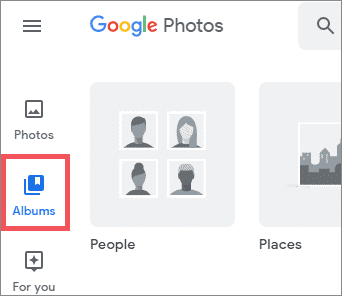
1. Go to photos.google.com Next, log in to your Google account.
2. Click on Albums. You will find it below ‘Photos.’
3. Next, click on Create Album.

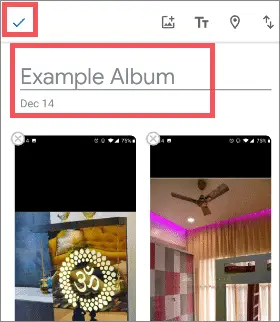
4. You will see an ‘Add a Title’ text box. Click on it. Once done, fill in the name you wish to keep. For example, we wrote ‘birthday’ here.
5. Next, click on Add Photos.

6. Select the pictures you wish to include in your Google Photos slideshow.
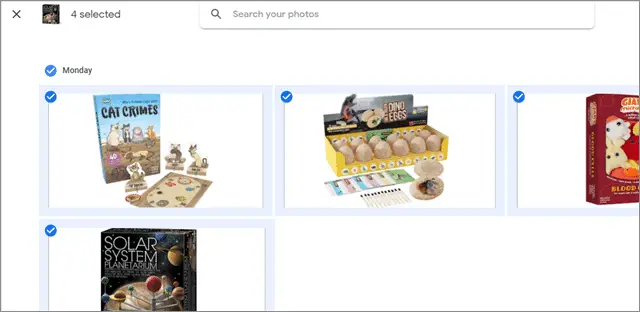
Alternatively, you can also select pictures from your PC by clicking on Select from Computer. You will find it at the top right corner of the page.

7. Find the photos you wish to add to add in your Google Photos slideshow. Select all of them and tap on Open.
The images you select will be added to the album you created.
How to Create an Album on Android and iOS
1. Go to Google Photos and log in to your account.
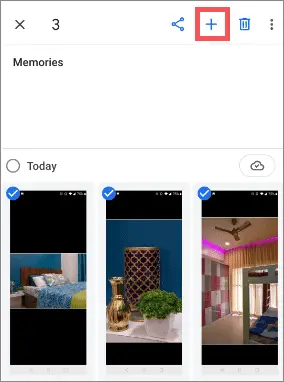
2. Tap and hold on an image you want to add to the new album. Select all the images in the same manner.
3. Click on the Add + button. You will find it at the top of the screen.
4. Next, click on Album.
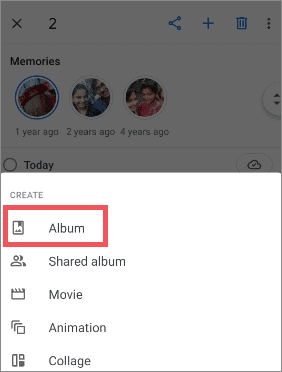
5. Click on the text box that says ‘Add a Name.’ Assign your album a name. Tap on the ‘tick mark’ to select done.
Now that we have an album ready let’s show it off to you people who are waiting to see your pictures. It is actually pretty easy to get your albums working as a slideshow.
How to Make a Google Photos Slideshow
At this moment, you can only create a Google images slideshow on your desktop computer. If you want to create one on your phone, you will have to use third-party apps.
Here’s how you can create a Google Photos slideshow:
1. Go to Google photos. Next, log in to your Google account.
2. Once done, tap on Albums. You will find it below ‘Photos.’
3. Select the album you want to create a photo slideshow from.
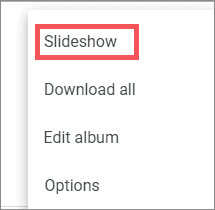
4. Click on the three vertical dots. You will find it on the top right corner of the page.

5. Next, click on Slideshow.
Google Photos then makes the web browser go full screen. It will start to cycle through your images in the album.
If you wish to go back to any previous picture, click on the screen’s left side.
Alternatively, you can also use the left arrow on the keyboard. Similarly, to view the next picture, click on the right side, or use the right arrow on the keyboard.
For pausing the Google image slideshow, you need to click on the Pause Button located at the bottom-left side of the slideshow.
Want to exit? Click on the Escape key.
Viewing a Google Photos Slideshow
Although you can choose which images will be a part of your Google images slideshow, this is the only thing where you get options for. The slideshow starts automatically, and you cannot even decide on the time for which you want to view each photo before it fades into the next one.
Wondering if you can play Google Photos slideshow with music?
Well, the answer is no. You cannot add or change music. You can only select the album and the first picture that will show up on the slideshow.
Additionally, you also cannot change the order in which your pictures will be displayed. It will be displayed in the order that was set while you were adding the photos. In case you plan to create an entirely new album for the slideshow, keep in mind that the pictures will be displayed from oldest to newest. It does not depend on the order you use while adding them to your album.
You cannot share your slideshow directly. You can show it to anyone on a device that has Google Photos or use a Chromecast to cast the slideshow on your TV.
Conclusion
If you need a slideshow with attractive features or wish to add music, you will have to do it additionally and take help through third-party apps. You should also take note of the fact that you will not be saving your Google Photos slideshow separately. It gets saved and can be viewed directly out of the album that contains your slideshow pictures. This is enough for you to make a fresh album for creating a slideshow with Google Photos.
Our final thoughts? We’d say if you need something easy to use and simple, then making a Google Photos slideshow is the best option. It is already installed on your phone, and creating a slideshow takes a few minutes only.
It is not the most powerful slideshow software, but since it is free, you might as well give it a try.
Also, check:
- The Easiest Methods To Get Rid Of Google Photos Duplicates
- Web Apps to Batch Resize Photos and Images Online
- How to Recover Accidentally Deleted Photos on Your iPhone


