Most of us feel the need to transpose large datasheets for better understanding and comprehension. Every type of data is convenient to read-only if it is arranged in a particular manner. Sometimes, some online datasheets need to be switched to a different format, and hence Google Sheets transpose feature comes into play.
Transpose in Google sheets is simple to understand and execute. Google sheets transpose is nothing but changing the orientation of a sheet, i.e., the columns and rows in a table or a data range are switched. When you transpose data in google sheets to switch rows and columns, you are basically flipping data as per your convenience.
Google Sheets Transpose To Ensure Convenient Data Reading
Google spreadsheets are very popular, be it for personal or professional reasons. The fact that you can work offline on Google sheets adds to its value. From making a graph in Google sheets to removing duplicates in Google sheets, there are various ways it adds convenience and efficiency to our lives.
Transposition of data isn’t a mandatory process; it should only be done as and when required. There aren’t a handful of methods for the same. That being said, let’s learn the top two ways Google Sheets transpose feature works on PC.
1. Using Paste Special to Transpose Google Sheets
Let’s learn how to transpose in Google Sheets on a PC first. You can use the Paste special option to transpose data (i.e., switch rows and columns) quickly and create a different arrangement.
Use your email address, sign in to your Google Drive, and open the google sheet in which you want to change the orientation of the data.
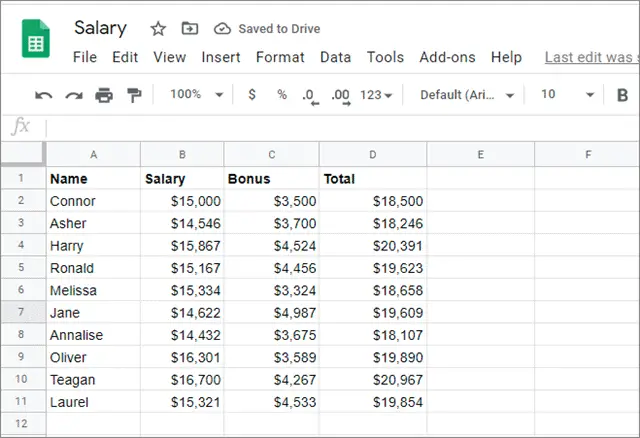
For instance, we will consider the salary list of employees arranged in a vertical order. By transposing, we will convert it into a horizontal arrangement.
Now, copy the data you wish to transpose. You can also use the Ctrl+C shortcut to copy the data.

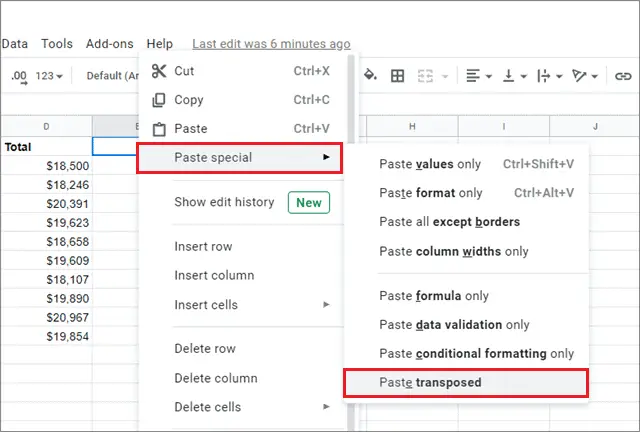
Next, select the cell from where you want your data to begin, right-click on it, and select the Paste special option.
From the drop-down menu, select the Paste transpose option.
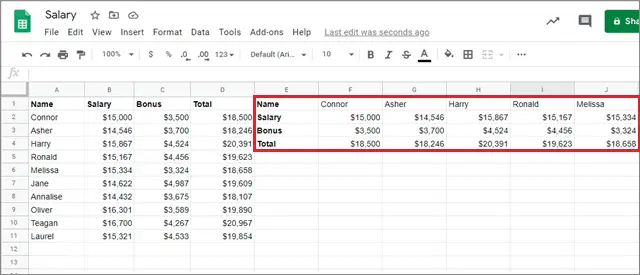
You will see that the columns and rows have interchanged their positions, and the data has been transposed successfully.
You can thus transpose in Google sheets with just a few simple clicks that hardly require any time.
2. Using The Transpose Function
If you would like to have your data transposed in another way than the one shown above, you can use the Google Sheets transpose function.
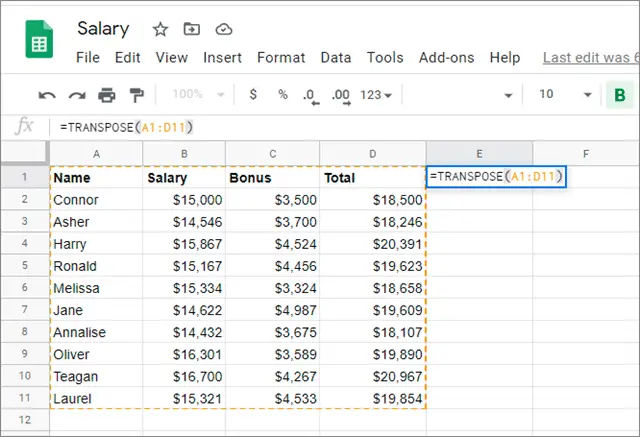
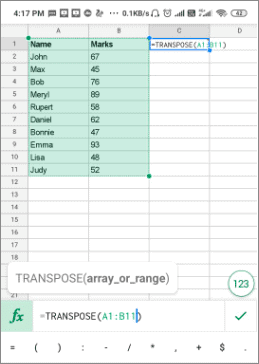
To begin with, select the cell from which you want your data to start.
Then, insert the transpose formula and click Enter. Make sure you select the correct range of data for the formula.
=TRANSPOSE(A1:D11)
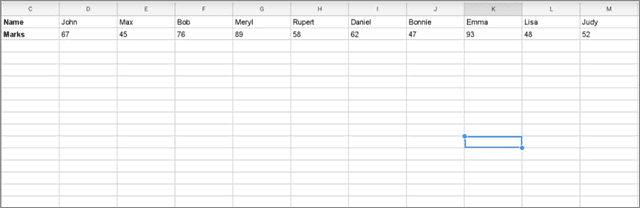
After doing this, you will see that the transposition has been completed.
Before leaving the document, make sure you delete the previous arrangement of data so that you don’t have duplicates in a datasheet.
How To Transpose Data On A Smartphone
In case if you do not have a PC for doing this task, no need to worry. Google Sheets transpose feature works fine on a smartphone.
To start with, open the Google Sheets on your phone by clicking on the Sheets icon.
Then, select and open the sheet to transpose data in Google Sheets (i.e., to switch rows and columns).
Next, select an empty cell; this will be the starting point of your data.
Insert the Google Sheets transpose formula and press the Enter key.
You will be able to see that the positions of the columns and rows have been interchanged.
You cannot delete a particular part of the array of the transposed data. If you want to delete the transposed data, you will have to delete the entire data set.
Conclusion
The Google Sheets transpose feature is used to change the orientation of a datasheet for better convenience and ease of reading the data. By using this function, the rows and columns of a datasheet get interchanged, thus enabling ease of comprehension for the users.
There are two ways. You can either transpose the data by using the simple copy and paste method or carry out the task by using the transpose function. Transposition of data can also be done on Google Sheets in a smartphone or a tablet – it’s a good option to go with if you are not using a PC to do the same.
We recommend using the copy-and-paste feature if you are not accustomed to using formulas. Regardless of the suggestion, users can choose to go with any method as per their needs and requirements.


