We are already in times where touchscreen smartphones have become the norm in society. Following their lead are touchscreen laptops that help in increasing the level of portability offered to the users. However, if the touch screen is not working in Windows 10, you will be deprived of all the benefits of navigation and accessibility that the touchscreen device offers.
Not being able to use the touch screen function is a serious issue, given that it stands as the main attraction for many users. Further, if you are a touchscreen user, transitioning to the use of a touchpad, mouse, and keyboard can be a tedious task if the touchscreen stops working. Navigation will be far more complicated, having a direct effect on the efficiency of use.
9 Solutions To Fix Touch Screen Is Not Working In Windows 10
There could be several reasons why your touch screen becomes unresponsive. Installation of specific apps or programs can result in issues with the touchscreen of your all-in-one computer system. If you have accidentally dropped your notebook PCs, that might be the reason why the touchscreen doesn’t work. Given the umpteen causes why this problem occurs, let’s look at how to tackle and resolve it.
1. Restart Your Device
Restarting a device is one of the most common solutions for a host of problems experienced by Windows 10 users. If your HP, Asus, or Lenovo touch screen is not working, make sure you restart the device to confirm the issue first. It is a good way to determine if your laptop screen has a problem with the touch.
2. Clean the Screen
Dirt often gets accumulated on the computer screen; even if you are using the touchscreen feature regularly, you will need to keep the screen clean. Dirt often affects the touch sensors and makes them unresponsive for a while.
So, if you have streaks or finger marks over the screen, use a microfiber cloth to clean it. You can also use special cleaners that are safe for electronic devices; never use alcohol or soap for this cleaning process.
3. Re-enable Touch Screen
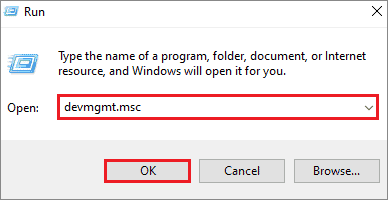
If the touch screen is not working in Windows 10, the first and the essential thing to do is to confirm whether the issue has occurred. To do that, you need to disable the touch screen functionality and then enable it again.
Use the Windows key + R keyboard shortcut key to open the Run window. Enter devmgmt.msc to open the Device Manager and click OK.
Then, locate and double-click on Human Interface Devices. From the drop down menu that appears, right-click on the HID-compliant touch screen and select Disable device.
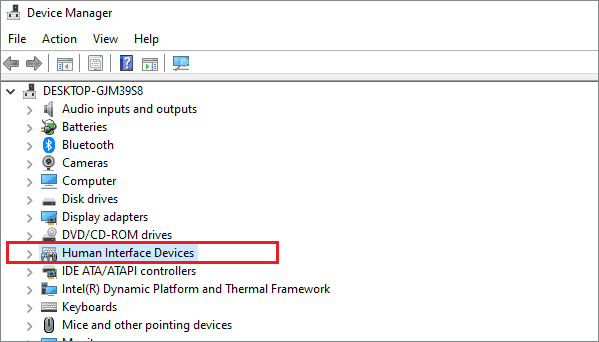
Once you have disabled the device, right-click on it again and select Enable to complete the process. If the touch screen problems vanish after executing this method, it’s safe to say that the unresponsiveness was probably because of a glitch.
4. Update Windows 10
Microsoft rolls out timely Windows updates to fix the bug issues. If you have an update available, make sure you install it if you face the touch screen issues on your laptop.
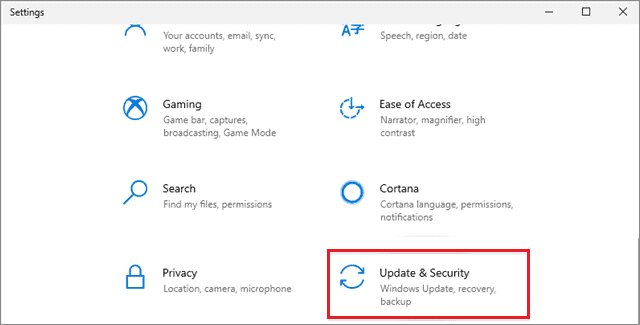
Open the Settings window using the Win key + I shortcut and select Update & Security from the available options.
Then, click on Download to download new updates.
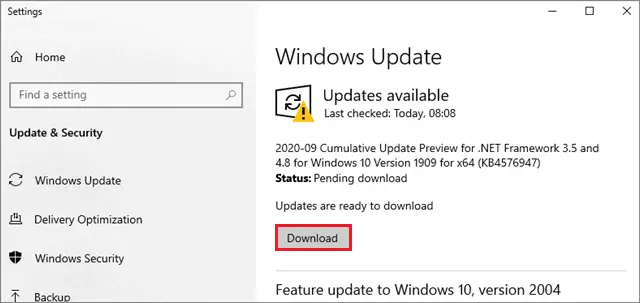
If any Windows update is available, they will be installed on your all-in-one PCs automatically. Restart the PC and check if the touch screen has started working.
5. Configure the Touch Settings
Touch screen settings are often affected when you install new updates. Hence, you need to calibrate the touch display accordingly.
First and foremost, open Control Panel and select Hardware and Sound from the list of options. Select the Display tab under Tablet PC Settings and click ‘Calibrate the screen for pen or touch input.’ Then, navigate to the Display tab in the window and select Calibrate.
Now, you need to calibrate an input style. Select Touch Input in this step. Next, you have to tap the crosshair every time it appears on the screen; make sure you don’t change your screen’s resolution in this process. After the completion of the process, you can save your calibration data. This calibration tool can also be used to calibrate the pen input.
6. Disable the USB Selective Suspend
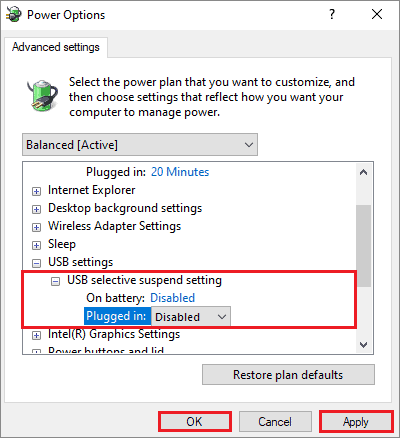
By using the Universal Serial Bus Selective Suspend feature, you can suspend a single port without affecting other ports on a hub. Many users have reported that this method has solved the touch screen not working issue for them.
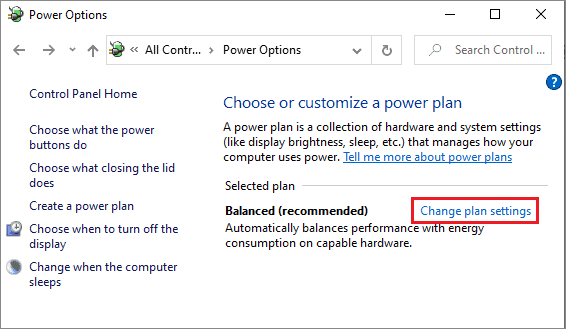
Open the Control Panel from the Start menu search box and select Power Options from the list of options.
Then, select Change plan settings.
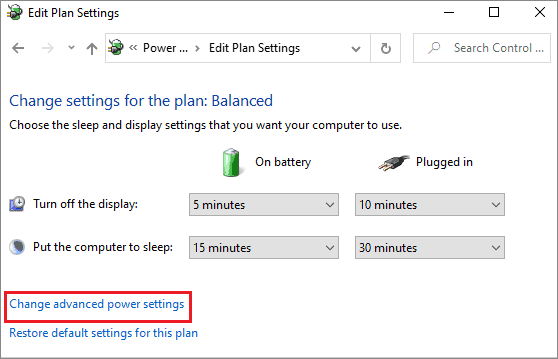
Next, click on Change advanced power settings.
Now, search for USB Selective Suspend settings in the Power Options window. Once you find it, expand it and disable the On battery and Plugged in options.
Now, you need to do a cold reset; switch off your all-in-one computer system, remove the battery, wait for about 10 minutes, and then restart the PC again.
7. Changing Power Management Settings
The Windows 10 operating system is well-equipped with settings that help users in conserving energy. By default, the OS is programmed to stop certain devices like speakers, monitors, etc., to save the battery.
If the Power Management Settings are indeed the reason why the touch screen is not working in Windows 10, we can tweak it and see if that resolves the issue. To begin with, open the Device Manager window using the ‘devmgmt.msc’ command in the Run window.
Then, expand Human Interface Devices. Right-click on the HID-compliant touch screen and select Properties. Once the Properties window opens, click on the Power Management tab and uncheck the box that says Allow the computer to turn off this device to save power.
In a nutshell, by executing this method, we just told our notebook to stop considering the touch screen as a means for saving the battery when the computer is on but not in use. Restart the computer to see if the issue has been resolved.
8. Run the Hardware & Devices Troubleshooter
The Hardware and Devices troubleshooter is often used to identify the root cause of a problem. If your Dell, Lenovo, or HP touch screen is not working in Windows 10, you can use this troubleshooter to identify the problem and fix the issue.
Note: The Hardware and Devices Troubleshooter is not available for Windows 10 v.1809 and above.
Open the Control Panel window and click on Troubleshooting from the available options. Click on View all in the left pane. Then, select Run the Troubleshooter option under the Hardware & Devices section.
Follow all the instructions on the screen to complete the hardware diagnostics process; make sure the Apply repairs automatically option is checked in the Advanced section. If any fix is discovered, click on Apply this fix and restart the computer or notebook PCs.
9. Update Touchscreen and Graphics Driver To Fix Touch Screen Not Working
Updating the driver is a very simple process to understand and execute. All you have to do is open the Device Manager, find the HID-compliant touch screen driver, right-click on it, and select Update Driver. Follow the steps for finding the HID-compliant touch screen driver given in the third solution. You also need to update your graphics driver to resolve the issue. You can check out the guide on how to update device drivers.
Conclusion
Touch screen laptops are steadily becoming popular amongst Windows 10 users, given the fact that they can now use a 2-in-1 laptop like their touch screen smartphone. However, if you face the touch screen not working in Windows 10 issue, it tends to take away the main attraction of the 2-in-1 laptop. The solutions mentioned above are the basic ways to fix the issue. If they don’t work, you need to consult a technician regarding the same.


