Antivirus software and tools are becoming essential day by day due to cyber-security. Avast is one such multi-platform antivirus solution that helps users and safeguards the systems from malicious attacks. It offers various services like webcam and anti-phishing protection, secure password vault, and internet threat scanning. However, many users have often reported that Avast won’t open in Windows 10 for various reasons.
You may encounter various errors related to Avast that need urgent attention. Sometimes, the software might fail to start, cause BSOD errors due to compatibility issues, or even try to delete Windows system files, deeming them malicious. Fixing the Avast issue is of paramount importance since it protects against various malware types.
9 Ways To Fix Avast Won’t Open In Windows 10
In some cases, the Windows 10 operating system might not even recognize Avast as antivirus software. You can try some simple methods to eradicate this problem. Let’s discuss some easy fixes to resolve this issue.
1. Repair Avast
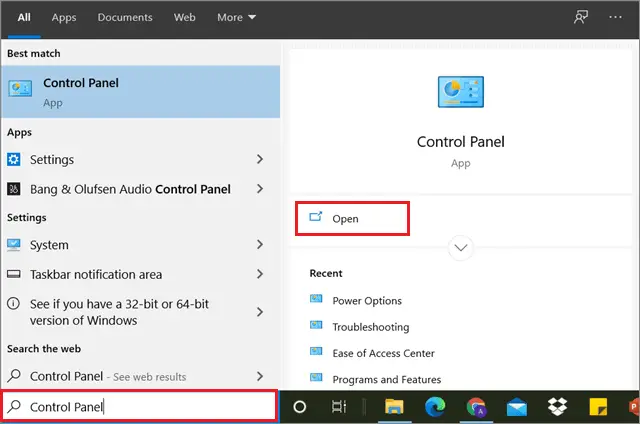
If Avast won’t open in Windows 10, the most straightforward solution is to reset it. You need to open the Control Panel and use the repair wizard for this purpose.
Before going on with this fix, make sure you are logged in to an administrator account. Then, open the Control Panel from the Start menu.
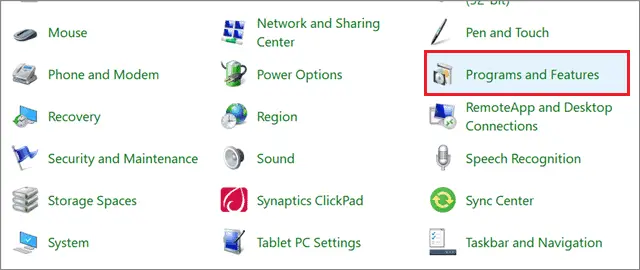
Now, select Programs and features from the given list of options.
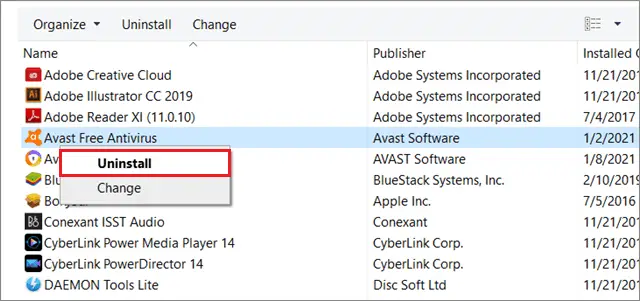
Right-click on Avast and select Uninstall.
Then, select Repair and click on Next to begin with the Avast installation process.
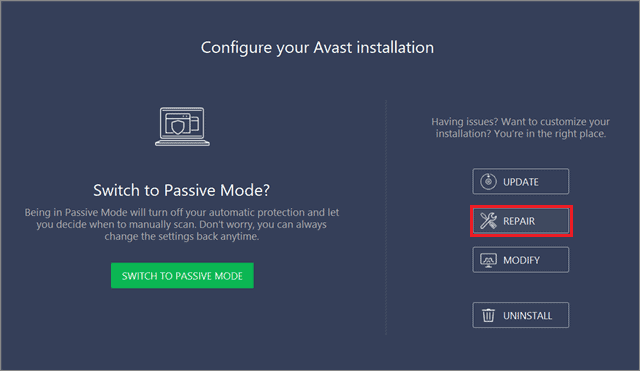
Following this step, you will face an authorization window; just click OK to confirm the step and start the process. Once the process is complete, check if the Avast program starts working properly.
2. Restart Avast
If the Avast antivirus program isn’t working correctly and Avast won’t open in Windows 10, you can choose to restart the software. The restart process is reasonably simple to execute.
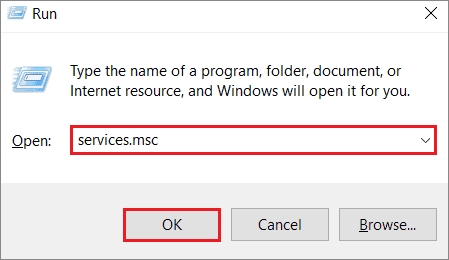
To begin with, press the Win key + R to open the Run command on your keyboard. Enter services.msc in the address bar and click on OK.
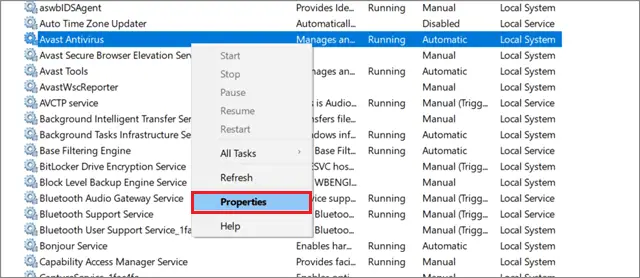
Then, locate the Avast antivirus service and right-click on it; select Properties from the context menu that appears.
In the Properties window, change the Startup type menu to Automatic and then click on the Start button. Click on Apply and OK to save the changes.

When you click on the Start button, you might receive the following error message:
‘Windows could not start the Avast Antivirus program service on Local Computer. Error 1079: The account specified for this service differs from the account specified for other services running in the same process.’
If you receive this message, follow the instructions mentioned above and open the Avast antivirus Properties dialog box. Then, select the Log On tab and click on the Browse button.
In the ‘Enter the object name to select’ box, enter your account name and select Check Names. Once the name becomes available, Click on OK to save the changes and restart the Avast antivirus program.
3. Perform A Clean Install
You can also opt for a clean install process to resolve the Avast won’t open in Windows 10 issue. The clean install step helps to delete all the cache files and the corrupted files in the registry.
First, go to the official Avast Antivirus website and download the software. You will also need the Avast Uninstall Utility to download and save it on your PC.
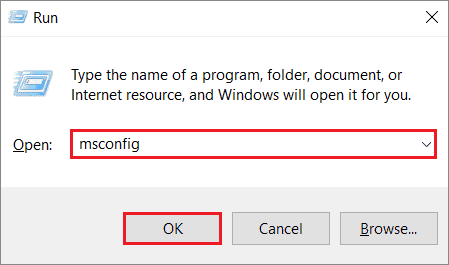
Next, switch off your internet connection and boot the PC in safe mode. Once you boot into safe mode, open the Run command window using the Win key + R shortcut and type msconfig in the address bar. Click on OK to open the system configuration window.
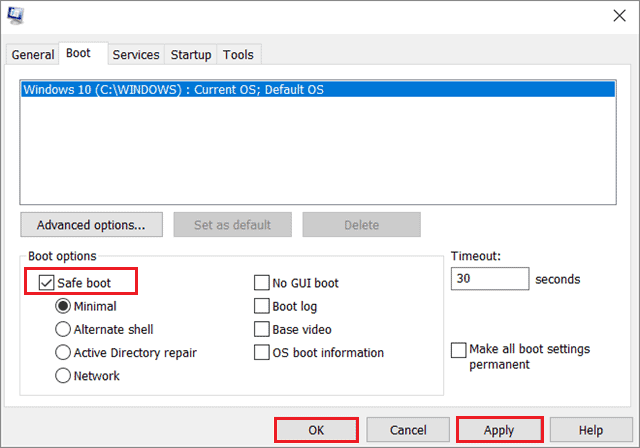
Select the Boot tab and check the Safe boot option; click on Apply and OK and then restart the computer.
Now, open the Avast Uninstall Utility and browse the location in which you have installed the Avast antivirus program. Then, click on Uninstall to remove the antivirus software; restart the PC in safe mode and check if the software functions correctly.
4. Update Windows 10
Outdated Windows 10 systems can cause errors in various applications. If the Avast won’t open in Windows 10, it can probably be due to an outdated system.
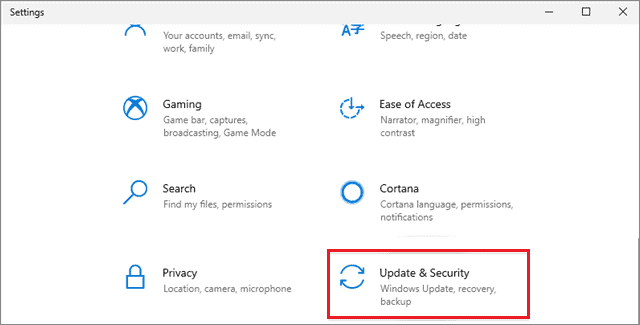
To begin with, press the Windows key + I shortcut to open the Settings window. Then, select Update & Security from the list.
Select Windows Update in the left pane and click on the Check for updates button. If any version updates are available, they will be downloaded automatically.
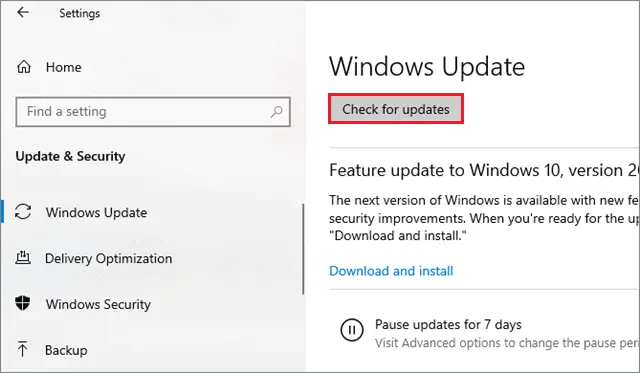
Once the update is complete, check if the Avast antivirus gets updated following this stable method.
5. Perform a Clean Boot
If the Avast antivirus update issue exists even after updating the Windows 10 update, you can opt for the clean boot process. The clean boot process helps a user identify issues with the background processes. It uses only essential files and folders required to run a PC.
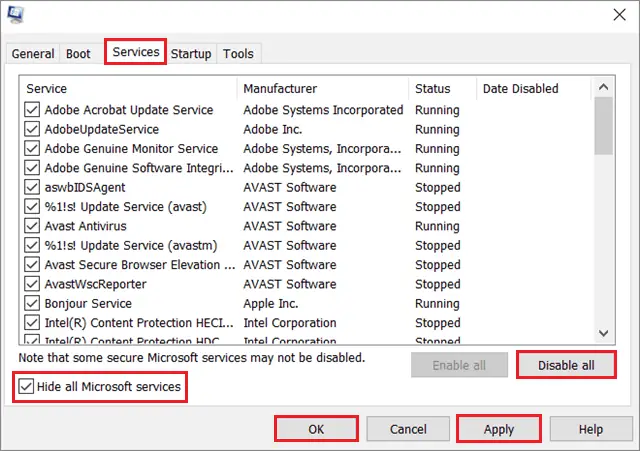
Open the Run window and enter msconfig and click on OK to open the System Configuration window.
Select the Services tab and check the ‘Hide all Microsoft devices’ box. Then, choose Disable all.
Open the Startup tab and click on Open Task Manager. Check if any processes are running. If not, click on Close.
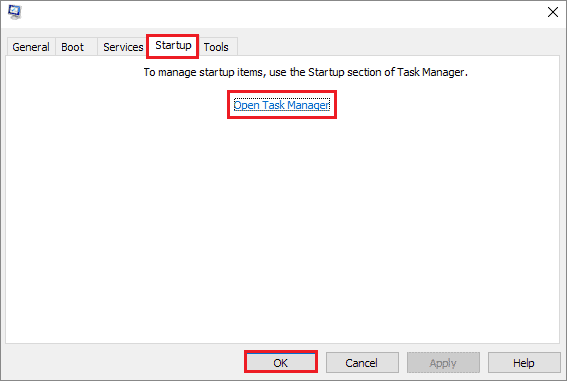
Now, right-click on all the tasks and click the Disable button.
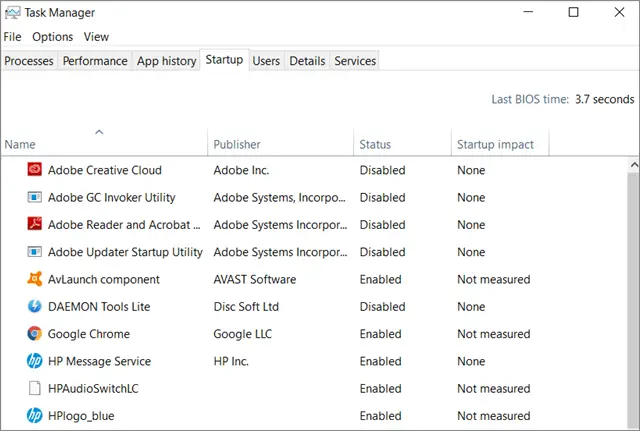
Then, click on Ok in the System Configuration window and restart your computer. Restart the PC and try running the Avast antivirus program following this process.
6. Disable the Firewall
Sometimes, the Windows Firewall can block the Avast antivirus update process. So, you can temporarily disable the firewall protection, update the software, and enable the firewall again.
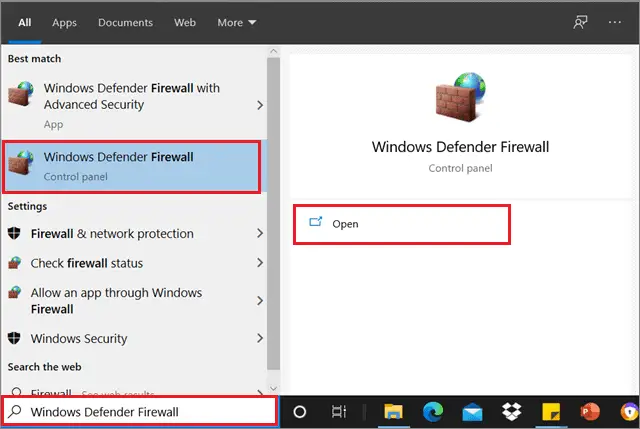
To start with, enter Windows Defender Firewall in the Cortana search bar.
Then, select ‘Turn Windows Defender Firewall on or off’ in the left pane; select the ‘Turn off Windows Defender Firewall’ option.
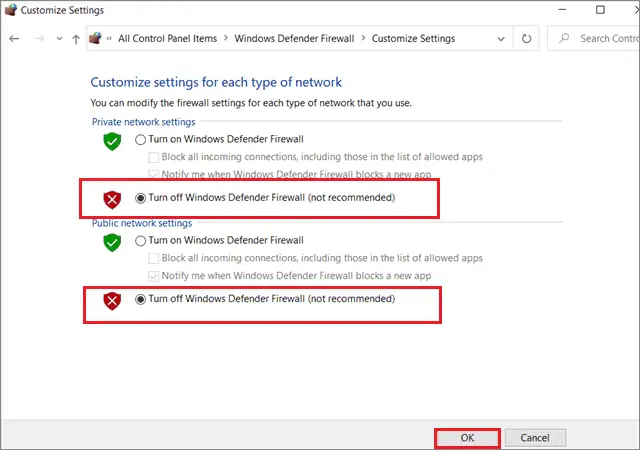
Now, install the Avast antivirus software update and then turn the Windows Firewall back on. Check if the Avast won’t open in Windows 10 after these steps.
7. Temporarily Disable the Avast Antivirus
If your Avast Antivirus won’t open in Windows 10, or if your system has failed to recognize Avast, you can disable it temporarily.
First, locate and right-click on the Avast icon on your taskbar.
Select Avast shields control from the context menu that opens and select ‘Disable for 10 minutes.’
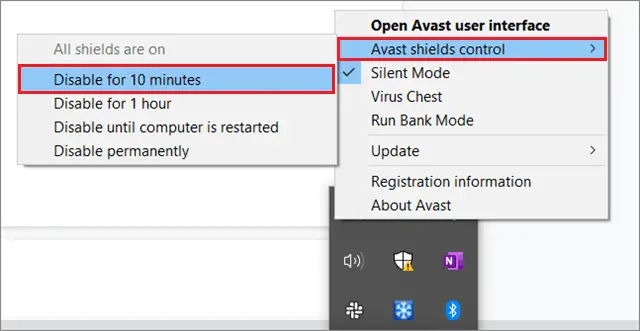
A confirmation window will appear asking if you wish to close all the shields. Click on OK to confirm your action. After around 10-15 minutes, follow the same steps and enable the shields options again. The Windows 10 system should start recognizing the shields following this step.
8. Verify WMI Repository
The WMI repository stores meta-information for WMI classes. If this repository is harmed in any manner, you can experience issues with any ongoing activity at that time. If Avast is not responding properly, or the Windows 10 system isn’t recognizing it, you can verify the WMI repository to resolve the Avast won’t open issue.
First, open the Command Prompt using the Run dialog window; enter cmd in the address bar and click OK.
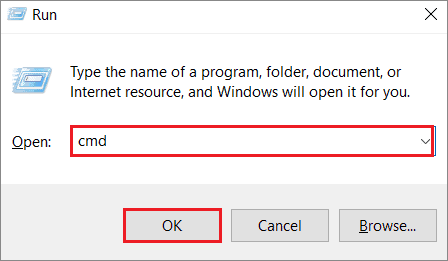
When the window opens, type the command given below and press the Enter key.
winmgmt /verifyrepositoryIf the repository is consistent, type the following command and press the Enter key.
winmgmt /resetrepository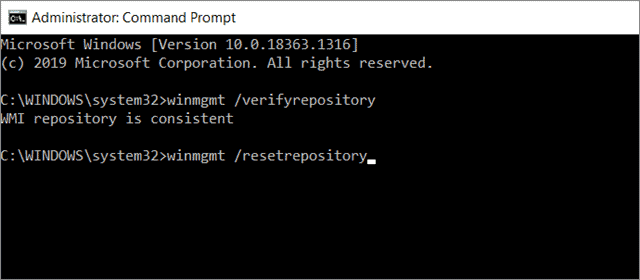
If it is inconsistent, you can run the following command in the window.
winmgmt /salvagerepositoryOnce you build the WMI repository successfully, reboot the PC and check if Windows 10 recognizes Avast antivirus.
9. Fix Black Screen Issue
Many users have reported that the Avast Antivirus software is responsible for causing a black screen in Windows 10. If you have encountered a similar problem, here’s how to solve that issue.
To begin with, open the Avast software and click on Menu. Select Settings from the right pane.
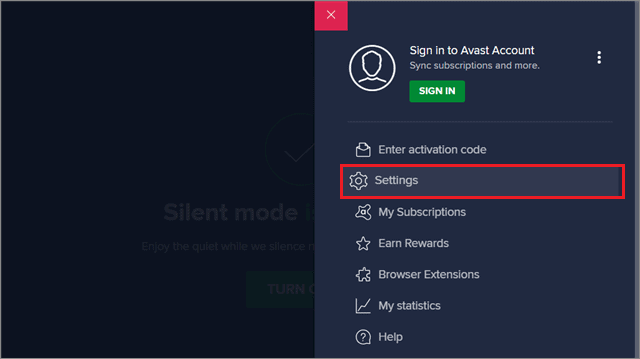
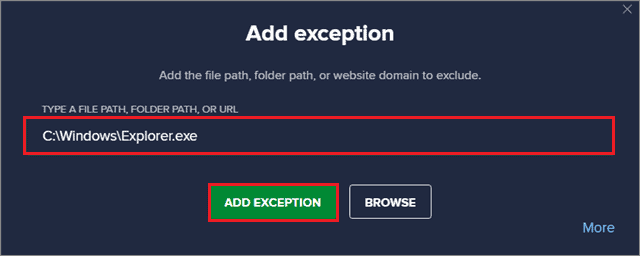
Next, select the General tab, choose Exceptions, and click on the Add exception button.
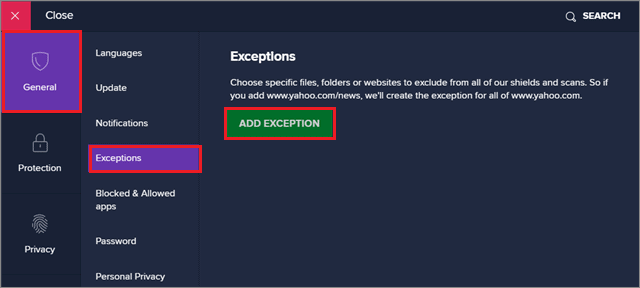
In the next step, enter C:\Windows\Explorer.exe and click on Add Exception.
After you have added this path as an exception, click on the Add Exception button again and enter the following path.
C:\Windows\ImmersiveControlPanel\SystemSettings.exe
Click on Add Exception after entering the path, and then reboot your computer. Check if the black screen issue is resolved following this method.
Conclusion
Avast is well-known free antivirus software that helps users protect their PCs from malicious files and viruses. It works on multiple platforms and offers a bunch of protection features. However, if your Avast won’t open in Windows 10, there could be other possible errors you might also face.
In case of any ‘Avast won’t open’ errors, these solutions can help the users eradicate them and use the tool safely. If any of the solutions discussed above doesn’t resolve the problems, the best thing would be to switch to a different tool that fits your requirements.


