If you use Microsoft Word or Google Docs frequently, you must be familiar with the term indentation. For those who aren’t, indentation is the space you leave at the start of a line to start a paragraph or any other purposes. Since it is used in many professional documents, most users want to know how to do hanging indent on Google Docs.
A hanging indent means the first line of a paragraph is written normally, while the rest of the lines following it have a small indentation. Doing so helps your first line stand out in the entire paragraph since it is the only line that hits the page’s margin. Hanging indents help in making the content and the document looks organized and neat; you can also add a border to your document to further enhance the look of your document.
How To Do Hanging Indent On Google Docs And Where To Use It
Hanging indents find their most common use in various formatting styles like MLA (Modern Language Association), CMS (Chicago Manual of Style), and APA (American Psychological Association). You can use them to denote references, citations, and bibliographies.
Let’s look at the easiest ways to create a hanging indent to Google Docs.
How To Do Hanging Indent On Google Docs
1. Open the Google Docs document and select the text.
2. Open the Indentation options from the Format menu.
3. Select Hanging indent.
4. Enter the amount of indent you want to apply and check the result.
How To Do A Hanging Indent Using the Menu Option
The first and the most common way to add a hanging indent is to use the menu bar in Google Docs.
1. Open the Google Doc and select the text
To begin with, open the Google Doc you want and select the text you want to indent.
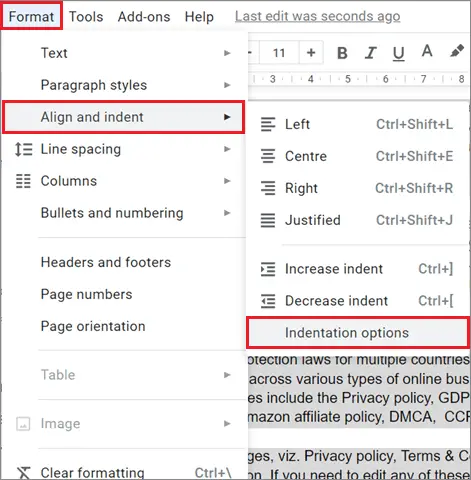
2. Go to the Format menu
Click on the Format menu and click on Align and indent from the drop down menu. Further, choose Indentation options.
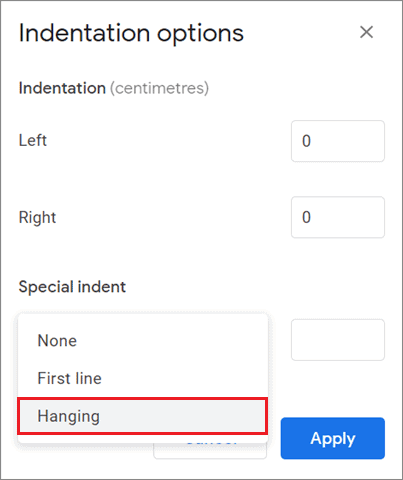
3. Select Hanging indent
Now, select the drop-down menu in the Special Indent section and choose Hanging from the list.
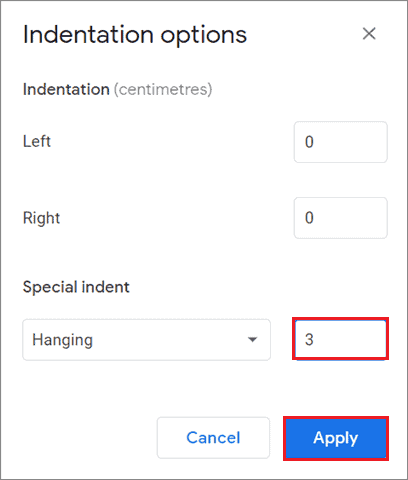
4. Enter the amount of indent
Enter the amount of inches you want to indent in the document. Select Apply to let the settings come into effect.
5. View the results
This is how your document should ideally look after you do a Hanging indent.
This is the basic answer for how to do hanging indent on Google Docs. You can try out other ways of indenting if you find this method difficult.
How To Create A Hanging Indent Using The Ruler Tool
Users can also indent their content using the ruler in Google Docs. However, the process might appear a bit complex as compared to the one we saw previously.
1. Open the document and select the text
First and foremost, open the document and select the text to indent it.
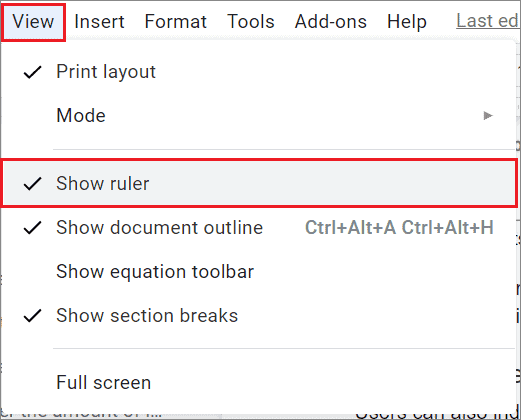
2. Turn on the ruler
Click on View and select Show ruler to make the ruler visible.
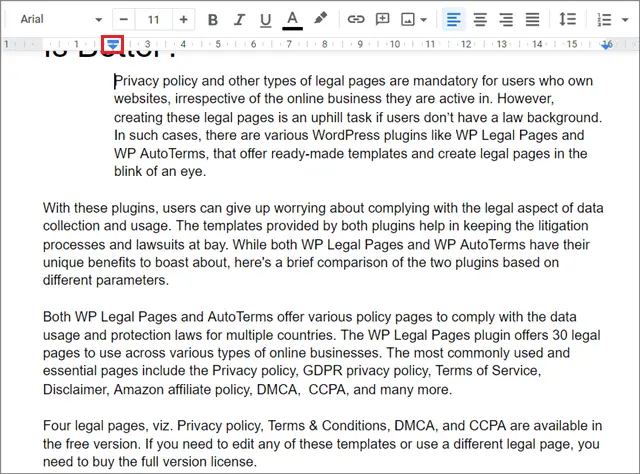
3. Drag the left indent marker
Now, place your cursor on the left indent marker, the blue triangle on the ruler, and drag it to the right as per your requirements. Doing so will help you adjust the left margin on the page.
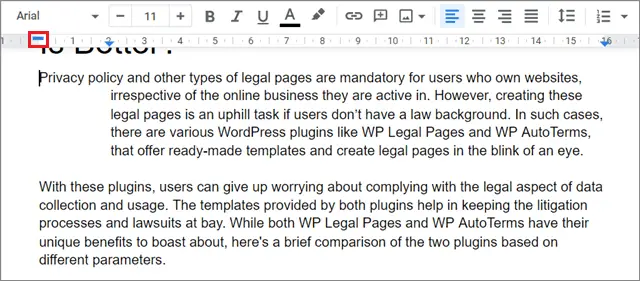
4. Set the first line indent
You will notice that the selected paragraph in Google Docs has moved to the right side following the previous step. However, we need to have normal indentation for every paragraph’s first line to call it a hanging indent.
So, choose the first line of the paragraph you have selected and drag the first line indent, the blue rectangle over the triangle back to its original position.
If you want to know how to do hanging indent on Google Docs manually, you can follow this method to indent Google Docs content.
Final Thoughts On How To Do Hanging Indent On Google Docs
The indentation feature is vital for creating text documents in Google Docs, regardless of whether it is for personal or professional use. A hanging indent helps make sure you achieve that trademark professional appeal. Users can also use it for creating citations or bibliographies.
The sheer professionalism that indentation display is why users need to get acquainted with how to do hanging indent on Google Docs. There are three simple ways to apply the hanging indentation to your Google Doc document. Users can go with any method they are comfortable with, as long as it works for them.


