Gmail is the most widely preferred corporate communication tool when it comes to emails; the Google email client allows users to send a Gmail message to their recipients effortlessly. Given its undeniable importance in marketing, knowing how to add a signature in Gmail will help you build trustworthy relationships with your consumers and recipients.
An email signature is a quintessential mark of professionalism. Be it a custom signature or a different signature generated by the signature generator, it helps to build trust. There are various parts of a digital signature that includes the name, company, contact email, and social media link button of the sender. If you are sending a document in the email, you can also learn how to insert signature in a Google Doc to make your documents look more authentic.
How To Add A Signature In Gmail And Ensure Professionalism
Having all the basic information in the desired signature also makes it appear like a digital visiting card or a business card. The recipients can also identify a person easily by going through the information provided in the email signature. That being said, let’s look at the process of adding a signature in Gmail.
How To Add Or Change Signature In Gmail
1. Click on Settings.
2. Enable the Signature settings.
3. Enter the signature name and create a Gmail signature.
4. Customize the Gmail signature and save the changes.
Now, let’s have a detailed look into how to add a signature in Gmail with the help of images.
How To Add A Gmail Signature
To begin with, you need to log in to your Gmail account on Google Chrome.
1. Click On Settings
Navigate to the top right corner of the Gmail inbox and click on the gear icon. Then, select See all settings.
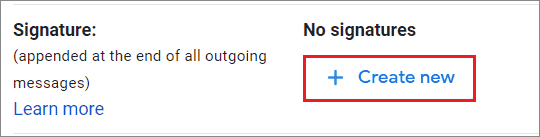
2. Enable The Signature Settings
Once you enter the settings, scroll down and click on Create New in the signature section.
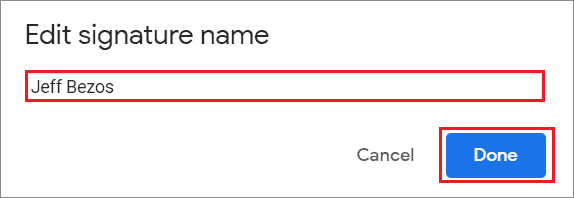
3. Enter The Signature Name
Next, you have to enter your signature name in a pop-up box.
4. Create The Signature
Now, you need to create a custom Gmail signature in the signature editor that appears on the right side. Make a list of all the details that you would like to insert in your signature.
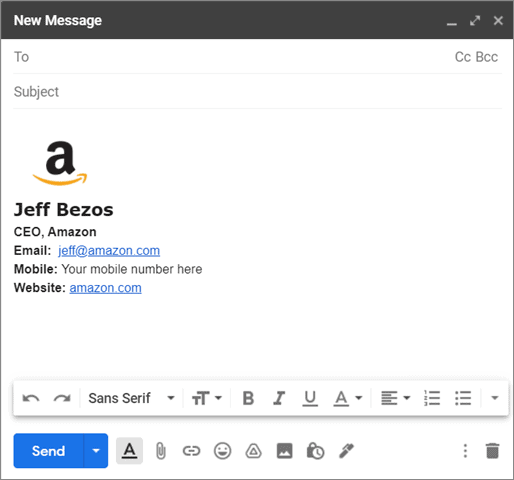
Ideally, your signature field must contain your name, email address, mobile contact number, and website address. You can also add the company logo and a social media icon to make the communication look more professional and authentic.
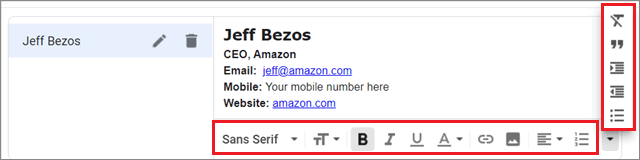
The signature box has various text formatting options such as Bold, Italic, and Underline buttons. It also allows you to select the text font and add a signature image, bullet points, and anchor texts. You can also change the text color by clicking on the ‘A’ button.
5. Customize The Use Of Gmail Signature And Save The Changes
After knowing how to add a signature in Gmail, it’s time to decide when to use them. Navigate to the Signature defaults section just under the signature text box.
The first signature option, i.e., For New Emails Use, allows you to use the signature for every new email that you compose in your Gmail inbox. The second option, On Reply/Forward Use, allows you to decide if you want to use the signature on a replying or forwarding email.
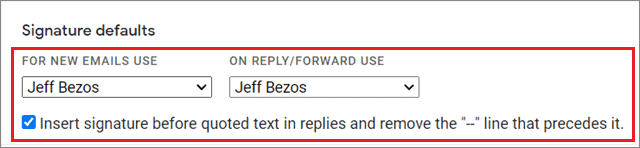
Next, you can check the line below that says ‘Insert signature before quoted text in replies and remove the “–” line that precedes it.’ This line allows you to append the signature to all your replies after removing the small dashes.
Once you are done with all the settings, click on the Save changes button below to apply the settings.

This is how the signature will look in your mail.
How To Add A Signature On Mobile Device
Most of the users use the mail app extensively on their Android or iOS device. Hence, it is essential to know how to add a signature in Gmail on a smartphone.
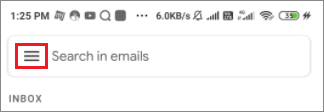
1. Click on the three horizontal lines
First and foremost, open the Gmail app and tap on the three horizontal lines in the top left corner.
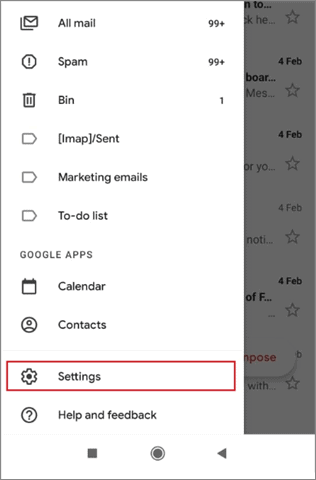
2. Select Settings
Select Settings from the menu bar and choose the email address to which you want to add a Gmail signature.
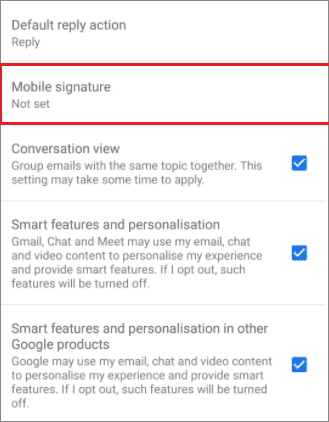
4. Open Mobile Signature
Once you have selected the mail account to work with, tap on the Mobile Signature section.
5. Enter the signature
Just as we did in the desktop method, enter the Gmail signature in the pop-up box and select OK.
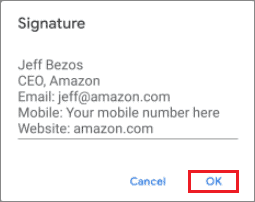
This is how the Gmail signature will look once you have appended it to the email.

Unlike what we saw in the desktop version, the mobile method doesn’t offer any options for customization. Also, you cannot add an image in the signature if you are creating it on a mobile device.
Conclusion
Since emails are predominantly used for communication in the corporate world, users need to make sure they appear professional enough while talking to people. Knowing how to add a signature in Gmail is the first step towards branding the communication to make it look more professional and authentic.
Creating signatures isn’t compulsory, but given the benefits, it offers in terms of building trust in the minds of your recipients, it would be wrong to ignore this facility. The process itself is a cakewalk to know and execute. You can create multiple signatures in your Gmail account and use them as per your preferences. Having a Google mail signature is all about having pros and no cons in business communication.


