The installation and uninstallation of all the software are taken care of by Windows Installer. If the Windows Installer is not working as expected, you won’t be able to install or uninstall any application on your Windows 10 PC.
Many users complain about different errors they experience related to the installer. Some of the error messages are:
- The Windows Installer Service could not be accessed
- Windows Installer Service couldn’t be started
- Could not start the Windows Installer service on Local Computer. Error 5: Access is denied.
- ERROR 1722 There is a problem with this Windows Installer package. A program run as part of the setup did not finish as expected.
If you are experiencing any of the above errors while installing the app on your computer, you need to fix the Windows Installer.
Why Is Windows Installer Not Working?
Many reasons can lead to the Windows Installer error on your computer. It can be because of a corrupted or damaged installer file, Windows Installer service issues, no access right to install an application, and not meeting the application’s minimum requirements. The Windows Installer can also stop working because of temporary glitches on your system.
13 Solutions to Fix Windows Installer Not Working
Although the problem may sound terrifying, it is easy to solve with some working solutions. You can go through the solutions given below and get rid of the Windows Installer error. Post that, you will be able to install and uninstall the app as per your wish.
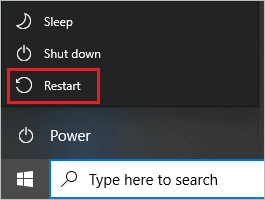
1. Restart your Computer
If Windows Installer failure is just because of a temporary glitch, you can restart your computer to fix it.
Press the Windows logo key from your keyboard and click on the Power button. Click on the Restart option.
Post the restart, try installing or uninstalling the app on the computer.
2. Uninstall Older Version of Software
If you are trying to install a newer version of the software that already exists on your computer, we recommend removing the old one first. The files from the older version of the software can conflict with the new version’s installation process.
You can experience many different issues, along with the Windows Installer not working in such situations. Once the older version of the software is uninstalled, try installing the new version again.
3. Update Windows
The bugs in the operating system can cause much trouble while using the device. However, Microsoft rolls out frequent updates to fix the issues. You can try updating Windows to resolve the issue with the installer.
Press Windows key + I to open the Settings app and go to the Update & Security section. Make sure you are in the Windows Update section.
Click on the Check for updates button.

You can download and install the available updates. To download the updates, you will need a good internet connection.
After the update, check if you got rid of the Windows Installer not working issue or not.
4. Run Program Install and Uninstall troubleshooter
You can run Programs Install and Uninstall troubleshooter to fix the issue with Windows Installer. This troubleshooter is not built-in in Windows 10, and therefore you need to download it from Microsoft’s official website.

Once the troubleshooter is downloaded, install it. You can then run the troubleshooter to help you fix the issue with the installation and uninstallation of apps on your computer.
5. Run DISM and SFC Scan
The corrupt system files can create havoc while using the PC and cause the Windows installer not working issue. You can use SFC (System File Checker) and DISM (Deployment Image Servicing and Management) utilities to scan and fix the corrupted system files. The corrupted registry keys will be fixed with this.
Type cmd in the Start menu’s search box and click on the Run as administrator for Command Prompt.

In the Command Prompt window, type sfc /scannow and press Enter to execute it. The execution may take some time.
Once the sfc command is executed, type the following command and press enter.
dism /online /cleanup-image /restorehealth 
After both the commands are executed, reboot your computer and check if the Windows Installer package error is resolved or not.
6. Check if you have Administrator Access
If you don’t have administrator privileges, some applications cannot be installed or uninstalled from your PC. You can log in using the administrator account and try installing the software again.
In the administrator account, right-click on the software and select Run as administrator from the context menu. So, if the app is not getting installed just because of rights issues, the administrator account will fix it.
7. Re-register Windows Installer Service
You can try registering the Microsoft Installer service again to fix the Windows Installer not working issue. If the fault is in the registries related to Windows Installer, this solution will help you fix that as well.
Open Command Prompt with administrator privileges and execute the below commands one by one in the terminal window.
%windir%\system32\msiexec.exe /unregister%windir%\system32\msiexec.exe /regserver%windir%\syswow64\msiexec.exe /unregister%windir%\syswow64\msiexec.exe /regserverOnce all the commands are executed, close the Command Prompt terminal and reboot your PC.
8. Run Built-in Windows Installer
You can try running a built-in troubleshooter to get rid of issues with Windows Installer. Some issues can be because of app incompatibility with your PC. In such cases, you can run Program Compatibility Troubleshooter.
If you are having problems with Windows Store applications, you can run the troubleshooter related to it. Follow the steps below to run the troubleshooter that is built-in in your Windows PC.
Open the Settings app and go to Update & Security. Click on Troubleshoot in the left frame of the Settings window. Now, scroll down and click on Additional troubleshooters.

In the next window, search for Program Compatibility Troubleshooter and click on it. You can click on the Run the troubleshooter button below it.

You can select the application that is causing the issue in the troubleshooter window. After you finish troubleshooting program compatibility, you can proceed with running the Web Store Apps troubleshooter.
In the list of additional troubleshooters, search for Windows Store Apps and run the troubleshooter for it.

After you run the Windows Store Apps troubleshooter, check if you can download the new app from the Windows Store and uninstall the Microsoft Store apps without any issues.
9. Start Windows Installer Service
You can manually start the Windows Installer service from the Services app. At times, some services need to be started manually to fix the error associated with them.
Press Windows key + R to open Run and type services.msc there. Click OK to open the Services app.
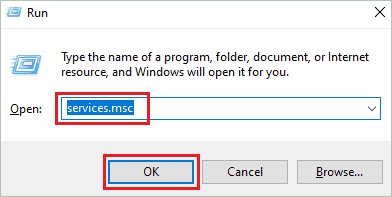
In the Services app, search for Windows Installer and double-click on it to open the Properties window.
Click on the Start button in the Windows Installer Properties dialog box.
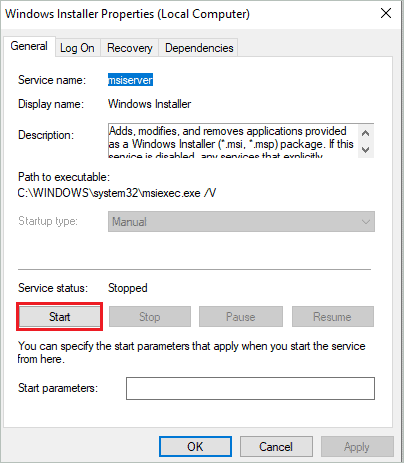
If the service is already running, you can right-click on the service and select Restart from the context menu. This will restart the service and fix the temporary issues related to it.
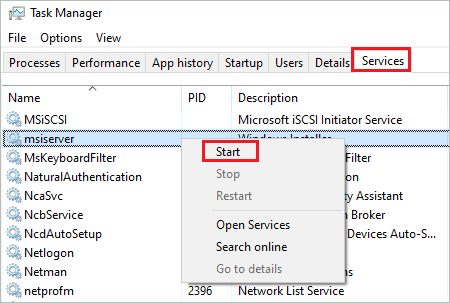
Alternatively, you can use Task Manager as well to start the Windows Installer service.
Press Ctrl + Shift + Esc to open Task Manager and go to the Services tab.
Now, search for msiserver, you can see Windows Installer in the Description column. Right-click on the msiserver and click on Start.
Any of the above ways will start the Microsoft Windows Installer service for you.
10. Delete Duplicate msiexec File
Sometimes, the virus can be present in the form of a msiexec file on your computer. You can get rid of it by deleting the duplicate file from File Explorer.
Open File Explorer by pressing Windows key + E and go to –
C:\Windows\System32Once you reach the System32 folder, go to the View tab and enable File name extensions.
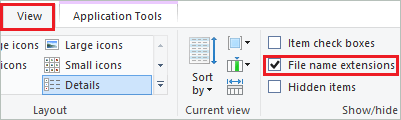
Now, go through the entire folder and search for msiexec file without the .exe extension. If you find any extra msiexec without any extensions, delete it.
11. Use regsvr32 Utility
You can use the regsvr32 utility to register and unregister the msi packages. It is an inbuilt utility that can be used via Command Prompt terminal.
Open Command Prompt with administrator rights and execute the below command.
regsvr32 C:\Windows\System32\msiOnce the command is executed, check if the Windows Installer not working issue is resolved or not.
12. Modify Remote Procedure Call (RPC) Service
Many users fixed Windows Installer not working issues by modifying the RPC service settings. Open the Services app via Run and search for Remote Procedure Call (RPC). Once found, double-click on it to open the Properties dialog box.
In the Properties dialog box, go to the Log On tab and select ‘Local System Account.’ Also, check the checkbox next to ‘Allow service to interact with the desktop.’
Click on Apply and OK. Reboot the PC and check if you can install/uninstall applications
13. Delete Temporary Files
Some temporary files can be responsible for Windows Installer not working error on your computer, as it can mess with the installation file. You can use Disk Cleanup to delete temporary files.
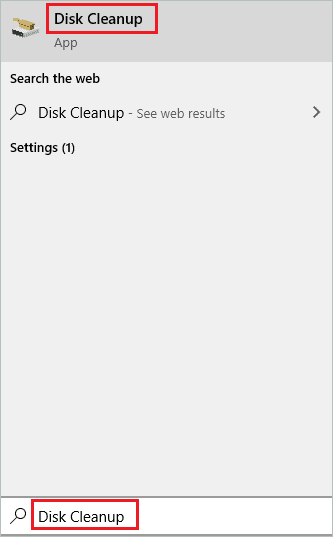
Search for Disk Cleanup in the Start menu and open the same from the search results.
If you have multiple drives, select the drive where Windows OS is stored. In most cases, it is the C drive.
Now, check the checkbox next to Temporary files and click on OK.
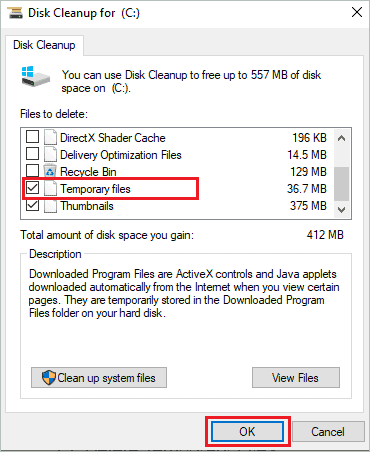
You can clear other junk from your system drive as well using Disk Cleanup.
Conclusion
You cannot install new applications and remove the old ones when Windows Installer is not working as expected. It isn’t easy to work with the same set of applications, as we need new apps and functionalities on our computer to work efficiently.
The issue can be because of usage rights and services; you can fix it conveniently with some workarounds. The solutions listed above will help you fix Windows Installer not working issues in Windows 10. You will be able to install new apps and remove the unnecessary ones after fixing the Windows Installer.


