If and when there is an issue with the system files, windows can malfunction. System files are crucial files and kept safe by Windows, where no one can access it. However, some applications, viruses, driver updates, and even Windows updates can alter or damage them.
In such situations, instead of restoring Windows, you can use SFC utility provided by Windows 10. SFC (System File Checker) is a utility available in Windows Operating System (OS) from Windows 7. It is present in C:\Windows\System32 folder under the name sfc.exe. It is a powerful utility that is run by a tiny command sfc /scannow from the command prompt.
System File Checker is associated with Windows Resource Protection, and hence, it also protects the registry keys and folder, along with crucial system files. Let’s explore the details and understand all about SFC utility, or sfc /scannow command.
What Does sfc /scannow Do?
As the name says, it is a system file checker. In simpler terms, it checks all the system files, including .dll and .sys files. sfc /scannow command scans and finds corrupt or damaged system files. Then, it replaces corrupted system files with a better one from its repair source.
sfc /scannow also gives you a detailed report of the scan in its logs file. So, if you wish to know the details after each scan, you can see the log file. The details of how to access the sfc log file and interpret it is mentioned in the latter section of the article.
How to Execute sfc /scannow?
If you can log in to the system normally, that is, you are not stuck on the blue or black screen, then you can use this method to execute sfc /scannow.
Step 1: Type cmd in the start search menu, right-click on Command Prompt and select Run as administrator.
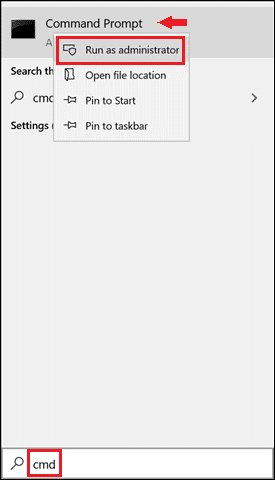
If you don’t run command prompt as an administrator, you will get the error “You must be an administrator running a console session in order to use the sfc utility.”, while executing sfc /scannow
Step 2: Type sfc /scannow in the command prompt and hit Enter.
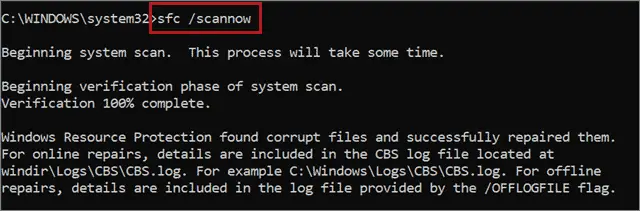
The scanning process will take time. Do not close your command prompt in between the process.
If there are any corrupted files in Windows 10, the message “Windows Resource Protection found corrupt files and successfully repaired them” will come on your screen, as shown in the above image.
If there are no corrupt files on your system, you will get a message “Windows Resource Protection did not find any integrity violations.”
Step 3: If the Windows system file checker repaired your system files, restart your PC.
Once you restart the PC, Windows may start working normally without any errors or issues.
How to Execute sfc /scannow Offline or During Boot Time?
There might be situations or issues when you need to run an sfc scannow outside Windows, which is generally during the boot time. Sometimes, Windows can prevent you from entering the system. It can happen due to the display of blue and black screen in a loop. During such situations, you can use advanced repair mode to run system file checker in Windows 7/8/10.
Step 1: If you cannot log in to the system, press the power button, and wait till the laptop starts. As soon as you see the Start screen, press the power button again to shut it down. Repeat this process until you see Preparing Automatic Repair Screen.
If you wish to run the sfc command offline, then you can log in to your computer as usual and follow the mentioned steps.
Press Windows key + I to open Settings and then click on Update & Security.
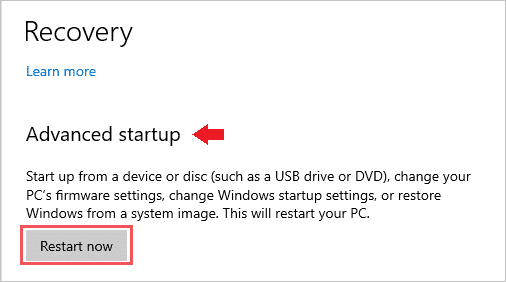
Next, go to Recovery from the left panel and click on Restart now under Advanced startup. Now, this will restart your PC in repair mode.
You can use Windows installation media to boot your computer and navigate to the repair screen and continue the further process, as mentioned below.
Step 2: The Repair screen will appear.
Navigate to Troubleshoot ➞ Advanced options ➞ Command Prompt.
Step 3: Select the Admin account when prompted to do so.
Now, enter the password for the same.
Step 4: To perform the sfc scan during boot time, you need to tell sfc where Windows is installed on your machine.
The drive letter can be different from where you see Windows daily when logged in.
Before the boot process, Windows can be on a different drive. To check this, execute the command – wmic logicaldisk get deviceid, volumename, description
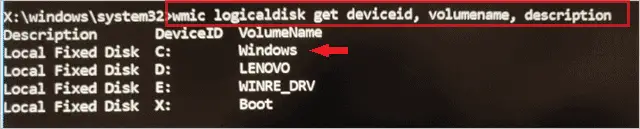
Note down the drive where Windows is present. In our case, it is C. It can be D or any other letter when you execute the command yourself.
Step 5: Execute sfc /scannow /offbootdir=c:\ /offwindir=c:\windows.

Here, instead of letter C, you need to use the drive letter, where Windows is present, as mentioned in step 4.
As mentioned above, as there is no corrupt file, the message after the sfc scan is “Windows Resource Protection did not find any integrity violations.”
How to View SFC Log File?
If you see a message that “Windows Resource Protection found corrupt files and successfully repaired them,” then you can see the log file to get more details.
Whenever you run sfc /scannow to repair any system files or registry keys in Windows 10, it updates about it in the log file.
You can navigate to C:\Windows\Logs\CBS and open the CBS.log file via the text editor application. The path mentioned assumes that Windows is installed on the C drive. If it is installed on D or E drive, you need to change the path accordingly.
How to Read CBS Log File?
CBS log file has many other entries. So, if you are specifically looking for entries related to system file checker in Windows 10/8/7, then you can copy the scan related entries into the new file. A simple command can do this.
You have to execute the below-mentioned command just after you see the repair message on the screen.
findstr /c:"[SR]" %windir%\Logs\CBS\CBS.log >"%userprofile%\Desktop\sfclogs.txt"
After executing this command, you can check a file named SFClogs on your desktop.
When you open the file, you can get to know which crucial system files are repaired.

Solutions to “Windows Resource Protection could not perform the requested operation.”
If, while executing sfc /scannow command, you get a message “Windows Resource Protection could not perform the requested operation,” then you need to work around some solutions.
1. Run chkdsk command.
2. Change the security descriptors using ICACLS command.
3. Run sfc /scannow in safe mode.
1. Run chkdsk Command
If there are any issues or problems in the hard drive of your computer, the sfc utility cannot function well. The chkdsk command can scan your hard drive and also fix the errors for you. You can run chkdsk command from the command prompt.
Open Command Prompt as Administrator and execute the command mentioned below.
chkdsk /r
After executing the command, you will get a message “Chkdsk cannot run because the volume is in use by another process. Would you like to schedule this volume to be checked the next time the system restarts?’”
Press Y to close the command prompt, and restart the PC.
It will start the scanning and repairing process of the hard drive. Once done, check if the sfc /scannow command works.
2. Change The Security Descriptors Using ICACLS Command.
Security descriptors store the security information of the securable Windows object. If you are facing issues while executing the sfc /scannow command, it might be because SFC is not getting access to the winsxs folder.
So, to solve “Windows Resource Protection could not perform the requested operation” error, you need to change the security descriptors.
Open Command Prompt as Administrator, type the below-mentioned command and hit Enter.
ICACLS C:\Windows\winsxs
After the commands finish its execution, you can restart the PC and check if the SFC scan works normally.
3. Run sfc /scannow in safe mode
You can also restart the PC in safe mode and try executing the sfc command. The safe mode starts only with the required drivers and software. So, if any third-party applications are causing trouble in using SFC utility, safe mode can solve it.
If sfc /scannow works in safe mode, you can try uninstalling the recently added software and applications. At times, some third-party software or app can cause trouble while using utilities.
Conclusion
SFC utility can solve many Windows related problems caused by corrupt and damaged system files. The above article also shows how to interpret or read the scan logs.
Even if your Windows has slowed down a bit, you can try executing sfc /scannow command and check if the corrupted system files were the trouble makers. If you are stuck with some critical error, you can run the sfc command without entering the Windows system and try to resolve the problem.
If you want to know more about “how to” repair system files, check this guide to Scan for and Fix Corrupted Files in Windows 10 with PowerShell


