RAM is an essential part of your PC that can affect your computer speed and, in turn, your working speed. With more RAM size, you can handle more running applications on your PC. It is essential to know how to check RAM on Windows 10 for many reasons.
The list of reasons includes hardware replacements, diagnosing issues with PC, or meeting software/application requirements. Windows users should know the Windows version, RAM, and all other details to use the PC efficiently. You can know different ways to check RAM on Windows 10 by going through the guide below. However, before going into the process of how to check RAM on Windows 10, it is essential to understand what RAM is.
What is RAM?
RAM is Random Access Memory used by computers to store files, applications, and folders currently being used or opened. It is also called short-term memory or temporary memory, as it only stores temporary data like launched applications and opened files.
Whenever you shut down or restart your computer, the RAM data is cleared, and all the apps/files you were working on wipes out. You cannot store data on RAM by yourself as you do with hard drives and SSDs. RAM is handled by the system it is placed on.
How to Check RAM on Windows 10? 6 Ways You Must Know
It is pretty easy to learn how to check RAM on Windows 10. You can follow the quick steps mentioned below to do so.
How to check RAM on Windows 10
1. Go to the Settings app and click on System.
2. Navigate to the About page from the System settings.
3. Under Device Specifications, check Installed RAM details.
This will help you know the size of RAM present on your computer.
In most cases, the software requirements only ask for a particular size of RAM. However, if you want more detailed information on how to check RAM on Windows 10, you can check out the details along with images and screenshots.
1. Use the Settings App
If you just want to know what RAM size your computer has, you can simply use the Settings app.
Press Windows key + I to open the Settings app and go to the System section.

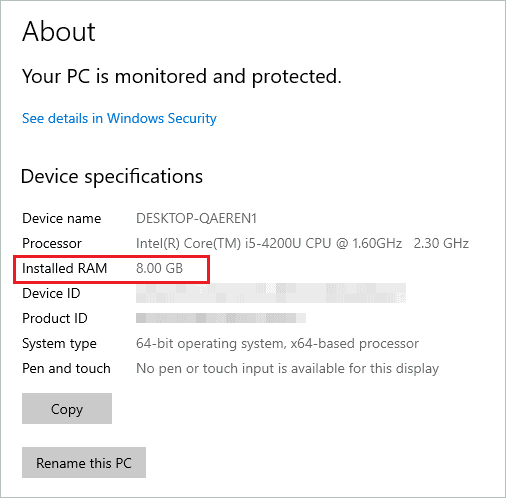
Next, navigate to the About section from the left navigation menu of System settings. You will have RAM size next to Installed RAM under Device specifications.
The RAM size shown here is the total RAM that is available on your computer.

You can use this piece of information to download an application that requires a specific RAM size. This is the easiest way to know how to check RAM on Windows 10.
2. Use Task Manager
If you want detailed information like RAM speed, used slots, size, RAM type, and reserved hardware, you can find it in Windows Task Manager.
Press Ctrl + Shift + Esc together to open Task Manager. In the Task Manager window, go to the Performance tab and then click on Memory to get RAM details.
The DDR3 next to the RAM is RAM type; it can be DDR4 RAM or some different word on your computer.
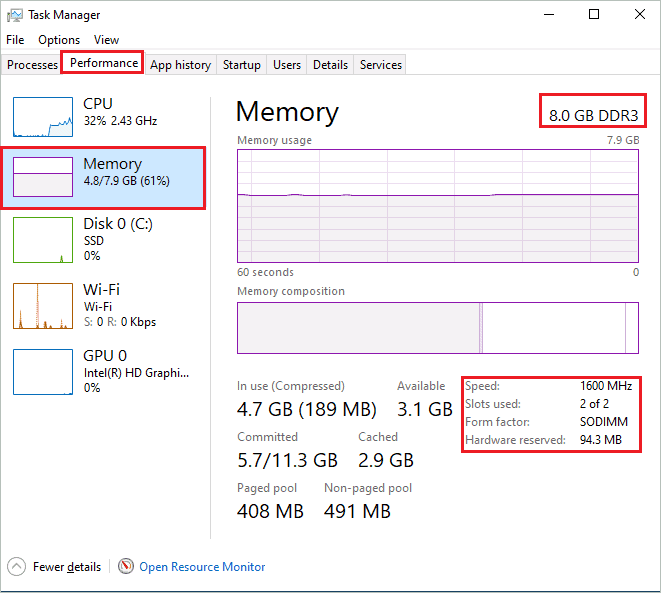
You can also see the RAM usage details like the one in use and available. Note down the details you want.
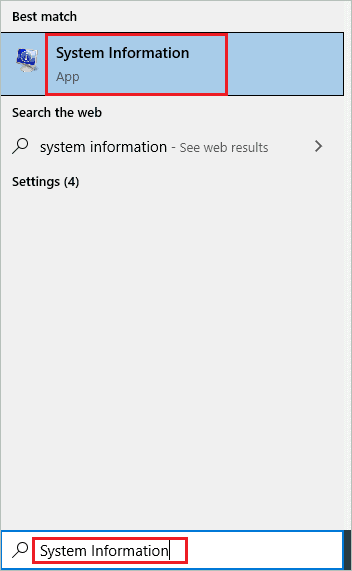
3. Use System Information
Another way to know how to check RAM on Windows 10 is via System Information.
Press Windows key + S and type System Information in the Start menu. Now, double-click on System Information from the search results.
In the System Information, make sure you are in System Summary and search for Installed Physical Memory (RAM).
You can see the RAM size next to Installed Physical Memory (RAM).
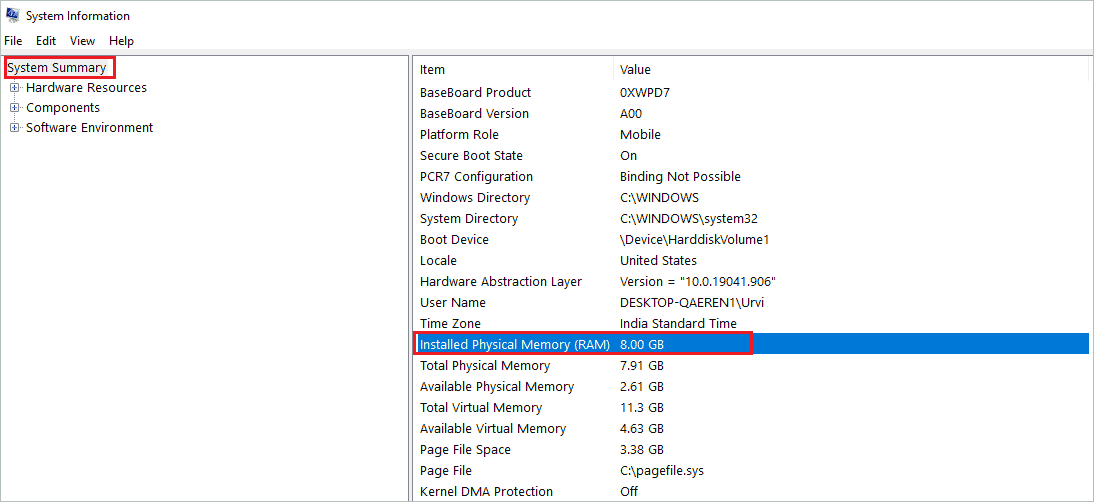
This is one of the simplest ways to check RAM size on your Windows 10 computer or laptop.
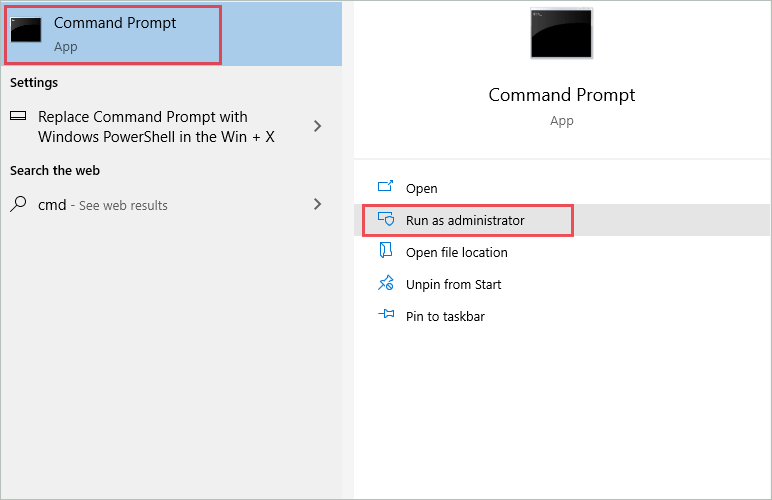
4. Use Command Prompt Terminal
If you are comfortable with terminal windows, you must know how to check RAM on Windows 10 using command line utility.
Type cmd in the Start menu and click on Run as administrator for Command Prompt.
In the terminal window, type the below command and press Enter to execute it.
wmic MemoryChip get /format:list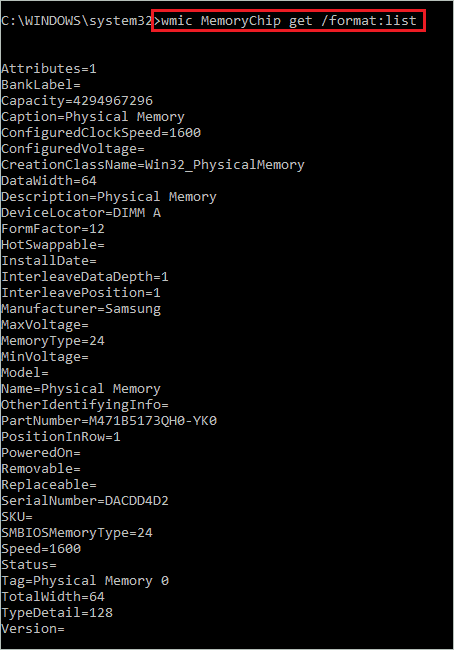
You can search for the information you want from the output. If you have RAM in 2 slots, the details will be divided into two parts as well.
If you are looking for any specific RAM details, you can execute the below command in the terminal.
wmic MemoryChip get Banklabel, Capacity, Configuredclockspeed, Devicelocator, FormFactor, Serialnumber, Speed, ManufacturerYou can add and remove the attributes from the command as per your requirement.
5. Use Control Panel
You can open the About page using the Control Panel as well. The About page is the page that is available in System settings in Windows 10. If you are more comfortable with the Control Panel, we recommend using this to know how to check RAM on Windows 10.
Search for the Control Panel in the Start menu and open the same from the search results.
In the Control Panel window, search for RAM in the search bar and click on ’Show how much RAM is on this computer.’

You will see the About page opened in the Settings app on your computer.
You can check the RAM size on this page.
6. Use PowerShell
The last option to know how to check RAM on Windows 10 computers is to use PowerShell.
Press Windows key + X and click on Windows PowerShell (Admin) to open it. In the PowerShell window, run the below-given command.
Get-CimInstance -ClassName Win32_PhysicalMemory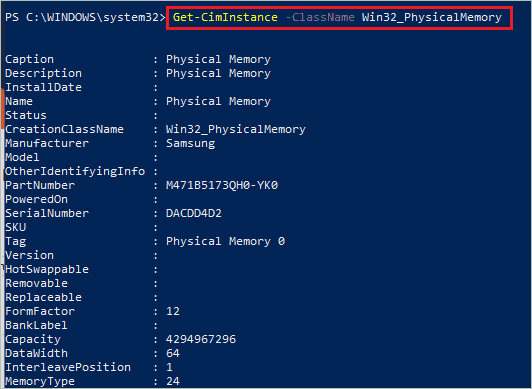
You find all the details of RAM in the command output.
To get only specific attributes on the PowerShell command, execute the below command.
Get-CimInstance -ClassName Win32_PhysicalMemory | Format-Table Capacity, Manufacturer, FormFactor, Banklabel, Configuredclockspeed, Speed, Devicelocator, Serialnumber -AutoSize 
You can use either of the commands to check RAM details on the PowerShell terminal.
Conclusion
Checking the RAM to know the size is the first thing we do while installing a heavy application on your Windows PC. However, we need to know other details like RAM speed, manufacturer name, slots used, RAM type, and form factor while replacing hardware components or troubleshooting the computer’s memory issues. You now know how to check RAM on Windows 10. The different ways mentioned above give additional information about the RAM; you can go through it all and use the one that gives you the required RAM details.


