Microsoft Teams allows you to communicate with your teammates smoothly over audio/video and text messages. However, if you are not using Microsoft Teams for communication and just taking over space on your computer, you must uninstall it. You can uninstall Microsoft Teams permanently from your Windows 10 computer.
Just as you uninstall Skype for Business when no longer required, you can remove MS Teams as well. Many Windows users complain about MS Teams getting reinstalled every time they uninstall it. Well, it can be annoying to uninstall it every time you start your PC. However, this issue can be fixed, and you can get rid of Microsoft Teams by uninstalling it correctly.
How to Uninstall Microsoft Teams
If MS Teams is getting reinstalled every time you uninstall it, there are chances that Teams Machine-Wide Installer is installing it again and again on your machine.
So, if you want to uninstall Microsoft Teams permanently, you need to remove Teams Machine-Wide Installer. You can go through the below ways to uninstall MS Teams in Windows 10 and eliminate the Teams icon from the taskbar.
1. Use the Windows Settings App
You can use the Settings app to uninstall Microsoft Teams. Follow the instructions given below to get rid of Teams.
Press Windows key + I to open the Windows Settings app and go to Apps.
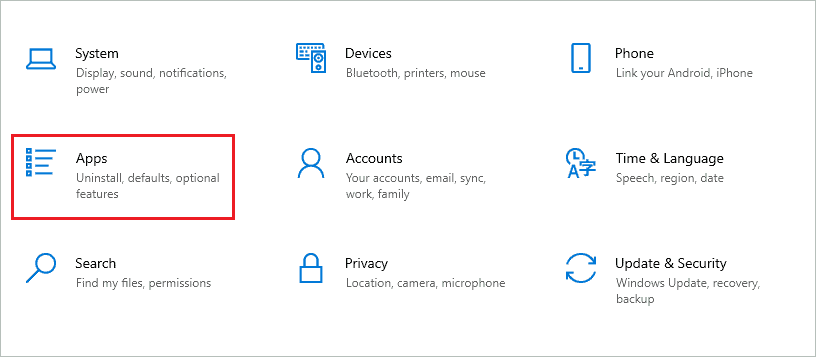
Make sure you are in the Apps & features section. Now, search for Teams in the search box and select Microsoft Teams.
Click Uninstall button below Microsoft Teams.
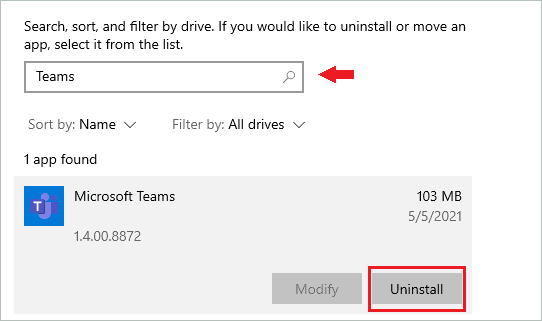
If you have Teams Machine Wide Installer, search and uninstall that as well. After uninstalling both the software, reboot your computer. You will no longer see Microsoft Teams on startup.
2. Use Control Panel
You can also use the Control Panel to uninstall MS Teams and Teams Machine-Wide Installer.
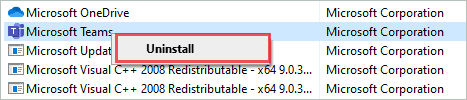
Click on the Start button and search for the Control Panel in the Start menu. Next, double-click on the Control Panel from the search results to open it.

Change the View by option to Category and click on Uninstall a program under Programs.

Search for Microsoft Teams and right-click on it. Select Uninstall to remove it from your device.
Similarly, you can uninstall Teams Machine-Wide Installer from the Control Panel.
3. Use PowerShell Script
If you love working on the PowerShell script, you can try uninstalling Microsoft Teams in Windows 10 using a script on the command line. You can either make your script or use the script created by folks over at LazyAdmin.
The below-given script can help you remove MS Teams for the current user on your Windows PC. However, this script can only work if you have the Teams Machine-Wide Installer file on your computer. If only Microsoft Team needs to be uninstalled, you can use the Control Panel or Settings app.
To run the script, press Windows key + X and click on PowerShell (Admin) to open PowerShell with administrator rights. In the terminal window, copy-paste the below script and press Enter to run it.
function unInstallTeams($path) {

  $clientInstaller = "$($path)\Update.exe"

   try {
        $process = Start-Process -FilePath "$clientInstaller" -ArgumentList "--uninstall /s" -PassThru -Wait -ErrorAction STOP

        if ($process.ExitCode -ne 0)
    {
      Write-Error "UnInstallation failed with exit code  $($process.ExitCode)."
        }
    }
    catch {
        Write-Error $_.Exception.Message
    }

}

# Remove Teams Machine-Wide Installer
Write-Host "Removing Teams Machine-wide Installer" -ForegroundColor Yellow

$MachineWide = Get-WmiObject -Class Win32_Product | Where-Object{$_.Name -eq "Teams Machine-Wide Installer"}
$MachineWide.Uninstall()

# Remove Teams for Current Users
$localAppData = "$($env:LOCALAPPDATA)\Microsoft\Teams"
$programData = "$($env:ProgramData)\$($env:USERNAME)\Microsoft\Teams"


If (Test-Path "$($localAppData)\Current\Teams.exe")
{
  unInstallTeams($localAppData)

}
elseif (Test-Path "$($programData)\Current\Teams.exe") {
  unInstallTeams($programData)
}
else {
  Write-Warning  "Teams installation not found"
}
If you want to remove the MS Teams for all the users on your computer, you can replace the section below # Remove Teams for Current Users with the below code.
# Get all Users
$Users = Get-ChildItem -Path "$($ENV:SystemDrive)\Users"

# Process all the Users
$Users | ForEach-Object {
        Write-Host "Process user: $($_.Name)" -ForegroundColor Yellow

        #Locate installation folder
        $localAppData = "$($ENV:SystemDrive)\Users\$($_.Name)\AppData\Local\Microsoft\Teams"
        $programData = "$($env:ProgramData)\$($_.Name)\Microsoft\Teams"

        If (Test-Path "$($localAppData)\Current\Teams.exe")
        {
          unInstallTeams($localAppData)

        }
        elseif (Test-Path "$($programData)\Current\Teams.exe") {
          unInstallTeams($programData)
        }
        else {
          Write-Warning  "Teams installation not found for user $($_.Name)"
        }
}
The above script will also remove Teams Machine-Wide Installer from your computer, so you don’t need to worry about that part of the uninstallation process. You can close the PowerShell window after running the script and check if it helped you get rid of MS Teams.
How to Clear Junk Related to Microsoft Teams
If you want to clear user settings, profile, and cache files after you uninstall Microsoft teams, you can do so by following the steps given below. You need to delete the Microsoft Teams folder to get rid of the junk.
Step 1: Press Windows key + E to open File Explorer.
Step 2: Navigate to the user’s AppData folder and delete all the files and folders one by one at the below-mentioned paths.
C:\Users\Username\AppData\Local\Microsoft\TeamsC:\Users\Username\AppData\Roaming\Microsoft\TeamsC:\Users\Username\AppData\Roaming\TeamsOnce done, reboot your computer. You will no longer see Teams on your PC after the restart.
Use Registry Editor to Prevent MS Team Installation
If you would like to prevent Microsoft Teams from repeatedly installing on your computer or all computers in one workgroup, you can set a registry value.
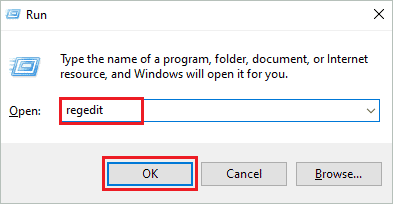
Press Windows key + R to open Run and type regedit. Press Enter to open the Registry Editor.
In the Registry Editor, navigate to the –
HKEY_LOCAL_MACHINE\SOFTWARE\Policies\Microsoft\Office\16.0\common\officeupdateRight-click on the empty space in the officeupdate folder and create a new DWORD. Name the DWORD as preventteamsinstall.
Now, double-click on the preventteamsinstall and set the Value data as 1 to avoid installing the Microsoft Teams app. Click OK to save the change.
Once the changes in the Registry Editor are done, reboot your computer.
Final Thoughts On How To Uninstall Microsoft Teams
Microsoft Teams can be helpful to some people. However, many Windows users don’t use Microsoft Teams and don’t want it on their computer. It can be annoying when you want to get rid of Teams, but it keeps reinstalling itself even after uninstalling it. Well, if the right application is removed with Microsoft Team, it won’t get installed again.
You, now, know how to uninstall Microsoft Teams permanently from your Windows 10 computer. You can use the Settings app, Control Panel, or PowerShell script to get rid of MS Teams. If you want more space on your system drive, you can also clear the junk related to Teams after uninstalling it.
If you wish to install Teams again, you can download it from the official Microsoft site.


