Google Assistant can help you with many things like setting the alarm, sending texts, calling someone, and operating your home appliances. It is one of the popular and intelligent voice assistants that can be used on Android smartphones, tablets, and other smart devices. However, there is still no official app to set up Google Assistant for PC.
Although the process is not as easy as setting Google Drive in File Explorer, you can go the unofficial way and set up Google Assistant for Windows 10 computer. You will need a Google Assistant Unofficial Desktop Client developed by Melvin Abraham.
The application is open-source and is available on GitHub for free download. You can go through the steps discussed below guide to set up Google Assistant for Windows 10.
How To Set Up Google Assistant for PC
Setting up Google Assistant for Windows 10 PC is lengthy and needs a bit of technical expertise. You need to set up Google Assistant API with Google Cloud and then work with the Google Assistant Unofficial Desktop Client to set it up correctly.
Although the process may seem a bit lengthy, you can set up Google Assistant on a Windows 10 computer in 15-20 minutes if done correctly. You can follow the detailed steps given below to set up Google Assistant for Windows PC.
Step 1: Open Google Actions Console and click on the New Project button there. If you are not logged in to your Gmail account, do it before opening the console.

Step 2: When the Terms of Service window opens, select Yes and click on Agree and continue.

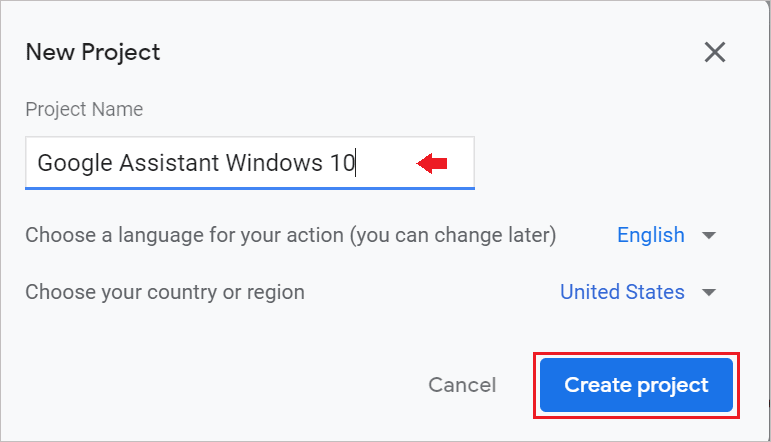
Step 3: Give the name to your project; it can be anything. We have named the project Google Assistant Windows 10. Click on the Create project button.
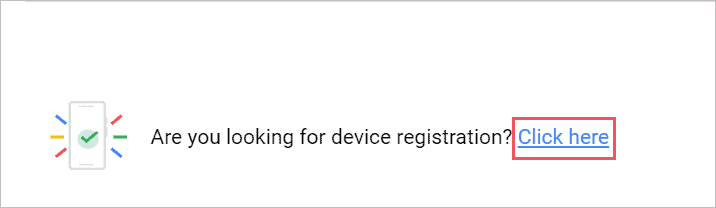
Step 4: Scroll down to the end of the page and click on the Click here link next to ‘Are you looking for device registration?’
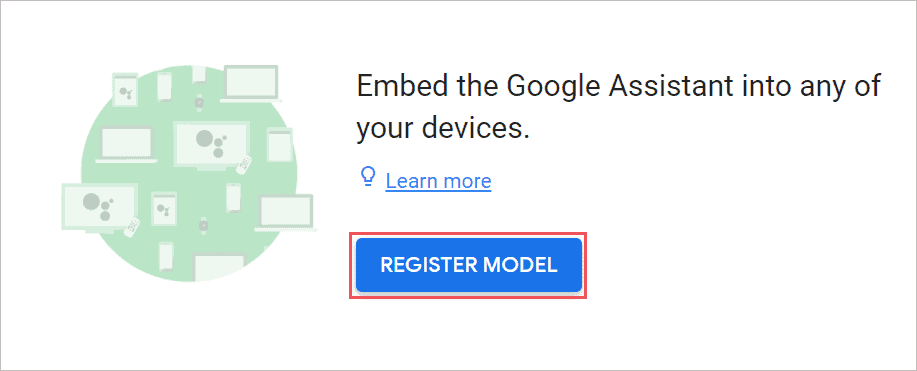
Step 5: Click on REGISTER MODEL
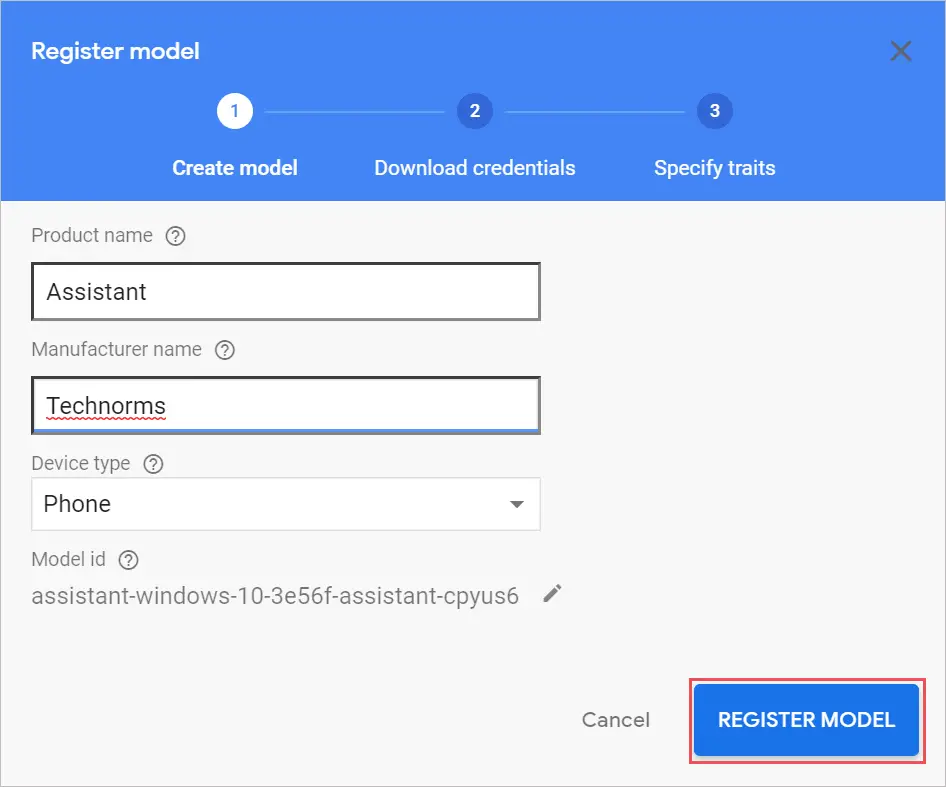
Step 6: Add the product name, manufacturer name, and select the Device type of your choice. The details can be anything. Click on REGISTER MODEL.
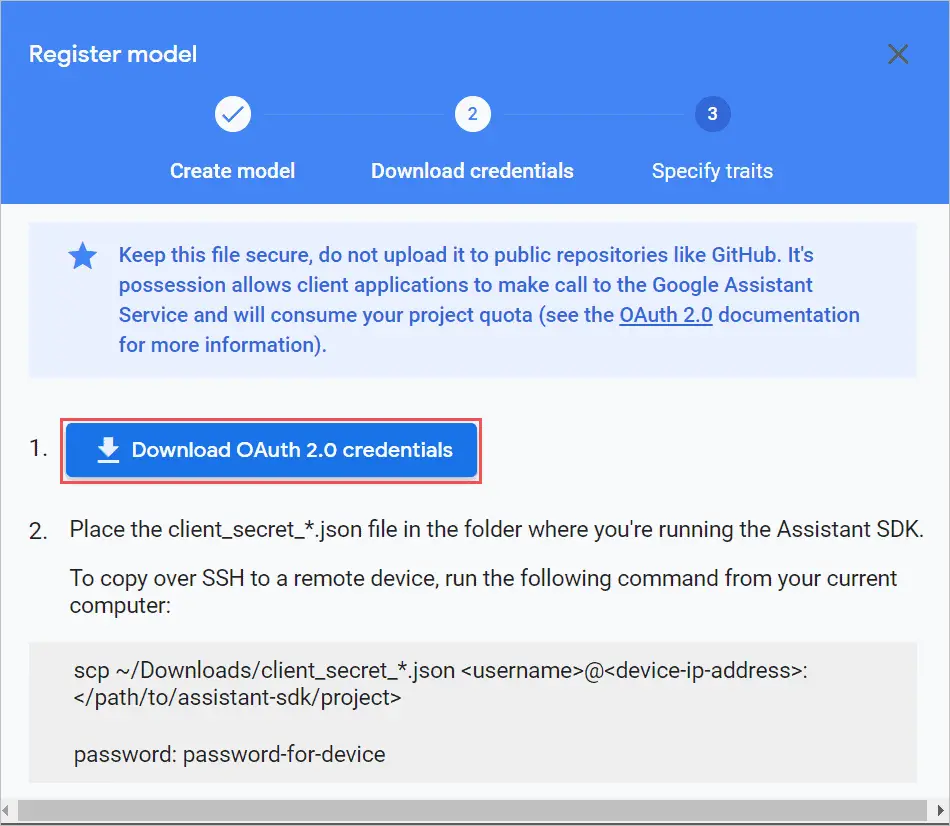
Step 7: Click on the Download OAuth 2.0 credentials to download the JSON file required for Google Assistant setup on Windows.
Step 8: Click on Next and then click on Skip.
Step 9: Now, open Google Cloud Platform on another tab and make sure it is the same browser; otherwise, you need to log in again into your Google account. Click on the Select a Project option.

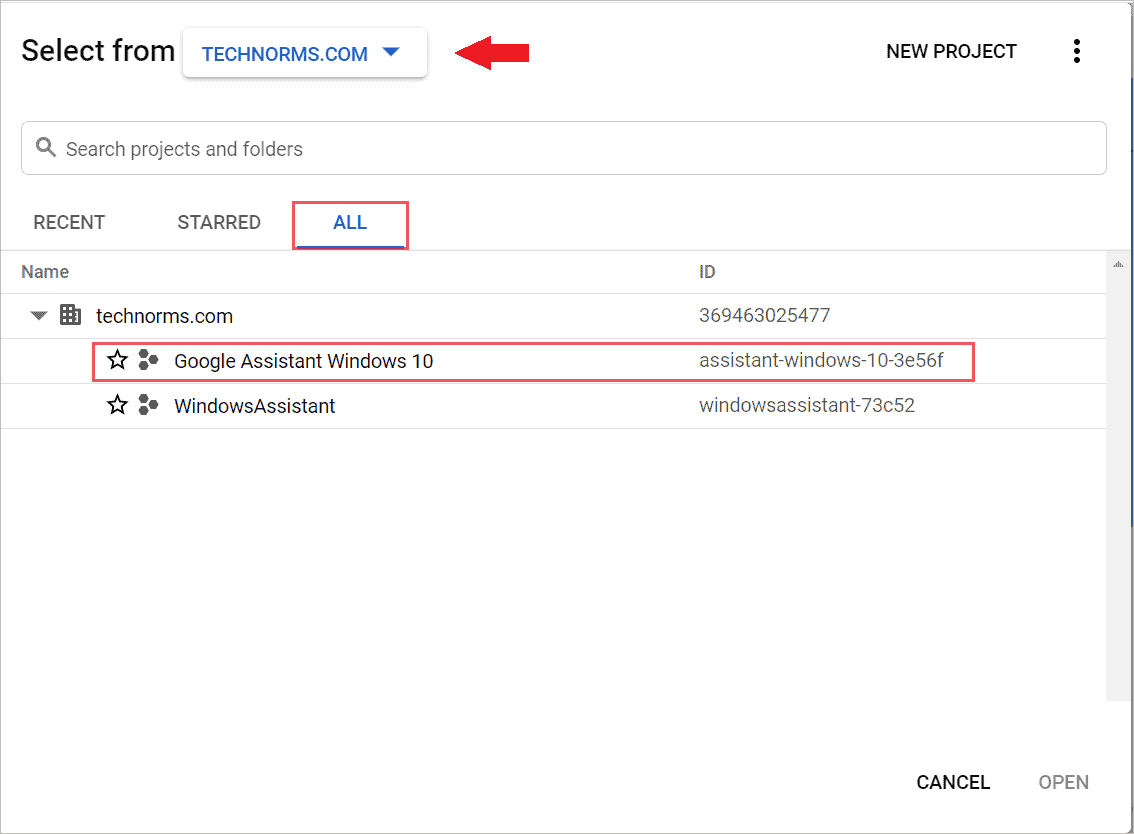
Step 10: Select the Project you recently created under the ALL tab. If projects are not visible, select the organization from the above drop-down menu.
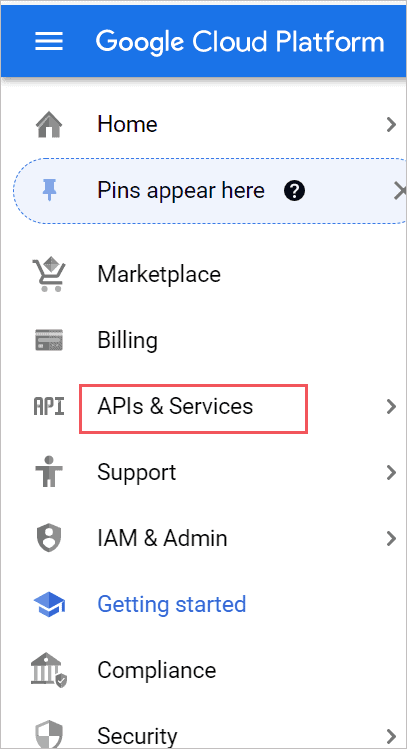
Step 11: Click on API & Services from the left frame of the browser window.
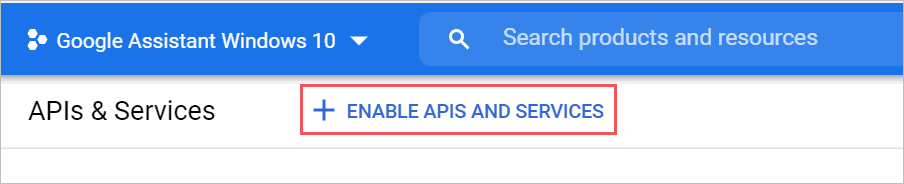
Step 12: Click on ENABLE APIS AND SERVICES.
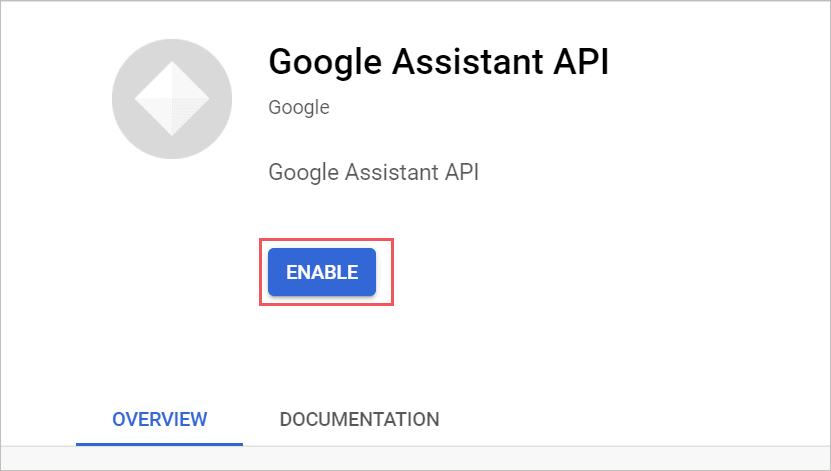
Step 13: Now, type Google Assistant in the search bar on your screen and click on Google Assistant API from the search result.

Step 14: On the next window, click on Enable.
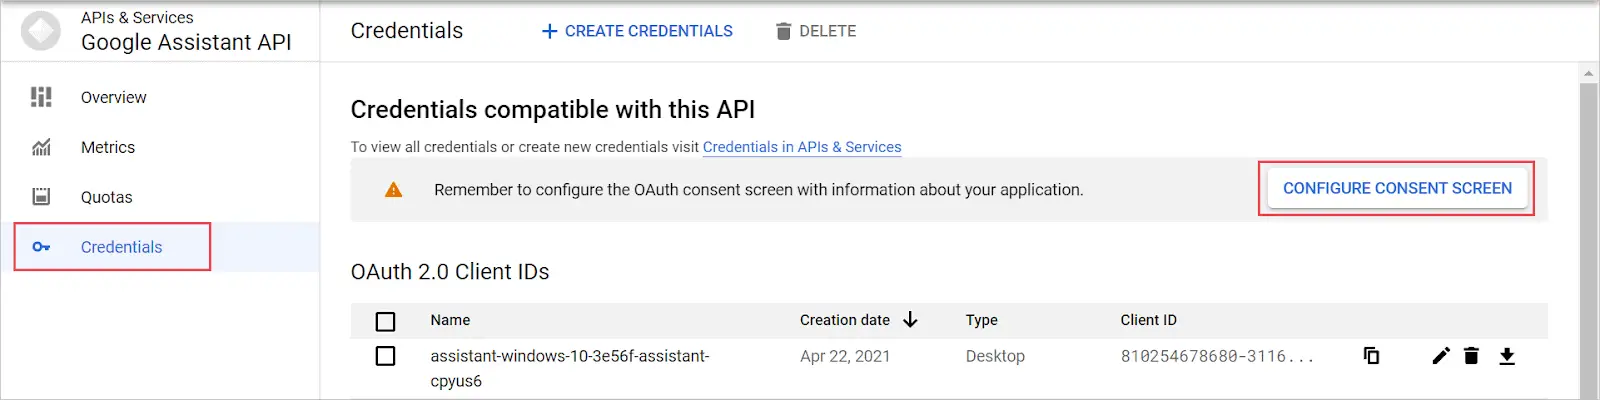
Step 15: When the new page is loaded, click on Credentials from the left menu and then click on CONFIGURE CONSENT SCREEN.
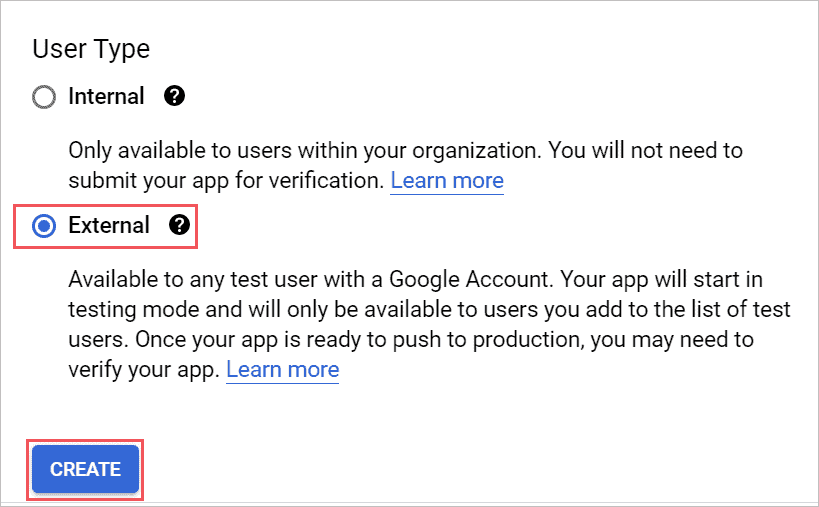
Step 16: Next, select the User Type as External and then click on the Create button.
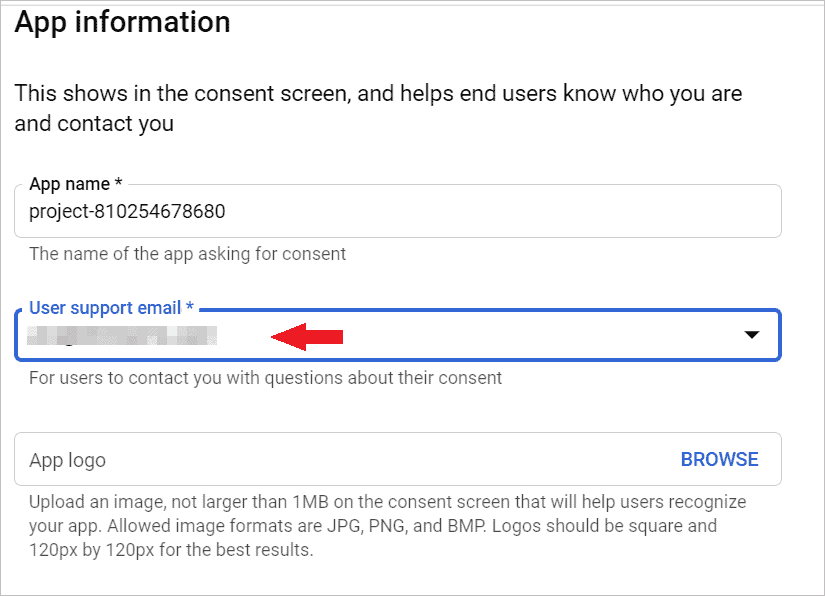
Step 17: Click on the drop-down menu under User Support Email and select your email address.
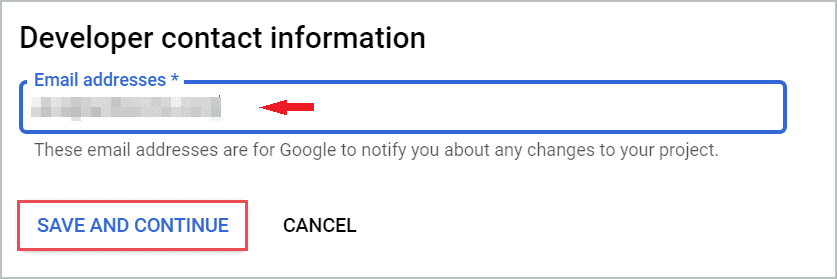
Step 18: Scroll down to the bottom of the page and enter your email address in the Developer Contact Information field. Click on SAVE AND CONTINUE.
Step 19: Now, on the following two pages, scroll down to the bottom and click on SAVE AND CONTINUE.
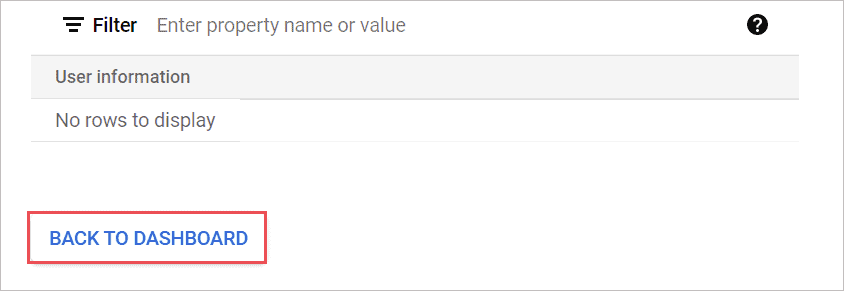
Step 20: On the third page, click on BACK TO DASHBOARD.
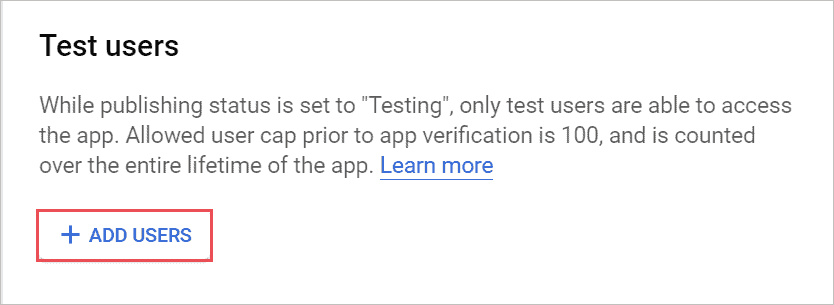
Step 21: Scroll down to Test users and click on ADD USERS.
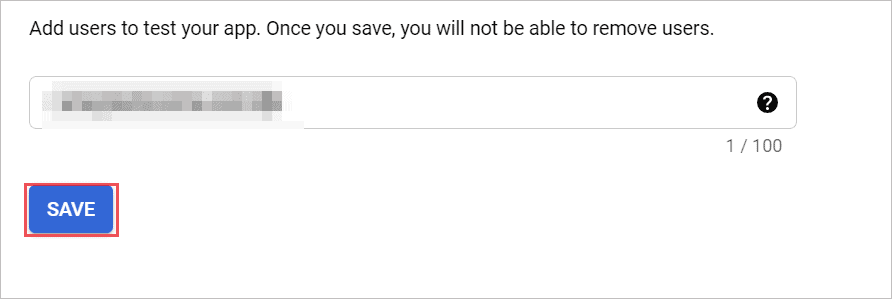
Step 22: Enter your email address and click on SAVE.
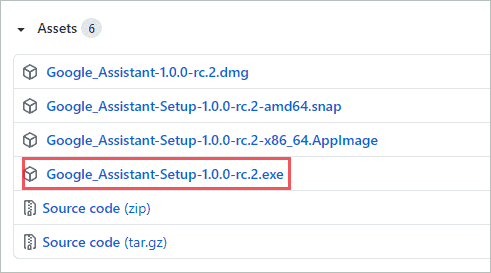
Step 23: Now, go to the GitHub page of Google Assistant Unofficial Desktop Client and download Google_Assistant-Setup-1.0.0-rc.2.exe by clicking on it.
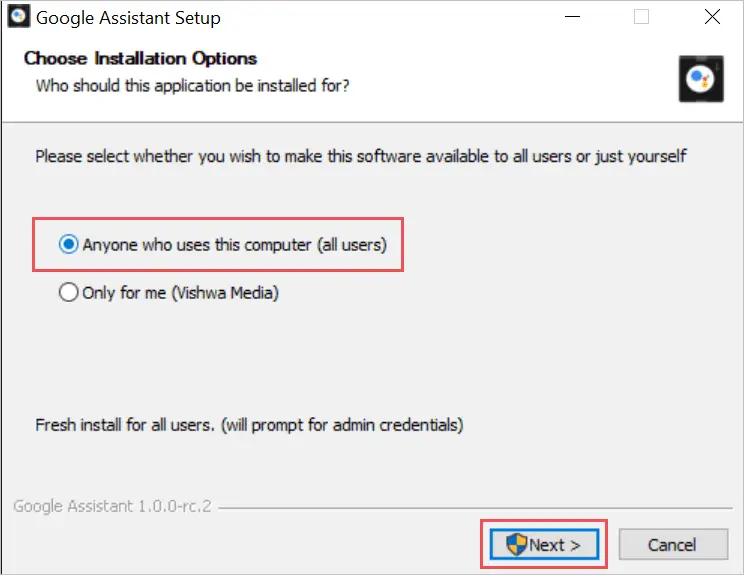
Step 24: After downloading the exe file, launch it. Select Anyone who uses this computer (all users) and click on Next.
Step 25: Click on Install and then Finish on the next window to successfully install the Google Assistant app on your desktop.

Step 26: If the Google Assistant is not launched on its own, press Windows key + Shift + A to launch it.
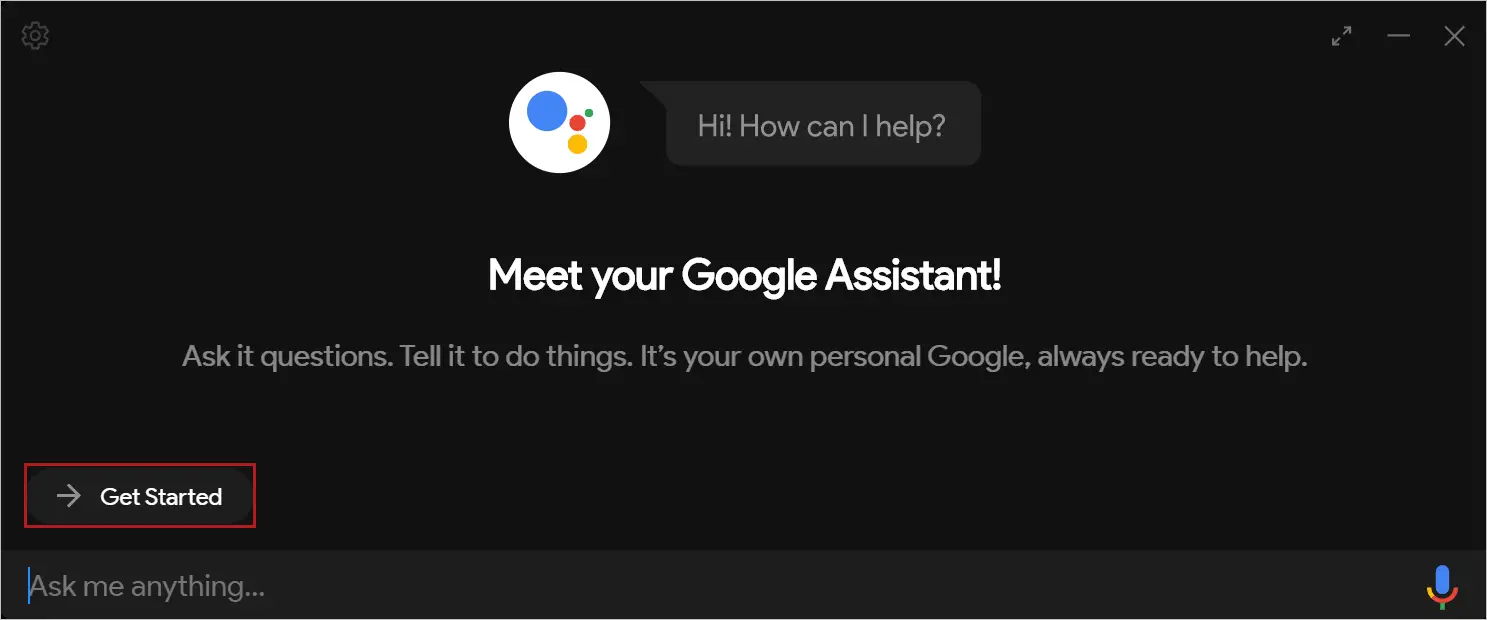
Step 27: Click on Get Started.
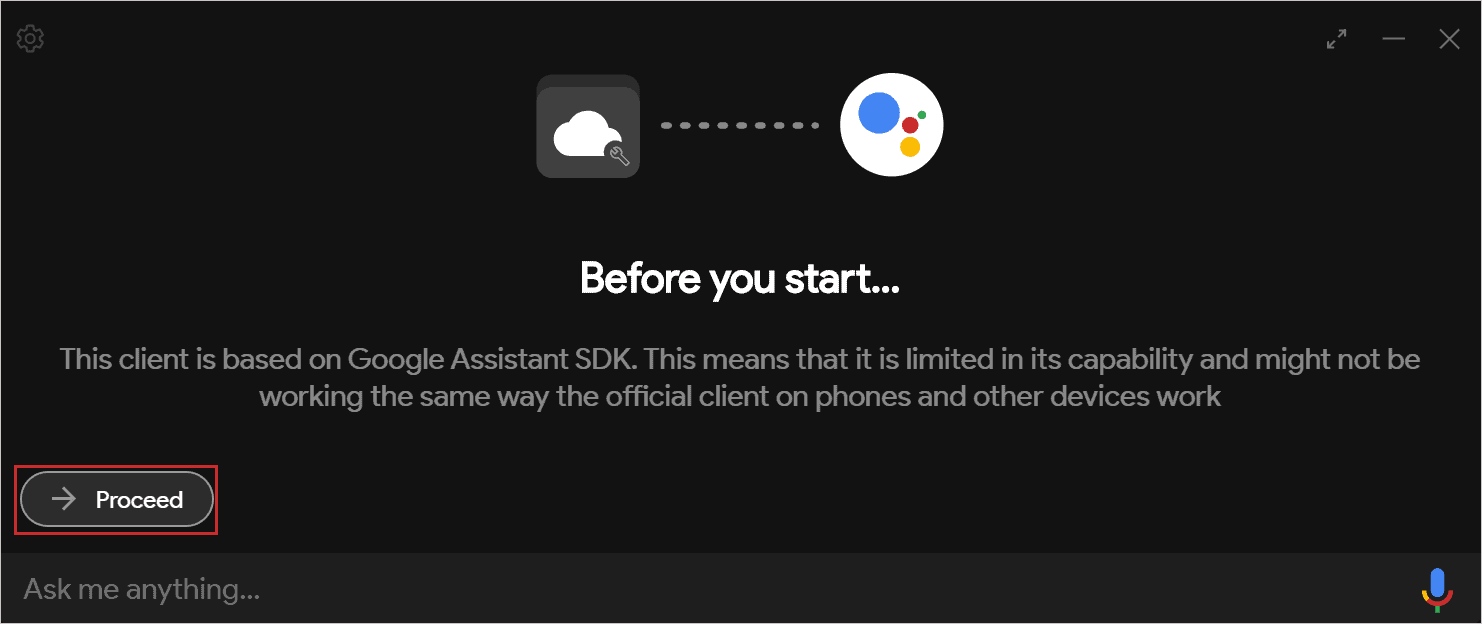
Step 28: Click on Proceed.
Step 29: Click on the Settings icon in the top-left corner of the Google Assistant app.
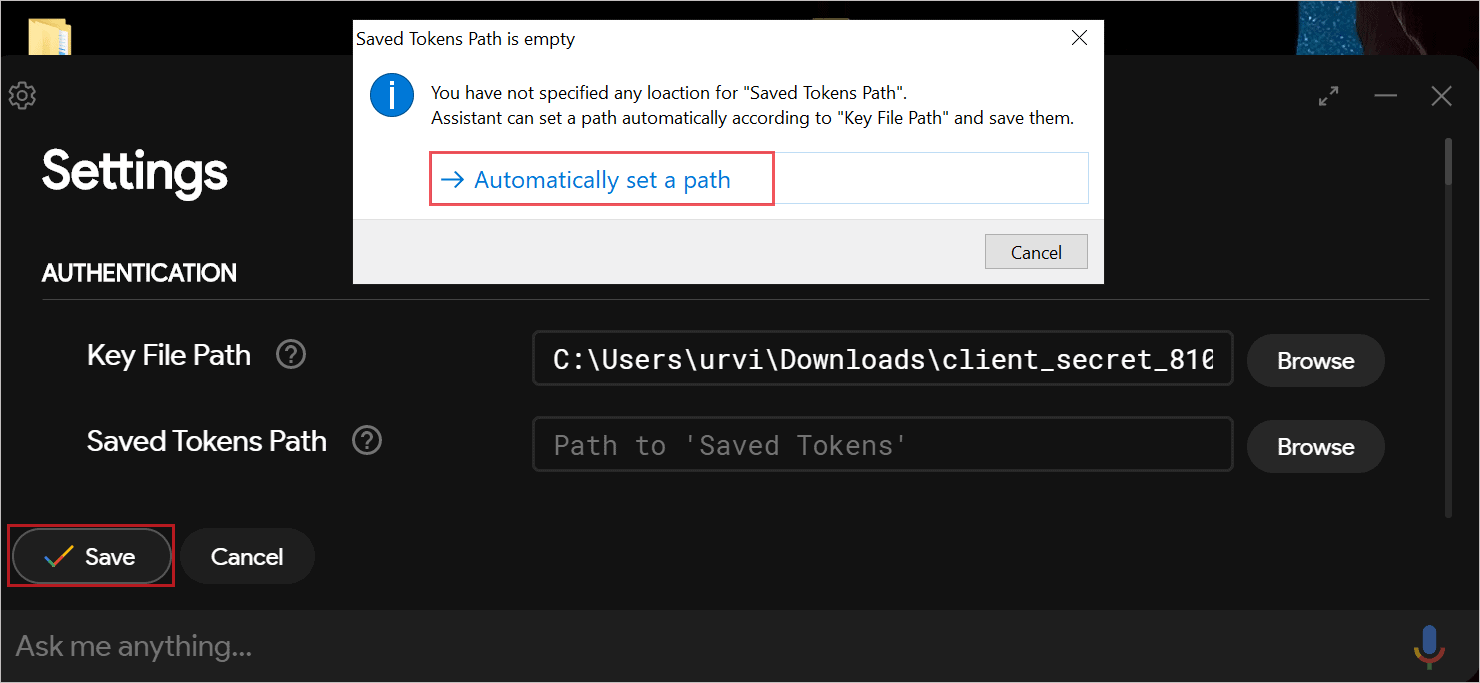
Step 30: In the Key File Path, you need to enter the location of the JSON file downloaded in Step 7. You can click on Browse and select the location.
Step 31: Click on Save and when there is a pop-up window, select Automatically set a path.
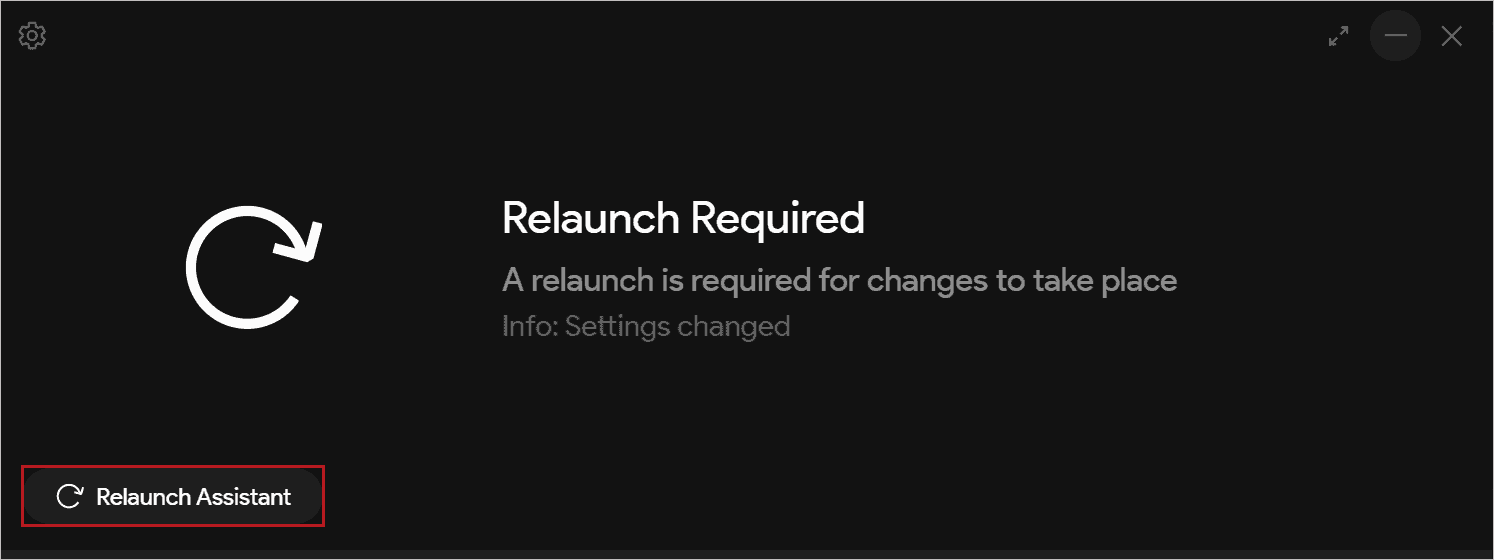
Step 32: You need to relaunch the assistant app after the changes are made; click on Relaunch Assistant.
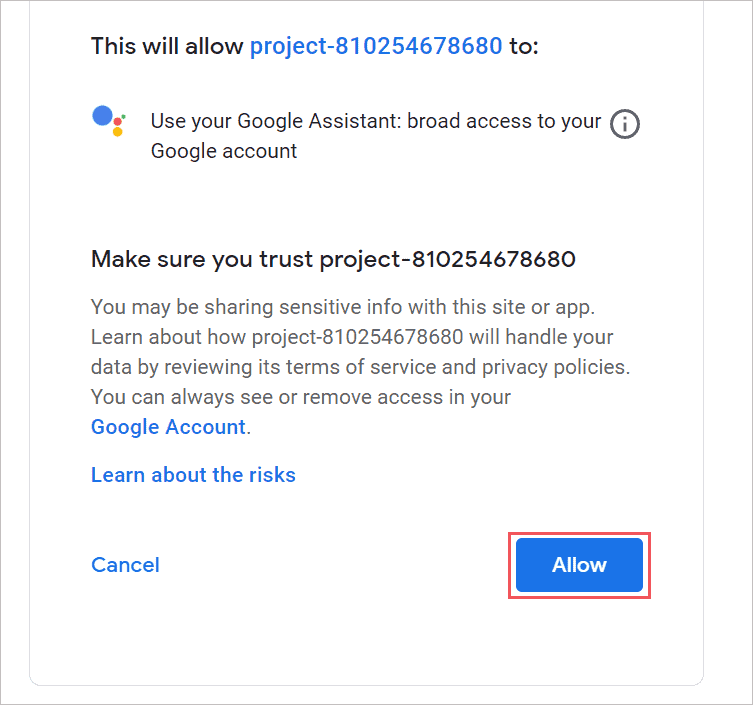
Step 33: After some time, a new tab will open on the default browser. If you are not logged in using the email id used to set up the assistant, you need to log in to get the code.
However, if you are already logged in, simply click on Allow.
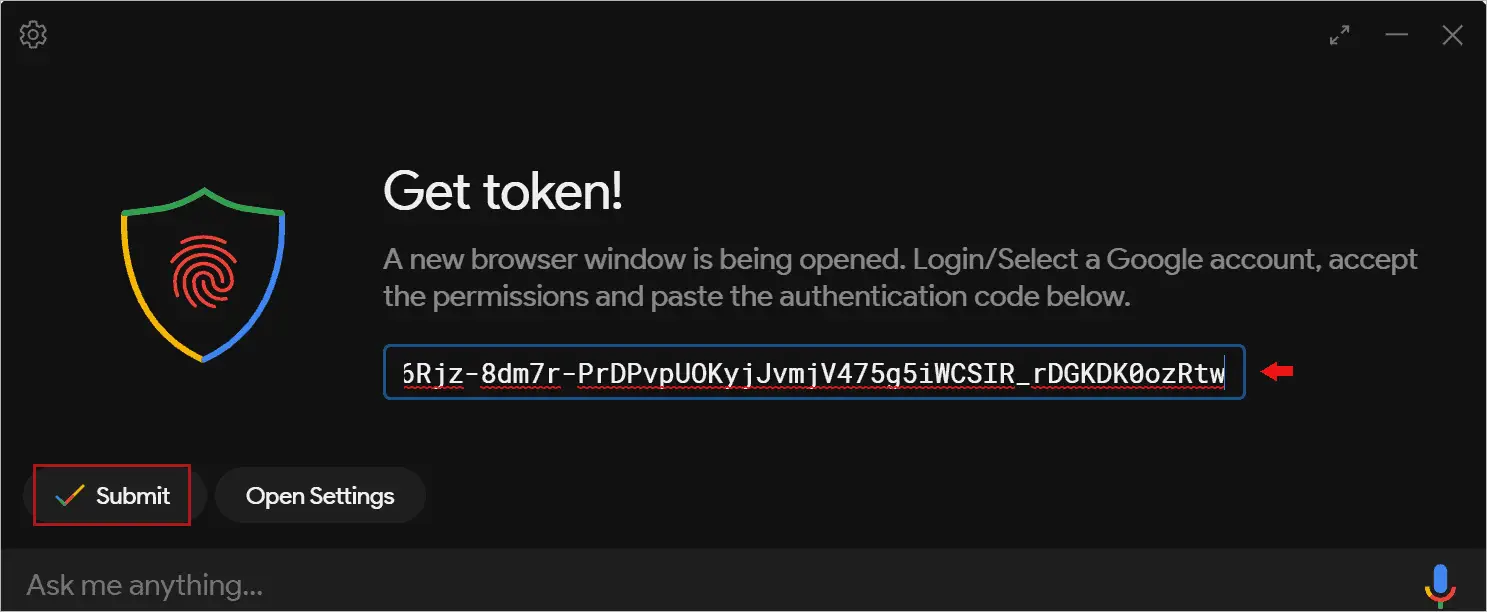
Step 34: Now, copy the code/key token that appears on your screen.
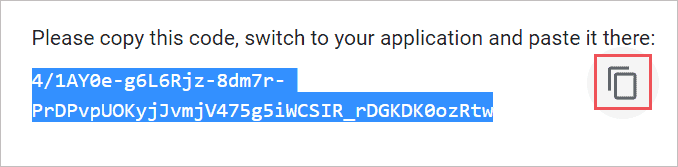
Step 35: Paste the authentication code in the Google Assistant app and click on Submit.
Step 36: Click on Relaunch Assistant to finally see Google Assistant for PC.
You can now use Google Assistant on your Windows 10. Although the feature might be limited, you will get the feel of Google Assistant.

You can click on the microphone icon to give the command to the assistant or type your query in the text box. The overall process is very long, but if the above steps are followed as it is, you can set up Google Assistant very conveniently on your computer.
Pros and Cons of Setting up Google Assistant on Windows 10
There are some pros and cons related to setting up Google Assistant on Windows 10 using an unofficial app. Our team of experts has jotted down some crucial pros and cons so that you can make a better decision.
Pros of Google Assistant for PC
- You can give commands to Google Assistant on Windows 10
- Customization option that is not even available on the original Google Assistant
- It does not require any heavy running applications on your desktop
Cons of Google Assistant for PC
- Cannot perform all the tasks that Google Assistant can perform on Android devices
- The app can be discontinued anytime.
- It does not respond to OK Google; you need to use the keyboard shortcut to open the app on Windows PC.
Even though there is limited functionality in the desktop version of Google Assistant, the setup process is worth giving a try. You can learn something new in the process and use Google Assistant on your Windows computer.
The cons can be overcome in the future because they are just technical limitations. Well, there are chances of Google putting a halt on the unofficial desktop app, but still, you can make most of it till it is available.
Conclusion
Setting up Google Assistant for PC can be stressful for some users, but it is a straightforward process that can be carried out by following the steps correctly. The above guide can help you to set up Google Assistant for your Windows computer.
We recommend giving the Google Assistant Unofficial Desktop Client a try before something easy and official comes out. It is fun to work to set up Google Assistant for PC on your own and enjoy giving different commands. The Google Assistant on your computer may not be as helpful as the one on your Android phone, but it can do basic tasks for you easily.


