Back when Google introduced Gmail, many users created multiple Gmail accounts for various reasons. However, if you have five or six email accounts, it’s a monotonous task checking all of them every day. Instead, what if you knew how to merge Gmail accounts to create a centralized process for reading and sending emails?
A centralized process means you can have a unified inbox that collects emails from all Gmail accounts and allows you to perform email-related activities in one place. Having this process in place helps users save time that they can utilize for other activities. Knowing how to create new folders in Gmail will help you sort your emails properly in one inbox.
How To Merge Gmail Accounts And Save Precious Time
If you have merged two or more accounts into one Gmail Google account, you also won’t need to go through the hassle of remembering many passwords. Let’s see how we can create a centralized email process using a different account to handle multiple emails.
How To Merge Gmail Accounts
1. Open Gmail and click on account settings.
2. Open forwarding settings.
3. Enter the email address to merge.
4. Click on the confirmation link and confirm the settings.
Note: There were the basic steps of merging Gmail accounts. Let’s look at each step in detail with images. It is also essential to know that you cannot perform this process on the Gmail app; you strictly need a PC for this purpose.
1. How To Merge Two Gmail Accounts
To merge two accounts in Gmail, users need to set up email forwards first. So let’s see how we can do it easily.
Open your second account, i.e., your old account.
Click on the Gear icon in the top right corner and select See all settings.
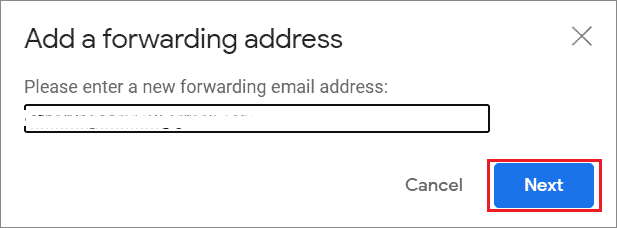
Click on the Forwarding and POP/IMAP tab. Then, click on the Add a forwarding address button.

Enter the email address that will receive your forwarded email, i.e., your main account. Click Next to continue. This could be a new account or one that is already in use.
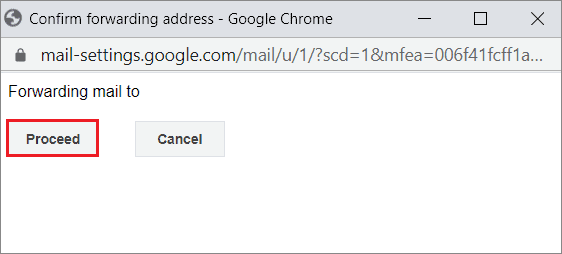
A popup will appear on your screen asking for your confirmation after entering the email address. Click on Proceed to confirm the email.
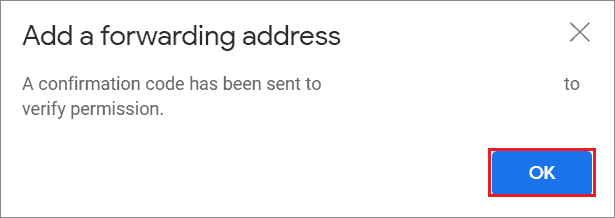
You will get a popup on the tab on which you have opened your secondary email, notifying you that a confirmation email has been sent to the email address you want to add as the destination account.
Click on OK in the dialog box.
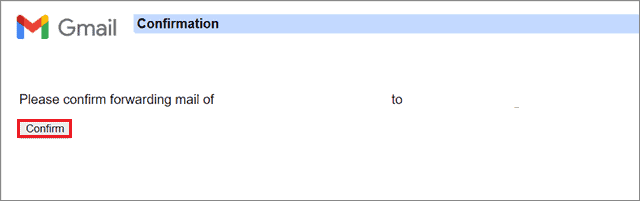
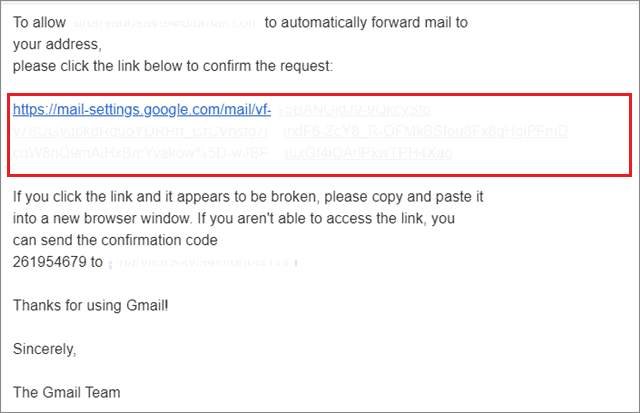
Open the confirmation email in your primary or new Gmail account. Then, click on the link to confirm the automatic forwarding feature.

Click on the Confirm button in the next window. Then, you will get a final confirmation success email, letting you know the forwarding is now correctly set up.
The secondary account is now forwarding to the primary inbox. You have successfully merged two gmail accounts.
2. Send Email As Another Account
Assigning a forwarding address is a great option. However, what if an email sent from a Gmail address appears as if it comes from another Gmail account? Let’s take a look at how we can do it to combine Gmail accounts.
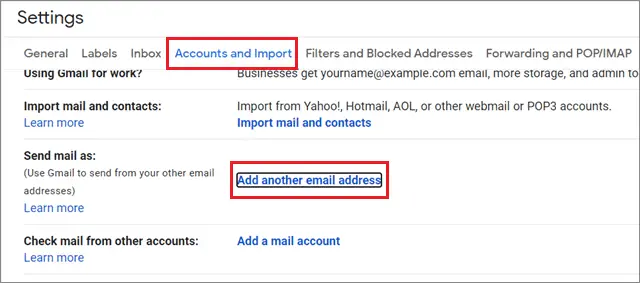
First and foremost, open your Gmail account. Click on the Gear icon in the top right corner and choose See all settings.
Select the Accounts & Import tab from the menu bar. In the Send email as section, click on the Add another email address option.
Enter the email address in the name of which you would like to send the email in the pop window.
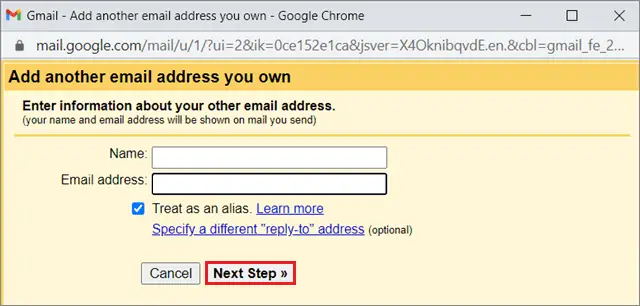
In the next step, click on the Send verification button.
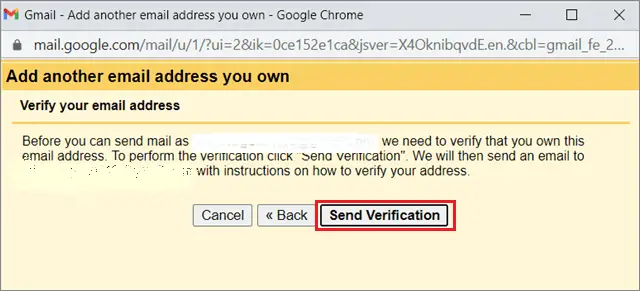
You need to verify the email address by either clicking on the confirmation link or entering the confirmation code.
Here, we have verified the email by clicking on the confirmation link.
Click on the Confirm button in the next window to merge Gmail accounts.
Now, open the Compose window in your primary Gmail account and check the new From option.
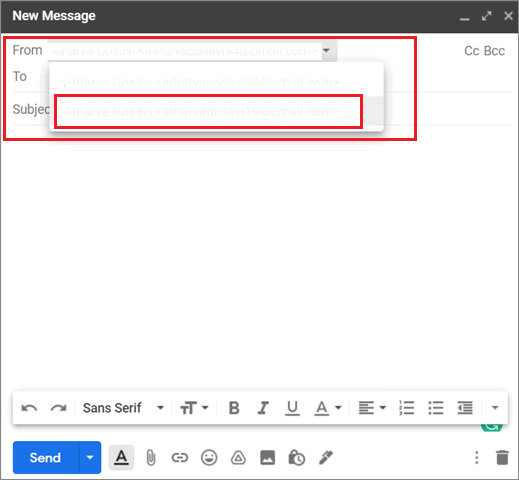
You can send an email from your primary account but in the name of another account by selecting it in the From section.
3. Set A Default Send Email As Address
In the previous method, we saw how to set a ‘Send email as’ address to merge Gmail accounts. Next, let’s see how to make that address our default email address.
Open the Gmail settings of your primary account and click on the Accounts and Import tab.
Then, in the Send email as section, select the make default option for the email address you have just added.
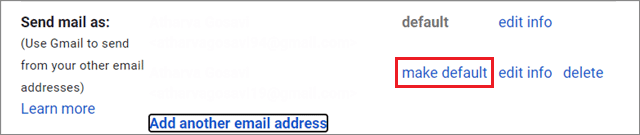
Whenever you compose a new email, the Send mail as email address will be your default address in the From section.

4. Organize Emails Sent To Different Addresses
Suppose you receive email messages from multiple inboxes of multiple google accounts in your primary mail inbox. In that case, it’s better to have an organized system that helps you sort all the incoming emails. In addition, your work will be more accessible if you know how to create Gmail filters after you merge Gmail accounts.
Conclusion
Merging email accounts helps users save precious time and eliminates the hassle of switching back and forth between multiple email accounts to reply to different emails. You can also improve your productivity by having a unified inbox to store all emails from different accounts in one place.
The process to merge Gmail accounts might seem moderately lengthy, but once you do all the settings, it will help you over the long term. Unfortunately, you cannot carry out the merging account process on the Google mail app on an iOS, iPad, or Android phone. A PC is mandatory to perform this process. Users can also merge multiple Google calendar accounts and Google contacts, but you need to follow different steps for that purpose.


