Every one of us must have cursed the junk of emails that we receive from various sources at least once. When the Gmail inbox starts flooding with pointless newsletters, unnecessary marketing emails, and spam messages, you feel frustrated at times. Gmail filters are a blessing at that point in time and can come handy in such situations.
In simple words, Gmail filters are a set of rules that defines the type of mails that will be welcomed to stay put in your inbox. All the unnecessary mail messages will be stored in specific folders and locations wherever you intend to put them. At times, we delete the promotional emails in Gmail. However, if you know how to filter emails in Gmail, it automates the mail management and keeps your inbox clutter-free.
How To Create Gmail Filters
Creating a Gmail filter is a relatively simple task to understand and execute. Before you create a filter, decide upon the precise set of rules that you want Gmail to follow. Once that becomes clear, you can easily create a filter by filling up a filter creation form. Let’s have a look at the types of Gmail filters and how you can create them.
How To Create Filters In Gmail Using Search Bar
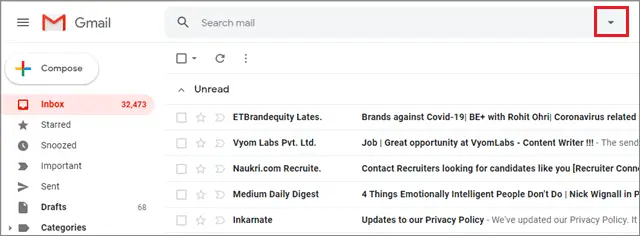
The first step in the process of creating filters is to open the filter creation form. You can procure that form by clicking on the downward pointer at the end of the search box in your mail.
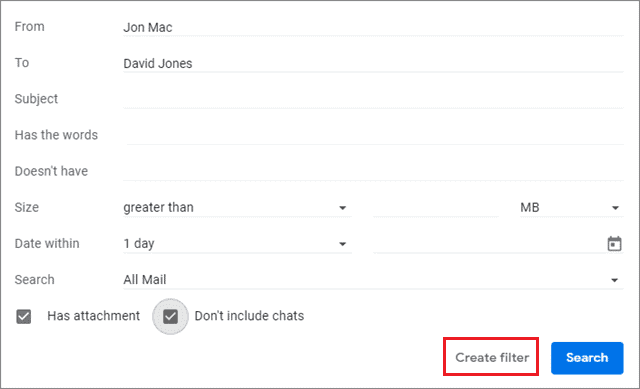
After the filter creation form appears, fill the fields with parameters that you have decided earlier. Once you have filled it up, click on the Create Filter button to create a filter.
Once you have selected that option, you will get several choices to set rules for the incoming emails. Select those which you think are appropriate and necessary.
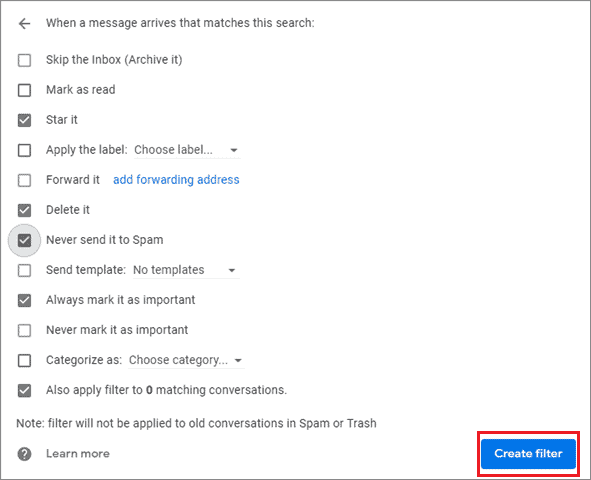
Click on Create filter once you have selected the needed options. It will create the required filter as per your customization.
How To Create Filters In Gmail Using Settings Menu
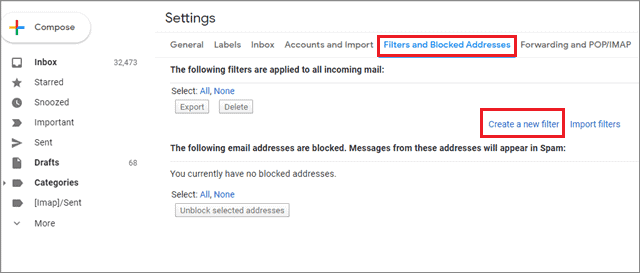
You can also create email filters in Gmail using the Settings menu in your mailbox. Click on the gear icon situated on the right side top corner and select Settings.
After the Settings menu opens up, go to Filters and Blocked Addresses and click on Create a new filter.
Once the filter form is created, you can follow the process mentioned earlier and create Gmail filters for individual emails as per your requirements.
Must-Have Filters for Gmail To Organize Your Inbox
While having filters is a matter of personal preference and choice, some filters will benefit every user. Using these Gmail filters will help you automate your mail management processes and keep your inbox clutter-free.
Create A Filter To Delete Unnecessary Emails Automatically
Spam messages, marketing emails, social media notifications, and other promotional emails contribute to the term ‘unnecessary emails’ for almost every user. Barring some of these messages, the rest of the mails can be deleted to maintain your inbox.
We can also unsubscribe from these emails, but some of them just keep coming back. The filter comes extremely handy to handle such messages. If you are wondering how to filter emails in Gmail and delete unnecessary emails, here’s your answer.
To start with, create a filter form by clicking on the downward arrow in the Google search bar.

Then, in the ‘Has the words’ field, type ‘unsubscribe’ and click the “Create filter with this search” link.
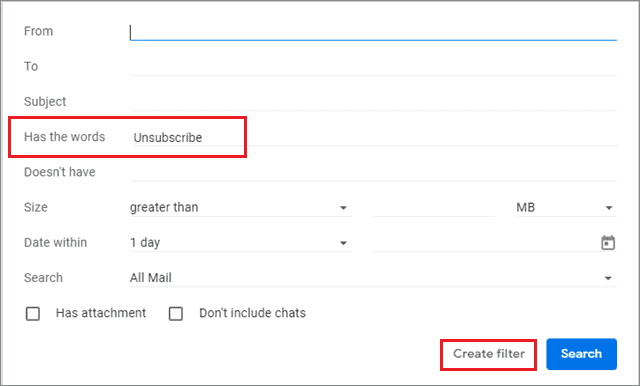
Now, check the box next to ‘Delete it’ and click on the “Create filter” button.
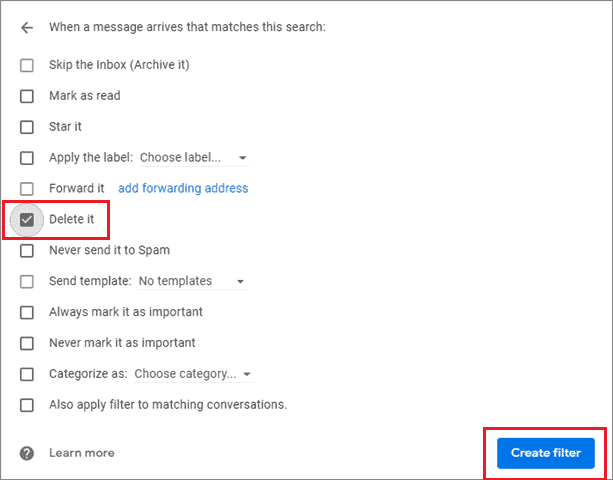
After creating the Gmail filters, you won’t need to delete unnecessary emails manually, as this filter will take care of it for you. You can learn how to delete old emails in Gmail automatically using this method.
Create A Filter To Sort and Apply Labels
If you are wondering how to create labels with Gmail filters, here’s the answer. Since Gmail doesn’t have the folder feature for sorting emails, labels can be assigned to do that job. All you need to do is create appropriate tags and filter accordingly to have all your filters sorted in one place.
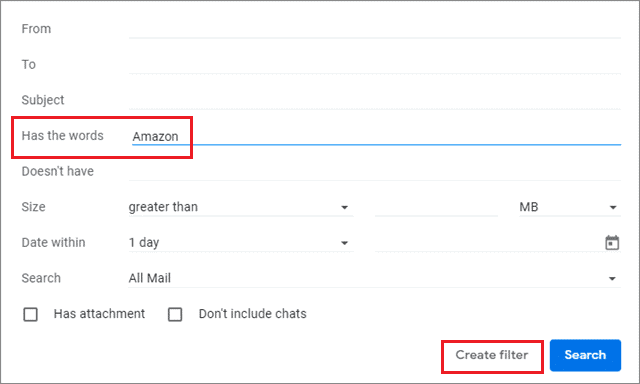
To begin with, create a new filter form from the search bar.
Then, there are various ways to filter the messages. You can either type keywords of the message in the ‘Has the words’ field or enter the email address into the ‘From’ field.
For example, if you wish to sort out all promotional emails from Amazon.com, you can either enter Amazon in the ‘Has the words’ field or put the store’s email address in the ‘From’ field.
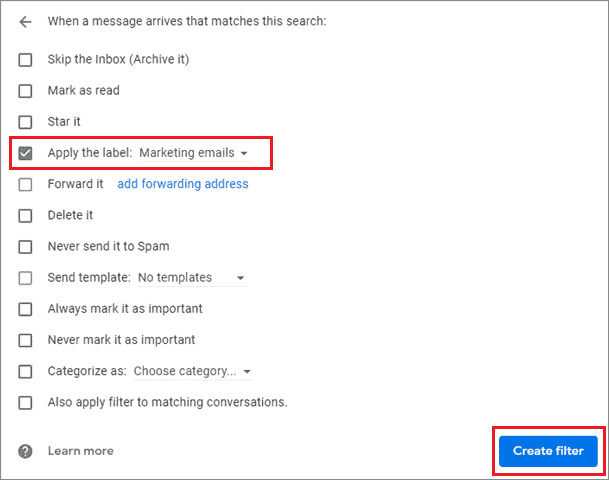
Now, you have to apply a label to these criteria.
In the next window, check the “Apply the label” box, and then click the drop-down menu next to it.
Select “New label” and then create the label you want to apply.
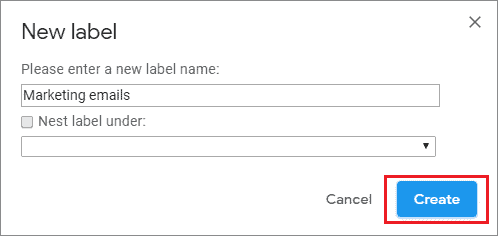
After you have created the label, apply it in the main form.
Creating such a label gives you more organization when it comes to managing your emails. These labels can be created for personal as well as professional purposes.
Create A Filter To Archive Emails
Gmail filters can be used to archive emails as well. Users usually tend to archive emails they feel are necessary and can be read after some time. Marketing and promotional emails can be archived if you think they are essential and can be attended later.
Create a Gmail filter as usual, by clicking on the downward arrow on the search bar in Gmail.
In the ‘Has the words’ field, enter ‘unsubscribe’ and click on ‘Create filter.’
Now, check the inbox next to ‘Skip the Inbox (Archive it).’ Create the filter by clicking on the ‘Create filter’ button.
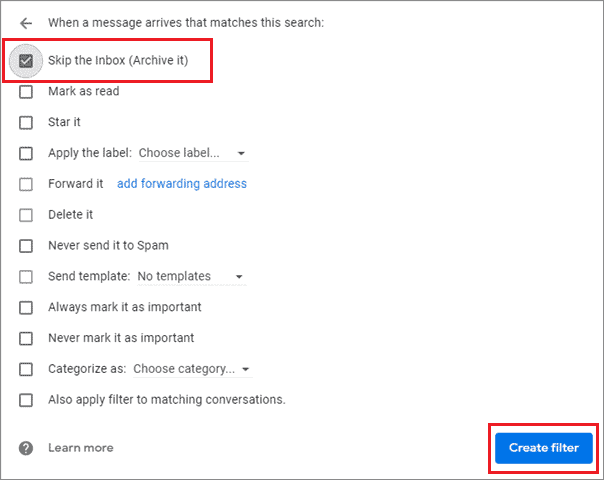
This filter sends all emails that include the word unsubscribe to the All Mail folder. While you won’t see the emails in your inbox, you will always have access to them in your archive.
Create A Filter To Delete Spam Mails
Spam mails can clutter your inbox and cause unnecessary difficulties in navigation. Creating a Gmail spam filter allows users to direct such emails to a specified folder and delete them as and when required.
To know how to filter emails in Gmail, create a filter by clicking on the downward arrow on the search bar in Gmail.
In the ‘Has the words’ field, type ‘is spam.’
Then, click on ‘Create filter with this search link.’

Now, check the box next to ‘Delete it.’ Create the filter by clicking on the ‘Create filter’ button.
As we know, sometimes relevant emails can be sent to the spam folder, albeit rarely. If you set this filter, some emails might get deleted automatically.
So, creating a Gmail spam filter is the best way to take care of spam emails.
Create A To-Do Queue
A to-do list could come handy in case you need to send out a bunch of emails. Creating a to-do list will make sure you don’t miss out on sending those emails.
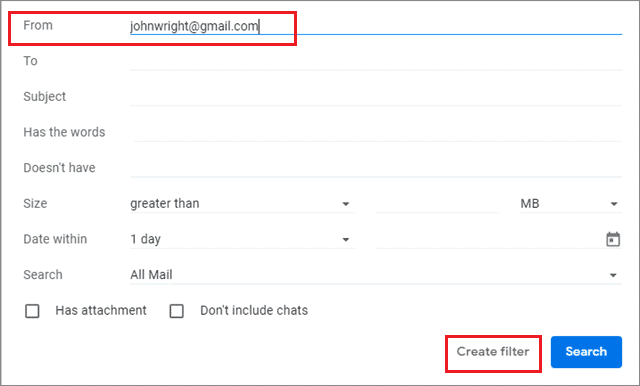
To start with, create a filter by clicking on the downward arrow on the search bar.
Now, type your email address in the ‘From’ field. Then click on ‘Create filter.’
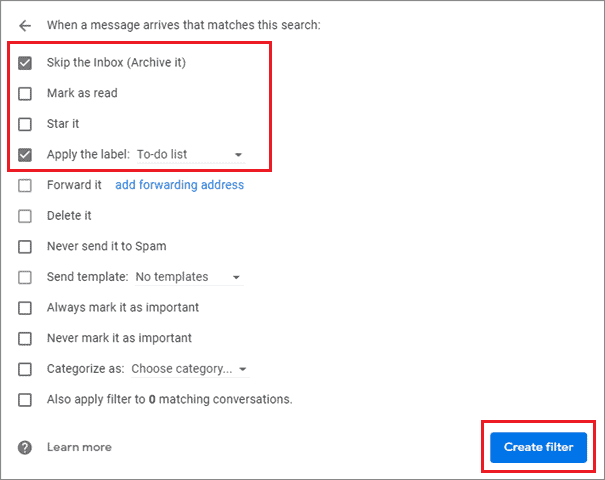
Then, check the inbox next to ‘Skip the Inbox(Archive it).’
Now, check the box next to the ‘Apply label’ and select the to-do label that you have created from the drop-down list.
Having a to-do list is always a great organizational habit as it helps you take care of your day-to-day tasks related to emails.
Create Filter For Forwarding Emails Automatically
Email forwarding is an important task when it comes to keeping people in the loop and keeping track of the progress of tasks in an organization. In case you need to forward emails to particular contact regularly, you can use this filter to do the job for you.
As usual, create the Gmail filter form by clicking on the downward arrow in the search bar.
Now, type your email address in the ‘From’ field. Then click on ‘Create filter.’
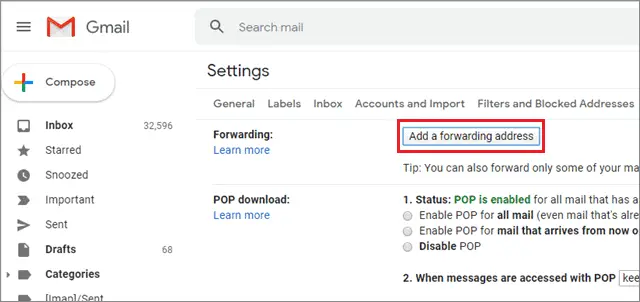
To add an address, you need to register it with the permission of the receiver. To do so, select the ‘add forwarding address’ option.
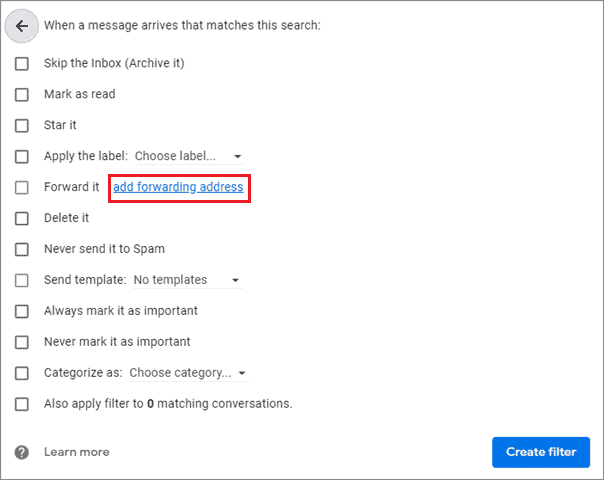
Again, click on the ‘Add a forwarding address’ and press enter. A dialog box will show up informing you that a confirmation mail has been sent to the receiver.
The address will be added only when the receiver approves your request.
Once you have added the email address, the receiver will be asked to verify and confirm his identification. After he approves it, his email address will be available for forwarding messages.
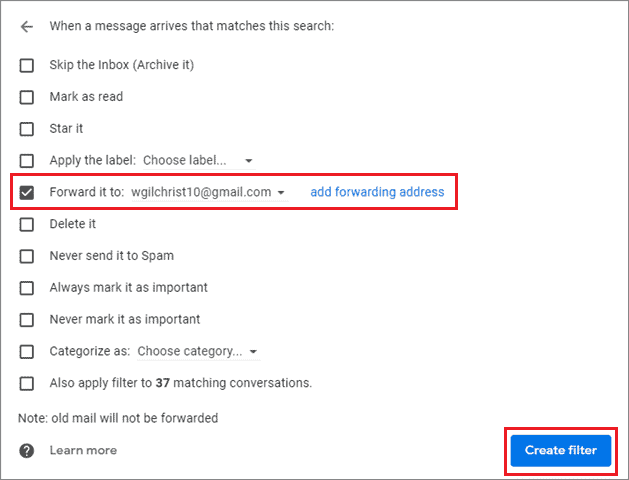
Click on the ‘Forward it’ option and add the forwarding address. Then, click on ‘Create filter’ to create the link.
How To Delete Gmail Filters
Deleting Gmail filters is as easy as creating them. In case you wish to edit the details of a particular filter or delete it permanently, you can follow the steps given here. First, click on the gear icon in the top right corner of the inbox and select ‘Settings.’
Once you have entered the Settings, click on Filters and Blocked Addresses tab and select the filter you wish to delete. Then click on the ‘delete’ option in front of it.
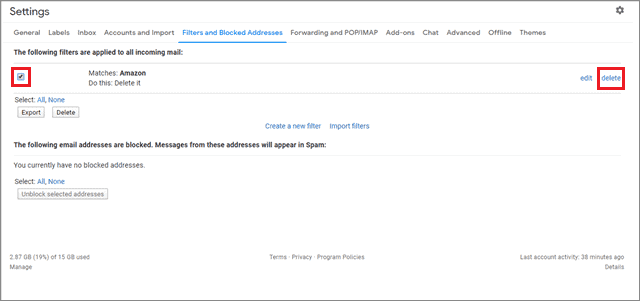
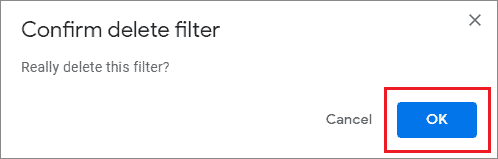
After the confirmation reminder appears, click ‘OK’ to confirm your action, and the filter will be deleted instantly.
In this way, users can delete filters as per their convenience.
Conclusion
Gmail filters are left unused by many Gsuite and Gmail users. Few users are aware of the benefits these filters for Gmail offer when it comes to proper organization of the email inbox.
There are several types of Gmail filters users can choose to apply to their respective inboxes. For professional users, a filter for the to-do queue could come handy as it helps in attending to daily tasks related to emails. You can also get rid of all the clutter consisting of promotional and marketing emails by creating the appropriate filter.
All in all, filters will make sure your inbox looks organized and tidy. The choice of applying the type of filter depends upon a user’s needs and requirements.


