Imagine you are waiting for an important email from a client. Your hectic schedule, however, forces you to keep working and rely on Gmail notifications for any updates. The issue arises when you face the Gmail notifications not working error and miss out on your email.
Time-sensitive communication can take a severe hit due to delayed Gmail notifications. It is easy to send or receive emails with Gmail. However, you won’t be utilizing the Gmail email client to the fullest if you don’t leverage the notification features of the app. You also get new mail notifications if you are using the Mail app on Windows 10. However, that will cease to be if your Mail app is not working correctly.
Gmail Notifications Not Working on Android? 12 Solutions To Fix It
Users turn to the Gmail app on Android frequently to check their emails. Hence, it’s essential to have a stable notification system to ensure you don’t miss out on important emails. Let’s see some of the methods to fix the Gmail notifications issue on Android.
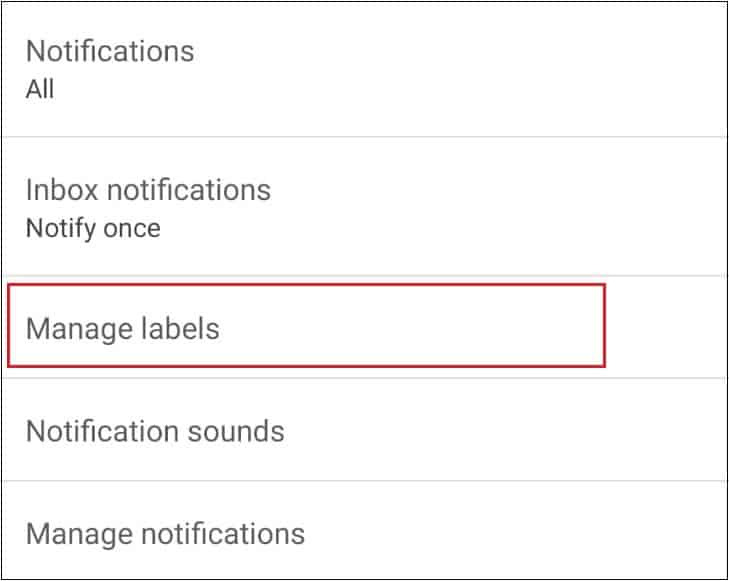
1. Check App Notifications
If you don’t receive Gmail push notification properly on your Android, or iPad, and iOS device, you can conduct a thorough inspection of your system settings and app settings. Doing this will ensure your Gmail Android app sends timely notifications to your lock screen.
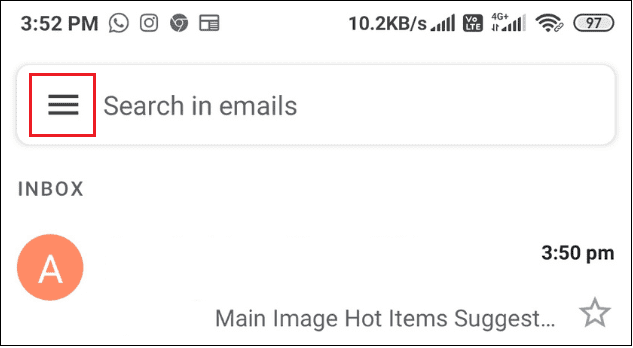
Open the Gmail app on your Android device and tap on the three horizontal bars in the top left corner.
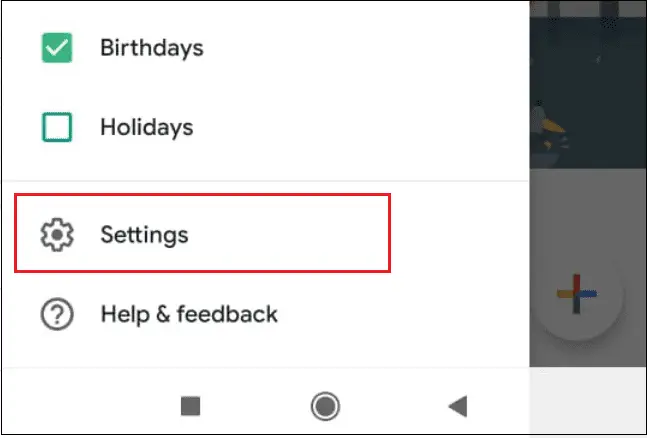
Next, select the Gear-Shaped (Settings) Icon option from the menu pane.
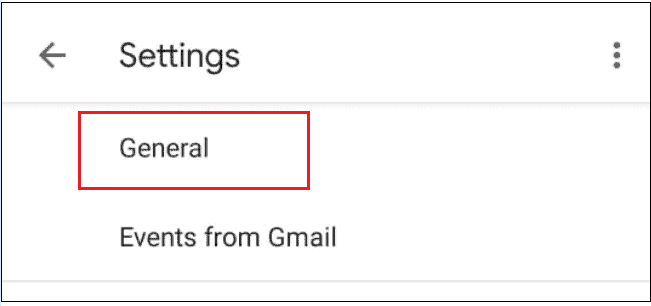
Choose General settings menu.
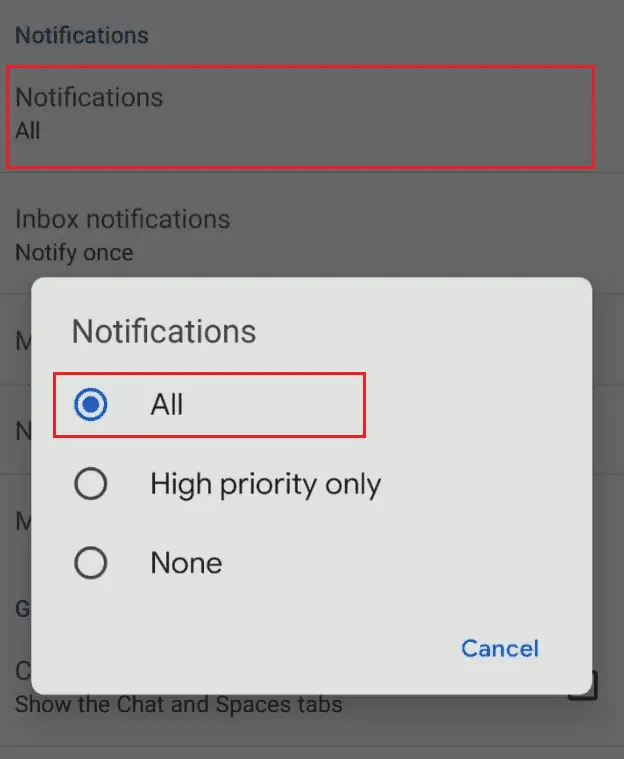
Now, select Notifications settings. Choose a notification level – All is the recommended level.
Then, go back and tap on Manage notifications.
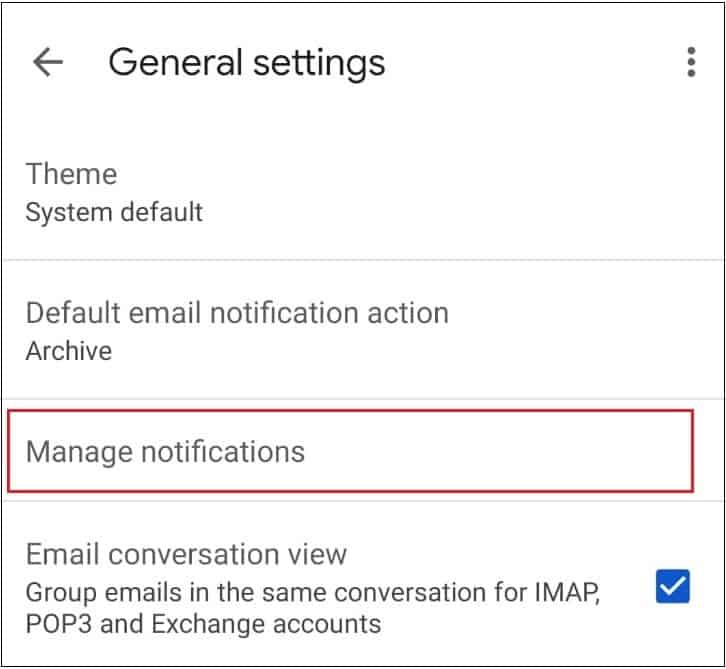
Now, make sure every option is enabled.

Once you have made these settings, restart your Android smartphone using the Power button to see if the Gmail notification issue is resolved.
2. Sign Out Of The Gmail Account And Sign In Again
If the Gmail notifications not working issue arises, you can sign out of your Gmail account and sign in back again. After signing out, you need to remove the Gmail account from your Android device and add it again.
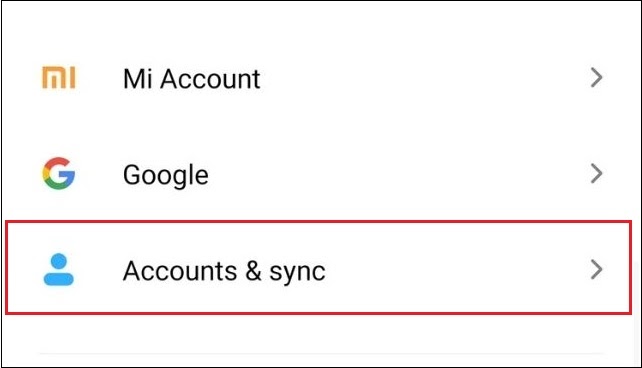
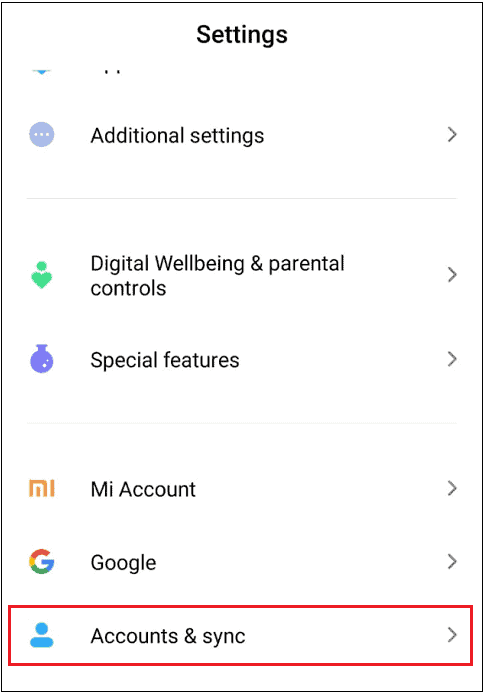
To start with, go to the Settings app and tap on Accounts and Sync.
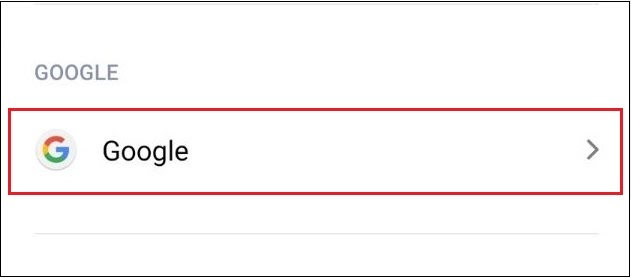
Select Google from the available list of options.
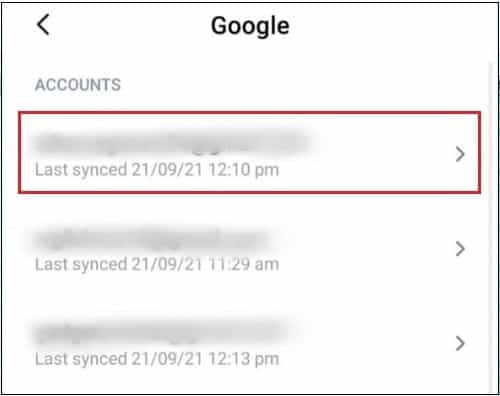
Choose the account that you want to remove.
Next, scroll down, tap on More, and select Remove account.
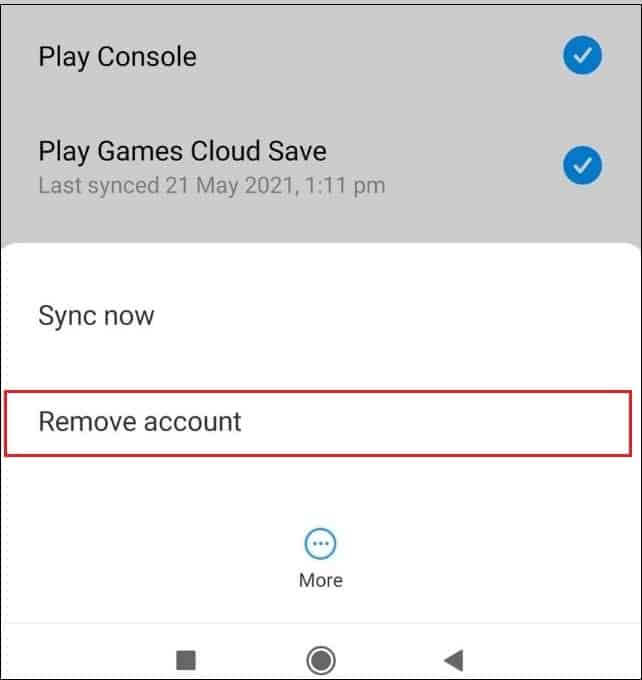
In the next window, choose the account you want to remove. Once that is done, reboot your Android phone and add the Gmail account again. Finally, check if the Android notifications are working correctly.
3. Clear Cache From Gmail
Clearing storage and app cache can sometimes resolve the issue of Gmail notifications not working. Doing this will reset the Gmail app.
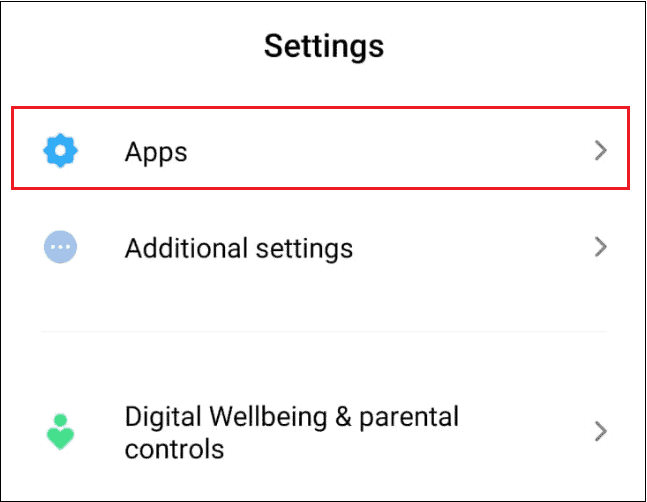
Go to mobile settings and select Apps.
Next, click on Manage Apps.

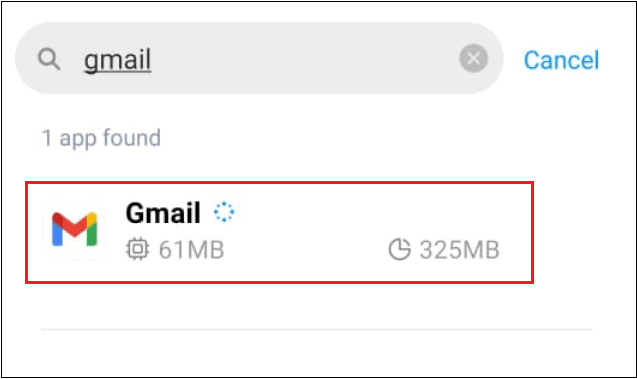
Select Gmail from the list of apps.
Now, tap on Storage and select Clear cache.
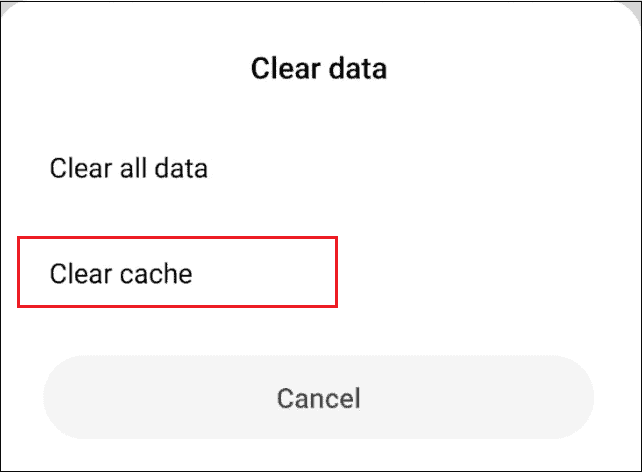
Reboot your mobile device after the Gmail cache is cleared.
4. Grant Permissions To Gmail
If you haven’t granted necessary permissions to the Gmail application, it may not notify you about incoming emails.
Open the mobile settings. Next, choose Apps and tap on Manage apps (as we did in solution no. 3).
Now, locate and open Gmail. Select Permissions.
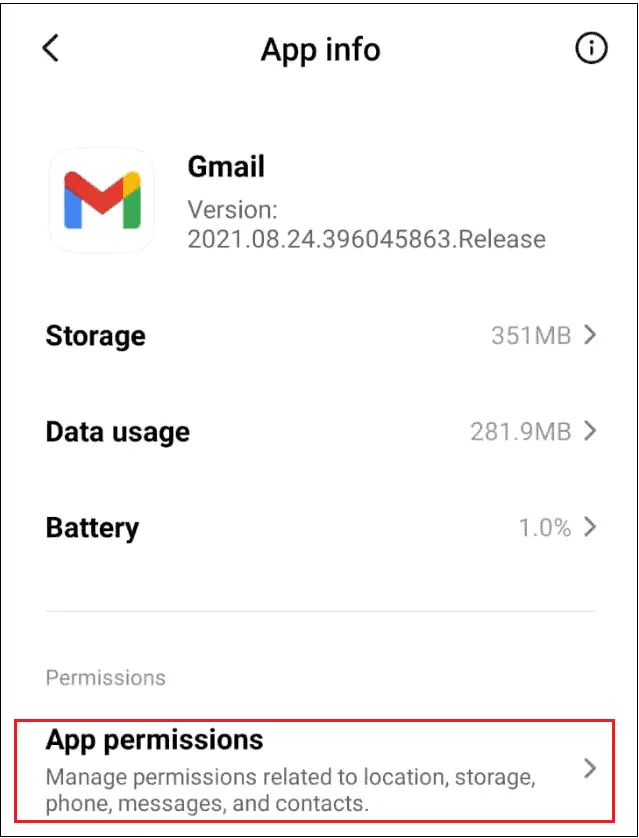
In the next window, grant all the necessary permissions to the Gmail app.
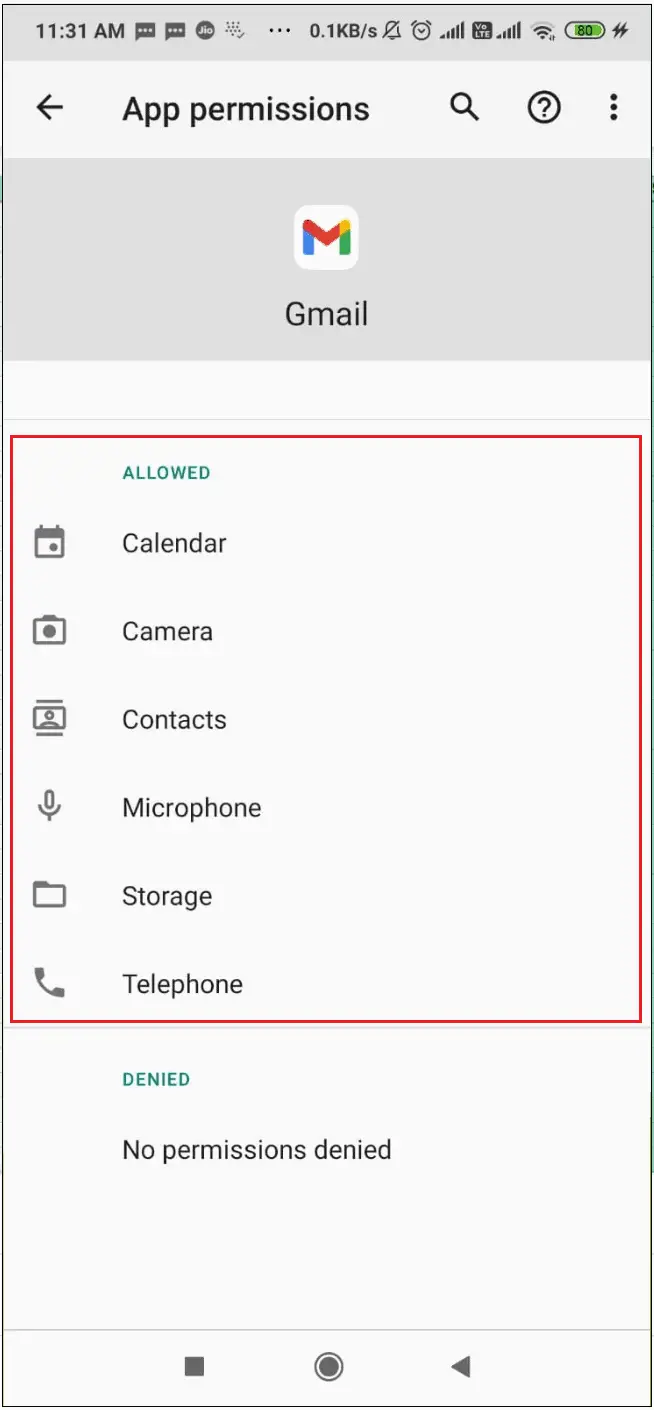
Now, go back to the menu and click on the three-dot menu to choose Default apps. Here, you need to set Gmail as the default app for checking emails.
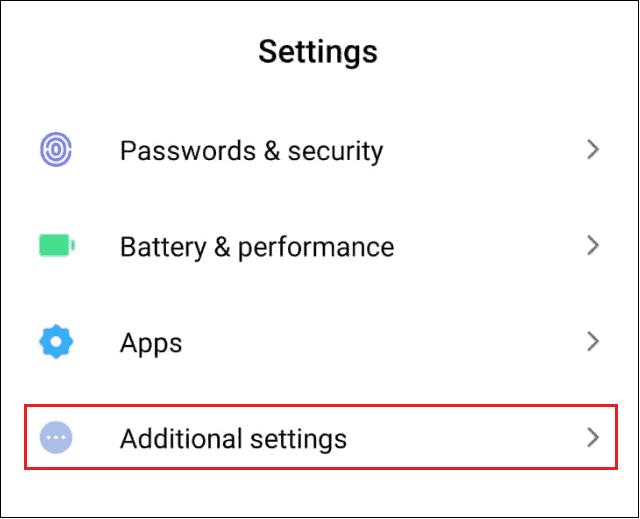
5. Check Check Date & Time
Wrong date and time can cause the notification settings to go haywire. If you have automatic timezone settings based on geo-location, you can avoid this issue.
To enable Automatic time, go to mobile settings and choose Additional settings.
Next, click on Date & Time.
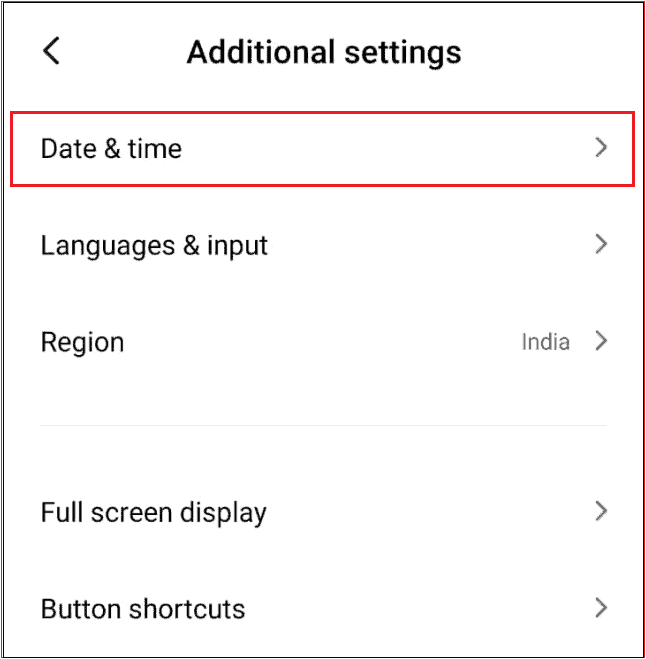
Check if the ‘Use network-provided time’ and ‘Use network-provided time zone’ options are enabled.

Once you are done with these settings, reboot your Android phone to see if the notification system has started functioning properly.
6. Update The Gmail App And Firmware
The Gmail notifications not working issue might occur if the app is outdated. Similarly, if you have system updates available for your device and haven’t updated it yet, you might face an issue with the notification system.
Both OS and apps are updated by default but check manually to ensure everything is updated if you haven’t enabled that setting.
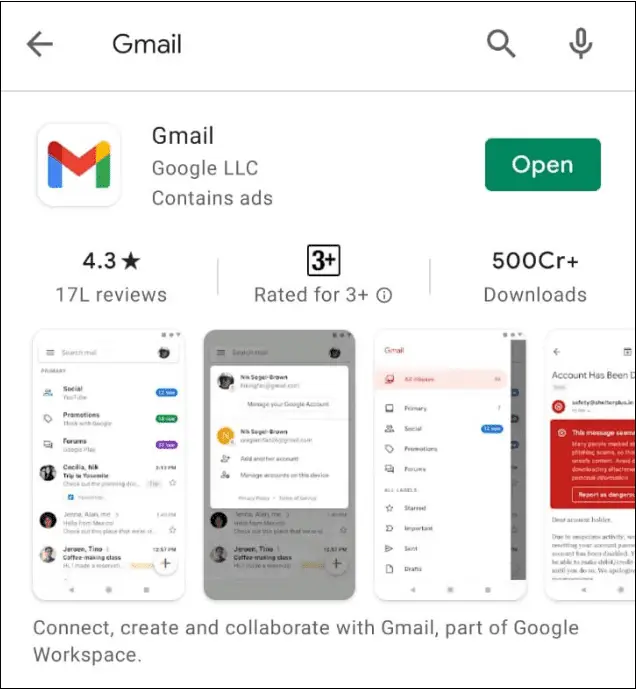
To check the Gmail update, go to the Google Play Store and type Gmail. Then, if any update is available, install it. If you have an update pending, you will see the Update option instead of Open in the Play Store, as shown in the screenshot below.
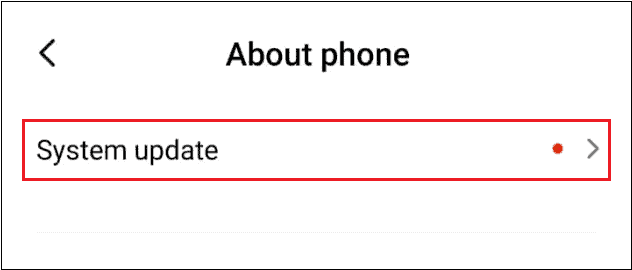
To update the smartphone firmware, go to the Settings app and select About Phone.

Next, tap on System update.
Tap on Download update if it is available.
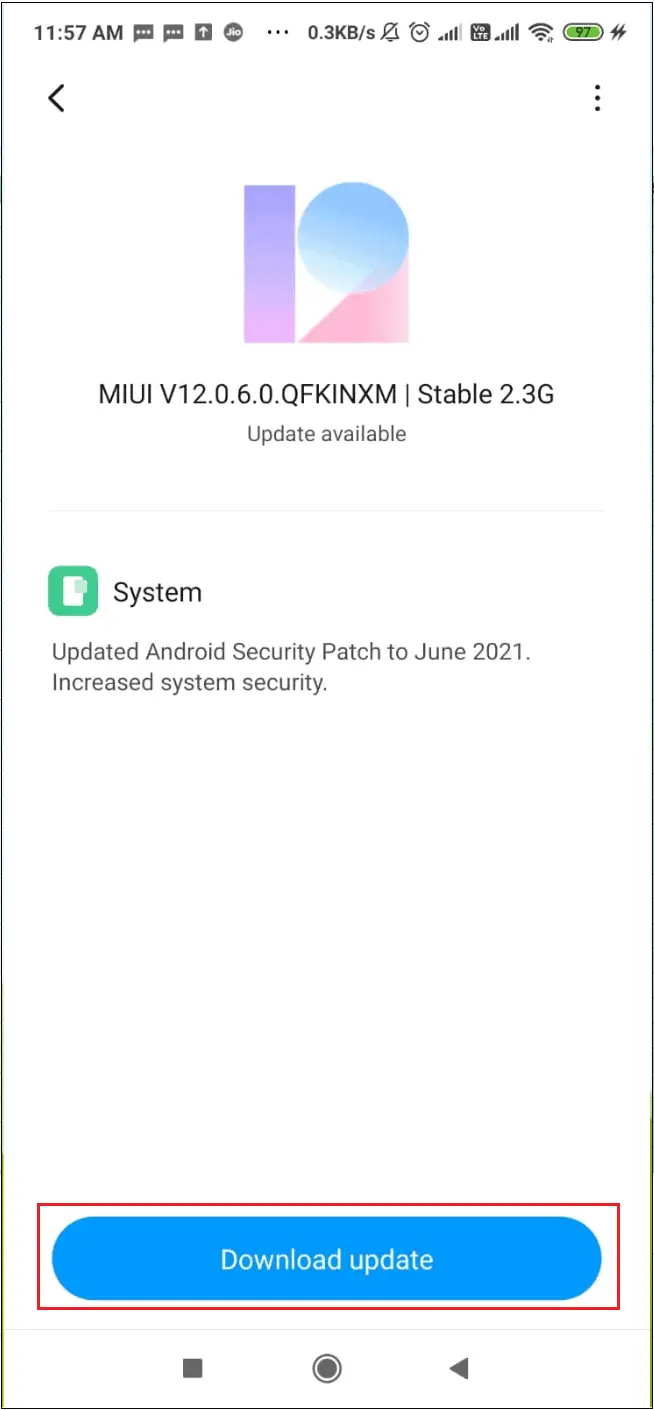
Once the update is complete, reboot your phone and check if the issue of Gmail notifications not working still exists. If Gmail isn’t a default app on your phone, you can uninstall it from the Play Store and reinstall it again to see if the issue is resolved.
7. Enable Sync
The email notifications problem can also occur if your sync settings are disabled. You can run a check through them to make sure they are perfectly in order.
Go to the Settings app on your phone and choose Accounts and sync.
Now, you need to make sure the Auto-sync data option is enabled. Then, select Google in the same window.
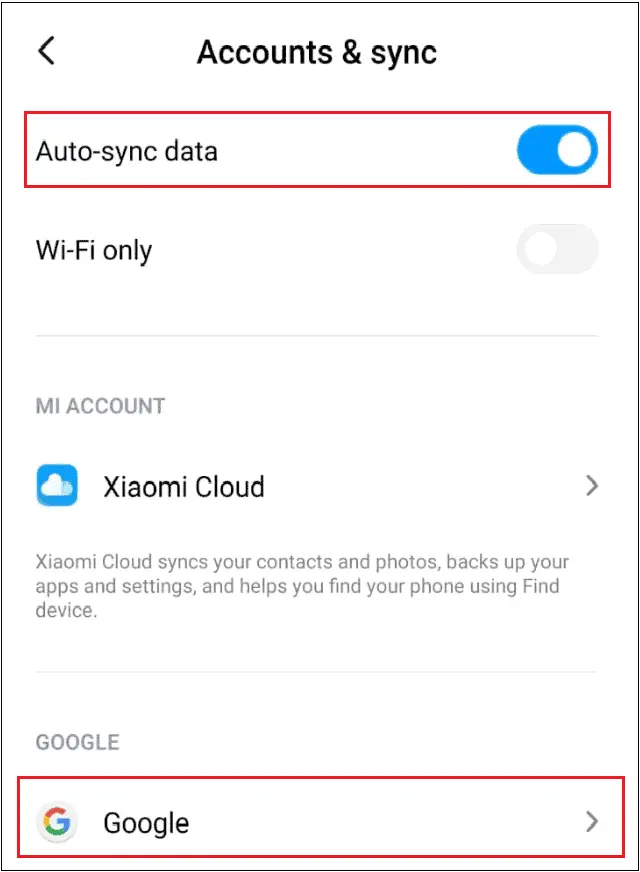
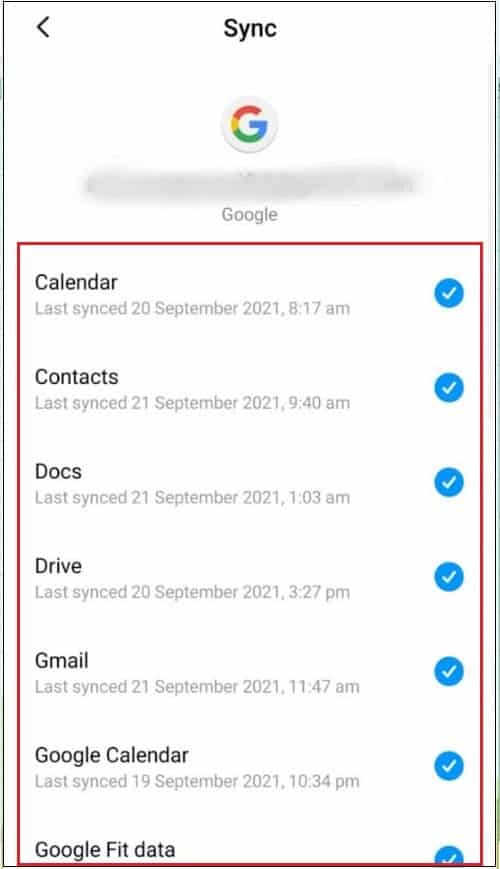
Choose the Gmail account for which you want to check these sync settings.
Check if the sync settings for all products are enabled.
If these settings are already configured properly, you can try other solutions to fix the Gmail notifications issue.
8. Make Sure Sync Gmail Is Enabled
In the previous section, we saw how to enable Google sync from your phone settings. In this one, let’s see how we can ensure Gmail syncing from the mobile app.
To begin with, open the Gmail app and tap on the hamburger icon menu in the top left corner. Next, select Settings from the left sidebar and choose the Gmail account you want to sync.
Further, scroll down to the Data usage section and check if the Sync Gmail option is checked and enabled.
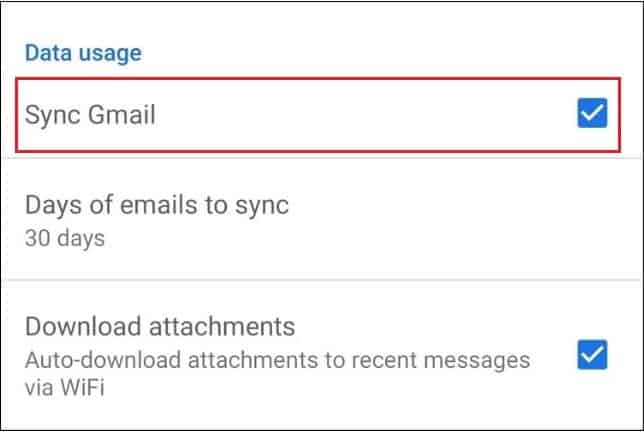
This will ensure the app isn’t causing any problems related to syncing incoming emails.
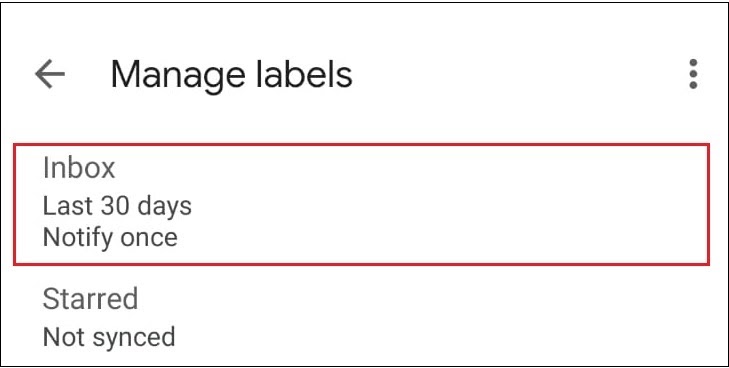
9. Tweak Label Settings
Gmail labels help you sort your inbox based on different parameters. If you use labels to manage your inbox, you need to check if their settings have changed lately.
First and foremost, tap on the hamburger menu icon in the top left corner of your Gmail app. Select Settings from the list of options in the sidebar.
Then, tap on the email address you want to edit.
Select Manage labels from the options.
Tap on Inbox.
Next, select Sync messages and choose Last 30 days.
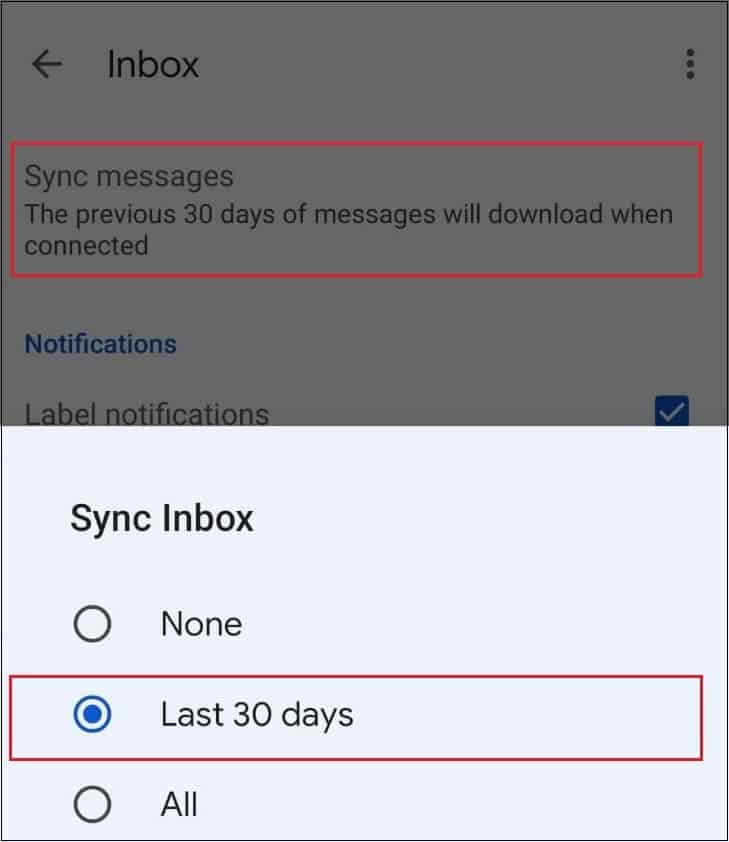
This method will ensure all the emails in your inbox are synced correctly to your respective labels.
10. Turn Off Battery Saver
The Battery saver option can significantly reduce the Gmail app’s power to function smoothly. To avoid this issue, you need to turn off the power saving mode.
Open your push notification tray and deselect Battery saver from the menu.
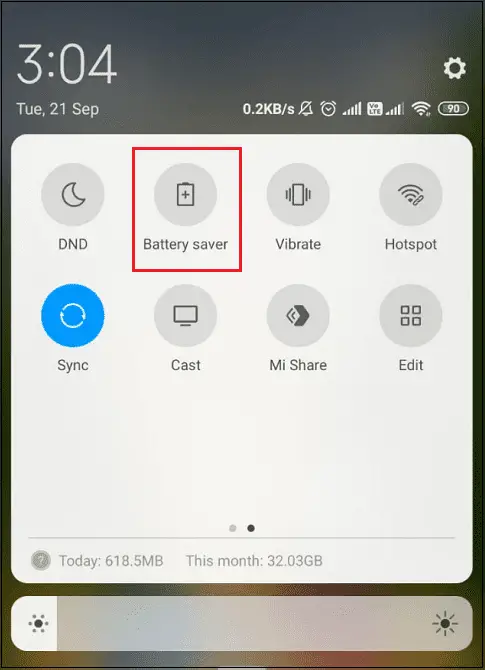
Now, check if the Gmail notification setting is working or not!
11. Whitelist Gmail On Power-Saving Mode
If you are an experienced Android device user, you must be well-acquainted with the power-saving mode. Mobile manufacturers usually provide this feature to ensure both battery life optimization and performance are on par with each other. In a nutshell, the power-saving mode saves battery juice to help the mobile last longer.
However, the power-saving mode often tends to disable certain applications or background processes in its bid to optimize battery life for performance. This could also lead to the issue of Gmail notifications not working properly on your phone. Therefore, you need to turn off the adaptive battery features for this purpose.
To fix this problem, mobile users can whitelist Gmail on power-saving mode.
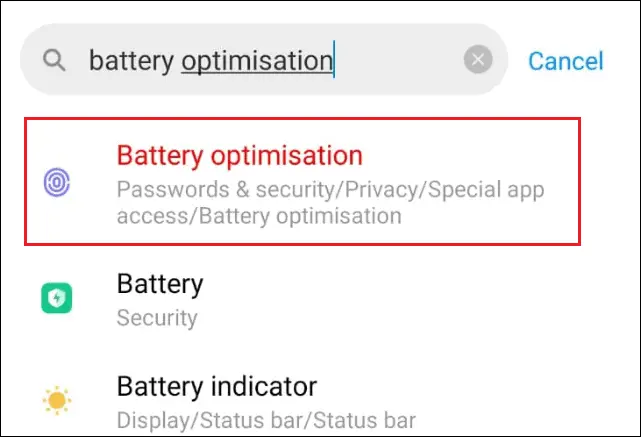
Open the mobile phone settings and search battery optimization in the Settings search bar. Then, select Battery optimization from the search results.
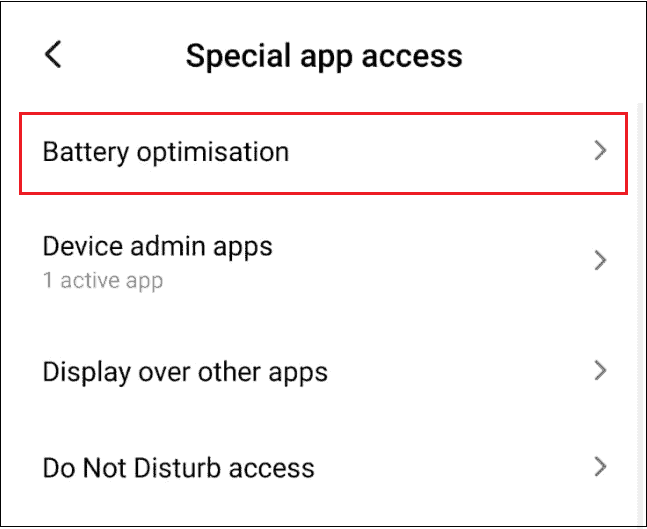
You can also access the Battery optimization section from the Special app access section in Apps and notifications.
Next, tap on Battery optimization.
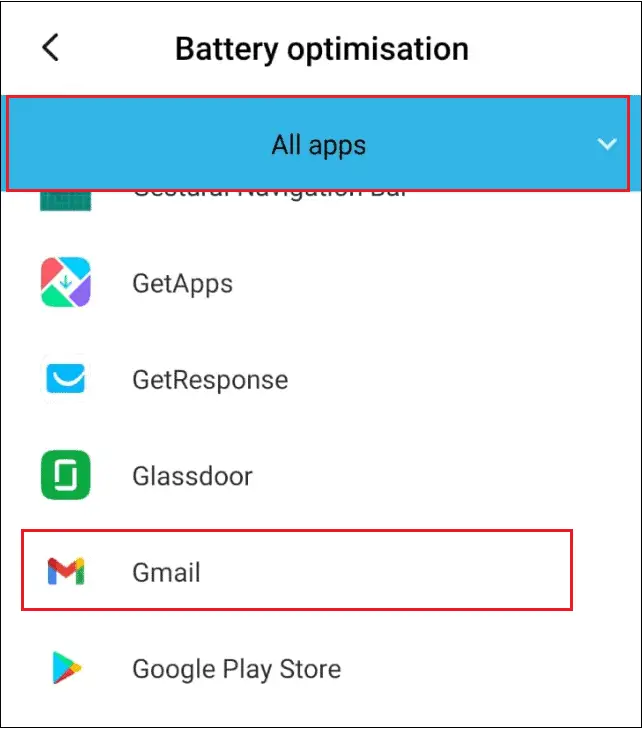
Select All apps in the filter bar at the top and tap on Gmail.
Choose Don’t optimise and tap on Done.
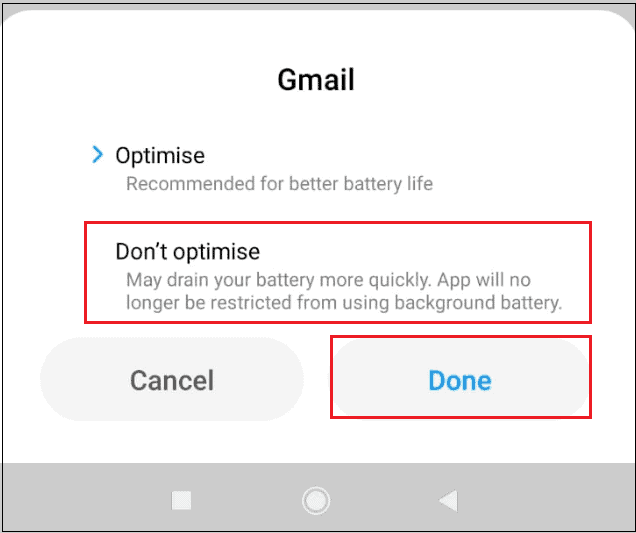
After these simple steps, check if all the notifications for Gmail are enabled and working properly.
12. Check Data Optimization Settings
Data optimization settings enable Android users to make the most use of their data plan. However, at some point, your Android phone may restrict the Gmail app from using mobile data. You need to check your data optimization settings to know if this is causing the issue of Gmail notifications not working properly.
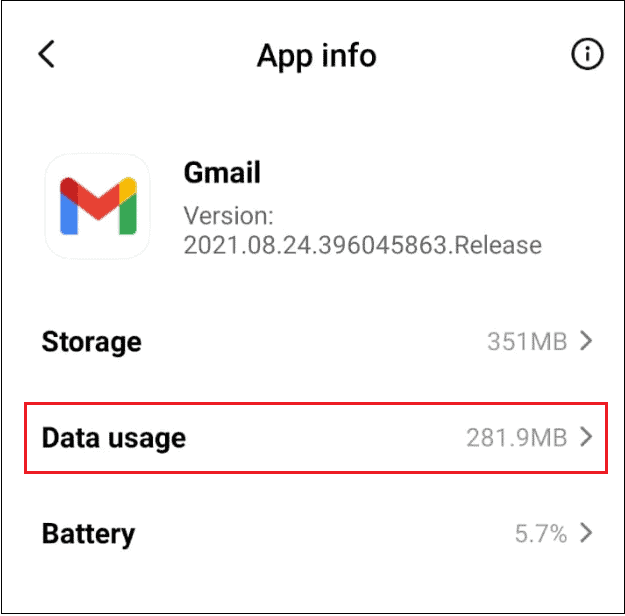
To resolve this issue, go to your mobile phone settings and choose Apps. Then, select Manage apps and open Gmail from the available list of options.
Next, select the Data Usage option.
After this, make sure the data settings for both WiFi and mobile are enabled, as shown below.

Go back to the App Info window. Tap on the Restricted data usage section, and make sure the mobile data permission for your SIM cards is enabled.
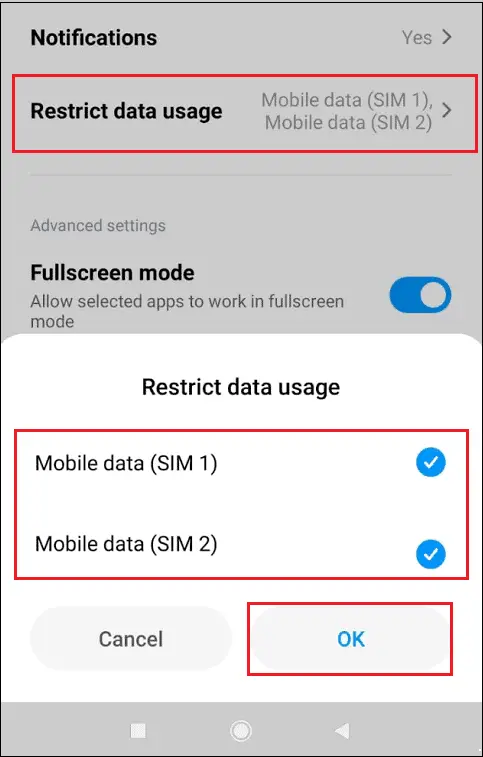
Irrespective of whichever SIM card you use for using the internet, the data usage for the Gmail app won’t be restricted on your phone after you do these steps. Now, check if it resolves the app notification settings issue.
What To Do When Gmail Notifications Not Working On Windows 10?
Some users also face the notification issue on Windows 10. If you are one of these, we recommend you try out the solution given below.
Enable New Mail Notifications
Sometimes, the Gmail desktop notification system may have some issues in functioning smoothly. This can lead to Gmail notifications not working properly.
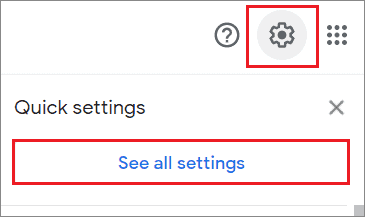
If you have opened your Gmail inbox in the Google Chrome browser, click on the Settings gear icon in the top right corner and select See all settings from the drop-down menu.
Now navigate to the Desktop Notifications section, and click New mail notifications on. Then, scroll down and click on Save changes.
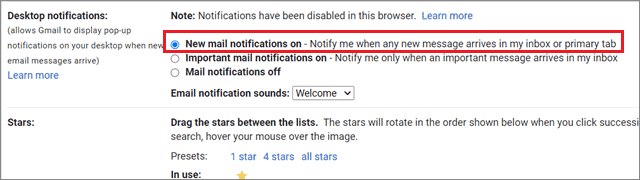
These settings will ensure you get Chrome notifications every time you receive an email on your PC.
Final Thoughts
Emails are essential when it comes to corporate communication. Hence, you need to be careful about having a seamless notification system that lets you know about important emails when they arrive in your inbox. From inbox notifications to the type of notifications you get, it helps you and keeps you aware. However, if the Gmail notifications not working issue occurs, it can have a dire effect on your communication and future actions regarding the message you missed out on.
Users need to have a seamless instant notification system both on PC as well as mobile. Notifications on the Android device are also essential as they allow you to access emails quickly on the go. There are multiple troubleshooting methods to fix the notification system. You can opt for any of these solutions at your convenience.


