The secure boot provides security from malware and viruses like a rootkit. It sits on top of UEFI and acts as a security gate. When you enable secure boot, it makes sure that Windows boot uses the OEM (Original Equipment Manufacturer) software.
You can disable and enable secure boot from your system BIOS. This guide shows how to enable secure boot in AMI BIOS and disable it. If the need arises, you can also check out our detailed guide to enable and disable secure boot on ASUS BIOS.
How to Enable Secure Boot in AMI BIOS?
You need to enter your system’s BIOS to enable secure boot in American Megatrends BIOS. It is easy to do so on a Windows 10 computer.
How to Enter System BIOS?
Follow the steps given below to enter the BIOS on Windows 10 operating system.
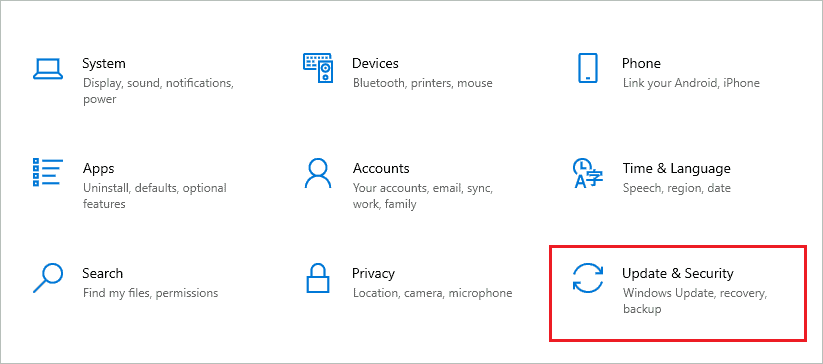
Step 1: Press Windows key + I to open the “Settings” app and go to the “Update & Security” section.
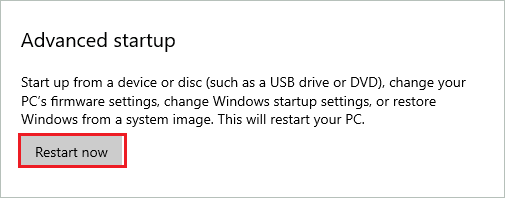
Step 2: From the left panel, go to “Recovery” and click on the “Restart now” button under Advanced startup.
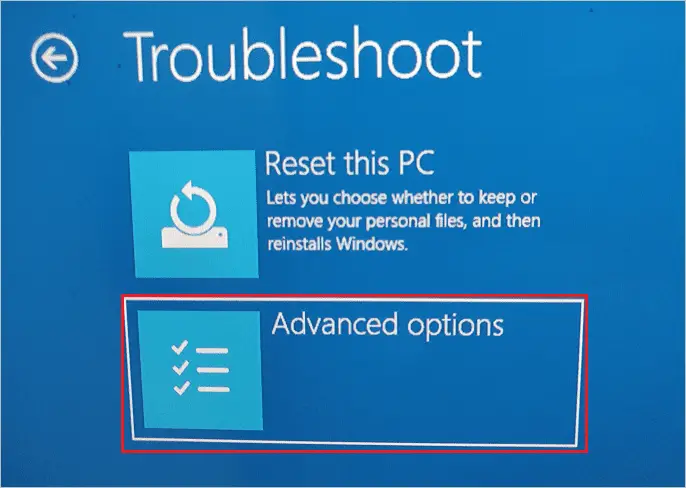
Step 3: On the blue screen, click on the “Troubleshoot” option.

Step 4: On the next screen, select “Advanced options.”
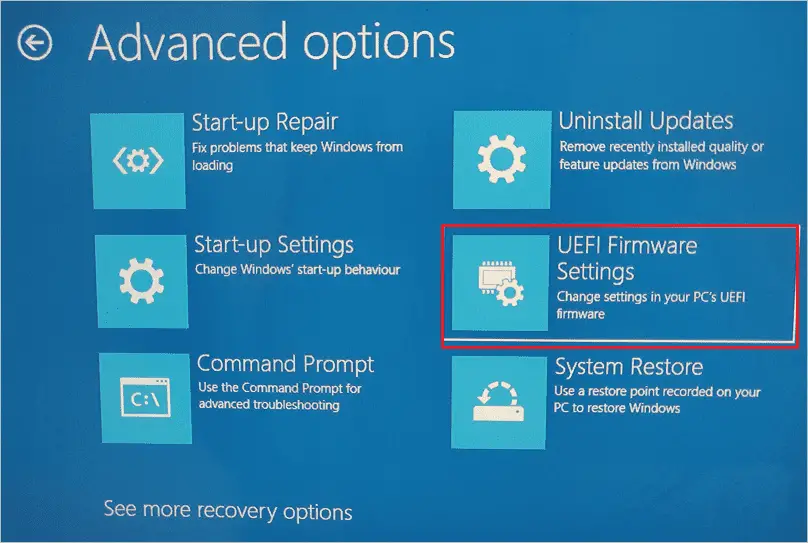
Step 5: Next, click on the “UEFI Firmware Settings” option.
Step 6: Lastly, click on the “Restart” button to reboot the PC and open the BIOS menu.

Once you enter the BIOS, you can follow the steps below to enable secure boot in AMI BIOS. You can also use a dedicated key to enter the BIOS. For example, you can press “Del,” “F1”, or “Esc” keys while your PC is booting to enter American Megatrends BIOS.
Enable Secure Boot in AMI BIOS
Once you enter AMI BIOS, you can carefully follow the instructions to enable secure boot.
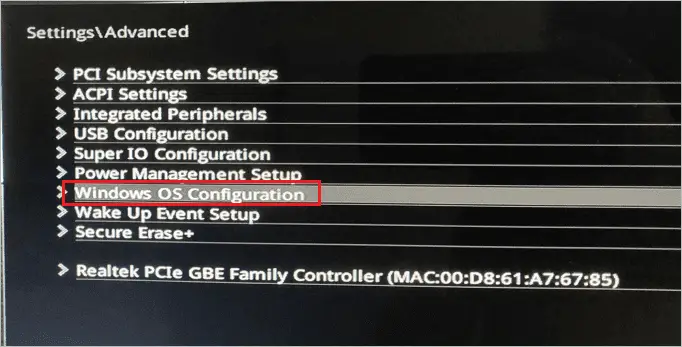
Step 1: Click on “Settings” in BIOS and select “Advanced” from the American Megatrends BIOS menu.

Step 2: Next, choose “Windows OS Configuration.”
Step 3: You need to set “Windows 10 WHQL Support” to “UEFI.” In some cases, Windows 10 WHQL option might be replaced with BIOS UEFI/CSM Mode. In both cases, you need to select the UEFI option.

Step 4: After this, click on Settings from the left corner again and select the “Save & Exit” option.
Step 5: Select “Save Changes & Exit” on the next screen. You also need to confirm the action by selecting “Yes.” You need to reboot the PC once after changing the option to UEFI; otherwise, you won’t be able to enable secure boot in AMI BIOS.
Step 6: Once the PC reboots, enter the BIOS again using the way mentioned above.
Step 7: In the BIOS, go to Settings ➜ Advanced ➜ Windows OS Configuration and go to “Secure Boot.”
Now, select the “Custom” option for “Secure Boot Mode.”
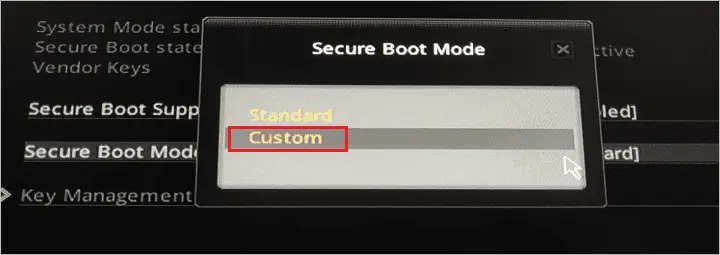
Now, if you directly try to enable Secure boot, there will be a message saying Repeat operation after enrolling Platform Key(PK). Therefore, you need to “Enroll All Factory Default Key” before enabling the secure boot in AMI.

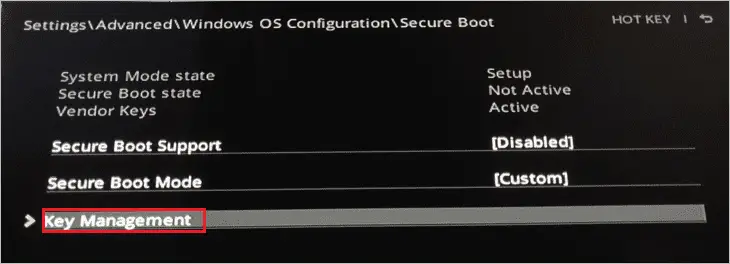
Step 8: Select “Key Management” to enroll all factory default keys.
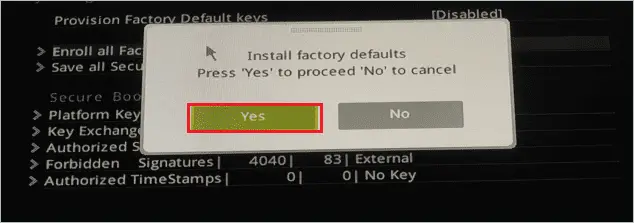
Step 9: Next, click on “Enroll all Factory Default Keys” and then click on “Yes” to confirm it.
Now, some of you can directly enable secure boot in American Megatrends BIOS. But, some PCs may need a reboot again to enable secure boot. If the PC needs a reboot to reflect the changes, make sure to save and exit the BIOS.
Step 10: You can now click on “Secure Boot Support” and select “Enabled” to enable secure boot in AMI BIOS.
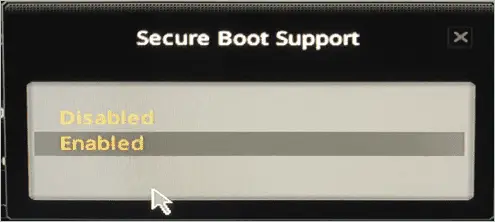
You can now save the changes and exit the BIOS. In addition, the secure boot is now enabled on your Windows computer.
How to Disable Secure Boot in AMI BIOS?
If you want to boot your computer from an external drive, you may need to disable UEFI secure boot. Also, to make PCs dual bootable, secure boot needs to be disabled. Follow the steps given below to disable secure boot in American Megatrends BIOS.
Step 1: Enter BIOS from your computer.
Step 2: From the BIOS, go to Settings ➜ Advanced ➜ Windows OS Configuration ➜ Secure Boot.
Step 3: Now, click on “Secure Boot Support” and select the “Disabled” option for it. This will disable secure boot in American Megatrends BIOS.
Step 4: Lastly, save and exit the BIOS to save the changes.
You can reboot your computer and use different drives to boot your computer, as there is no longer a security gate available.
Conclusion
The secure boot provides you security on the hardware level, thus making it impossible for hackers to get into your computer. Therefore, Microsoft has also made it a part of Windows 11 system requirements. However, if secure boot is not enabled by default, you can enable it manually from the BIOS. The above guide can help you enable secure boot in AMI BIOS and disable it if the need arises.
You should not disable secure boot unless there is a need to boot from an external drive or you want a dual boot setup for your PC. If you want to disable secure boot in AMI BIOS for any reason, the instructions in this guide can help you.
FAQs
Should I enable secure boot?
Secure Boot sits on top of your UEFI and provides security on the hardware level. You should enable secure boot to keep hackers away from your system.
How do I enable secure boot in BIOS?
You can enter BIOS from your PC and go to Settings ➜ Advanced ➜ Windows OS Configuration ➜ Secure Boot. You can then select the “Enabled” option for Secure Boot Support. This can differ from system to system, and there are some prerequisites for every manufacturer. You can find the details in the manufacturer guide.
Will disabling secure boot cause issues?
No, as such disabling secure boot does not cause any issue or error. However, security can be compromised when you disable secure boot on your computer.


