Secure Boot is often enabled by default on ASUS motherboards with UEFI BIOS. I wanted to have a dual-boot setup on my new PC, and that is not possible when secure boot is enabled. That meant having to identify the Asus BIOS key for the motherboard, enter the Asus BIOS utility and disable secure boot on my Windows 10 running PC.
This guide is created to reflect the process that I followed to disable secure boot using Asus UEFI BIOS Utility on Asus X99-Deluxe motherboard. You can use this guide to identify the motherboard you have if you are not sure which one it is.
Prerequisite for Windows UEFI Mode: GPT Partition Style
Installing Windows on UEFI-based systems requires that your hard drive partition style has to support UEFI mode or at least be in a legacy BIOS-compatibility mode. You might run into an error as below, which indicates that your PC is booted in UEFI mode, but your hard drive does not support it.
“Windows cannot be installed to this disk. The selected disk is not of the GPT partition style”
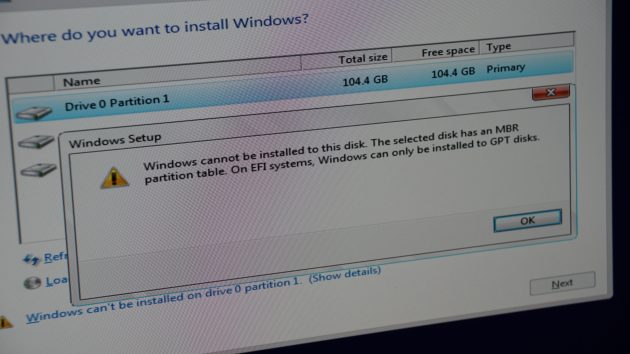
The GPT partition style on your hard drive is required for the UEFI mode. Another advantage of GPT partition style is that you can set up drives of size greater than 4 GB, and have as many partitions on it as you need. The easiest way to apply the GPT partition style to your hard drive is to do it over the command prompt using the installation disk or let a Windows-based tool to handle it for you.
Two Ways to Convert Your Hard Disk to GPT Partition Style
-
Use a Software to Create a GPT Disk and Avoid Possible Data Loss.
If you want to convert a disk in use to the GPT format, all the data on the disk could be lost. You can avoid this problem by using a software like the Windows Partition Manager from EaseUS.
EaseUS partition master can help you convert the hard drive to GPT. In addition, it can help you create, merge, remove, delete or wipe partitions. It can also help you with data recovery in case of deleted or lost partitions. It has an effective free version as well and the pro version offers more advanced features like – converting to GPT partition style without data loss! It is not too expensive and can be a valuable addition to your toolkit.
This Windows Partition Manager has been mentioned by a few of our readers before, and another one emailed me recently mentioning how useful it was for him while setting up a dual boot system. He also mentioned that the support team from EaseUS was very helpful with any questions he had, and highly recommended the tool.
-
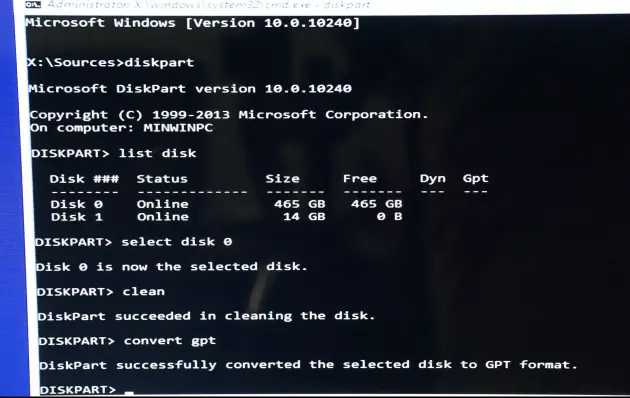
Convert Your Hard Drive to GPT Partition Style Using the Command Prompt
- Plug-in the Windows setup disk or USB and boot your PC in UEFI mode.
- Once in Windows setup, press shift + F10 to open a command prompt window.
- Open the disk partition tool with diskpart.
- List and identify the disk to format with list disk.
- Select the drive to format and convert to GPT.
select disk <disk number here>
clean
convert gpt
exit - Close the command prompt and continue.
How to Enter Asus BIOS
On Your Asus Laptop
The Asus BIOS key that you need to know is F2
- Press F2, hold it and power on your laptop.
- Keep the F2 key pressed till the Asus BIOS screen displays.
This approach should work on Windows 7 and earlier operating systems.
On Your PC With an Asus Motherboard
The Asus BIOS key you need to know is DEL (Delete)
- Power On your PC or if it is already on, restart it.
- Wait for the screen with the Asus logo to display
- Hit DEL key to load Asus BIOS utility. You have only a few seconds to do so before the operating system starts loading.
Note: Some Asus systems have the Esc or F10 keys as the Asus BIOS entry keys. Pay attention to the loading screen with the Asus logo. It should mention what specific key is to be used to enter Asus BIOS utility on your machine.
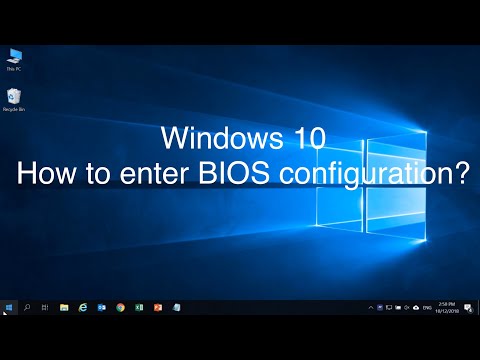
On Systems Running Windows 8 or Windows 10
Since Windows 8 and Windows 10 leverage Fast Startup, you would not be able to get to the BIOS during the system start-up sequence. Instead, you need to restart your computer to get there. Detailed steps can be seen in the video below.
Step-by-Step: Make A Backup of Existing Keys and Disable Secure Boot
- Plug-in a USB drive.
- Restart your computer and enter into the BIOS utility by pressing the Asus BIOS key applicable to your system. In my case, it was DEL. Keep an eye out for instructions on the first screen. This should load up the Asus UEFI BIOS utility interface.

- Go into the Advanced Mode (F7 or any other key as specified).

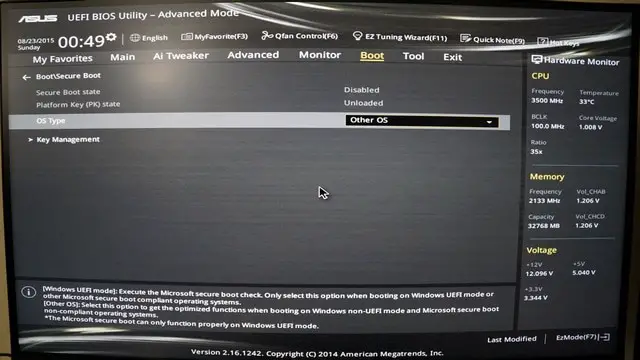
- Go into the ‘Secure Boot‘ option under the Boot section.

- Ensure the proper OS Type is selected, and go into Key Management.

- Select ‘Save Secure Boot Keys‘ and press enter.

- Select the USB drive when asked to ‘Select a File System‘.

- Four key files named PK, KEK, DB, and DBX are saved to the USB.

- Delete Platform Key (PK) to disable secure boot. (Note: Do not delete other keys)
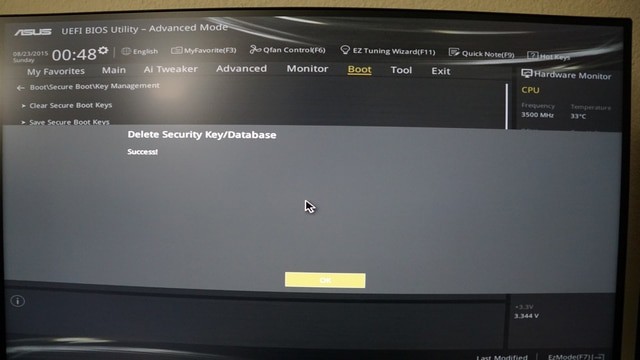
- Save and restart to apply settings (usually F10) and boot with ‘secure boot’ disabled.
Step-by-Step: Restore Keys and Enable Secure Boot
- Follow steps 1 to 5 from the previous section. Use the USB drive that has the backed up keys
- Go to ‘Load Default PK‘ and press enter. You have two options to set the new key.

- ‘Yes’ loads the default keys. Once done, save the configuration and restart to have secure boot enabled.
- ‘No’ lets you load the backed up keys.
- Select the USB drive that has the backup files.

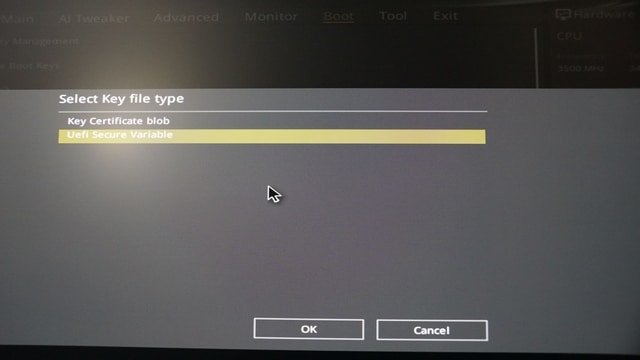
- Select the right file to restore (In this case – PK)

- Confirm that it is a ‘UEFI Secure Variable‘ type.
- Confirm that you want to update the PK file.

- Save and restart. ‘Secure Boot’ should be enabled now.
- Select the USB drive that has the backup files.
That’s it. Enabling or disabling secure boot can appear to be a complicated process, but it is quite straightforward once you know the steps.
(Article updated on September 7, 2021)


