Key Takeaways
- It is vital to password protect folder in Windows 11 to keep your sensitive information safe.
- Windows has many built-in features to password protect your folders, which can be enabled manually.
- If you prefer, you can also use third-party programs that offer better security to your data.
Windows 11 prompts the users to enter a password before they can log in to the system. If this is not enough, you can opt to password protect folder in Windows 11 as an extra security measure. You can keep all your sensitive files, including PDF files and audio files, in the locked folder to best use this security feature.
The built-in Windows security features offer a fair amount of data protection. But there are many other methods you can employ to create a password for your folders. When you create a folder or file password, ensure that it is strong both lengthwise and in uniqueness. You don’t want to invite unsolicited people to get hold of your data just because your password was easy to guess.
How To Password Protect Folder In Windows 11
The built-in features of the operating system let you password protect folder in Windows 11 in more than one way. But you can also try various third-party applications that do not compromise folder security. Some of the methods explained here may not work with a few editions of Windows. Try each and find out which one works best for your PC.
How to Make Folder Password Protected Using Encryption
You can use the built-in encryption option to password protect folder in Windows 11 Pro edition only. Note that this method may not apply if you own a Windows Home version. The encryption method is useful if many users use your computer and you don’t want them to see what is in your folder. Here are the steps to encrypt contents of your folders.
Open File Explorer on your computer to open the folder list. Go to the folder you want to encrypt. Right-click on it and select “Properties.”

Select the General tab and click the “Advanced” button beside Attributes.

Under Compress or Encrypt attributes, check “Encrypt contents to secure data.”
Click “OK” and then “Apply.”

Now, you will be asked for confirmation whether you want to apply changes to this folder only or to the subfolder and files too. Select an option, and click “OK.”
If you are adding a layer of protection using encryption for the first time, you can back up your file encryption certificate and key as an additional step. Select the Back Up Now option and follow the on-screen instructions. Always use a strong password that nobody can guess.
The next time you double-click on the secured folder to open it, you will need to provide the password to remove the folder access block. To remove the encryption, you can uncheck the Encrypt contents to secure data box, click the Apply button, and then OK.
How to Add Password to a Folder Using 7-Zip
7-Zip is an open-source program that lets you password protect folder in Windows 11. The software works with zip files, and 7-Zip’s folder encryption protocol stands apart from others when it comes to folder protection. You must first download and install 7-Zip and proceed with the further steps.
Download 7-Zip and install it on your PC. Locate the folder you want to protect and right-click on it. Select “Show more options” from the context menu.

Select 7-Zip > Add to archive.

In the Add to Archive dialog box, select “0 – Store” in the Compression level drop-down menu, and check the “Delete files after compression” check box.
Next, enter your password in the Enter password field under the Encryption section and re-enter it to confirm. Finally, click “OK” to close the dialog box.

A new folder will be generated with a .7z extension. You can use any archiving software to open it by entering the password when prompted.
How to Password Protect Folder on Windows 11 Using OneDrive
The cloud-based backup solution OneDrive from Microsoft is excellent at storing all your data safely. It can also password protect folder in Windows 11, which makes it even more popular. The Personal Vault option available in OneDrive lets you keep your entire folder safe, including all your sensitive documents.
The protected folder in OneDrive can include up to three files. Users with Microsoft 365 membership can use it to store unlimited data. Here is how you can use OneDrive to secure folders.
Windows PCs already have OneDrive installed in them. If not, you can download OneDrive. Once it is installed, click on the cloud icon in the system tray to open it.

Click the gear icon and select “Unlock Personal Vault.”

You will now get a two-factor authentication code in your phone number or email address. Enter the code when prompted to unlock the Personal Vault. It will now appear in your file list. Copy your folders to the Personal Vault, and it locks automatically after 20 minutes of inactivity.
To manually lock the Personal Vault, right-click on Personal Vault, and select “Show more options.”

Then, select “Lock Personal Vault.”
How to Make Folder Password Protected Using BitLocker Device Encryption
Microsoft offers great support for encrypting user data, and BitLocker Device Encryption is the perfect example of this. You can now use BitLocker even to password protect folder in Windows 11 Home edition. To be precise, the encryption feature protects not just a folder but the entire drive so that no one else has access to files and folders that are important to you. Let us walk you through how to turn on BitLocker.
Type “disks and volume” in the search bar and open Manage disks and volumes.

Here, you can see all the drives on your PC. Click the “Properties” button near the drive you want to password-protect.

Click the Turn on BitLocker option.

On the next page, you can select an option to decide how to back up the recovery key. Click “Next” and follow the on-screen instructions. After the above-mentioned steps, restart your PC to complete the encryption process.
How to Make Password Protected Folder Using Third-Party Software
If you don’t want to use the built-in features to password protect folder in Windows 11, you can use some third-party app. The effective software Easy File Locker is a convenient option to protect your individual files and folders. After downloading the desktop program, you can password protect your folders with a few clicks. Here is how you can do it.
Download Easy File Locker and install it.
After installation, launch the tool. Next, select System > Set Password.

Enter the password and click “OK.”

Now, select Files & Folders > Add Folder.

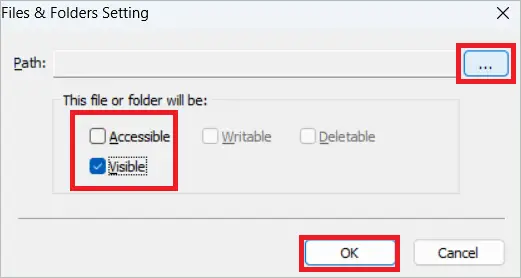
In the next window, select the path of your folder by clicking the three-dots menu. Next, uncheck the Accessible option and check the Visible option.
Finally, click “OK,” and the selected folder becomes protected with the password entered.
To reverse the password protection, select the folder in the Easy File Locker software. Next, select Files & Folders > Remove, and click “Yes.”
How to Make a Password Protected Folder Using a Batch File
A batch file stores commands to be executed in order. Here, we will use a batch file to password protect folder in Windows 11. The file contains a script, which, when run, will create a private folder with restricted access. Follow the instructions given below to password protect folder in Windows 11 using batch file.
Open the folder to be protected with a password and click on any empty space. Next, select New > Text Document. A new text document will be opened. Give a name for it.

Open the document and paste the following text into it.


Locate the line with ‘TYPE_YOUR_PASSWORD_HERE’ and replace it with the password you want to use. Select the File menu in the menu bar and select “Save as.”

Save the file as a batch file by replacing .txt with .bat in the file name box. Next, select Save as type as “All files.”
Finally, click “Save” and close the text document.

Double-click on the batch file to run it. Now, a new folder with the name Locker will be created in the same folder as the batch file. Move the folder you want to protect into this new folder. Double-click on the batch file again, press “Y,” and then press Enter.
Now, the Locker folder will become invisible. You can run the batch file and provide the password to view the folder again.
Final Thoughts
We don’t want anyone to tamper with our data, so Windows has made content protection features its top priority. You can password protect folder in Windows 11 to ensure that your files and folders are encrypted and cannot be opened without a password. For this, you can use the excellent features provided by Microsoft or use other dedicated tools.
The cyber-world is full of users who never miss a chance to peek into others’ confidential information. However, if you password-protect files and folders, then there are lesser chances that your data gets leaked.


