Key Takeaways
- Different users of the same PC can use different local accounts in Windows 11 to keep their data separate
- Even though you need a Microsoft account for Windows 11 installation, the requirement can be bypassed by using a local account instead
- A local account can be created during or after the installation of the OS
With the latest Windows 11 22h2 upgrade in full swing, installing Windows 11 without a Microsoft account is almost impossible. But we are not less smart either. There are a few workarounds to create a local account in Windows 11 during and after the installation. Most of them can be used with Windows Home and Pro editions.
You may need different offline accounts on the same device so other users can sign in. Each local account with Windows 11 can have different settings for varying purposes. These can be set up without the internet, and their operation is easier as the data always remains private. The setup process of Windows 11 Pro or Home local account is a matter of a few steps anyone can complete.
8 Ways To Create A Local Account In Windows 11
In the article, you will learn a few ways to create a local account in Windows 11. The first two are methods you can use to set up your computer with the latest OS. And if you don’t want to add your Microsoft account, you can use a local account instead. The remaining methods let you create a local user account after installation. So, let us get into the task now.
Create Local Account During Windows 11 Setup
Even though it is mandatory to have a Microsoft account during the Windows 11 setup process, there is a workaround to choose a local account. You can set up your local account in Windows 11 and complete the installation successfully without disconnecting the internet. Let us see the steps.
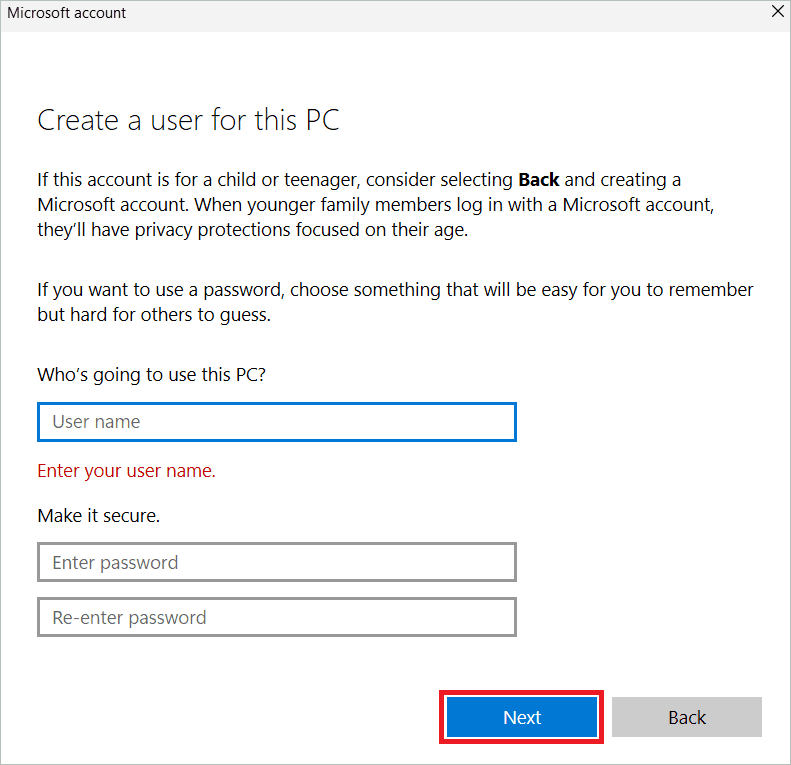
Connect to the internet and start the Windows 11 install. When the Microsoft sign-in page appears, type a@a.com in the email field and click “Next”. Next, type any password in the next page and click “Sign in”.
You will get an error message as the dummy account is already locked due to incorrect passwords. Now, you will be able to create a local account. In the error page, click “Next”. You will be taken to the page where you can enter your local account credentials, like username and password. Complete the setup and start working on your new OS with the local account.
Create Local Account During Windows 11 Setup Using Rufus
Rufus is open-source software that helps create a bootable USB drive to set up Windows 11. With Rufus, you can bypass Microsoft account requirements during installation and instead opt to create a Windows 11 local account. Here are the detailed steps to install Windows 11 without using a Microsoft account.
Download Rufus and connect the USB drive to your computer. Next, click the Select button to add the Windows 11 ISO image. Now, click the Start button.
In the pop-up window, check the “Remove requirement for an online Microsoft account” box, and click “OK”. Once Rufus flashes the image, install Windows 11 from the USB drive. You will be prompted to create a local account and complete the installation.
Windows 11 Local Account Setup Using Settings
The methods from here on guide you through creating a local account in Windows 11 after installing the OS. The first one uses Windows Settings, which works for both Home and Pro editions. Here are the detailed steps.
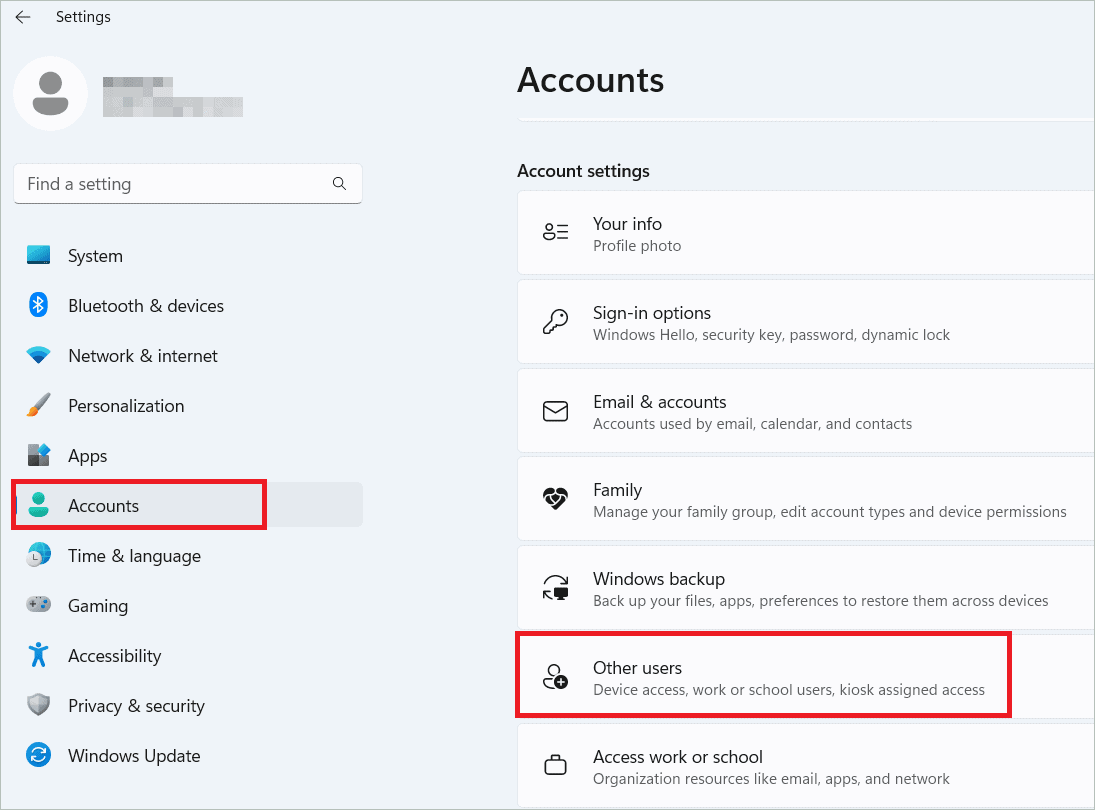
Open the Settings app by pressing Windows + I. Select “Accounts” in the left pane and “Other users” under Account settings in the right.
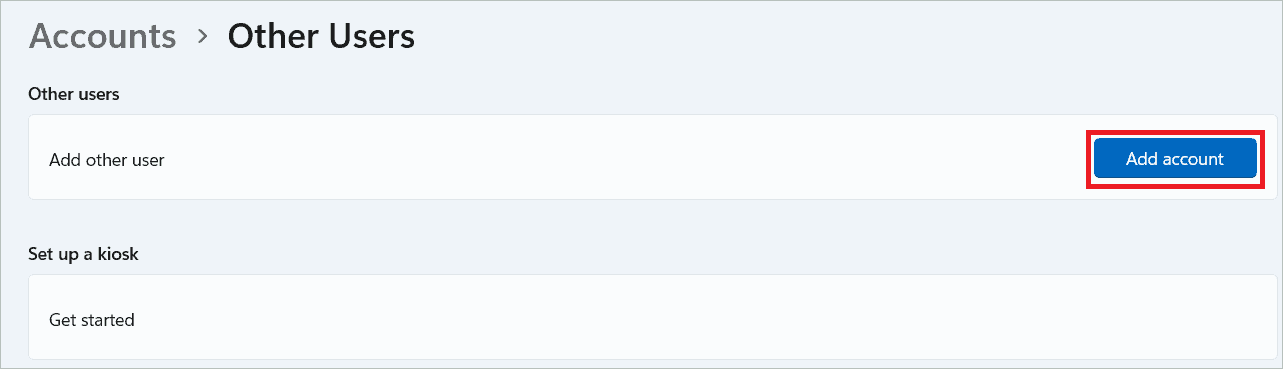
Click “Add account” beside Add other user under Other users.
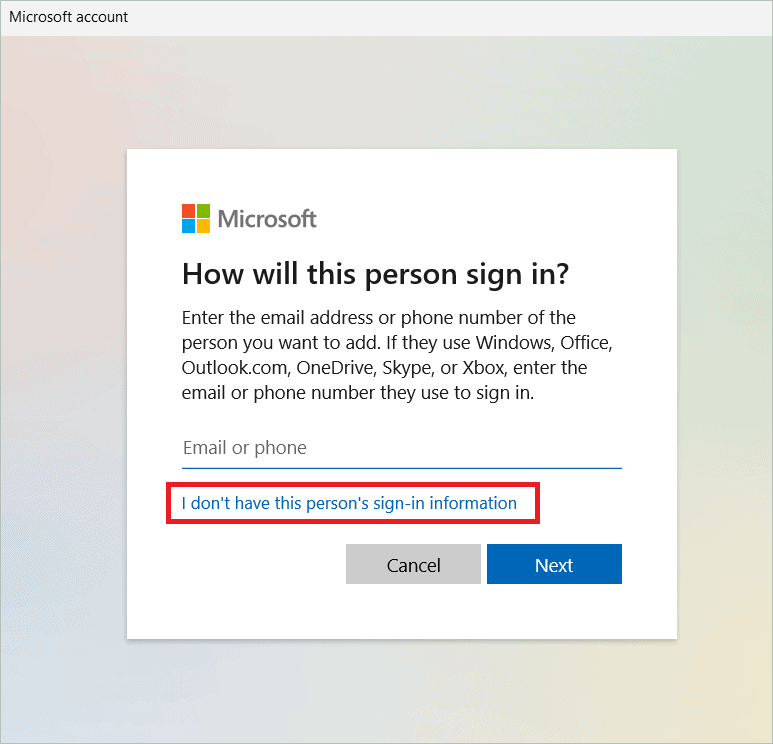
Click “I don’t have this person’s sign-in information.”
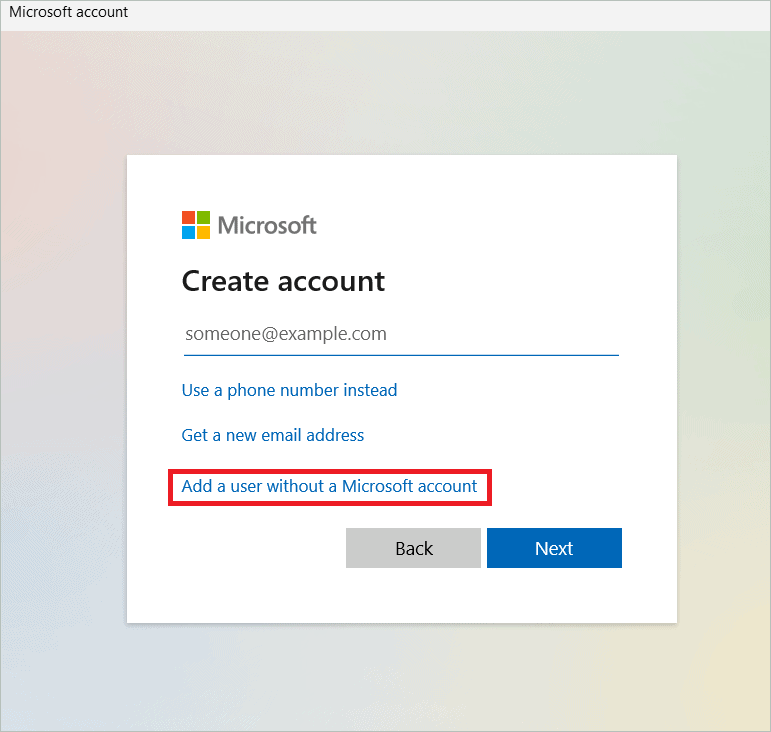
To avoid creating a Microsoft account, click “Add a user without a Microsoft account.”
In the next window, enter the username and password in the respective fields and click “OK” to complete the account creation process.
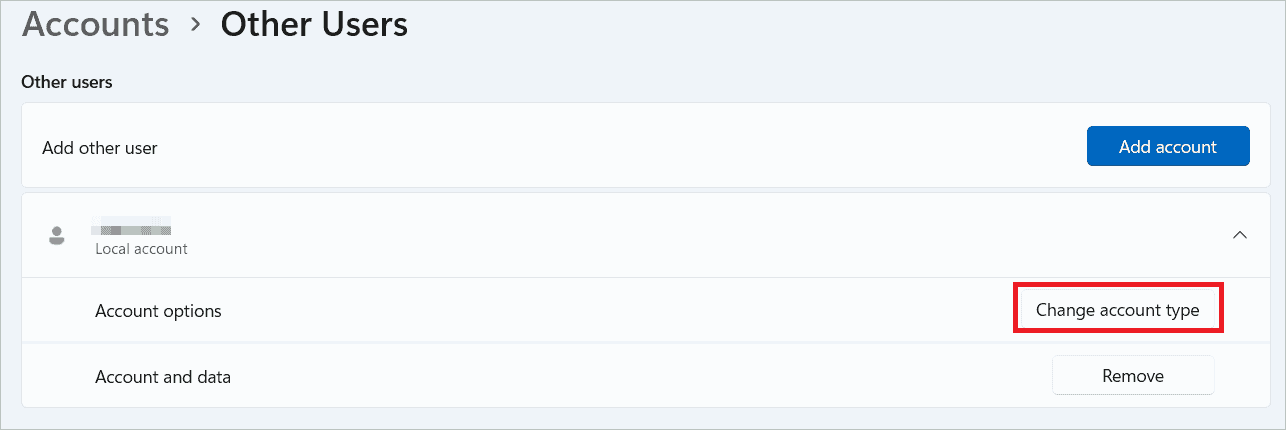
If you want to give administrative privileges to the account, go to Accounts > Other users. Select the user account you wish to make administrator and click “Change account type” beside Account options.
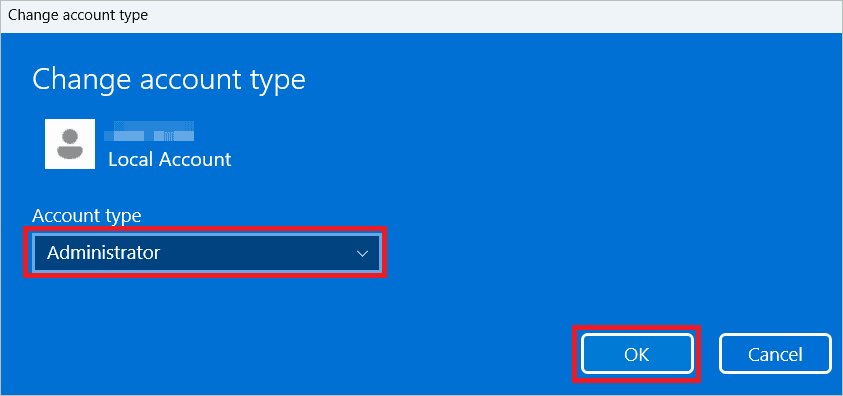
In the Change account type window, select “Administrator” in the Account type drop-down box and click “OK.”
Create A Local Account Using Command Prompt
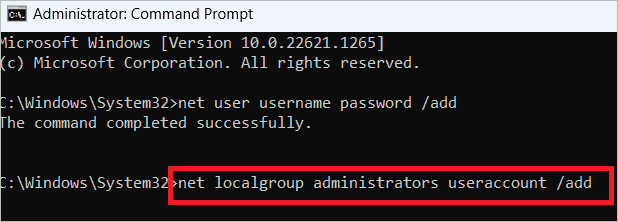
If you are comfortable with command-line tools, you can create a local account in Windows 11 using the Command Prompt. You only need to know and type the command correctly on the interface.
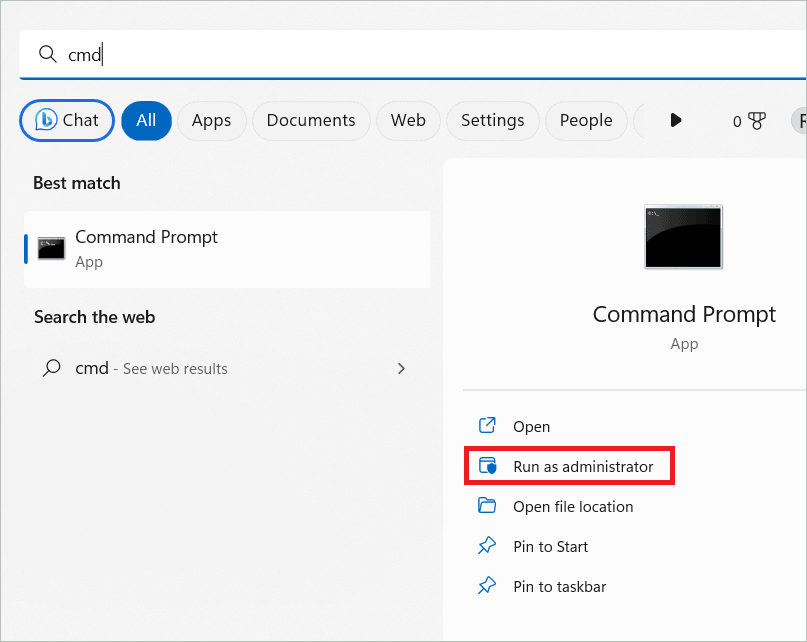
Type “cmd” in the search bar. Select the “Run as administrator” option when the Command Prompt appears.
To set up a new local account, type the following command in the Command Prompt window and press Enter.
net user username password /addYou may replace the username and password with the username and password you intend to use.

To make the new account an administrator account, type the following command and press Enter.
net localgroup administrators user account /addUse the actual user account in the command.
Create A Local Account Using PowerShell
Creating a local account using PowerShell differs slightly from the Command Prompt method as both commands differ. In PowerShell, the password is first assigned to a variable. This variable is then used in the command in place of the password. Look at the steps below to understand how to create a local account on Windows 11.
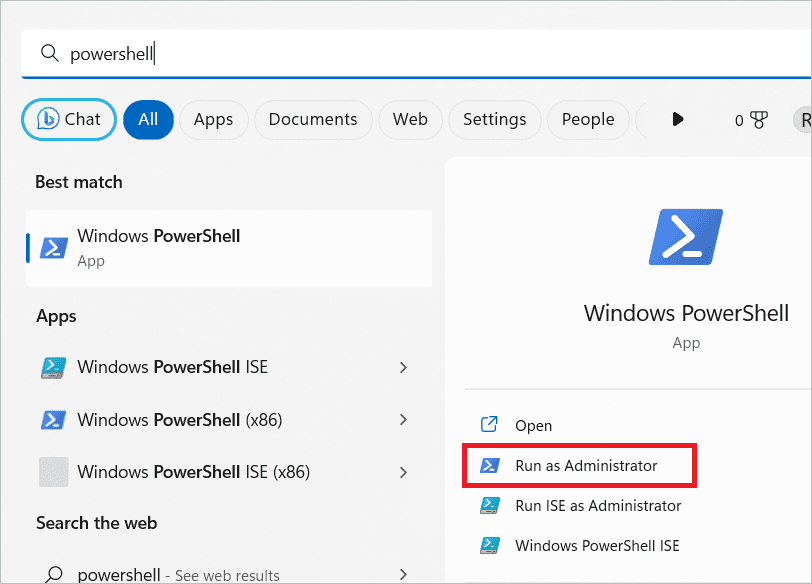
Type “powershell” in the search box and open PowerShell by selecting the Run as Administrator option.
Type the following command to store the password in a variable and press Enter.
$Password = Read-Host -AsSecureStringNow, enter the password you want for the new account and press Enter.
For account creation, type the following command and press Enter.
New-LocalUser "Account name" -Password $Password -FullName "Full name" -Description "Description"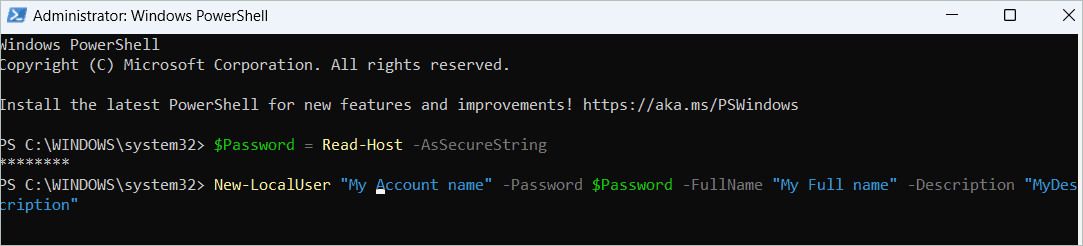
Replace the Account name, Full name, and Description in quotes with the actual name of the account, full name, and description of the account, respectively.
To add the account to the Administrators group, type the following command with the actual account name and press Enter.
Add-LocalGroupMember -Group "Administrators" -Member "Account name"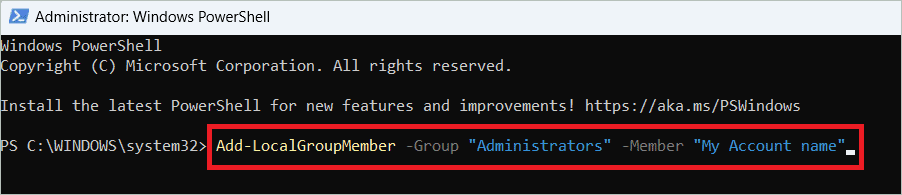
Windows 11 Local Account Setup Using Netplwiz
Netplwiz is a Windows utility that administrators can use to manage users and groups. You can use Netplwiz to create a local account in Windows 11. Here are the easy steps.
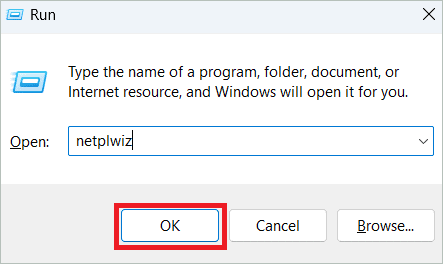
Press the Windows key + R to open the Run dialog box. Type “netplwiz” and click “OK.”
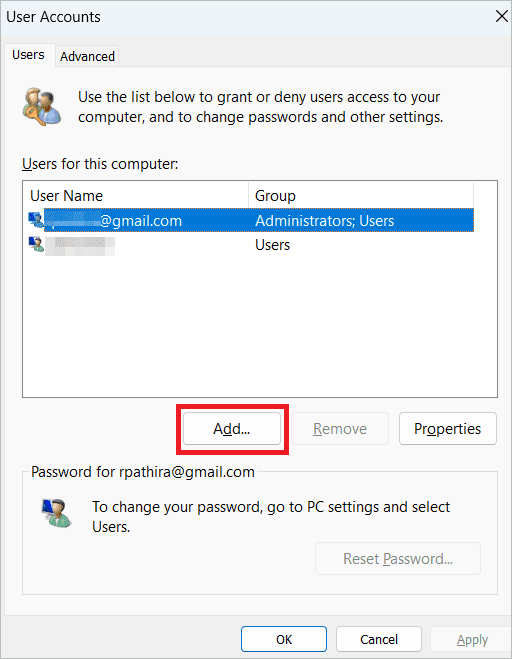
In the User accounts window, Click the Add button.
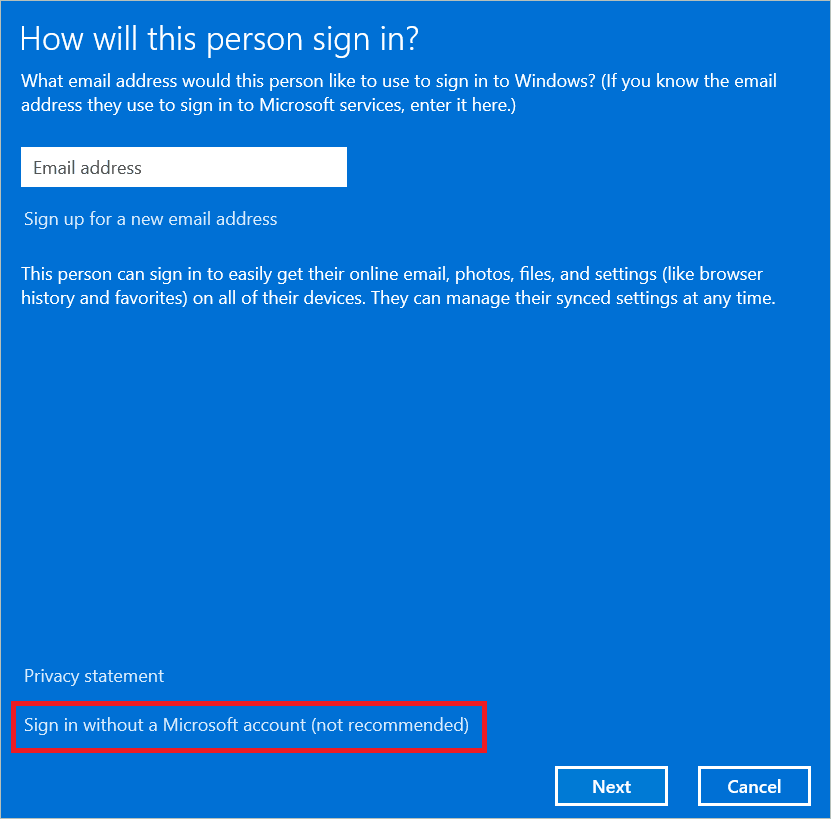
Click “Sign in without a Microsoft account.”
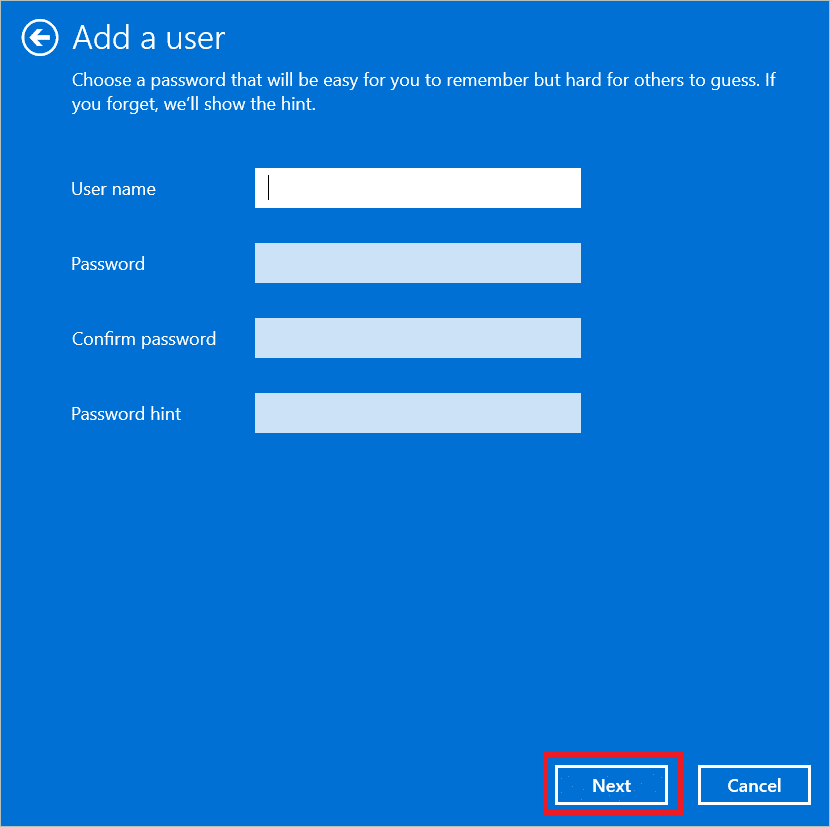
To create a local account, click the Local account button.
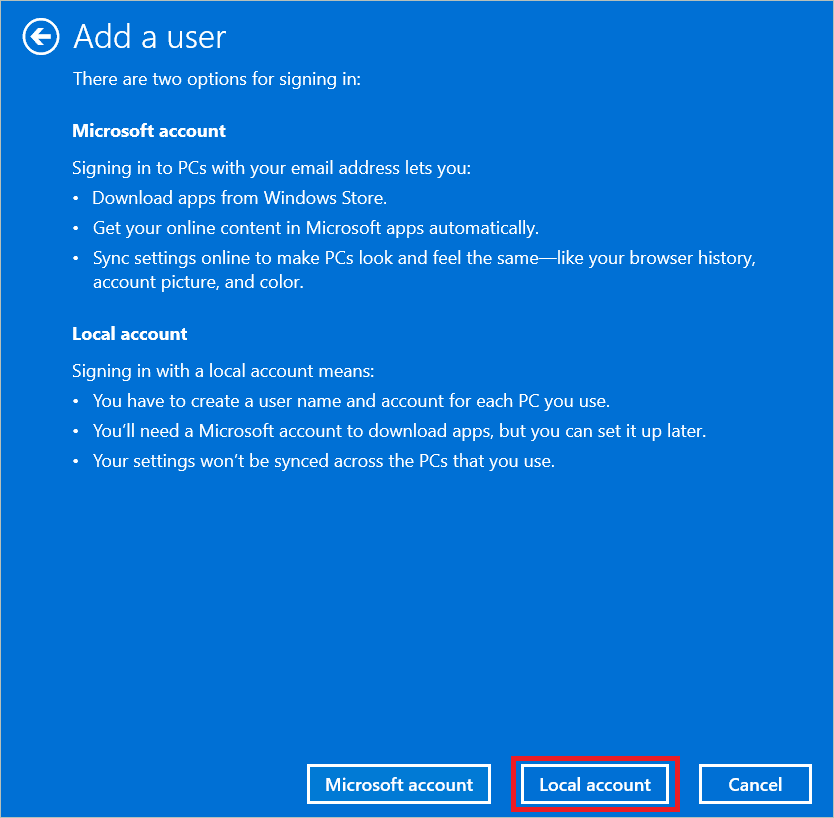
In the Add a user window, type in the username, password, and password hint, and follow the on-screen instructions.
Create A Local Account Using Computer Management
Computer Management brings together administrative tools that help manage remote or local computers. You can use Computer Management to create Windows 11 local accounts if you are a Windows Pro user. But Windows 11 Home local account setup will not be possible with the app. Let us see the steps to create an account with Computer Management.
Type “computer management” in the search bar and open the app.
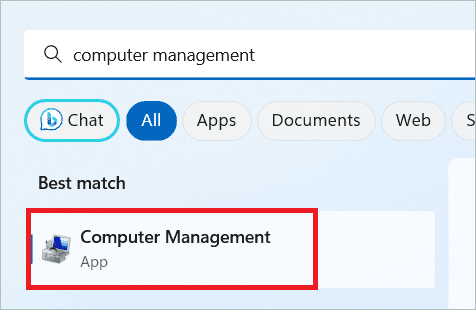
In the left panel, select System Tools > Local Users and Groups. On the right-hand side, you will see an option named Users. Right-click on it and select “New User.” Then, follow the on-screen instructions to create a local user account by typing in a username and password.
Switch To A Local Account in Windows 11
Most users sign into Windows using a Microsoft online account to get benefits like getting Microsoft services. If you want, you can switch the existing Microsoft account to a local account on Windows 11 PC right from the Settings page.
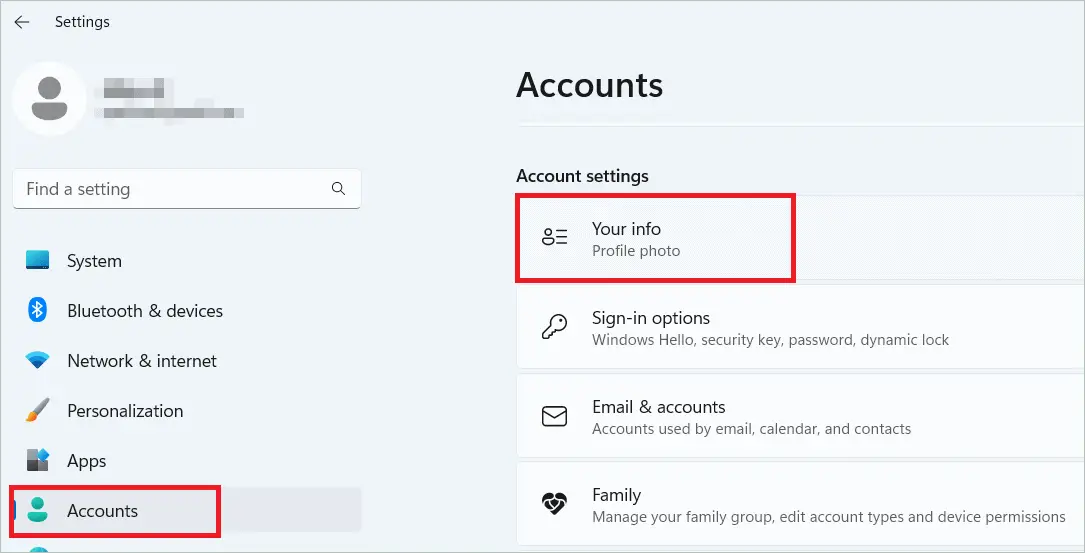
Open Settings and select Accounts > Your info.
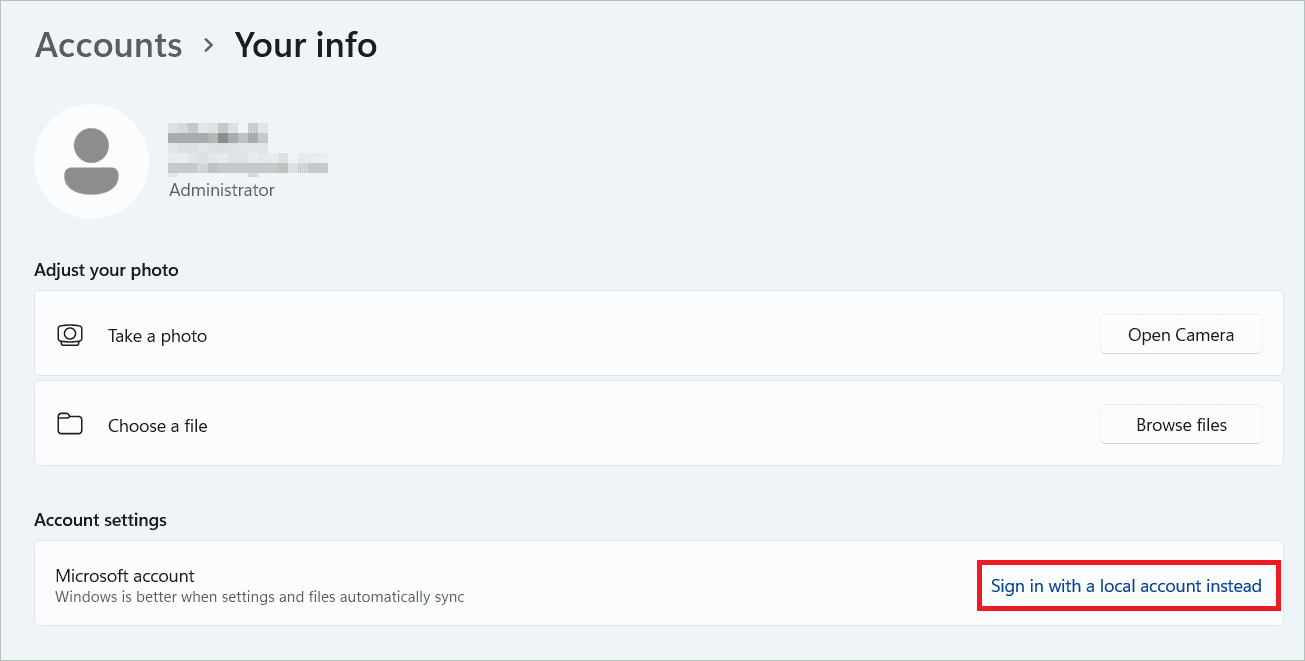
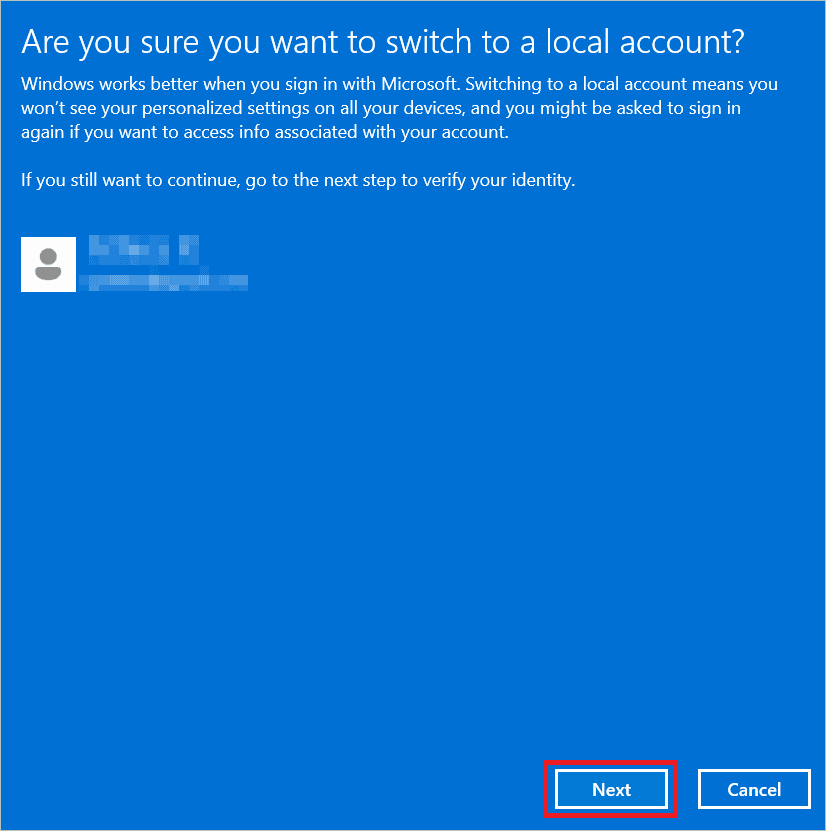
Click “Sign in with a local account instead” near Microsoft account under Account settings.
Click “Next” in the confirmation window.
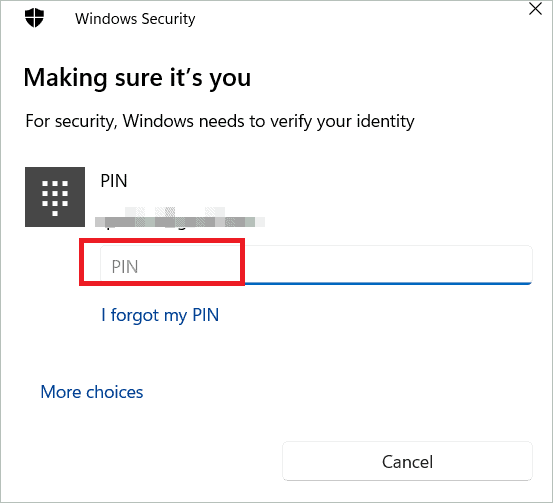
Type in your PIN to go to the account setup page.
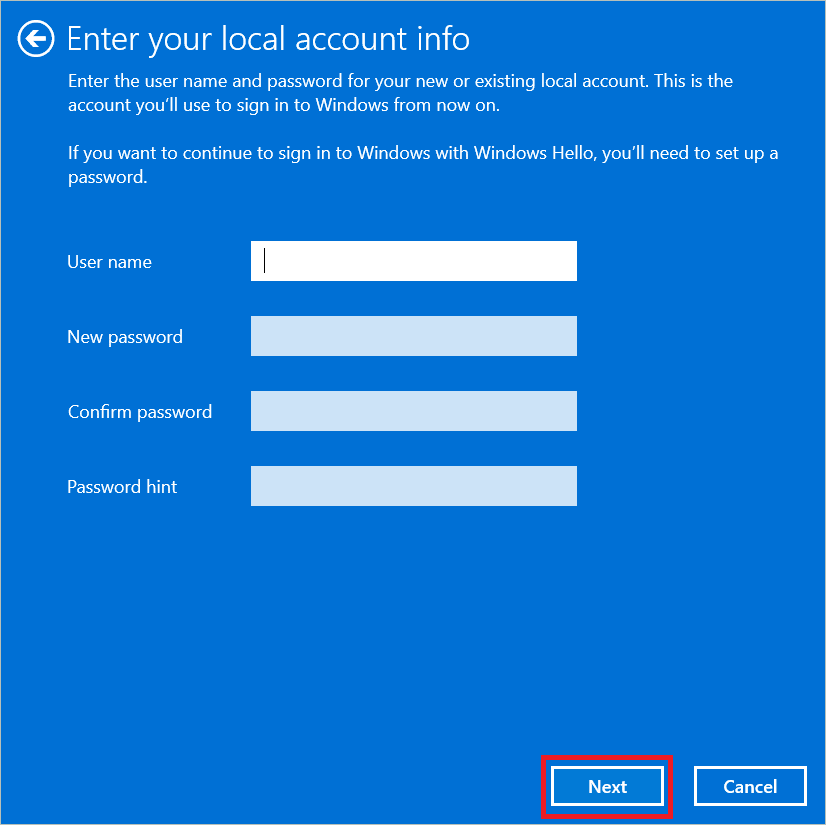
Enter your username, password, and hint password for successful local account creation.
Final Thoughts
A local account in Windows 11 gives you privacy if many users are using the same device. Each can set up a local account and sign in to the system using the particular account credentials. This way, none of the private data will be accessible to other users. You can also use this option to create a local work or school account.
Whether you are into a fresh Windows 11 installation or are already done with it, you can create a local account without any hassle. If you have already installed the OS on your computer with a Microsoft account, you can even consider switching to a local account whenever you want!


