There is nothing more frustrating than your Windows 11 keeps crashing unexpectedly! From losing your data to damaging the device, you never know the after-effects of the crash. As Windows 11 is relatively new and updates are on their way, you must take charge of the situation before it goes out of hand.
Some minor things to remember include verifying if you have correctly shut down your PC, using the power adapter that came with the device, and checking the power supply for issues. But anything from faulty drivers and corrupt system files to software conflicts can also be held responsible for Windows 11 constantly crashing. If you have taken all precautions from your side, it is time to do some deeper analysis.
17 Ways To Fix Windows 11 Keeps Crashing
There are several ways to fix the Windows 11 keeps crashing issue. Many of them are standard solutions that can also be used with the blue screen of death error. If you have tried all the obvious solutions, you may try these and see if you can end your Windows 11 issue that makes it crash often.
1. Uninstall Recent Updates
It is essential to run Windows updates periodically to keep the system up to date. Mostly, the OS runs auto updates. But you must be vigilant about the updates resulting in compatibility issues. If Windows 11 keeps crashing due to these issues, you may find the recent updates and uninstall them.
Open the Settings app by pressing the Windows key + I. In the Settings window, select Windows Update > Update history.
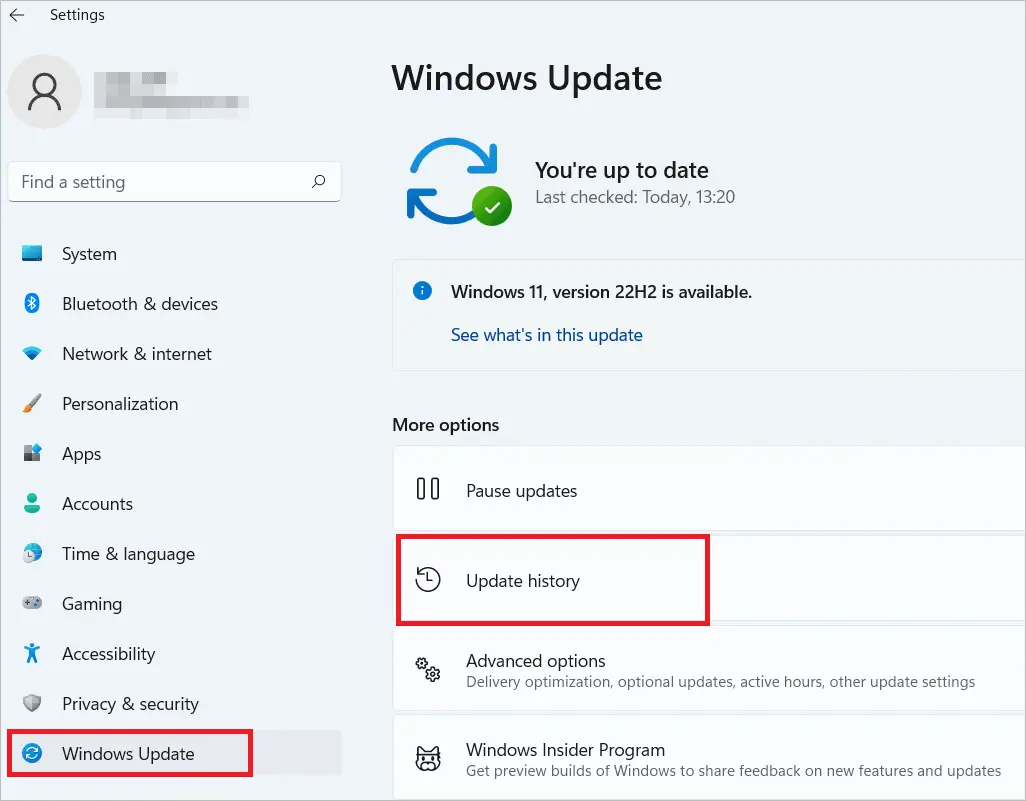
Next, select “Uninstall updates” under Related settings.
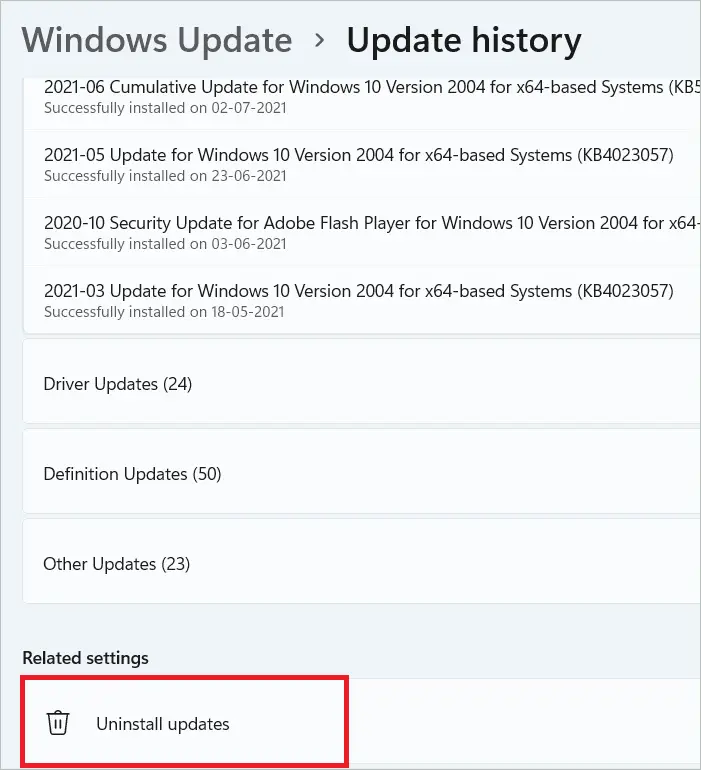
Select the ones you want to remove from the list of recent updates and click Uninstall.
2. Uninstall Recently Installed Applications
Sometimes, our device overflows with applications, many of which are not necessary. Especially with the latest version of the OS, you cannot say which applications are compatible with it. If the Windows 11 keep crashing error occurred after you recently installed an app, you can remove it to see if the problem persists.
Type “settings” in the search bar and open the Settings app.
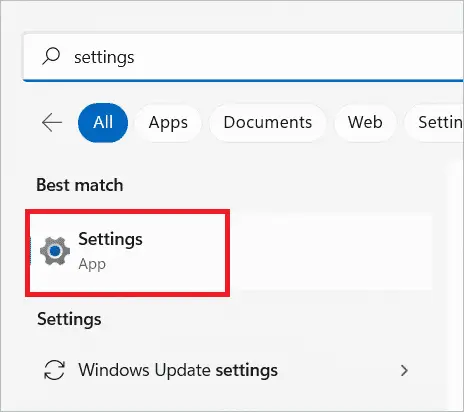
In the Settings window, select Apps > Apps & features.
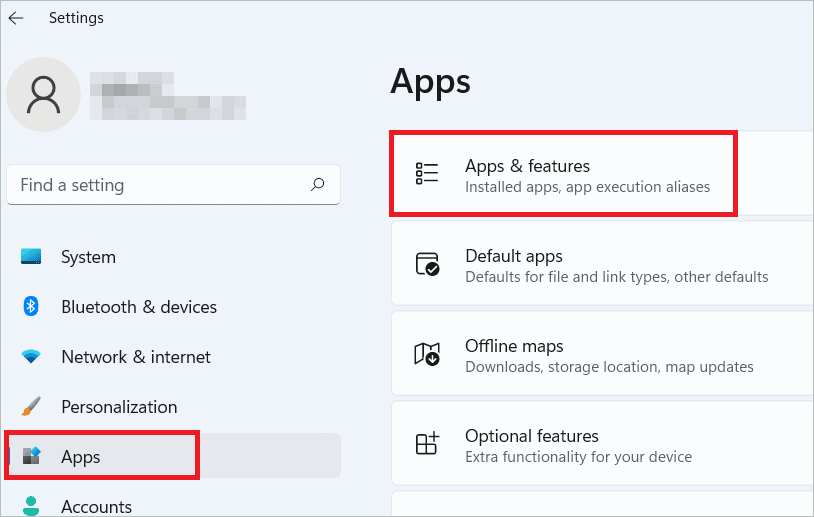
In the Apps & features page, locate the application you want to remove. Then, click on the three dots beside it and select “Uninstall” from the list.
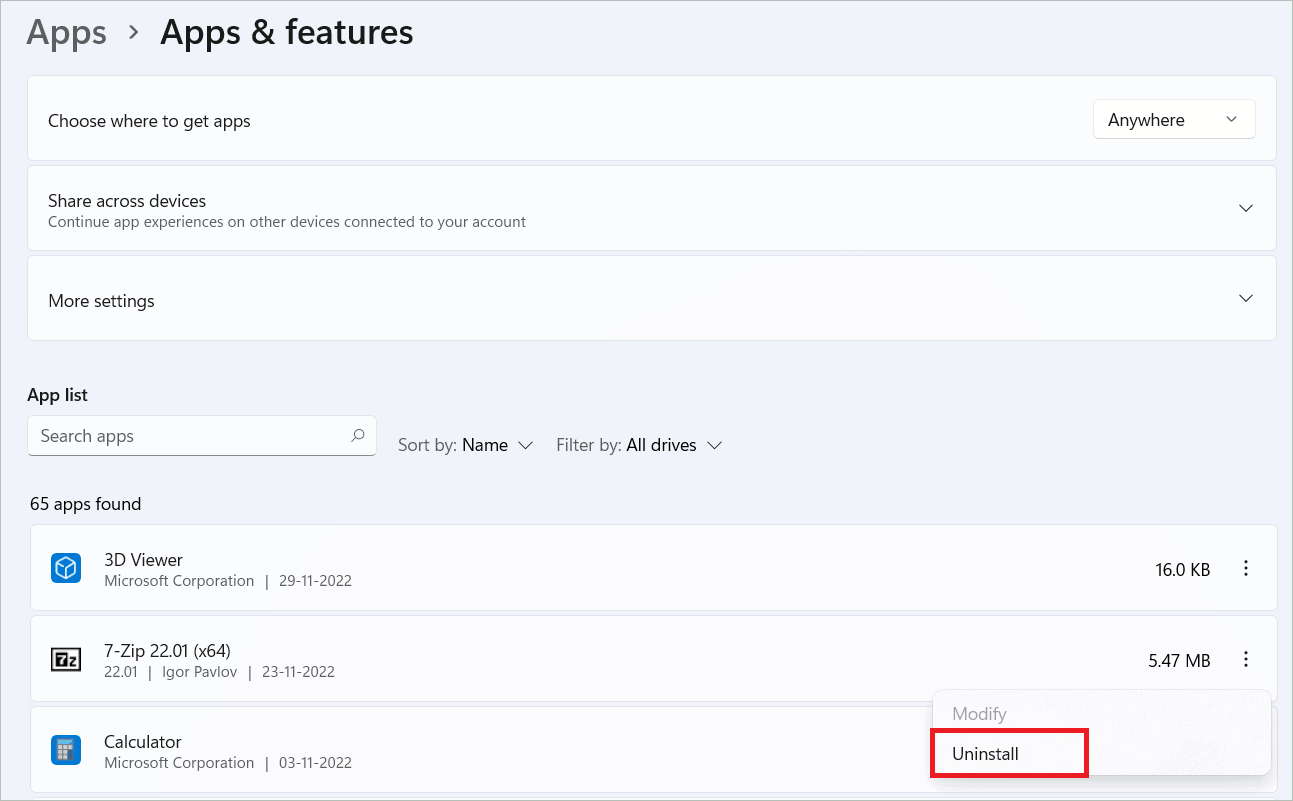
Click “Uninstall” in the confirmation window. Once the app is uninstalled, restart your system.
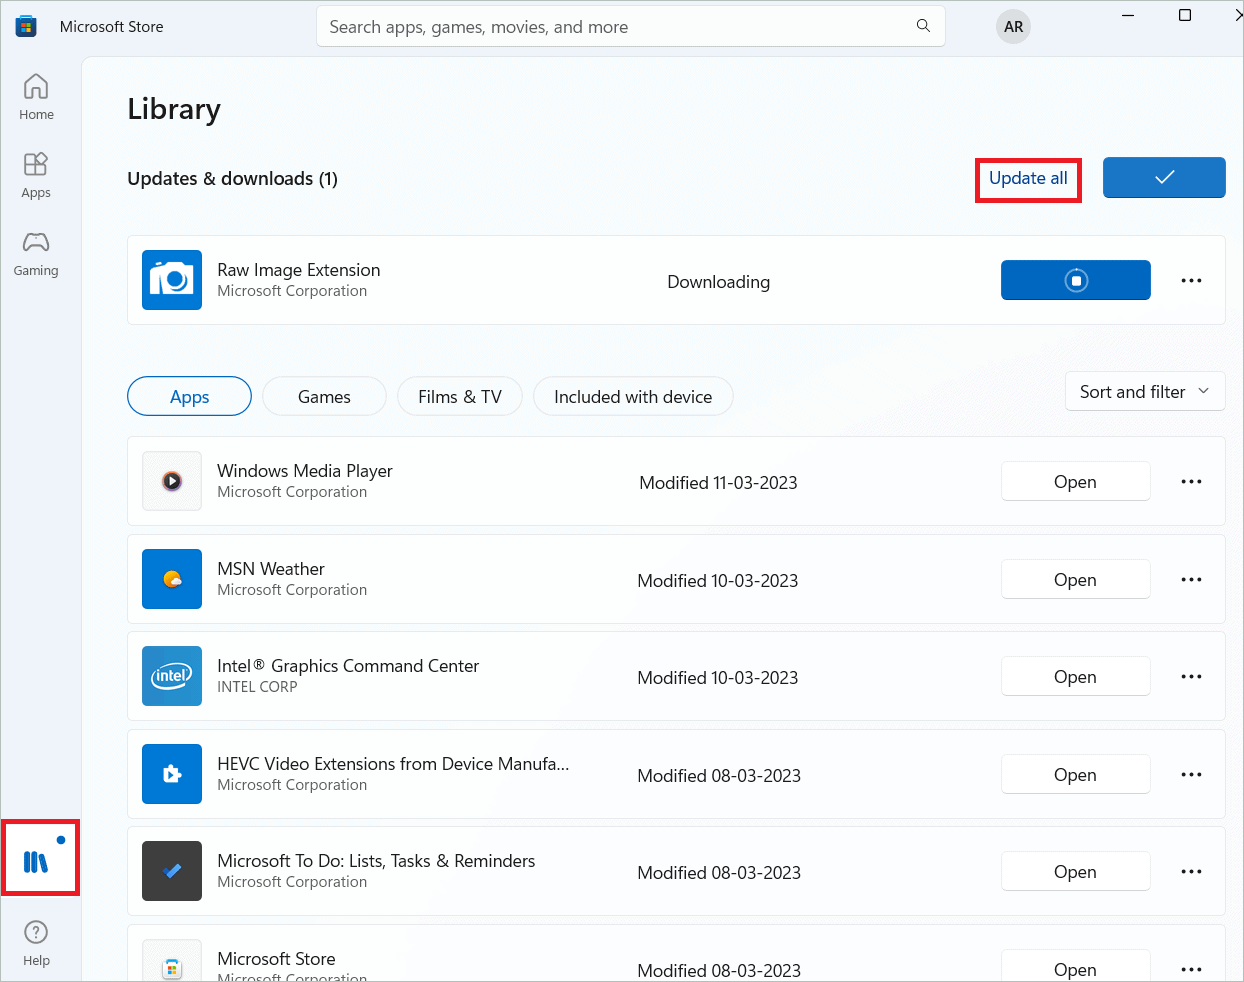
You may also update the recent app to fix software conflicts. To update Microsoft Store apps, launch Microsoft Store and select the Library tab on the left panel. Check app updates by clicking the “Get updates” button. Click the “Update all” button to install the updates, if any. If Microsoft has an update with a bug fix, you may be saved from the crashing issue.
3. Update Graphics Driver
The graphics card is an important component of your PC that affects its performance. If your Windows 11 keeps crashing, check if the graphics driver is updated. Many compatibility issues arise from outdated drivers. Use Windows Device Manager to manually update the graphics driver, as detailed below.
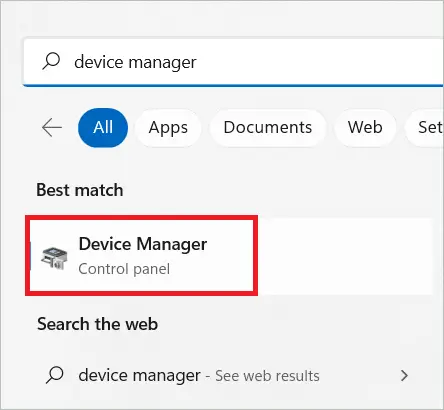
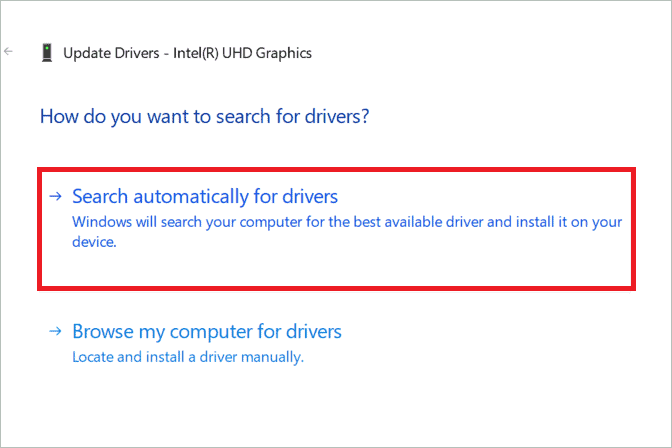
Type “Device manager” in the search bar of your Windows 11 PC and open the Device manager.
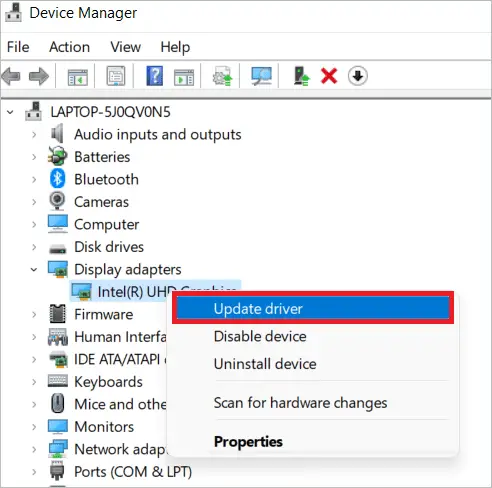
Double-click on “Display adapters” to expand it. Right-click on the graphics card and select “Update driver” in the context menu.
You will get two options in the next window. Select “Search automatically for drivers.” The OS will now find the best available driver and install it.
Note: Check all the components on your device for outdated or faulty drivers. If you find bad device drivers, you can also visit the manufacturer’s website to install the latest updates. You may also reinstall drivers if you want.
4. Disconnect Incompatible Hardware
Incompatible or faulty hardware also cause Windows 11 crashing episodes. If you have connected various hardware pieces to your PC, you may disconnect them and check if you can recover Windows 11.
You may unplug gaming gears, mouse, keyboard, or any other hardware connected to your system one after the other. Now if the PC is working fine, it means that the hardware component was causing the problem. Connect each back and find the real problem-causer.
5. Windows Update
You must be aware that Windows automatically checks for system updates and installs them without any user intervention. But Windows 11 keeps crashing unless the updates are installed timely. You can check for updates in Windows Settings and install them manually.
Open Settings and select “Windows Update” from the left pane. Click the “Check for updates” button on the right.
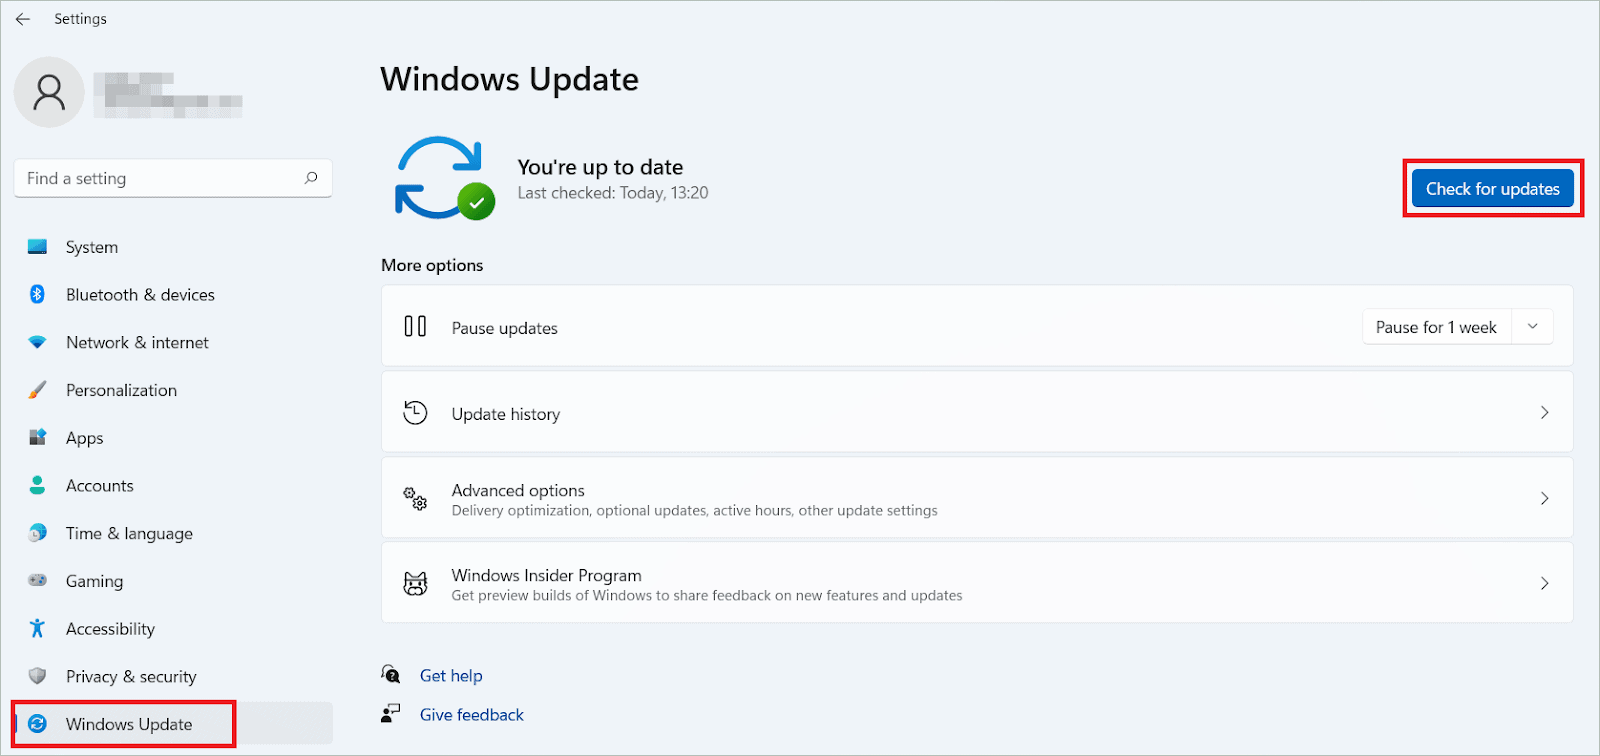
If you find any updates listed, click the “Download & install” button to start updating Windows. Finally, restart the computer for the changes to apply.
6. Run Windows Memory Diagnostic Tool
If there are any errors with the RAM and storage drive, it might affect the whole device’s working. If your laptop keeps crashing due to these hardware issues, you could run the Windows Memory Diagnostic Tool to find a solution.
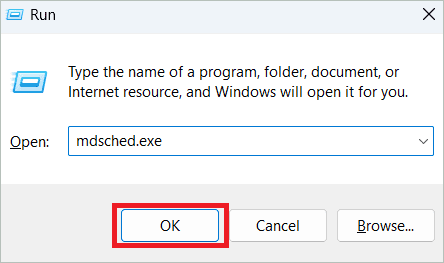
Press the Windows key + R to open the Run dialog box. Type “mdsched.exe” and click “OK.”
When the Windows Memory Diagnostic Tool opens, select the “Restart now and check for problems” option to run a scan.
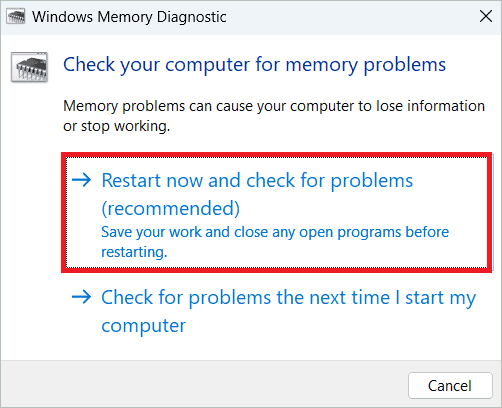
After the system restarts, the scan is done. You may then check if Windows 11 still crashes.
7. Fix Overheating
Overheating can be dangerous to your computer as it slows down the system, or your Windows 11 keeps crashing due to excessive heat. Overheating means the CPU fan must run at its full speed. This is, again, a bad thing resulting in system issues.
To avoid heating issues on a desktop or laptop, make space for ample ventilation. Steer clear of any dust particles on the surface of the device. Remember not to place the laptop on surfaces that make it warm, like blankets. Also, remember to shut down the laptop before tucking it away in its bag.
8. Clean Boot
A clean boot starts your computer with only the essential programs. So if some incompatible software is responsible for Windows crashing, you can identify it easily. Your system resumes working once the component is disabled. A troubleshooting initiative will reveal which one was causing the issue. Let us see the clean boot steps to fix the problem.
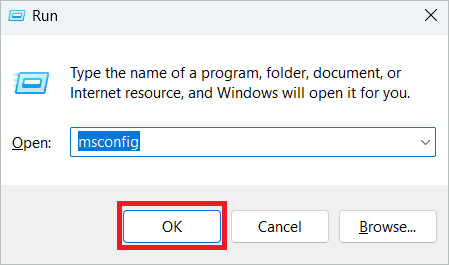
Open the Run dialog box, type “msconfig” and click “OK.”
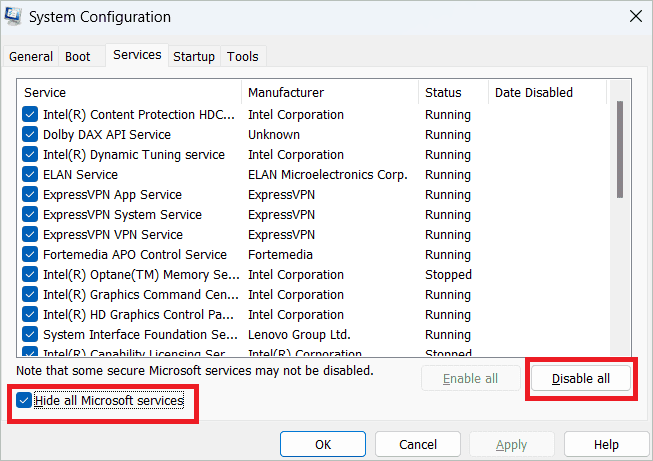
In the Services tab, check “Hide all Microsoft services” and click the Disable all button.
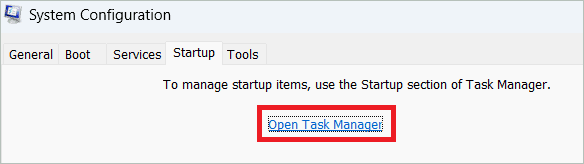
In the Startup tab, click “Open Task Manager.”
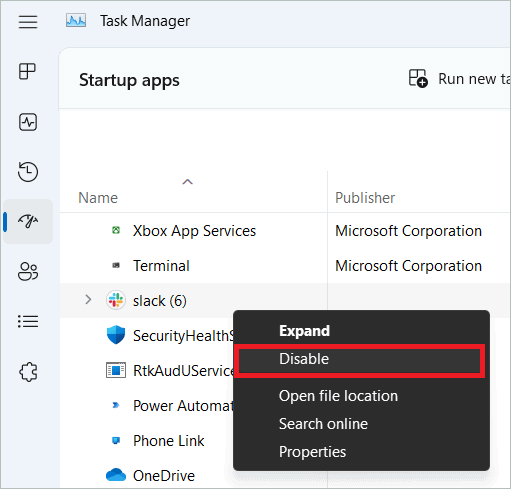
Locate the third-party applications, right-click on them, and select “Disable.”
Click “OK” in the System Configuration dialog box. Finally, restart your PC to see if the system still crashes.
9. Scan For Malware
If malware is an uninvited guest on your computer, no surprise that Windows 11 keeps crashing. Even though the OS does its part to keep malware at bay, it is better to be extra sure by running a malware scan. You can use the scan feature in the OS to fix Windows 11 crashing issue.
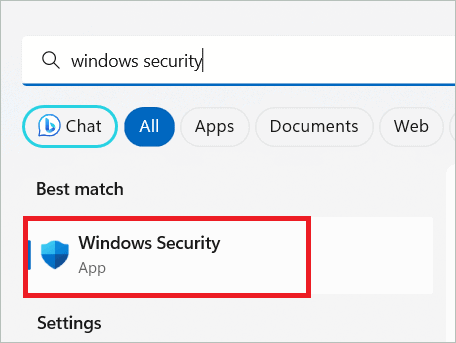
Type “windows security” and open Windows Security app.
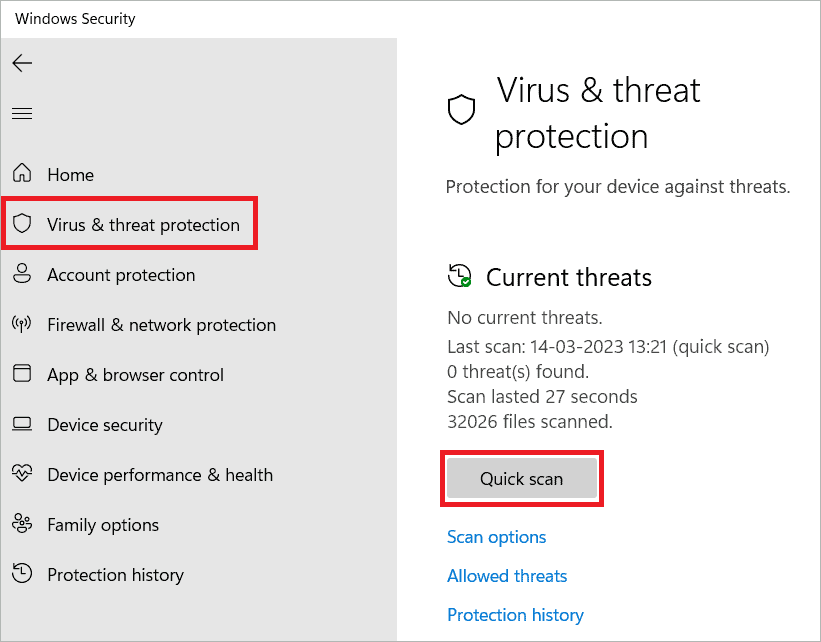
Select “Virus & threat protection in the left panel. Then, on the right, click the “Quick scan” button to start the malware scan.
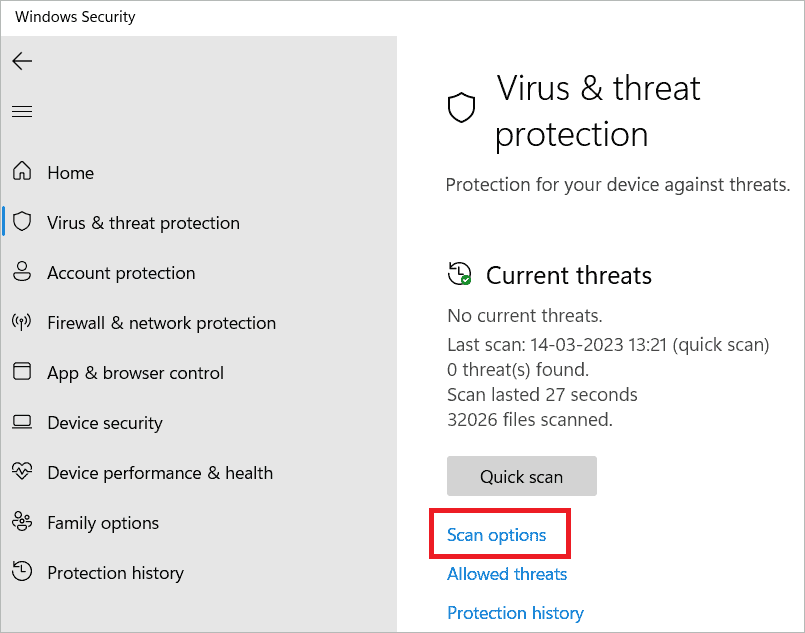
You can also do a deeper scan by clicking the Scan options.
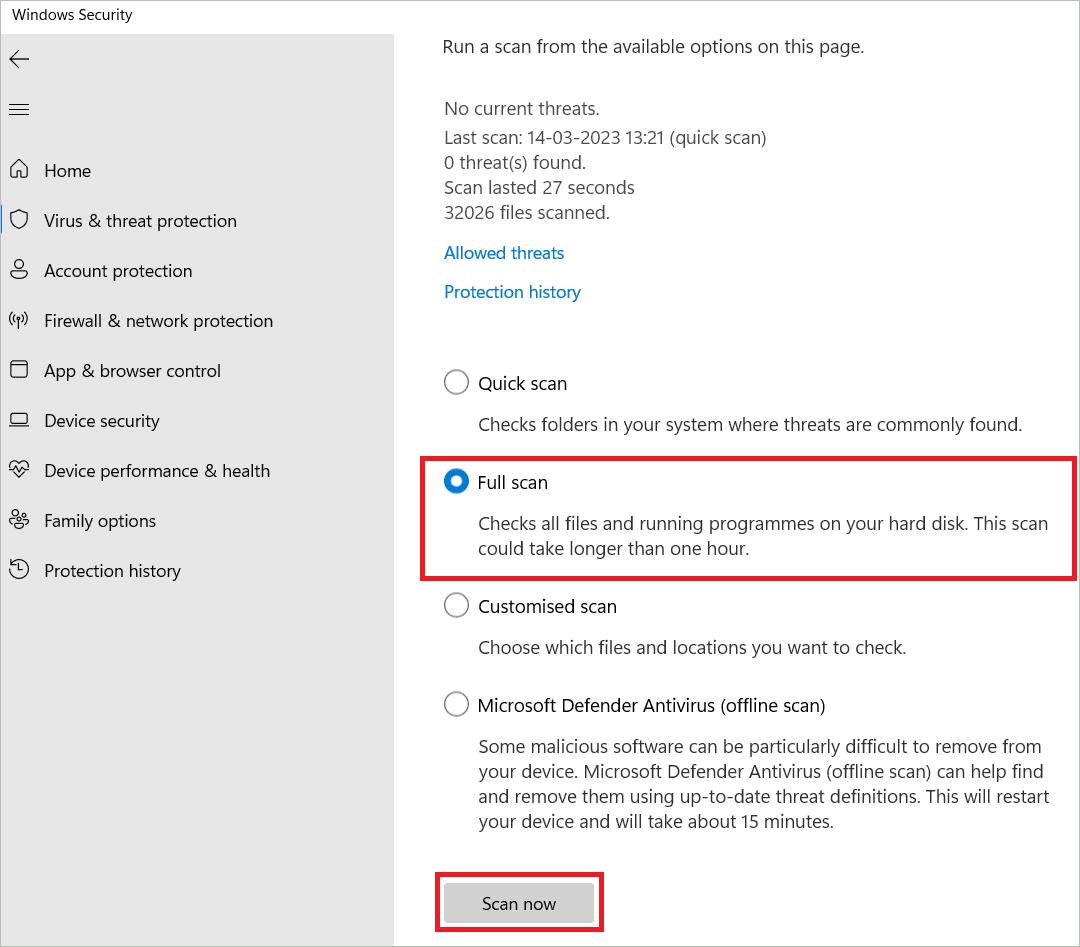
Select the “Full scan” radio button and click “Scan now” to unearth any hidden malware.
10. Run SFC And DISM Commands
If your computer keeps crashing Windows 11, you may also blame it on the corrupted system files. Luckily, the OS comes with SFC and DISM utilities that scan for such files and replace them. Here is how you can run the commands.
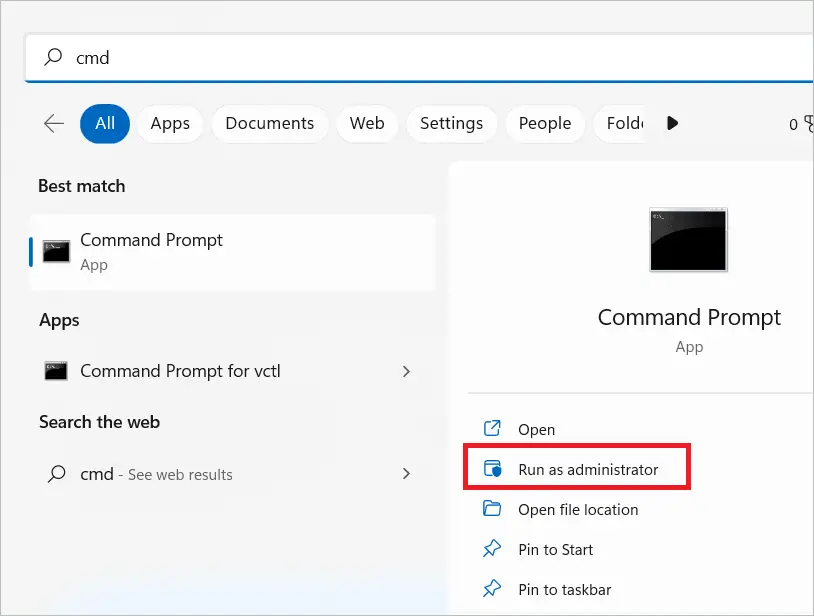
Type “cmd” in the search box and open Command Prompt by selecting “Run as administrator.”
Type the following command and hit Enter to run the SFC scan.
sfc /scannow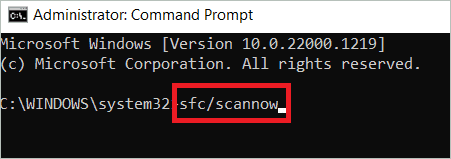
Wait for some time, and then restart your PC. If it is still crashing often, run the following DISM commands.
DISM /Online /Cleanup-image /ScanhealthDISM /Online /Cleanup-image /CheckhealthDISM /Online /Cleanup-image /RestorehealthAfter executing the commands, check if the PC crashes again.
11. Change Display Resolution
Changing display resolution is a method that can be tried with ultra-wide displays. If Windows 11 keeps crashing for the wider screen system, choose a display resolution that maintains an aspect ratio of 16:9.
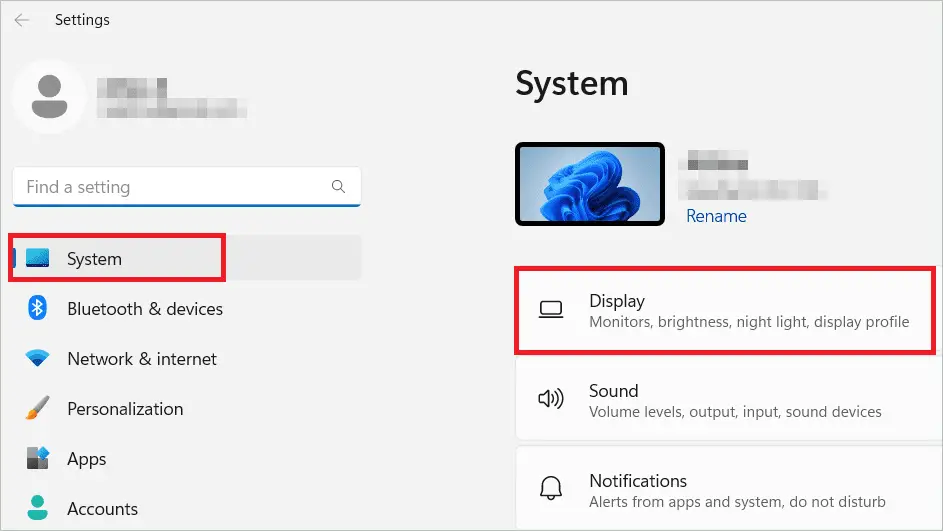
Open Settings and select System > Display.
Under the Scale & layout, you will find the Display resolution option. Select the apt value in the drop-down menu beside it to put an end to the crashing issue.

12. Disable Overclocking
If your PC is stable, then there is no harm in overclocking it to get better performance. But overclocking may not be a good idea if the OS crashes often. Disable the overclocking settings in the software as soon as possible to avoid further damage. Also, if BIOS settings were changed, reset BIOS to default. Visiting the manufacturer’s website will give you the specific steps for each device.
13. Increase Virtual Memory
If your PC is out of RAM, your Windows 11 keeps crashing, giving you a hard time. But if you increase the virtual memory, it will work in place of RAM and offer relief in memory requirements. So, take a look at the steps to increase virtual memory.
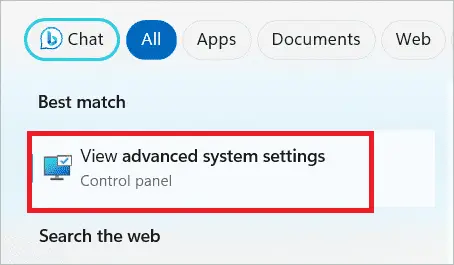
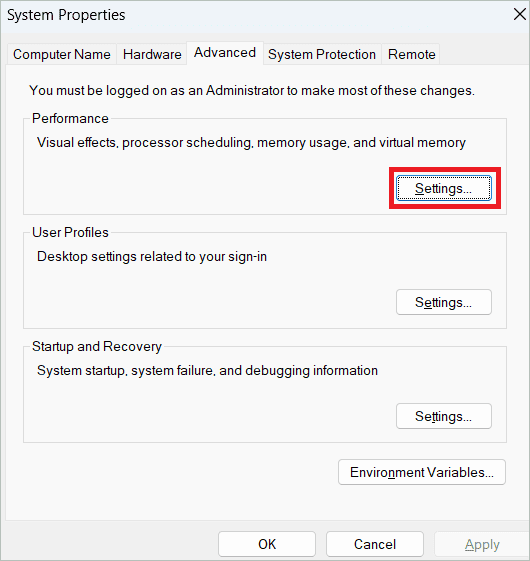
Type “advanced system settings” in the search bar and open the settings page.
Select the Advanced tab and click “Settings” under the Performance section.
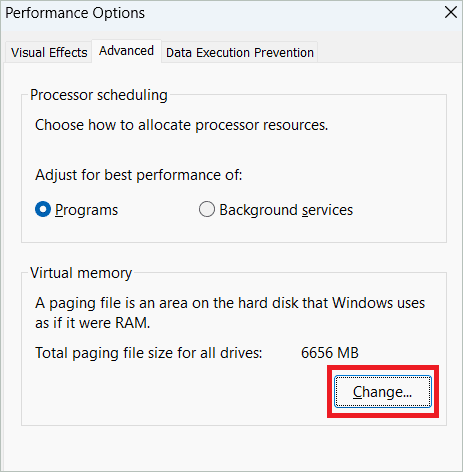
In the Performance options window, select the Advanced tab. Then, click “Change” under Virtual memory.
Uncheck “Automatically manage paging file size for all drives.” Next, select the Custom size radio button and enter the initial and maximum sizes. Finally, click “Set” and “OK” to save the changes.
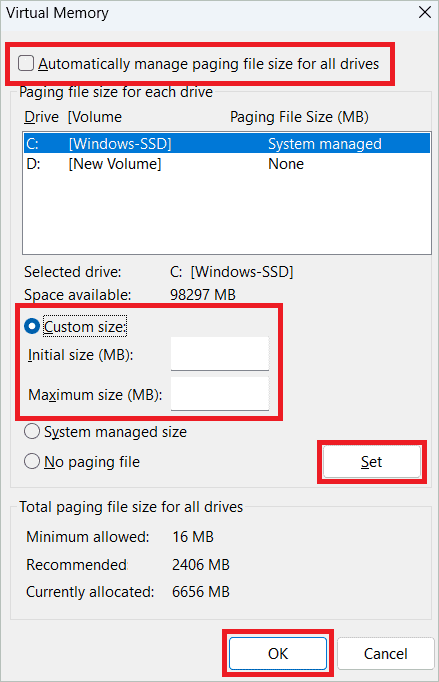
Note: The initial and maximum sizes to be set depend on the computer’s physical memory. According to Microsoft’s suggestion, the virtual memory must be 1.5 to 3 times the size of physical memory.
14. Read The Crash Log
It helps if you identify the root cause of the system crashing frequently. The crash log is the right place to check the actual problem. The built-in Event Viewer has a log of the system behavior. So, take a look at it to find the error messages.
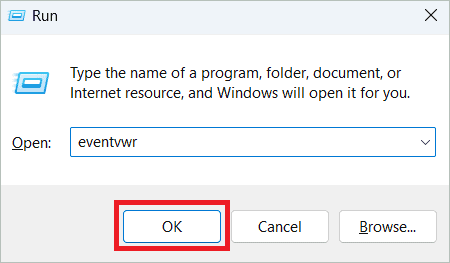
Open the Run dialog box, type “eventvwr” and click “OK.”
In the left panel, double-click “Window Logs” and select “System.”
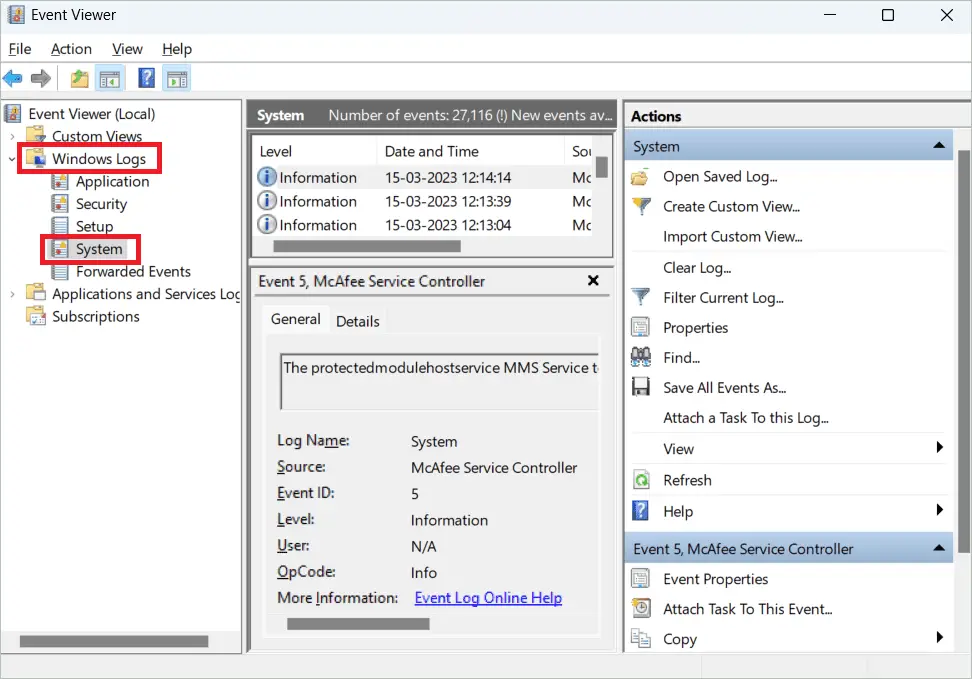
You will find the error message on the right side if there is a system crash. Look up the error in Google and find an appropriate solution.
15. Run Startup Repair
Many problems related to Windows 11 can be resolved by running Startup Repair. If Windows 11 keeps crashing, access the feature from the Settings page or the Advanced Startup options.
Open Settings and select System > Recovery.
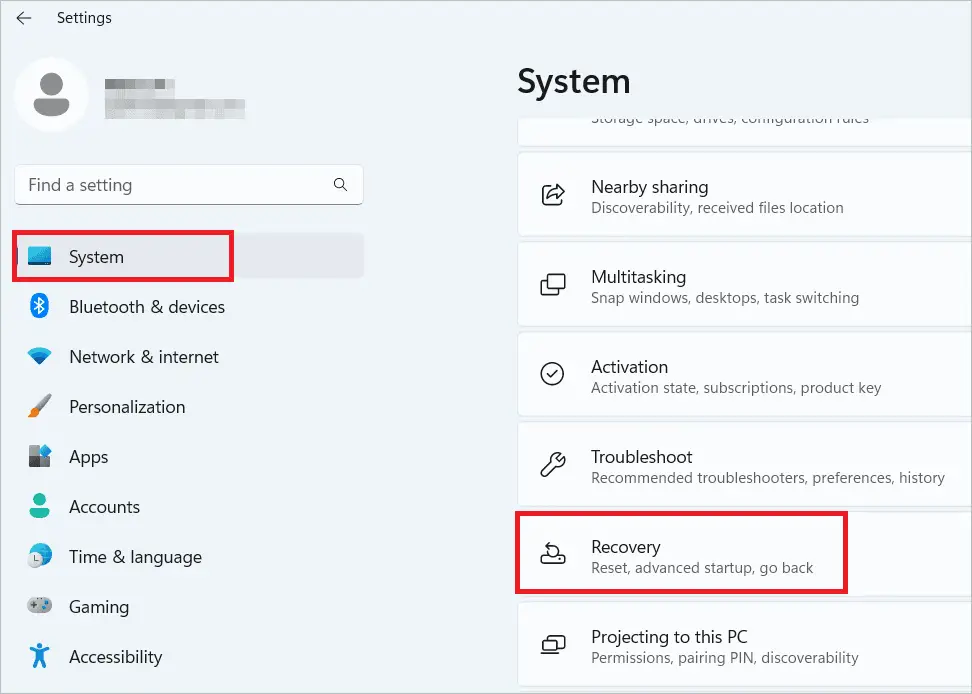
Under the Recovery options, click the “Restart now” button beside Advanced startup.

If you cannot find the setting using the above method, follow the steps below.
Press the Power button forcefully to shut down and turn the PC on again by pressing the same button. Do this thrice, and you will see the ‘Preparing Automatic Repair’ message on the screen. Now select Advanced options > Startup Repair to initiate the repair.
16. Revert To A Restore Point
Microsoft allows users to revert their PC to a previous point by creating restore points. A restore point contains system files on a particular date and time. So, your system will work again by reverting to the restore point. Remember that you must have created a restore point before for this method to work.
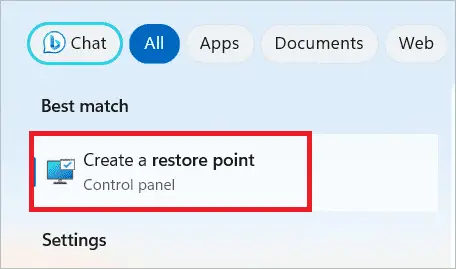
Type “restore point” in the search bar and open the option when it appears.
In the System Protection tab, click the “System Restore” button and select the restore point in the next window.
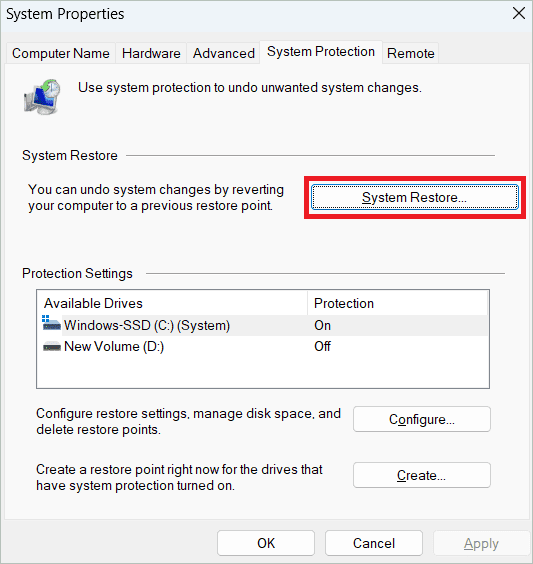
Now, your PC will restart and start working normally.
17. Reset PC
If your Windows 11 keeps crashing mercilessly despite all your efforts to fix the issue, you can reset your PC to factory settings. This will roll back your device to how you got it from the manufacturer.
Open the Settings app, and select System > Recovery.
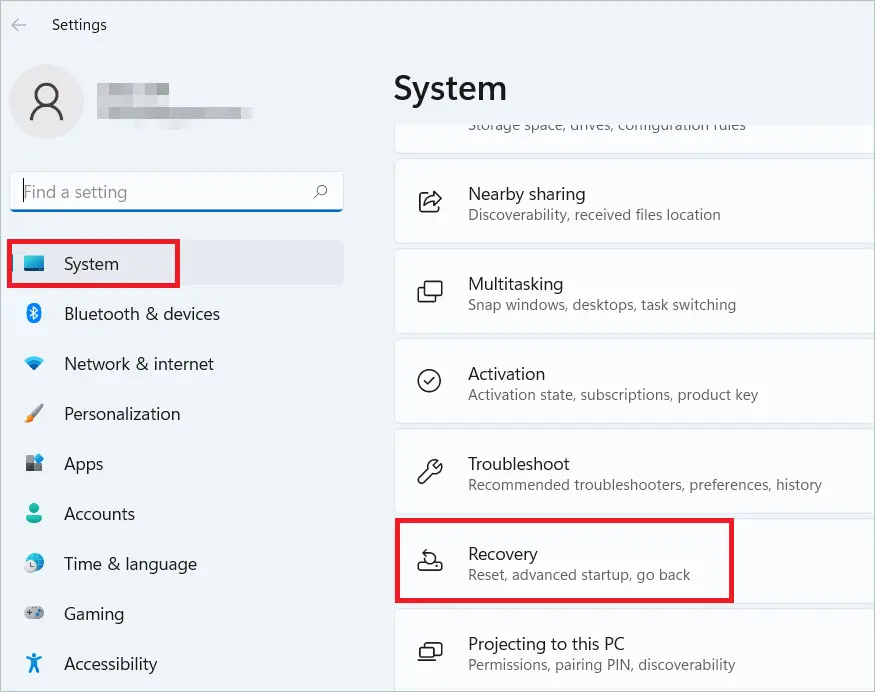
Under Recovery options, you will see Reset this PC. Click the “Reset PC” button beside it.
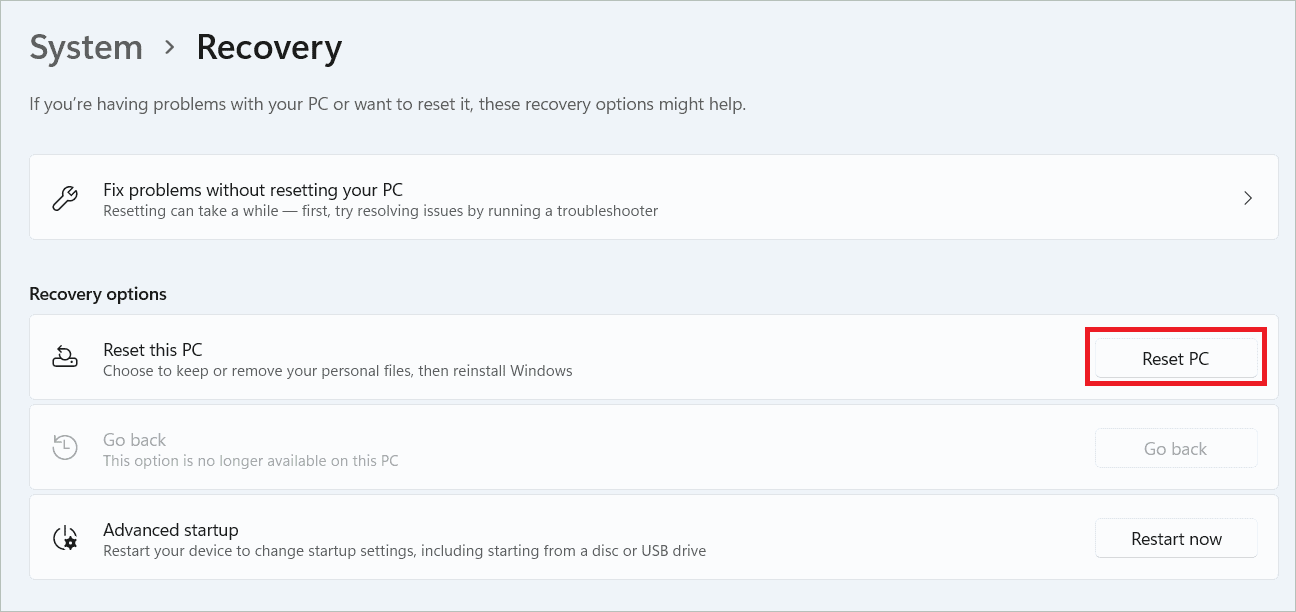
The following window asks if you want to keep or delete the files. Choose an option and follow the on-screen instructions to reset your PC. You may now check if the OS is working fine.
Final Thoughts
The causes for Windows 11 crash may be diverse. Quite obviously, you will find as many solutions to tackle it. Whether your Windows 11 keeps crashing due to third-party app interference, CPU overheating, or any other issue, finding the right fix is necessary to stabilize the system.
Sometimes a simple restart will solve the issue, but at other times, you may have to do deep troubleshooting to detect and rectify it. Our detailed solutions will give you a clear idea of how to approach the crashing issue in different scenarios.


