Do you know how to share files between Windows computers without email, cloud services, or other physical mediums? Nearby sharing on Windows 11 is a feature that allows transferring files and links between Windows PCs using Bluetooth or Wi-Fi. If you have worked on a Windows 10 computer, you might be familiar with using Nearby sharing in Windows 11.
When you enable and use Nearby sharing, you can start sharing and receiving files of any kind from Windows devices wirelessly. Presently, you can use the feature to move files between Windows 10 and Windows 11 only. And it uses Wi-Fi and Bluetooth to complete the transfer. You cannot use Nearby sharing to share files with smartphones like Android devices.
Requirements To Transfer Your Files Via Nearby Sharing
- The devices must be installed with Window 10 (version 1803 or higher) or Windows 11
- They must support Bluetooth 4.0 or later with Low Energy (LE)
- Both devices must be kept close to each other
- They must be accessible via Wi-Fi or Bluetooth and Nearby sharing must be enabled
How To Enable Nearby Sharing On Windows 11 And Use It
Once the minimum requirements are met, you can quickly transfer files between devices using Nearby sharing on Windows 11. You can send website links and all types of files to nearby Windows PC by searching for the name of the PC. Read on to learn about enabling and using the Nearby sharing feature.
Enable/Disable Nearby Sharing From Settings
Nearby sharing on Windows 11 is easy to navigate in the Settings app. So, if you want to enable the feature, you can open the app and select the correct radio button. It is that simple.
Press the Windows key + I to open Settings and select System > Nearby sharing.
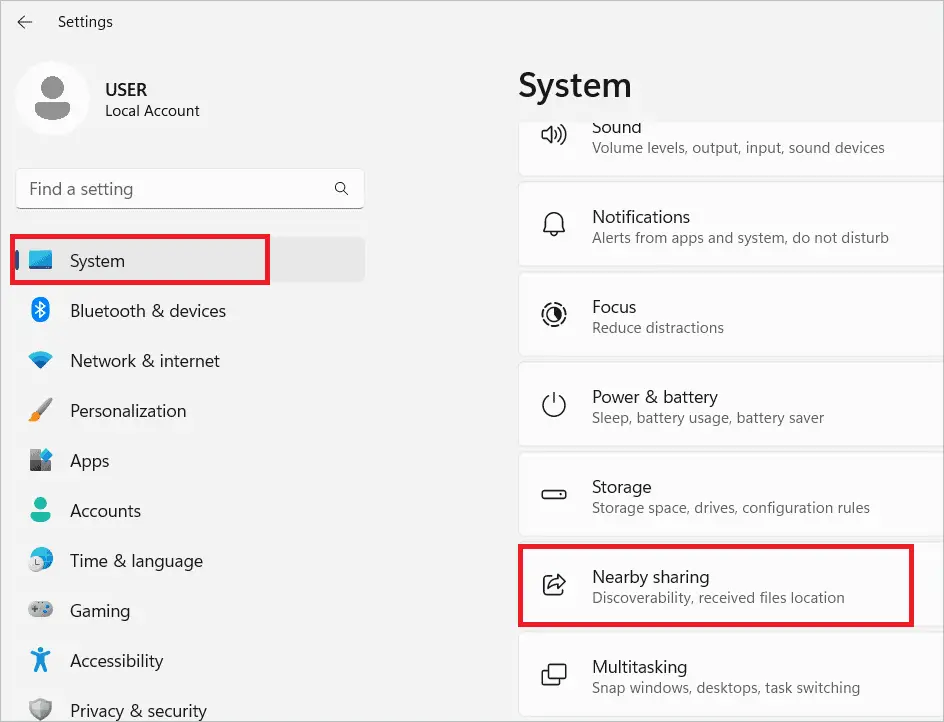
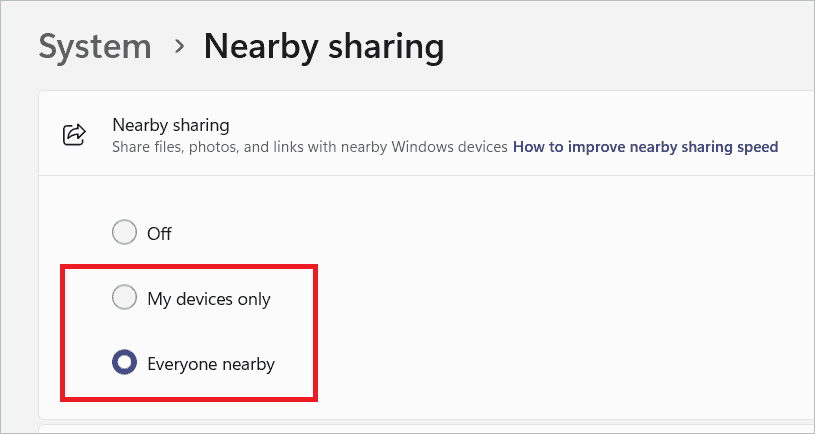
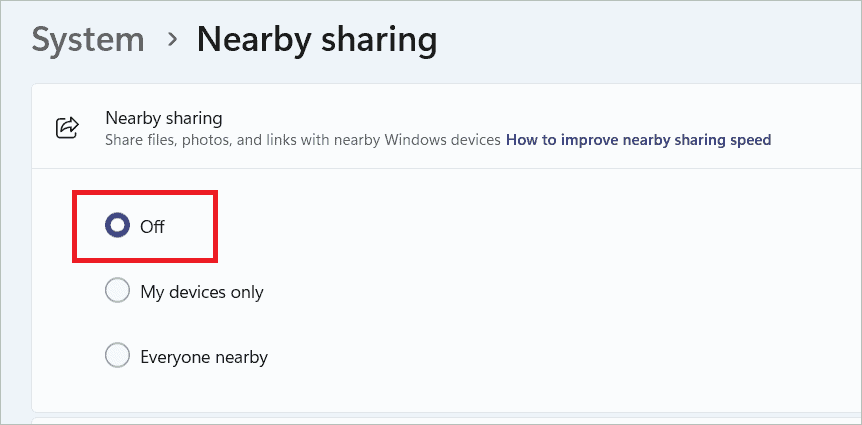
Here you will see three options. You can select one depending on which devices you want to share or receive content from.
Off: Turn off the Nearby sharing feature
My devices only: Allows sharing with nearby devices logged in with the same Microsoft account
Everyone nearby: Enables sharing content with all nearby devices
You may select the “My devices only” or “Everyone nearby” option to enable the feature.
To disable the feature, go with the “Off” option.
Enable/Disable Nearby Sharing From Quick Settings
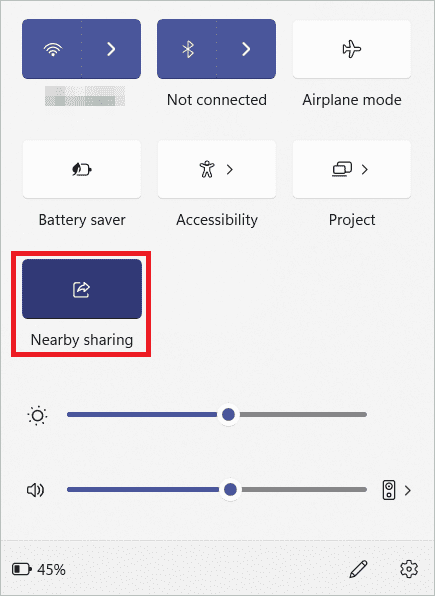
The Quick settings have shortcuts to many features, including Nearby sharing on Windows 11. Instead of opening the Settings app, you can directly go to the Quick settings and turn the feature on/off. Let us see the steps.
Press the Windows key + A to open Quick Settings. If the Nearby sharing feature is not present in it, you can edit the settings to include it.
Click the edit icon and click “Add”.
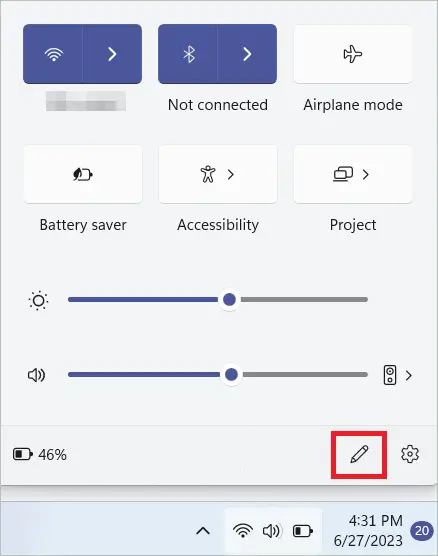
In the list that appears, select “Nearby sharing”.
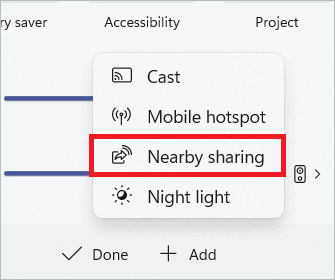
Now, the Nearby sharing option will be present in the Quick settings. Click the button to select the “Everyone nearby” option. If you click again, the feature will be turned off.
Enable/Disable Nearby Sharing Using Registry Editor
You can use the Registry Editor to tweak the Registry entries. In this case, you can change a few entries to enable or disable Nearby sharing on Windows 11. Remember to take a Registry backup before working on the entries.
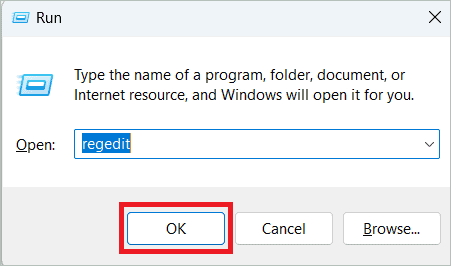
Press the Windows key + R to open the Run command box. Type “regedit” and click “OK” to open the Registry Editor.
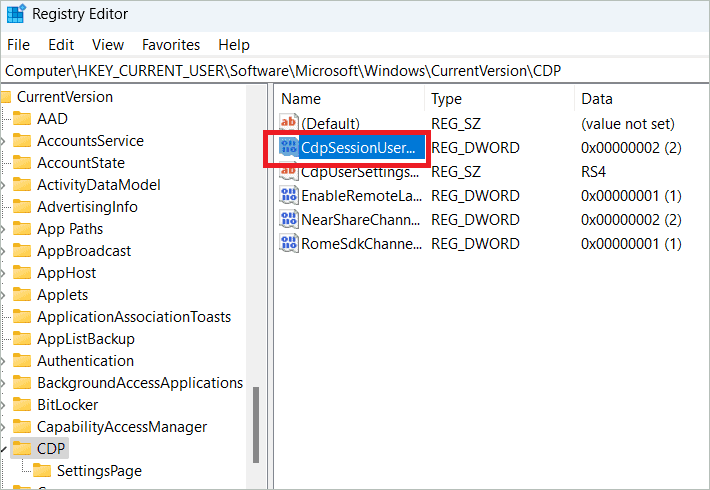
Copy the following path, paste it into the address bar, and press Enter.
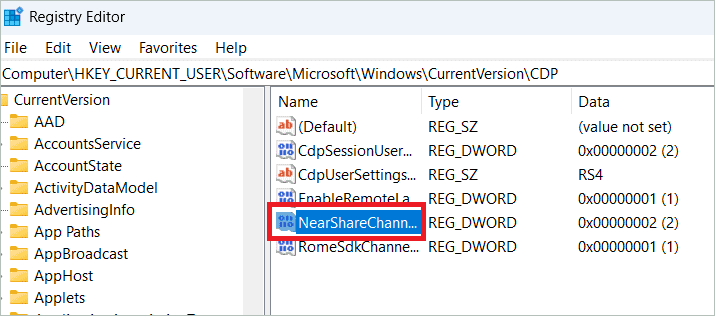
HKEY_CURRENT_USER\Software\Microsoft\Windows\CurrentVersion\CDP
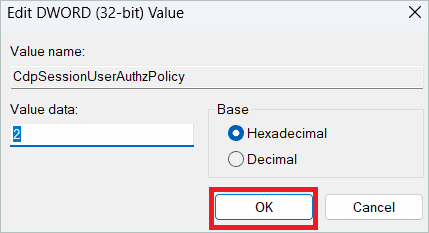
Double-click CdpSessionUserAuthzPolicy to edit its value.
Enter any of the values – 0 (Disable Near sharing), 1 (Enable for My devices), 2 (Enable for Everyone nearby), and click “OK”.
Double-click NearShareChannelUserAuthzPolicy and enter 0,1, or 2 as per needs.
Now, go to the following path.
HKEY_CURRENT_USER\Software\Microsoft\Windows\CurrentVersion\CDP\SettingsPage
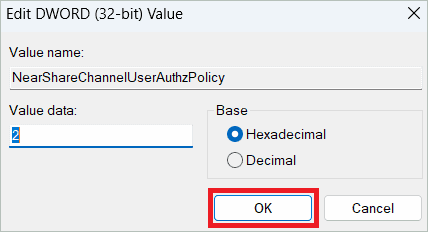
Double-click NearShareChannelUserAuthzPolicy and enter 0,1, or 2 as per needs.
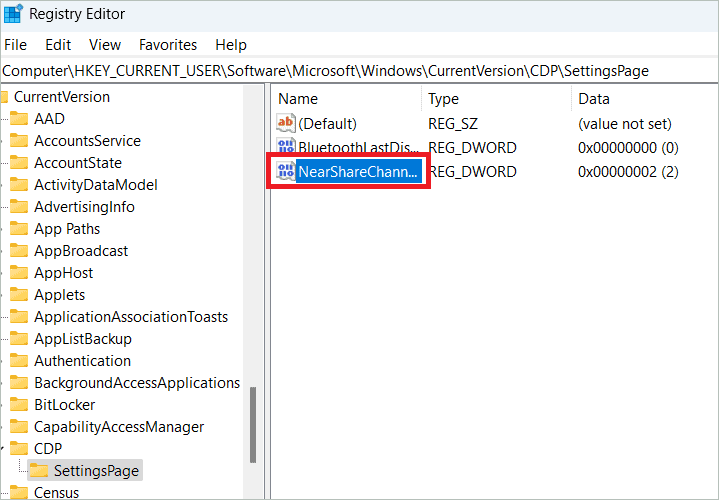
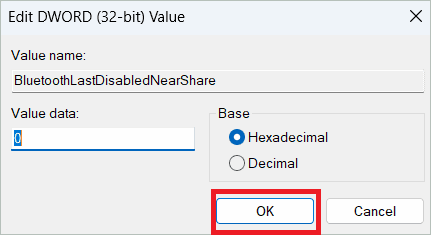
Double-click BluetoothLastDisabledNearShare and enter 0,1 or 2.

Lastly, restart your PC to apply the changes.
Enable/Disable Nearby Sharing Using Local Group Policy
Another method to enable or disable Nearby sharing on Windows 11 is to configure the group policy settings in the Group Policy Editor. Here is how you can do it.
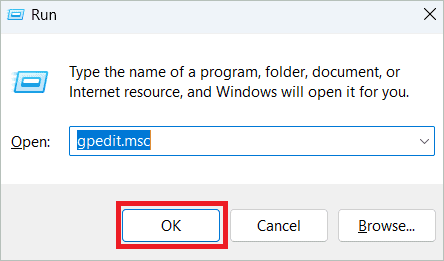
Press the Windows key + R to open the Run command box. Type “gpedit.msc” and click “OK” to open the Group Policy Editor.
Paste the following path in the address bar and press Enter.
Computer ConfigurationAdministrative TemplatesSystemGroup Policy
Double-click the “Continue experiences on this device” policy on the right side.
Select the “Not Configured” radio button to enable Nearby sharing or “Disabled” to turn it off. Click “OK” to save the settings.
Send Files With Nearby Sharing
Once you have enabled Nearby sharing on Windows 11, you can easily send files to nearby devices. The Share button comes in handy in helping you send files. You can even share photos using the method.
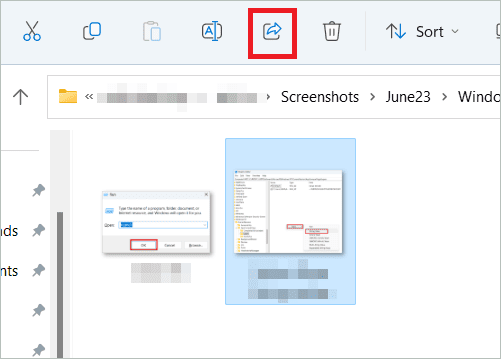
Open File Explorer and navigate to the folder where the file to be sent is saved. Select the file and click the Share button in the toolbar at the top.
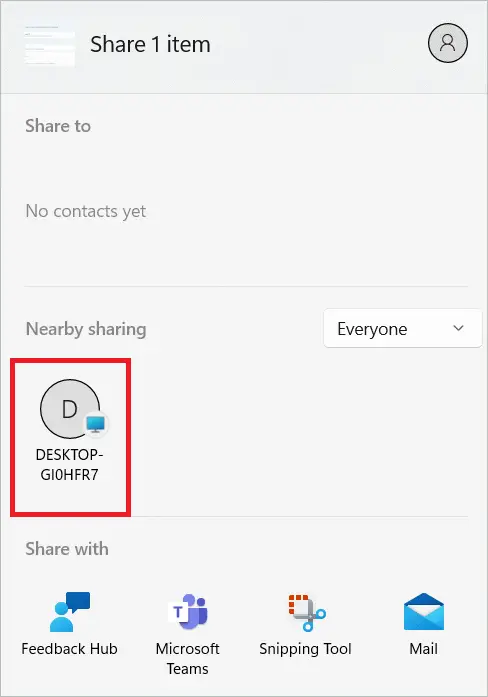
Select the device to share your file under the Nearby sharing section.
This will send a notification to the other device. Click “Save” or “Save & open” on that device to complete the file sending.
Share Website Links With Nearby Sharing
Not only documents and photos, you can also share links to websites with Nearby sharing on Windows 11 enabled. You need to open the link in the Microsoft Edge browser and send it from there.
Open the Microsoft Edge browser and open the link you want to share with another device. Right-click anywhere on the web page and select “Share”.
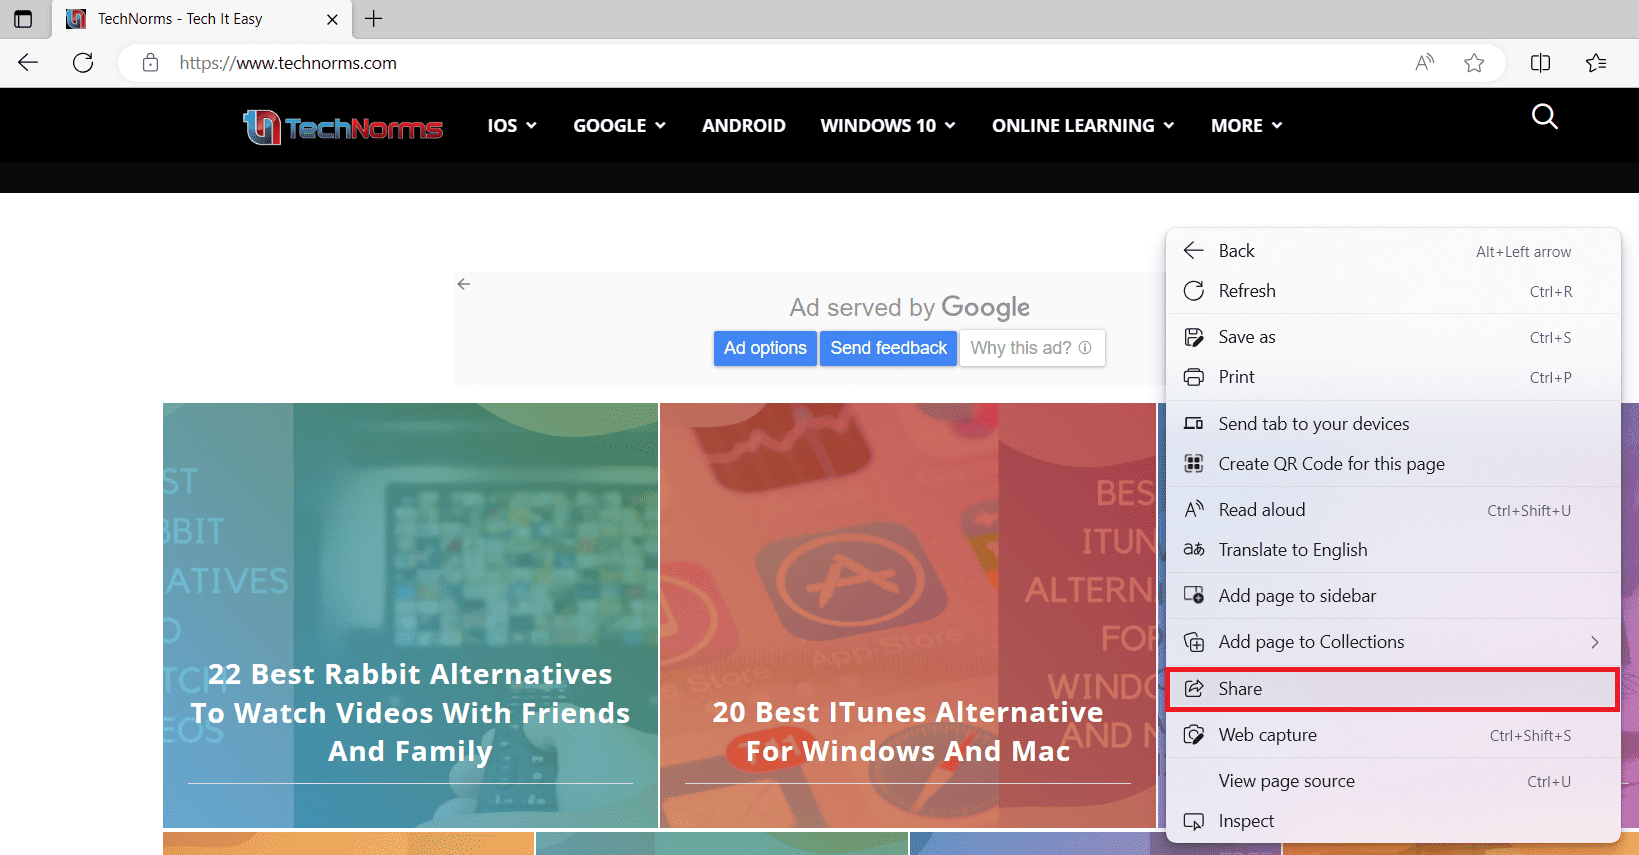
In the next window, select “Windows share options”.

Select the device to share the link under the Nearby sharing section.
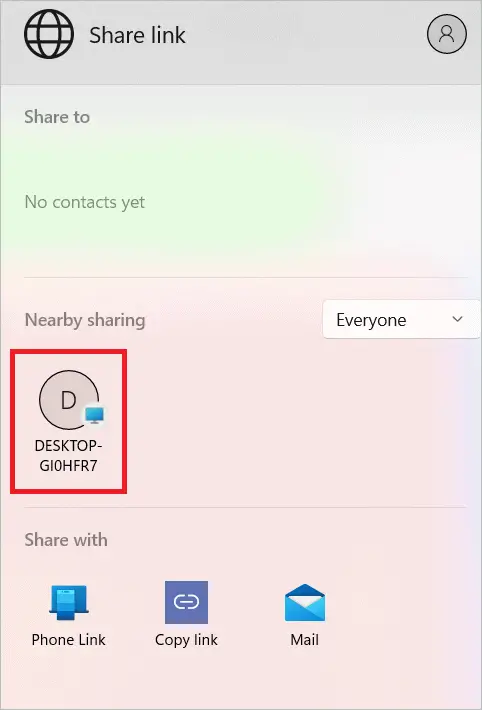
Open the notification in the destination device and click “Open” to open the link in the browser.
Change The Download Location
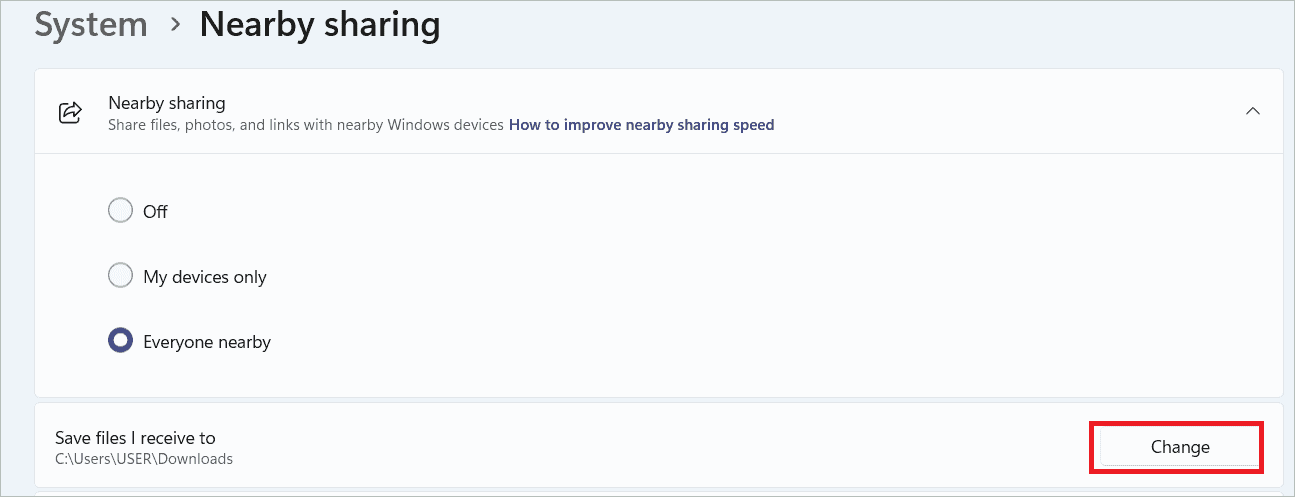
When you receive a file from another device after enabling Nearby sharing on Windows 11, it gets downloaded to the Downloads folder in the C drive. You can change this location by changing the settings under the feature.
Open Settings and select System > Nearby sharing. Click the “Change” button near the Save file I receive to option.
Browse to the folder to which you want to save the files and click “Select Folder”.
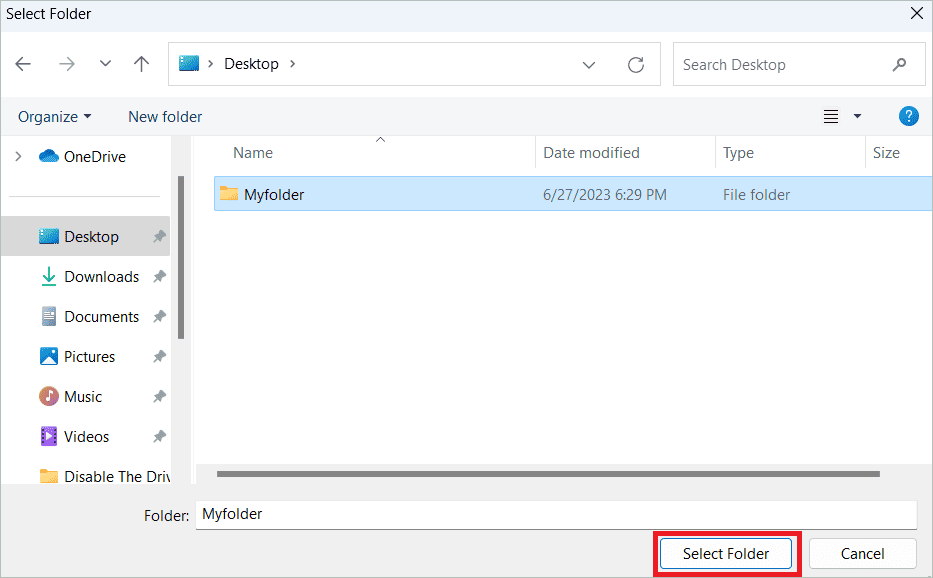
Now, the download folder will be changed.
Final Thoughts
Nearby sharing on Windows 11 is a feature that lets you share documents and files with other devices nearby. The link and file sharing happens wirelessly using Bluetooth or Wi-Fi, so the transfer is easier than any other method.
The article gives different methods to turn on/off Nearby sharing for Windows. Once you enable the feature, you will be able to share and receive website links and files by searching for nearby devices. You can also change the location where the received files are saved.


