The Snap feature included in Windows was first introduced in Windows 7, and since it was pretty popular with the users, Microsoft continued it in Windows 8. Although it’s easy to use, there are absolutely no options to customize it’s settings. At times, it can be annoying and get in the way when you really don’t have any use for it.
The way the Snap feature works is when you drag an open window to a side of the screen – be it top, left, or right – the window automatically snaps into place. Drag it to the top and it will maximize or to the sides to shrink its size and only display a portion of the window so you can have room for other things on the screen. Basically, it’s an easy way to multitask.
The problem lies, however, in that when you are moving windows around for any other purpose than to snap them to the screen, you really have no choice when you come too close to the edge – it will snap automatically without prompt. Also, if your screen is on the small side, the snap feature will likely be rendered useless. While we can’t enable any prompts to display, we can disable this feature entirely. Read below on how to disable and enable the Windows snap feature with ease.
Disabling Snap Feature in Windows
Method 1: Use the Control Panel
Begin by opening the “Control Panel” from the Start menu.

Search for “Mouse” and then choose “Change how your mouse works” under the “Ease of Access Center” section.

Near the bottom of this window, check the box next to “Prevent windows from being automatically arranged when moved to the edge of the screen.”

Snap is now turned off without a reboot necessary to take effect.
Disable Snap Feature in Windows 8
In Windows 8, Use the “Win + X” keyboard shortcut to open the Admin Menu and click on “Control Panel”.
From the options provided, click “Make the mouse easier to use” and choose the option to automatically arrange Windows, as shown in the image above.
Method 2: Use a Registry Tweak
While the first method is effective and simple, another option is to disable this feature via Registry.
Open the Run command window by using the “Win + R” keyboard shortcut, type in Regedit and press Enter. This will open the Windows Registry. Go to find the following key: HKEY_CURRENT_USER \Control Panel\Desktop
You could also use a shortcut and go with Registry Key Jumper to automatically find the key.
HKEY_CURRENT_USER \Control Panel\Desktop

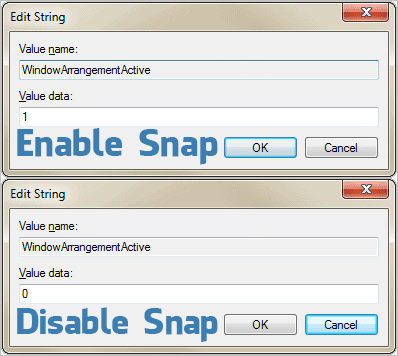
With the “Desktop” folder selected, look at the right window pane and find “WindowArrangementActive” at the very bottom. Right-click this string and choose “Modify.”

Notice “1” is default value with Snap enabled. So to change this and turn off this feature, modify the “Value data” to read “0.”

A log off or reboot is necessary to make this change take effect.
Conclusion
If Windows Snap is bothering you in any way, it’s just a few steps away from being disabled. I recommend the first method above because it’s safer to stay out of the registry and the effect is immediate.


