Android security should not be taken for granted. People who use Android devices face a wide range of security threats ranging from data loss, identity theft, hacked accounts, compromised financial information and even theft of your Android devices. Being the most widely used smartphone platform globally, it is a tempting target for malicious actors and all user’s should follow at least the basic Android security practices.
Given the wide range of customizations of the stock Android, it is almost impossible to cover the security features offered by all the ROMs and Android skins. This article focuses on the Android security features in the stock Android version, which would be available in most other ROMs.
Related Reading: Android Safety Apps: The Good, The Bad, and The Insecure
Configuring the Android Security Features
We will move from the basic security settings to more advanced settings as we progress through the article.
#1 Set up a Screen Lock

This is the base level of android security that you can set up to prevent physical access to your device. You have the following options to choose from.
- None – No lock on the device.
- Swipe – Again, no lock. You just need to swipe to go to the home screen.
- Pattern – Set up a pattern lock on the device. You will have to draw the pattern twice while setting it up. You should be aware that very simple patterns can just be figured out by looking at the smudges on the screen. A few overlapping nodes might make it difficult to recognize the start and end nodes and make your pattern harder to break. You can sidestep the pattern lock if you are locked out but that is a drastic step and not advised to be taken on any device that is not your own.
- Pin – You can set up a numeric pin lock on the device. The pin has to at least 4 digits long, but we would recommend to keep it longer. Reusing numbers in the pin to make it more difficult to identify using the screen smudges. As is the usual advisory regarding pin numbers, do not use birthdays, anniversaries and other dates of personal significance as the pin. In the age of social media, it is becoming all too easy to find out dates that are important to someone.
- Password – Set up a password of at least 4 digit length for the device. Passwords are often recommended to be of length 8 or longer, and that precaution applies here as well. You can use numbers and symbols to make it more secure.
My personal preference is towards a pattern lock as it’s easy to use and provides a decent level of Android security. See what works the best for you and set it up!
#2 Set up Fingerprint Access (Optional)
If your device has a fingerprint reader, you can set it up as the passcode for your device. Being a regular user of the feature on my S6, I’d say that it is the most convenient way to access your device. Granted that it does not work 100% of the times, but that’s what you set up a backup access method like a pattern or pin for.
To do so, you can go to ‘Nexus Imprint’ under Security and follow the on-screen steps to have your fingerprint registered on the device. Next time you want to log in, just keep your finger on the reader and you are in! When it works, it is an incredibly comfortable way for device access and secures your Android device.
#3 Set up a Smart Lock
The Smart Lock feature allows you to configure your device to look for certain situations and stay unlocked.

You can enable or disable Smart Lock from Settings > Security > Trusted Agents (under Advanced). You have the below options to configure the smart lock.
- On-body detection – You can enable this setting to allow the device to identify when you are carrying it and stay unlocked. It locks once you keep it somewhere.
- Trusted places – You can locate places on Google Maps that you want to be regarded as ‘Trusted, ‘ and the device will stay unlocked there.
- Trusted devices – Allow your Android device to stay unlocked in the proximity of your smartwatch, car or even NFC stickers. Note that this feature requires Bluetooth.
- Trusted face – Use the camera on the device to recognize the face of authorized users and unlock. It can be flaky at times and a regular PIN, pattern or password would be a safer option.
- Trusted voice – You need to have ‘OK Google’ in always on mode for this feature to work. You will need to go through a training process that sets up the voice model matching your voice before using this feature. In case the voice recognition is not accurate, you can go back and train the voice model again for greater accuracy.
#4 Set up Device Administrators
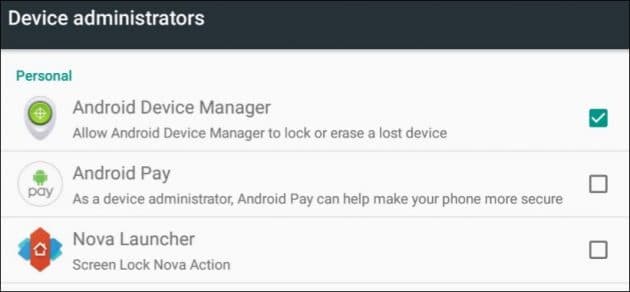
Applications that need certain special permissions will be listed under ‘Device Administrators.’ Tap on the app to see what permissions is it requesting for and whether you want that app to be able to have that permission.

You MUST enable ‘Android Device Manger’ as it allows you to remotely wipe and lock your device – something that is crucial in case it is stolen or lost. Of course, you can try to Google your phone, but this is quite useful in case you are unable to locate your missing device.
Enabling ‘Android Pay’ as a device administrator will impose certain restrictions on the PINs and passwords that you can use on the device. If you use Android Pay, we’d recommend that you add it to Device Administrators.
#5 Enable Encryption
Enabling encryption on you Android device ensures that the data is not in a readable form when the device is locked. It goes a long way in securing your Android device’s data. Once you unlock it, the data is decrypted and used.
Some devices, like my Nexus 9, are encrypted by default. Other devices may have the option to enable it. Enable this feature to further enhance Android security.
#6 Enable Screen Pinning
You can use this feature to pin the current screen on your device till you unpin. You can ask for a passcode verification when the screen is unpinned. The steps to pin a screen are not the most intuitive, though, as a security measure, it can be used to restrict access to only one screen on your device.
How to pin a screen to your Android device?
- Enable screen pinning from Settings > Security > Screen Pinning.
- Open the screen that you want to pin.
- Touch Overview (The quick app-switching menu)
- Swipe up and touch the pin icon at the bottom
How to unpin a pinned screen?
Hold Back and Overview buttons at the same time. You may need to enter the pattern, PIN or password to unlock depending on your settings.

Note: Screen pinning may not restrict the user to a single screen, but rather a single app. For example, pinning the security screen in Android settings lets me navigate through all settings but did not let me outside of Settings.
#7 Check Trusted Credentials
Trusted credentials, in short, are used by the apps and browsers communicating over the internet to verify the identity of the server they are talking with. These credentials prevent any other server from posing as the authentic server and ensures that any data that the apps or browsers are sending is ending up at the intended destination. You can read more about trusted credentials here.
Usually, you should not have to go into trusted credentials and do anything, especially the System section. The User section lists credentials that you might have added if any. You should verify that the credentials added here by you are indeed trustworthy.
#8 Restrict Apps with Usage Access
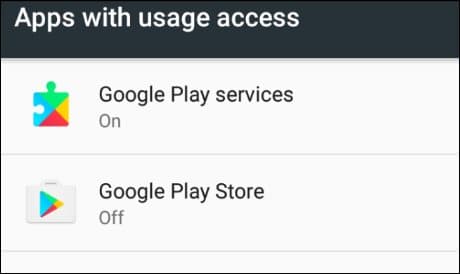
These are the apps that have permission to monitor your app usage on the device. They can track and log which apps are used, when and for how long, etc. Usually, this list will have Google Play Services and Play Store in it. Unless you install an app to track your usage, no other apps should have any business tracking it.

If you do not want even Google to have this information, you can refuse permission to access usage data.
#9 Toggle Some Settings
- Disable ‘Make pattern visible’ to hide the pattern from prying eyes as you unlock your device.
- Disable ‘Make passwords visible’ to keep them hidden while unlocking the device.
- Disable ‘Unknown sources’ to prevent side-loading apps and APKs (What is an APK?) from sources other than the Play Store.
- Enable ‘Power button instantly locks’ to lock the device immediately on the press of the power button.
#10 Other Android Security Measures
Keep your Google account safe – Your Android device is only as secure as your Gmail account associated with the device. Ensuring that your Google account is secure will help in keeping your Android safe as well. Also, if you are locked out of your device for any reason, you can use the account information to verify your identity and unlock the device.
Check and Manage Permissions – Permissions requested by apps can leak your data and lead to a security concern. Since Android now offers granular control over which permissions are given to which apps, you should check for permission usage by apps and change the permissions as required. Keep in mind that removing a permission that an app requires may cause it not to function properly.
Disable Developer Options – You should disable developer options unless you use the Android device for app development.
Consider using an Android security app – Some of the prominent cyber security service providers offer security apps for Android. You should consider those for keeping your device free of viruses and malware.
Android Security Updates – Last and not the least, always keep a lookout for the latest Android security patches and download them without delay to get best possible protection. You can read more about the latest Android Security updates here.
With cyber security threats continuously rising, the users need to be vigilant and act proactively to stay safe. Taking the above steps to secure your Android device should protect you from most non-targeted security threats and attacks out there.
Got any other tip for improving security on your Android device? Help others stay secure by sharing it in the comments below.
Further Reading: 5+ Android Apps To Test the Hardware Integrity and Performance of Your Device


