If you suddenly see a blue screen of death with an error message critical process died in Windows 10/11, there is no need to panic, as we have got you covered. A Windows system does not allow access and modification to some crucial sections of the data or system files. If something messes up with this part of the data, the system shows BSOD with a critical process died error.
BSOD is also known as STOP codes in Windows. You may experience the CRITICAL_PROCESS_DIED in between a game, after waking up the system from sleep, after login, or after some updates. It can happen to a brand-new system or an old system that has been working fine for years. A faulty driver, software update, corrupt sector, virus, or compatibility issue can cause a Windows stop code error of critical process died in Windows 10. The reason for the problem of CRITICAL_PROCESS_DIED in Windows 10/11 is multiple, and so are the solutions.
If you can log in to your Windows system, you can try all the solutions mentioned in the article. There are times when such issues cause the system to boot in a loop; in such cases, you need to reinstall the OS or update the BIOS, as there is no other way to login to the system. Lastly, if you can enter the safe mode, then try some of the solutions due to the limitations of safe mode.
How to Fix CRITICAL PROCESS DIED in Windows 10/11
As mentioned above, the solutions for critical process died in Windows 10/11 differ based on the criticality of the issue that you are facing. Some may be able to solve the problem by walking through the first solution itself, while others may require to reset their PC.
1. Enter Safe Mode and Perform Clean Boot.
You may not be able to login to the system due to the CRITICAL_PROCESS_DIED issue in Windows 10/11. However, you can enter the safe mode in such a situation. Safe mode has a limited number of drivers and software, so the trouble-causing factor may not be present in it.
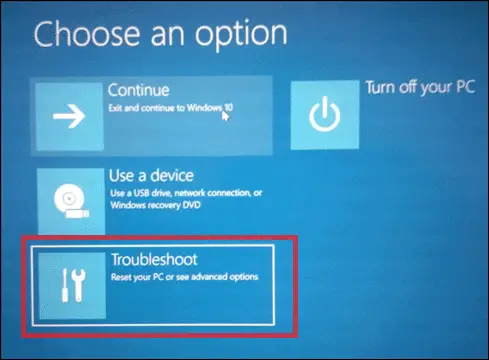
To enter the safe mode, press the power button of the computer/laptop, and when you see the Windows icon, press the power button again. Repeat this step until you see ‘Preparing automatic repair’ or ‘Diagnosing your PC,’ and click the Advanced options.
Next, click on Troubleshoot.
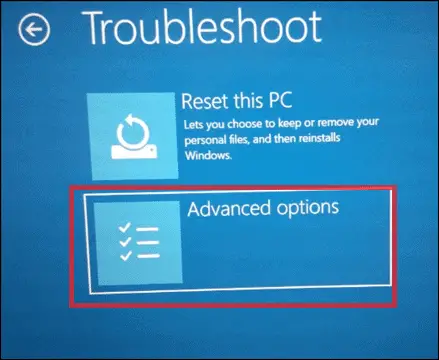
In Troubleshoot, select the Advanced options.
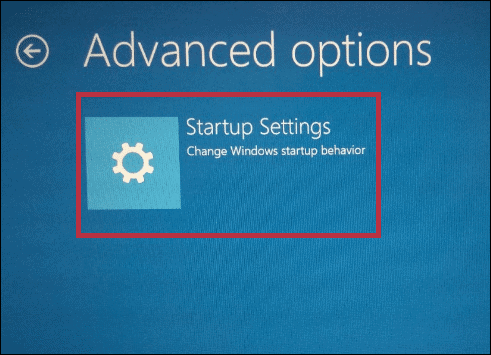
As you need to start your PC, choose Startup Settings.
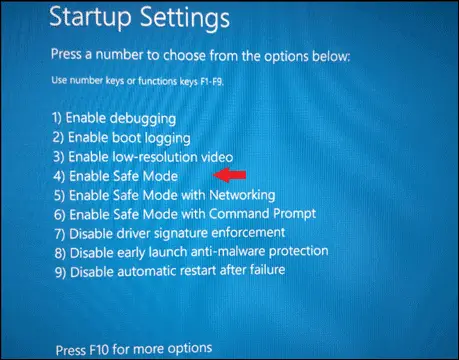
Click on Restart on the next screen. Then, you must select what you want to enable using the function key. Press F4, to enable safe mode.
Once you have successfully entered the safe mode, you can now perform a clean boot. The clean boot will disable all the optional process and load only those services which are essential to start the OS.
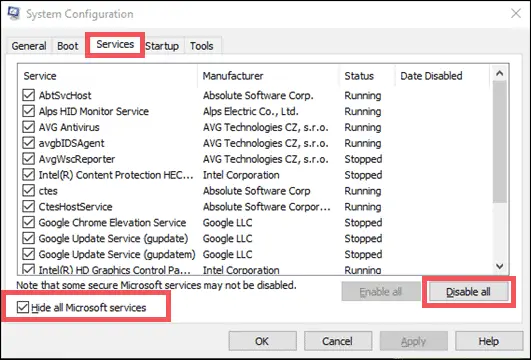
To clean boot a system type msconfig in the start menu. When the System Configuration opens, go to the Services tab and check on Hide all Microsoft services checkbox, and then click on Disable all.
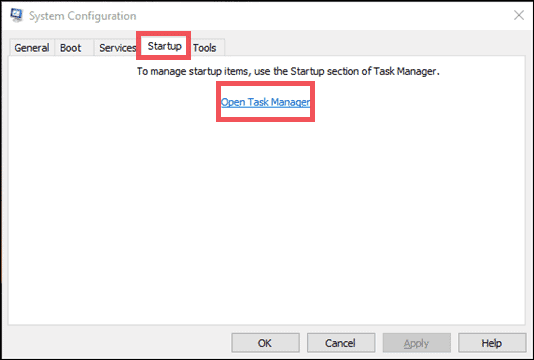
Once you complete the process mentioned above, you need to go to the Startup tab and click on the Open Task Manager.
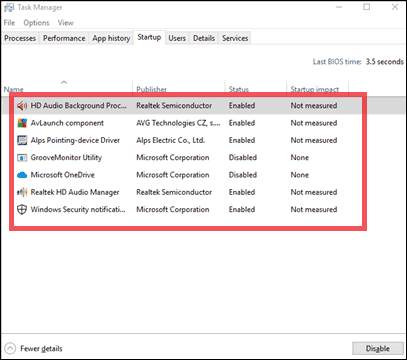
Once the task manager opens, disable all the services. Please note that the list can differ from system to system.
Now, close the task manager and click on OK in System Configuration.
Now restart your PC and try the below solutions to get rid of BSOD CRITICAL_PROCESS_DIED error completely.
2. Use SFC and DISM tool
By and large, if you are not able to login to the system, you can apply this solution for critical process died in Windows 11 or 10 in safe mode as well.
Use System File Checker(SFC) to scan all the system files we don’t have access to. It also restores the corrupt system files for you.
To use the sfc tool, open the command prompt, type sfc /scannow, and press Enter.
If the SFC scan does not solve your Windows 10 critical error, then DISM (Deployment Image Servicing and Management) can fix it for you. Type the following commands in the command prompt to run the DISM command.
Dism /Online /Cleanup-Image /CheckHealthDism /Online /Cleanup-Image /ScanHealthDism /Online /Cleanup-Image /RestoreHealthRestart your computer and check if the critical process died in Windows 10/11 is solved.
3. Update Drivers
To update the device drivers, you need to have an internet connection. If you are in safe mode, you must have the ethernet cable connected for an internet connection as wifi may not work. However, if it is a normal mode, you can stay connected to wifi.
You can go to the company’s profile and update the drivers based on compatibility with Windows 10.
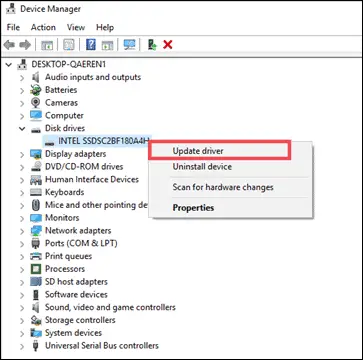
You can also manually update the outdated drivers. To do so, press the Windows key + X and click on Device Manager.
After the device manager opens, right-click on the driver you wish to update and click Update driver.
After the driver update, restart your PC and check if the PC works without any issue.
You may also try reinstalling the drivers from the Device Manager. Open the Device Manager, right-click on the driver you want to reinstall, and select Uninstall device from the context menu. After uninstalling, restart your PC, and Windows will automatically install the driver for you.
4. Scan for Virus
Sometimes, the virus may also affect the Windows system file, which in turn causes Windows 10 critical service to be failed. This virus or malware need not be dangerous; regular spyware and adware can also be a troublemaker that leads to critical process died in Windows 10/11.
You can use third-party software to scan for viruses or the Windows Security app. To use the inbuilt application for scanning malware, type Windows Security in the start menu and click on Windows Security.

When the app opens, click on the shield icon in the left pane.

Click on Scan options. You will now see the various options available. Click on Full Scan and, last but not least, click the Scan Now button to start the scanning process.

Once the scanning is over, remove the affected files from your system and check if the stop code critical process died error screen is still there.
5. Check for Recent Changes and Undo them
The recent changes made to your system may also cause the critical process died in Windows 11 or 10. Some newly installed apps can mess up with critical system files resulting in BSOD, so you can try uninstalling them.
If everything was working fine before an update, then a recent Windows update could be the main culprit. Thus, to uninstall the last Windows update, follow the detailed instructions below.
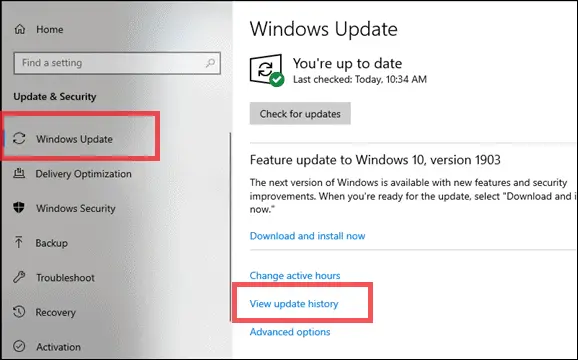
Type Windows Update in the start menu and click on Windows Update settings. When the window appears on the screen, click on View update history.
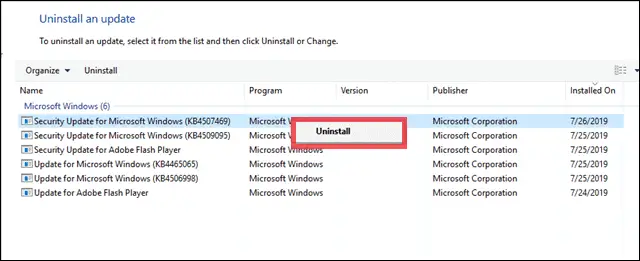
- Next, click on Uninstall Updates.

- A new window will appear on your screen with a list of updates. Right-click on the most recent ones and uninstall it.
- Restart the PC.
In the next update of Windows, you will also get the upgrade you uninstalled, so there is no reason to worry about the uninstallation.
6. Use chkdsk command
Windows 10 chkdsk command checks the bad sector and also provides you with a fix. It can resolve logical and physical errors for you based on the different parameters. However, if you don’t use the parameters, it will only scan and display the results without providing any solution.
As you need to fix the logical as well as physical error, execute the following commands in command prompt. Open the administrative command prompt box by selecting Run as administrator.
chkdsk C: /fThis command scans the C drive, and parameter ‘f’ is used to fix the logical error.
chkdsk C: /rTo set the physical errors on file, you need to execute the above command, as well. If you wish to scan any other drive, you can change C to drive letter in the command.
Restart the PC and check if it’s working fine.
7. Disable Sleep and Hibernate mode
In some cases, disabling hibernate and changing the settings for sleep may also stop the BSOD CRITICAL_PROCESS_DIED in Windows 10/11.
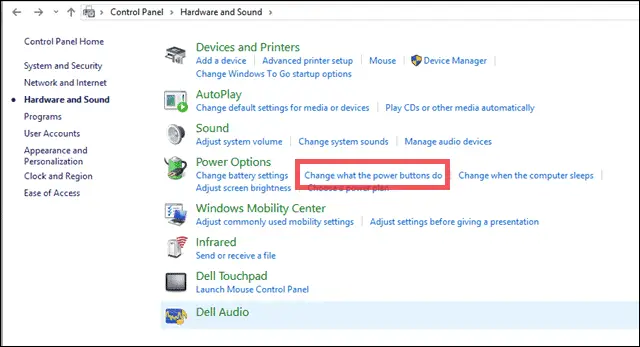
To change the settings, open the Control panel, and click on Hardware and Sound. Next, click on Change what the power buttons do under the Power Options.
You can change the settings in this section of Power Options.
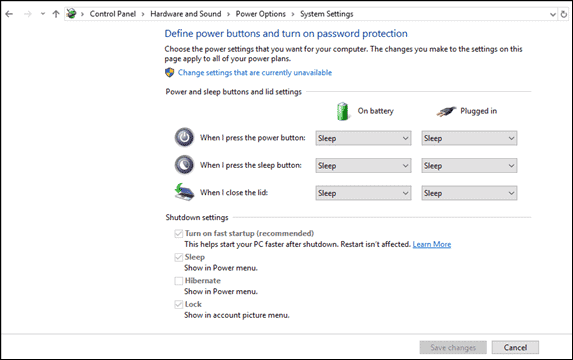
Click on Save changes after making the required changes and restart the PC. The changes can differ as per the configurations and one’s choices. Thus, temporary disabling sleep and hibernation may help you solve the issues.
8. Run the troubleshoot
There might be some issue with the hardware or network in the PC, which, in turn, causes the problem of BSOD critical process died in Windows 11 or 10. Type troubleshoot in the start menu and click on Troubleshoot settings to initiate the troubleshooting process.
Select the individual hardware option and click on Run the troubleshooter.
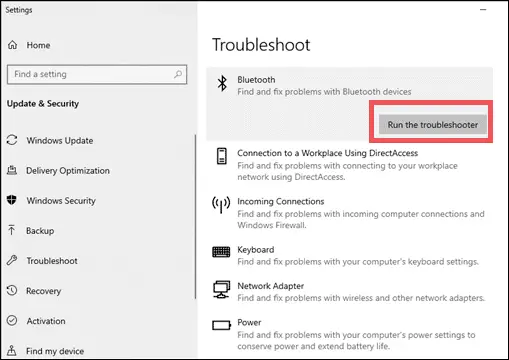
You can also run the troubleshooter for selected hardware like Bluetooth, Power, Network Adapter, or all. This solution may help you recover from BSOD. For this, go to Settings > System > Troubleshoot > Other Troubleshooters, from where you can run a couple of troubleshooters.
9. Run Memory Diagnostics
You can also check the system memory for the BSOD issue. If there is any bug in the system memory, then this diagnostic tool may help you solve it.
To run the memory diagnostic tool, type memory diagnostic in the start menu and click on Windows Memory Diagnostic.
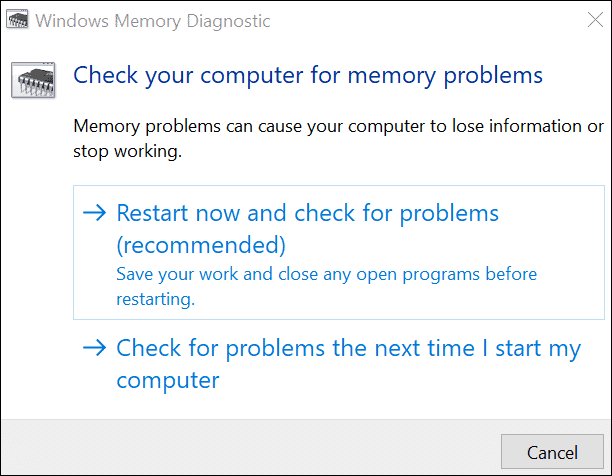
There will be two options available for you. One is to restart now, and the other is to check later. This diagnosis helps you find the Windows memory problems and hence solve the CRITICAL_PROCESS_DIED issue.
10. Use System Restore to Rectify Critical Process Died in Windows 10
If none of the solutions for critical process died in Windows 10/11 are working for you, then you need to restore your system to the restore point where it was working fine.
To restore the system, type system protection in the start menu and click Create restore point. Then, click on System Restore.
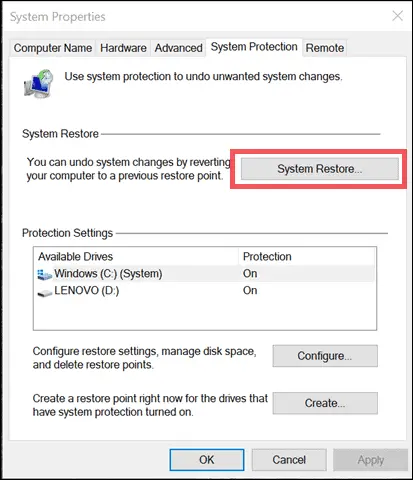
Windows 10 System Restore will not delete any of your files, photos, or videos. It uninstalls the software but does not remove the files created by using them. So, you can use System Restore without worrying about losing your data.
11. Reinstall OS
If none of the solutions mentioned above work for you or you are not able to perform any of them to remove the critical process died in Windows 11 or 10, then the next option is to reinstall your OS.
Take the required backup of the essential and critical files if you can enter the system. Once you have the backup, reinstall the OS.
Remember that the OS installation is not only a hectic process but also a lengthy one! You should give it a go only if none of the above solutions works for you.
12. Update BIOS to Resolve Critical Process Died in Windows 10
Another way to stop code error critical process died in Windows 10 is to update your BIOS. You have to be extremely careful while doing this as there are chances of BIOS getting corrupted due to a power failure, freezing, and other such issues with the system.
There is no formal process to update your BIOS, as it depends upon the manufacturer of your laptop/desktop. Thus, you must refer to the manufacturer’s guide for the complete process. You can follow this guide to update BIOS on a Lenovo machine and this for a DELL machine.
13. Disconnect Faulty External Hardware
If you have done all the internal checks of your PC, it is time to check the external devices connected. Faulty devices connected to your system can cause issues in the working of your PC. When the PC tries to connect to them, you may face the BSOD.
Disconnect all the external devices like the mouse, keyboard, and the like. Now, check if your PC can boot normally. If yes, then the external devices are to be blamed.
14. Run Hardware and Device Troubleshooter
Apart from the troubleshooters discussed above, we have one more troubleshooter that can be run to identify the BSOD error trigger. It diagnoses and fixes hardware issues freeing you from the bluescreen error that says critical process died in Windows 11 or 10.
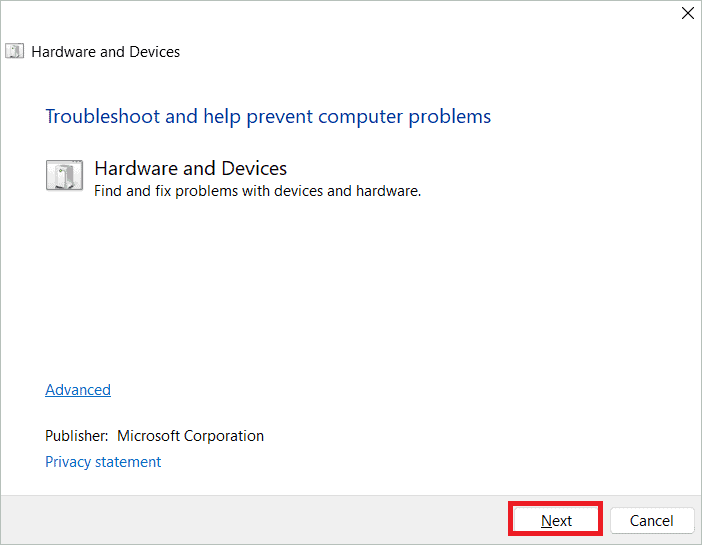
Press the Windows key + R to open the Run dialog box. Type “msdt.exe -id DeviceDiagnostic” and press Enter.
In the troubleshooter window, click Next. The troubleshooter will identify hardware issues, if any, and suggest actions you can take to correct them.
15. Uninstall the Problematic Applications
If the common error resulting in the blue screen popped up when you recently installed a 3rd party software, then look nowhere else for the cause. You can uninstall the program and end the blue screen error.
Type “settings” in the search box and open the Settings app.

Select Apps in the left pane and Installed Apps in the right.
You will find all the installed apps here. Find the one you want to uninstall and click the three dots near it. Select Uninstall and then again Uninstall when asked for confirmation.

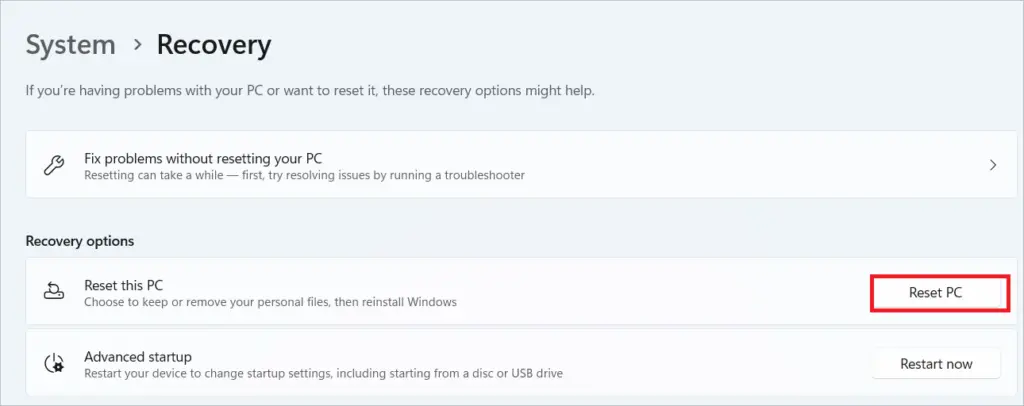
16. Reset your PC
Resetting your PC is an easy thing to do. The only thing you have to ensure is that you backup everything before initiating a reset. Resetting your PC reinstalls the OS, and you can decide if you want to keep the files. Doing so will most likely resolve the critical process died in Windows 10/11 issue.
Use the search icon to search for the Settings app and open it when the option appears. Select System in the left panel and Recovery in the right.
Under Recovery options, you will see the Reset this PC option. Click the Reset PC button near it and follow the on-screen instructions to complete the reset process.
17. Use Find and Fix Bluescreen Problems
The last one fixes the critical process died in Windows 11 PC. The built-in troubleshooter in Windows 11 specifically aims at solving the blue screen error issues. You can find it in the Control Panel.
Type “find and fix bluescreen problems” in the search menu and open the automatic troubleshooter in the Control Panel.
Unfortunately, some Windows versions do not support the troubleshooter. If yours does, it will detect the cause of the issue and solve it automatically.
Conclusion
The above-mentioned methods in the detailed article might help you fix the BSOD CRITICAL_PROCESS_DIED issue in no time. However, you must remember that the solutions also depend upon how severe the problem of critical process died in Windows 10/11 is. Which essential or vital file got corrupted or modified?
You may try the fixes in the listed order and see which solves your issue. Windows 11 users can find a bonus fix using the built-in troubleshooter only available in Windows 11. Nonetheless, if the issue happens to be critical, you might need to reinstall the OS or update your BIOS.
(Article updated on 2 May 2023)


