There are times when your PC appears to be frozen or simply unresponsive or just slows down to a crawl. Unless you are running software with heavy requirements, the most likely cause of the slowness is a Windows 10 memory leak issue.
This kind of behavior can also be attributed to a high CPU usage or even a space leak on a rare occasion. Although these terms are loosely used as substitutes for each other, they are quite distinct from each other.
What is a Memory Leak?
A Memory leak happens when a computer program fails to manage memory allocations correctly. That means a previously used memory by some program is not released even when the previous program no longer needs it.
To be certain that it is a memory leak, all you need to do is look at the system’s RAM usage. Use the Resource Monitor and check the available memory and how much is in use. We will show how it’s done as we move ahead in this guide.
What is a Space Leak?
A space leak is rare, and it is usually more of a software developer concern than an end-user concern. A space leak occurs when a program uses more RAM than it is supposed to.
In space leak, the problem is temporary as the extra space utilized by the program gets released when it terminates, but it can cause periodic slowness. This is completely contrary to the memory leak where the unreleased memory is not in use by any program.
High CPU Usage
The basic purpose of the CPU is to perform the calculation on instructions. Some of the programs that you run on the PC can cause a high percentage or even 100% CPU utilization. But if this is an ongoing event even when you are not running a heavy program, it might be a sign of malware or adware infection and you need to take steps to avoid high CPU usage.
Before you think of replacing any hardware (RAM) to solve the issue of Windows 10 Memory Leak, you must check whether it is a software issue that needs to be debugged.
Impact of Memory Leaks on Your System
As we mentioned earlier Memory leak is the consequence of memory that is not freed even when not in use.
- Memory exhaustion, leaving no space for other programs to run.
- An application can crash due to this memory depletion.
- Lack of memory results in slowing down the system’s performance.
Before we move to resolve the Memory leak in Windows 10, let us take a look at the simplest way to detect it.
How To Detect a Memory Leak?
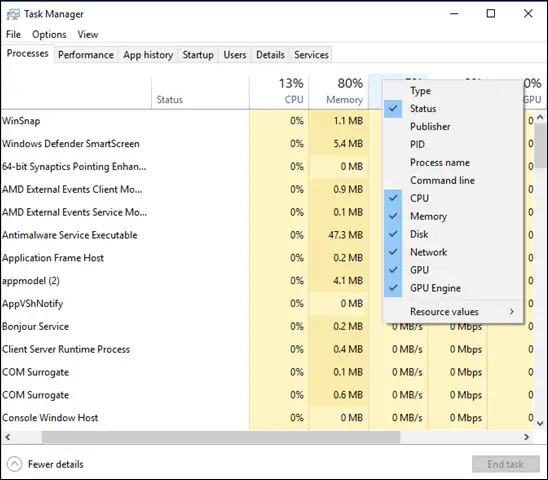
The very basic way to avoid memory leak is to monitor the RAM usage by various programs and applications by going into the Task Manager.
You can add the columns you think are helpful to keep an eye on resources used by an application.
You can utilize tools like Runtime Broker to identify memory leaks in Windows, though this tool can itself be a cause for memory issues. More on that below.
Solutions to The Windows 10 Memory Leak Issue
1] End Unnecessary processes and restart.
This one is the simplest and hence less-reliable solution for Windows 10 memory leak, but it may work if the problem is minor.
Go to the Task Manager (CTRL+SHIFT+ESC), see which process is unnecessarily taking up the RAM and end that process.
Once you have ended up the process, your system will need a Restart to resolve the memory leak issue.
Popularly used applications can also take up a lot of RAM – Chrome consumes a lot of memory and so do other browsers. Periodic cleaning up of the processes can help keep memory usage better managed.
2] Run Inbuilt Memory Diagnostic Tools
To run the inbuilt Memory Diagnostic follow the steps mentioned below:
- First, make sure you have saved all your unsaved tasks.
- Now, press Win+R and type mdsched.exe.
- Hit Enter
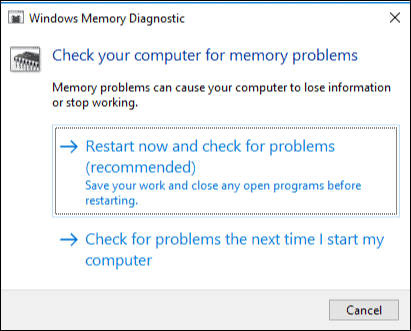
Once the Restart is completed, you have to run the basic scan, or you can also go for ‘Advanced‘ options that include Test Mix, Cache, and Pass Count.
Now press F10 to start the test.
Check if the issue is resolved with this temporary solution.
3] Check for Operating System Updates.
Operating systems like Windows are being constantly updated with features and even performance tweaks to speed them up. Even a firmware update can help improve the performance of your system.
As such, always keep your Windows 10 system updated to the latest version.
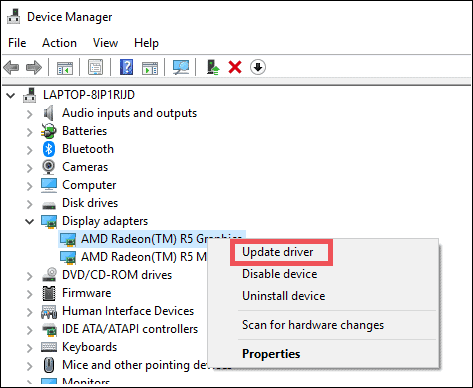
4] Check For Driver Updates
If the drivers are not updated on your system, it can be a cause for the memory leak in Windows 10 systems.
Hence, make sure all the drivers are updated without fail. It is generally a good practice to follow anyways.
To update drivers go to Device where all the devices will be listed.
To go to the Device Manager, press Win+R and type devmgmt.msc in the Run box, and hit Enter.
Check for all the outdated drivers and update all of them.
5] Optimize Windows for Best Performance
To optimize systems performance, you have to first go to Control Panel > System and Security > System.
Now on the left side of the Windows pane, move to the Advanced system settings.
You need admin access to change this Settings.
Now under the Performance section, click on Settings.
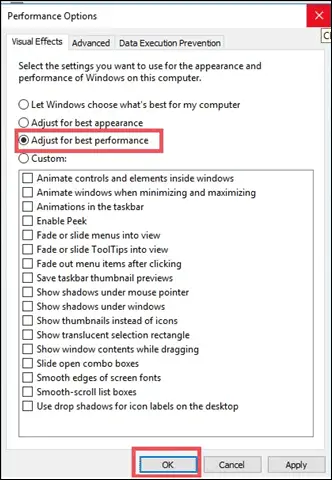
Under the Visual Effects tab, check for Adjust for best performance.
Click OK to confirm the changes. Now restart the PC and see if the issue is resolved.
6] Disable Programs Running On Startup
It’s not a bad idea to disable all those chunky startup programs that may be the cause of memory leak.
To do that, you have to go to the Task Manager (CTRL+SHIFT+ESC) and disable those troublesome programs.
And if you are confused which programs are creating the trouble, go to Task Manager > Startup and disable all the programs that you don’t need during startup.
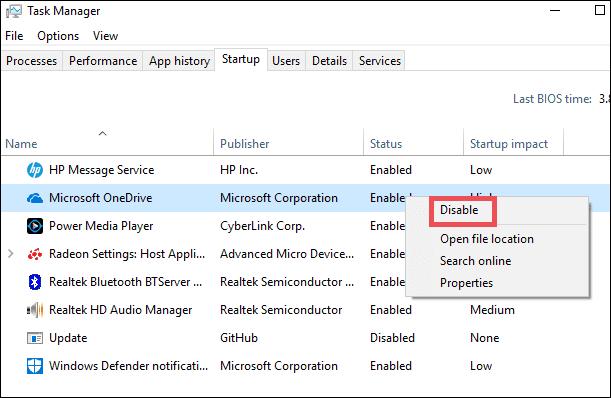
To disable most of the programs, you need admin access.
7] Defrag Hard Drive
Windows takes care of your system, and hence it automatically defrags the hard drives.
However, it is one step ahead to manually defrag hard drives to avoid any inconsistency or poor performance.
To do the same go-to This PC or My Computer.
Now, right-click on the systems hard drive (usually, that is C: drive).
Select Properties from the menu, and once you are into Properties, go to Tools tab.
Under the Tools tab, click on Optimize.
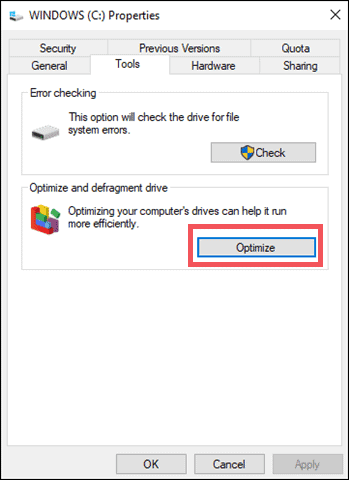
Now select the drive you want to defrag and click on Analyze.
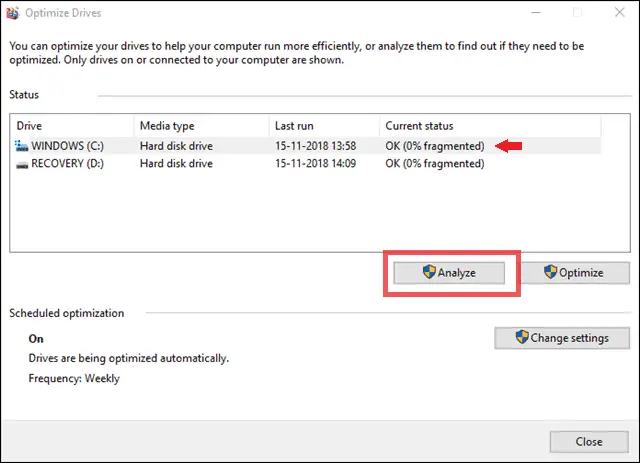
Once done, restart the PC.
Note that defragmenting the hard drive does not pertain to a RAM’s memory leak, but it does speed up the process of reading files from the hard drive, thus making your programs run a bit faster.
8] Clear PageFile At Shutdown
This solution is the most complex one but a helpful step towards resolving memory leak issues in Windows 10.
PageFile.sys is part of the Virtual Memory management mechanism that comes in the picture when Windows runs out of physical memory (RAM). It resolves the issue by writing some of the content of RAM to the hard drive.
Read more: What is Pagefile.sys and can you move or delete it?
As the memory requirements of your system increases and there is not enough space on RAM to hold all the files, the files that are least-used get ‘paged’ out to PageFile.sys.
Over a period of time, an automatically growing PageFile can start causing memory allocation issues caused by the latencies associated with the growing size of the PageFile. This can cause your applications to crash as they run into an ‘out-of-memory’ exception.
The easiest way to ensure that the PageFile is in use but gets cleared regularly is to clear the PageFile at every shutdown. On the flip side, this may increase the time taken by your computer to shut down.
To clear the PageFile at every shutdown:
- Open the Run box (Windows Key+ R), and type regedit into it. Hit Enter and Registry Editor is launched.
- Enter the path HKEY_LOCAL_MACHINESYSTEMCurrentControlSetControlSession ManagerMemory Management.
- Now, tweak the value of ClearPageFileAtShutDown to ‘1’.
- Once done, save the changes and give a Restart to your computer.
Now, this should work to resolve the Windows 10 memory leak and allocation issues due to a large PageFile.
9] Disable Superfetch
Superfetch is a useful feature in Windows (leveraged by ReadyBoost performance tool) that analyzes your RAM usage patterns and see which apps you use the most. Once the analysis is done, Superfetch loads them in RAM in advance to save the loading time.
Well, it is not recommended to disable this feature, you can try it once in isolation to see if it turns up to be a solution for you.
Go to the search bar and type services.msc and head to Services Manager.
Scroll down to Superfetch and right-click on the Properties.
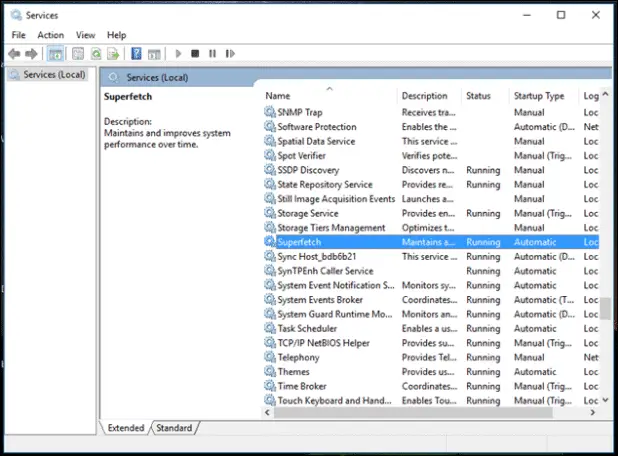
Select Stop. Along with that, Disable the service from the drop-down menu of Startup type.
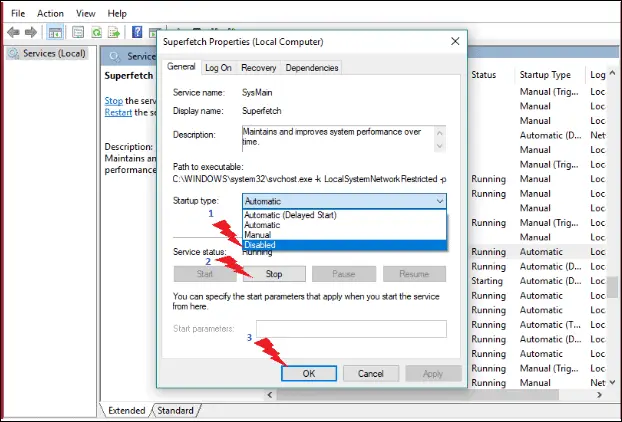
Now Restart the PC and see if it is a working solution for you. And if it didn’t work, enable it following the same steps mentioned above, with the exception of choosing the startup type as ‘Automatic’.
10] Check For Malware
You can use good Antivirus software to detect and remove any malware that is present in your system.
There are some good Anti-Malware Tools (link to the best anti-malware tools article) that can help you eliminate any malware that is causing memory issues or even high CPU-usage on your PC.
The antivirus or antimalware software should be updated to avoid any additional problem.
11] Disable Runtime Broker
Runtime Broker that sits in Task Manager is responsible for all the permissions for apps from Windows Store in Windows 10.
Usually, Runtime Broker takes low memory, but if there is some troublesome app in the system, the process can consume more than expected memory.
This may be causing issues as no memory is left for other programs to use. Disabling Runtime Broker may be helpful, and you might notice a difference. Below are the steps to disable Runtime Broker:
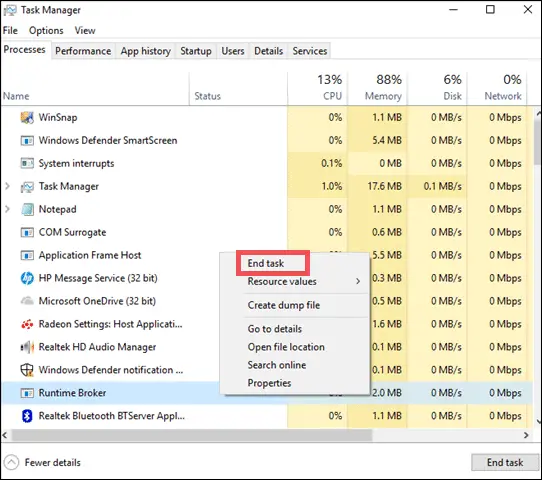
Go to Task Manager (CTRL+SHIFT+ESC), Under Processes, move to Runtime Broker and right-click on it. Now, select End task.
Restart the PC and check if there is any improvement.
12] Disable Windows Tips and Tricks
Primarily Windows 10 Tips and Tricks are greatly helpful to newbies of Windows 10. If this feature is enabled, you can get some really good recommendations about using and handling the system properly.
However, these tips and tricks can be quite tiresome for some people who are seasoned users of the operating system.
Moreover, this feature can also consume a good amount of memory of your system which can hinder the system performance.
Hence, if this is the cause of Windows 10 memory leak or unnecessary usage, you may see the difference after disabling it.
To disable Windows 10 Tips and Tricks follow the simple steps below:
Go to Settings > System > Notifications & actions.
Move to Get tips, tricks, and suggestions as you use Windows and switch it Off.
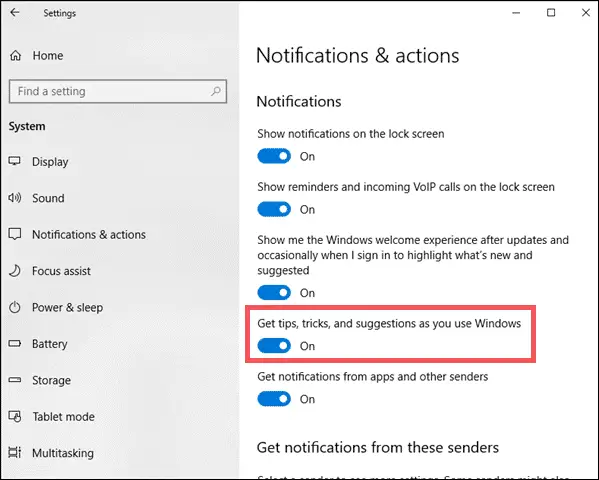
Once you disable it, you will stop seeing those tips and tricks pop-ups, and the RAM used for this purpose would be freed up.
Conclusion
Since every system has a different configuration, the behavior towards any issue or its solution depends on the individual reason that caused the problem.
We have summed up every possible solution that we expect to work in resolving your Windows 10 Memory Leak issues. Give them a try and let us know what worked or you.
See Also: 4 Useful Tips for Using a Slow, Low-End Windows PC


