BIOS is an acronym for Basic Input/Output System, a program that resides on the motherboard of your system. It is responsible for initializing hardware during the booting process. BIOS comes preinstalled on your PC/laptop, and it is the first program to get activated whenever you turn on your PC. So, you cannot update BIOS in Windows 10 automatically.
If you want to update BIOS, there is a proper procedure that needs to be followed, otherwise, the system can get damaged beyond repair.
What does BIOS do?
As mentioned above, BIOS initialization hardware on your system. It has crucial settings of your Windows system saved in it. A wrong change in the BIOS settings can make your entire system crash and hardware malfunction.
BIOS is also known to check all the hardware components like a mouse, keyboard, monitor, and other Input/Output (I/O) devices during the booting process. It notifies you if any of the I/O hardware devices do not function as usual.
Windows 10 lets you access most of the crucial settings via the operating system. However, accessing BIOS via the operating system is not possible. There are different methods to enter BIOS settings depending upon the manufacturer of the motherboard.
The guide covers different ways to enter and update BIOS depending on the manufacturer of your laptop or motherboards in Windows 10.
How to Enter BIOS?
One of the common ways to enter BIOS in Windows 10 is by using advanced startup.
Step 1: Press Windows key + I to open Settings and click on Update & Security.
Step 2: Go to Recovery from the left panel and click on Restart now under the Advanced startup section.

Step 3: Once the PC restarts and you see the Advanced Startup screen, click on the Troubleshoot.
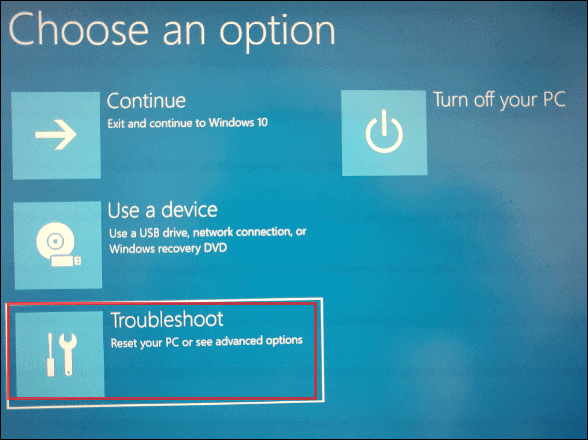
Step 4: Next, click on the Advanced options.
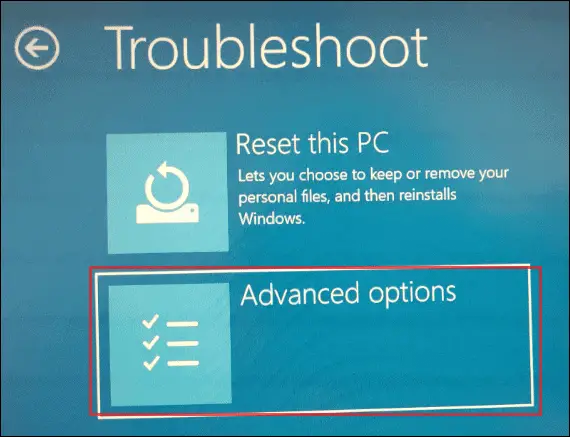
Step 5: Click on UEFI Firmware Settings to enter the BIOS settings.
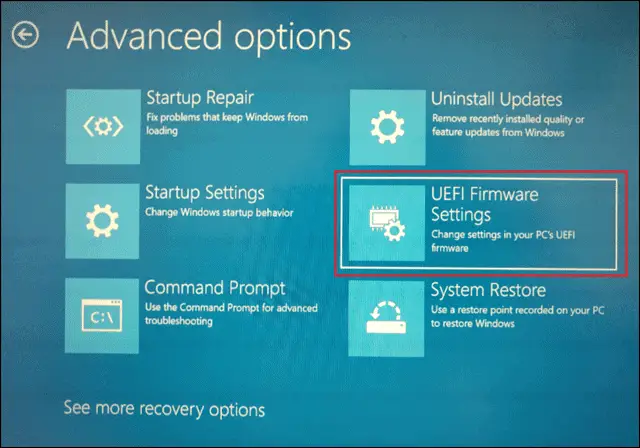
Step 6: On the next screen, click on Restart.
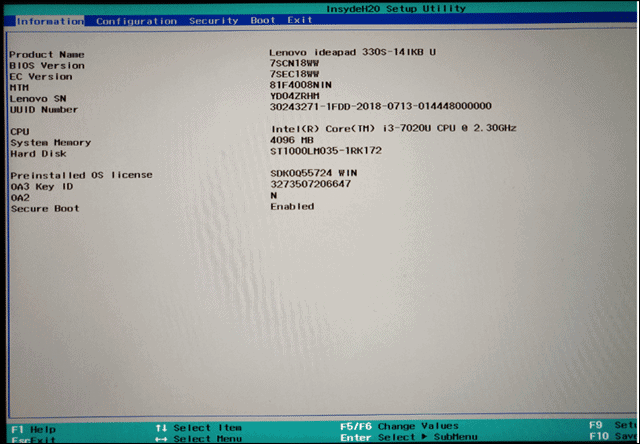
You can now see the BIOS settings on your screen.
If you cannot see UEFI Firmware settings in the Advanced Options, then you can try a manufacturer-specific way to enter the BIOS settings mentioned below. The function keys can be used to enter the BIOS settings.
The mentioned function keys should be pressed immediately when you see the black screen after the restart. If the Windows logo appears, you need to redo the process again. Below is a list of the function keys mentioned for different manufacturers.
Lenovo: F2
Lenovo(Desktops): F1
Lenovo (ThinkPads): Enter + F1.
ASUS: F2 for all PCs, F2 or DEL for motherboards
Dell: F2 or F12
HP: ESC or F10
Acer: F2 or DEL
You can opt for any of the ways you find it convenient to enter the BIOS.
How To Check the BIOS Version Of Your System?
Whenever you wish to update BIOS in Windows 10, the first thing you need to check is the BIOS version. You can see the BIOS version when you enter the settings. However, that doesn’t mean you need a reboot just to check the BIOS versions. There are two ways to do it without a reboot, as well.
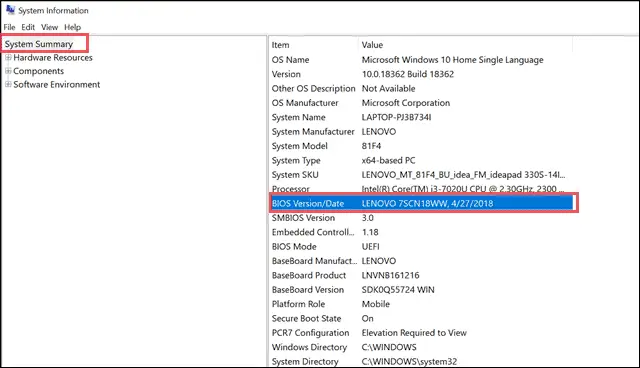
Check BIOS Version via System Information
Search for System Information using the search menu and open it. You can now see BIOS Version/Date in the System Summary as soon as the System Information opens.
Check BIOS Version via Command Prompt
Open Command Prompt and execute the command mentioned below.
wmic bios get smbiosbiosversion

After the command execution, you can see the version number on the command prompt screen. You can note it down for the update process of the BIOS in Windows 10.
How to Update BIOS in Windows 10?
BIOS is the essential program when it comes to the booting of the system. It also maintains the security of the system by checking the hardware against the security measures. BIOS is not updated via the operating system; a proper procedure needs to be followed to achieve a successful BIOS update.
The procedure to update BIOS in Windows 10 depends on the manufacturer. If you have personally built your PC, you need to find the manufacturer of the motherboard to know which BIOS update procedure to follow. If you use a laptop, you can follow the laptop’s manufacturer name to get along the BIOS update process.
It is recommended to update BIOS in Windows 10 only if necessary. If you have sudden hardware problems, which can only be solved by updating BIOS, then you can go for a BIOS update.
Below is the detailed process on how to update Windows 10 BIOS for Lenovo, Dell, HP, and ASUS manufacturers.
Warning: Flashing BIOS is a critical process, so one should be careful while doing it. There should not be a power shortage or sudden freeze, shutdown of your PC/laptop. As a sudden shutdown causes problems while writing BIOS when updating, which can cause damage to the system.
How to Update BIOS on the Lenovo Systems?
If you own a Lenovo system, you need to visit the Lenovo Support website to download the BIOS.
Step 1: The first thing you need to do after visiting the support site is to select the Product Category for the product you own.
Step 2: Select the Product, Series, and Subseries.
Lenovo’s Series and Subseries is found on the bottom of the laptop or in the System Information window next to System SKU.

Step 3: Enter the Serial Number on the next page. The serial number is only present on the bottom of your laptop. Once the product details are displayed, click on the Drivers & Software.

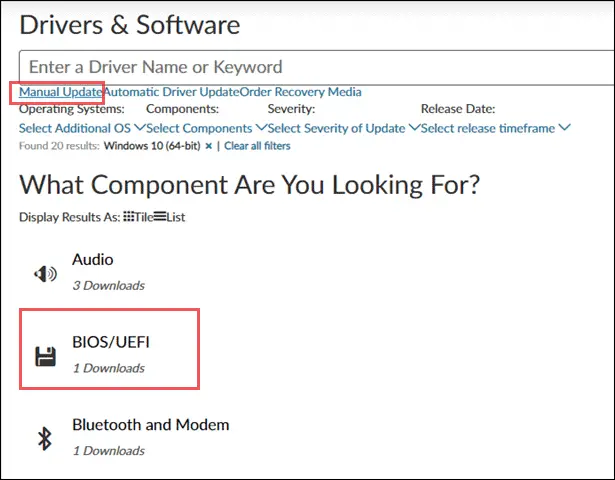
Step 4: Click on the Manual Update, and then select BIOS/UEFI.
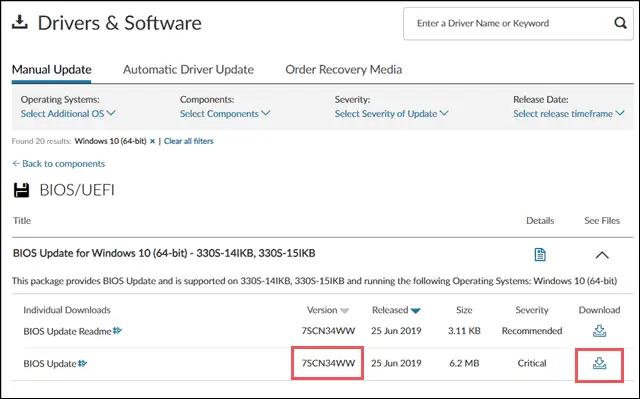
Step 5: Check the BIOS version against the BIOS version number seen in your system information. If both the version numbers are different, download the BIOS update by clicking on the Download button.
Step 6: After the download completes, click on the downloaded .exe file and follow the wizard on the screen to complete the BIOS update process.
Step 7: Restart the PC after the BIOS update.
You can check out the video for a clear view of the process: https://youtu.be/9jMz7KV76VA
How to Update BIOS on the Dell Systems?
Follow the procedure mentioned below to download and install BIOS updates in Windows 10 for your Dell system.
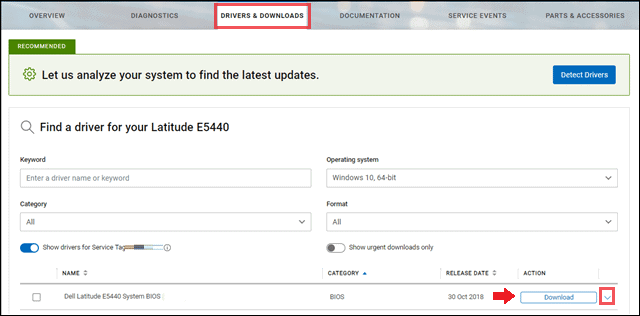
Step 1: Go to the Dell Support page and enter the Serial Number/Service Tag. Click on the search button to get the details related to your system.

Step 2: Next, click on DRIVERS & DOWNLOADS. You can check out the details related to update by clicking on the drop-down button. Once you are done with version comparison, click on the Download.
Step 3: After downloading, click on the install button or right-click on the downloaded file and click Open.
Step 4: Restart the PC after the BIOS update.
Are you stuck somewhere? Have a look at the video from Dell’s official site. The video will give you a better understanding of updating BIOS on the Dell system.
How to Update BIOS on the HP Systems?
If you own HP motherboards or HP systems, then you can download and install the BIOS from its official site.
Step 1: Go to the official HP site for downloading BIOS and select your product.
Step 2: Enter the serial number or let HP detect your product.

Step 3: Click on the BIOS and then click on the Download.
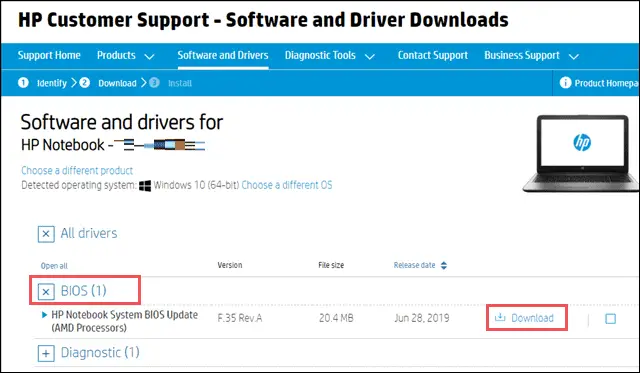
Step 4: Start installing the BIOS by clicking on the downloaded BIOS update. Follow the wizard on the screen.
Step 5: Restart the PC after the BIOS update.
For some other details related to flash BIOS, you can refer to the guide written on HP’s official site.
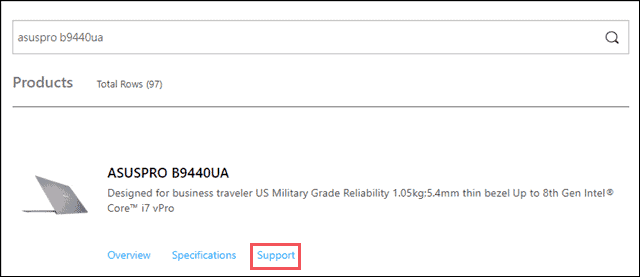
How to Update BIOS on the ASUS Systems?
To update your BIOS on the ASUS systems, you need to use a preinstalled app called Winflash. Winflash is a licensed application that can only be used by ASUS users. Let’s see how to flash BIOS in ASUS using Winflash.
Step 1: Note down the serial number and enter it in the search bar. To get the search bar, click on the search button next to Login.

Step 2: Click on Support.
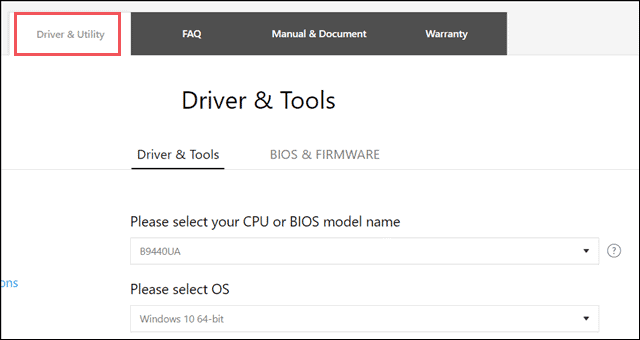
Step 3: Select Driver & Utility, and then select the BIOS model name and OS.
Step 4: Click on the Download for the BIOS version you wish to install.
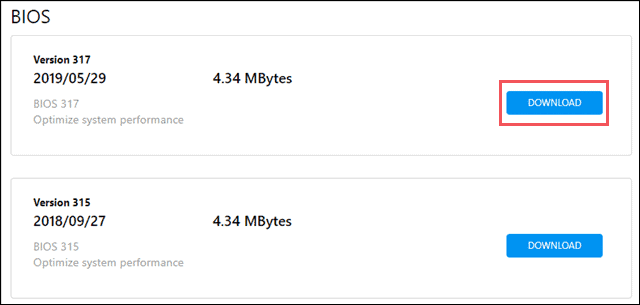
Step 5: After the download completes, open the Winflash app and start the installation process.
You can get a clear idea about using Winflash by referring to the FAQ section of ASUS.
Related: Disable or Enable Secure Boot on Your Computer via ASUS UEFI BIOS Utility
Final Thoughts on Update BIOS in Windows 10
BIOS updates are crucial, and hence it is important to download the correct update. A wrong update can mess up with your system and can cause troubles that are beyond repair. One should download the BIOS update for the system from the official manufacturer’s website only.
Hence, flashing BIOS should only be done if required. The above guide can help you update BIOS in Windows 10 for 4 manufacturers; ASUS, Lenovo, HP, and Dell. The guide can also quickly walk you through the process to enter BIOS and check the version number of the BIOS currently in use.


