PowerShell is a powerful command-line utility launched by Microsoft in November 2006. It was developed to carry out admin tasks effectively and securely on the Windows platform. Windows PowerShell commands are far more powerful and advanced than the commands used on the command prompt.
We have listed the commands in three different categories; beginners, intermediate, and advanced users. Before executing the command, let’s see what Windows PowerShell is and how it is different from the command prompt.
What is Windows PowerShell?
PowerShell is built on the .Net framework to carry out task automation and script-based processes. You can control your entire Windows 10 PC using the PowerShell commands known as cmdlets (command-lets). The work of Windows admins and advanced power users is much more simplified by PowerShell access to data stores like registry and file systems using cmdlets.
Microsoft made it open source and cross-platform on 18th August 2016. It is now available on GitHub for every platform.
Commands vs. Cmdlets
As mentioned above, the Windows PowerShell commands are cmdlets that let you execute the tasks in Windows Powershell. The cmdlets are light-weight commands that return the .Net framework object to the next command after performing the tasks.
The cmdlets are not stand-alone utilities like the commands executed in the command prompt. PowerShell offers a list of cmdlets to perform different tasks.
The cmdlets list is much longer than the commands used in the command prompt.
Note: We have executed each command mentioned below and checked if its functions as required.
Basic Windows PowerShell Commands for Beginners
If you are new to Windows 10 PowerShell, then you can try the basic commands to begin. Our beginner’s list of PowerShell commands will help you get the hang of PowerShell commands or cmdlets. Kids can also work around such beginner commands, which can add fun to their routine computer classes.
1. Get-Help
The first command on the beginner’s list is Get-Help. You can get help related to any cmdlets of PowerShell using this command. Along with commands, Get-Help can help you with functions, workflows, Common Information Model (CIM) commands, aliases, scripts, and providers.
Examples:
Get-Help Clear-History2. Get-Host
Well, to get information about the PowerShell, you can use the Get-Host command. You can get complete information like Name, Version, Instance ID, UI, and many more.
Example
Get-Host
Gives the complete information with all the parameters; Name, Version, InstanceId, UI, CurrentCulture, CurrentUICulture, PrivateData, DebuggerEnabled, IsRunspacePushed, Runspace
Using this PowerShell command you can know the version number of your PowerShell.
3. Get-Location
Get-Location gives you the path of the working directory. If you wish to know the current location or location stack, where you are currently working, then you can use the Get-Location command.
Example
Get-Location
Gives you the path of the current working directory
4. Get-History
Each PowerShell session history is maintained by PowerShell, which includes the commands you execute during the entire session. You can get this session history using Get-History cmdlet.
Example
Get-History
Displays the list of all the commands executed in the single session
5. Clear-History
Clear-History can help you delete the entire history of the ongoing session. After using Clear-History, if you again use Get-History, then only Clear-History command is displayed.
Example
Clear-HistoryWipes out the history of the entire session
6. Set-Content
You can create a file and add the contents to the file using Set-Content. This PowerShell command also replaces the existing content on the file with the new content.
Example
Set-Content -Path .Desktop Example.txt -Value 'This is a Sample Content in the Example File'Creates a file named Example.txt on the Desktop and adds the specified value to it.
Note: If you already had a file name Example.txt on Desktop with contents, the above command will replace the contents.
7. Get-Content
You can see the contents of a particular file from the PowerShell window using the Get-Content cmdlet. To read a specific number of lines from the file, you can mention that in PowerShell command itself.
Example
Get-Content -Path .Desktoptesting.txt Display the entire contents of the mentioned file
Get-Content -Path .Desktoptesting1.txt -TotalCount 2 Display only first 2 lines of the file
8. Clear-Content
You can delete the contents of an entire file with the Clear-Content PowerShell command in Windows 10. With Clear-Content cmdlet, you can clear many files with the same extension in the particular folder/directory.
Example
Clear-Content .Desktoptesting.txtClears the content of the testing file
Clear-Content .Desktop* -Filter "*.log"Clears the content of all the files present in the Desktop having .log extension
9. Start-Process
You can launch Windows 10 app using the PowerShell command called Start-Process. This PowerShell command allows you to open Notepad, Settings, and many other apps using a single command.
Example
Start-Process “notepad”Opens Notepad in Windows
Start-Process "ms-settings:"Opens Windows Settings
Start-Process -FilePath "Example.txt" -WorkingDirectory "C:Users" -Verb PrintPrints the file named Example.txt present in C:Users folder.
Start-Process for Advanced Users
The advanced users can use the Start-Process cmdlet for different tasks, other than printing or opening an app.
Example
Start-Process -FilePath "powershell" -Verb RunAsOpens PowerShell as administrator
Start-Process -FilePath "$env:comspec"Opens command prompt. You can also pass the argument list to execute the command in the command prompt.
10. Get-Process
If you wish to know the processes running on Windows, then you can use the Get-Process command. You can get information like utilized CPU time, process ID, pageable and non-pageable memory, and virtual memory.
Example
Get-ProcessLists all the running process on the local computer along with the information stated with it
Get-Process -Name 'notepad'Lists the information related to notepad only
11. Stop-Process
You can close the open apps on Windows using the PowerShell cmdlet named Stop-Process. You can close the running processes by using the ID or name.
Example
Stop-Process -Name 'notepad'
Closes Notepad
Stop-Process -Id 13636 -Confirm -PassThru
Closes calculator on my PC
You can get the ID using the Get-Process command, and it differs from system to system. If you try to close the app or process which is not running, then you will get an error stating ‘Cannot find a process.’
12. Get-EventLog
With Get-EventLog PowerShell cmdlet, you can view the events and event logs of the local and remote computers. You can also check the error events log from the PowerShell window.
Example
Get-EventLog
Displays all the Event logs
Get-EventLog -LogName System -Newest 5
Displays the last five events from System logs
Get-EventLog -LogName Application -EntryType Error
Displays the error events from Application logs
13. Read-Host
You can play with this command and write your first line of code in the PowerShell window. Read-Host reads the input for you from the console itself.
Example
$Age = Read-Host "Please enter your age"Takes the input and stores it in Age variable

$pwd_secure_string = Read-Host "Enter a Password" -AsSecureStringTakes the input and stores it in the variable as a secure string because of AsSecureString parameter
14. Remove-Variable
You can delete the variable using the Remove-Variable command. It simply deletes the data that is assigned to it.
Example
Remove-Variable $AgeDeletes the age number assigned to it
15. Out-File
The output of any command can be saved into a file using the Out-File command. The file is saved at the specified location after the FilePath parameter.
Example
Get-Process | Out-File -FilePath .Process.txtSaves the output of Get-Process command in Process.txt file
Basic Tips
Some tips mentioned below can help you use PowerShell more conveniently. The tips are given by our technical experts to answer some basic questions related to PowerShell.
- You can execute all the commands of the command prompt in PowerShell as well. Hence, you can use the different utilities to fix the corrupt files and bad sectors in PowerShell.
- To clear the entire PowerShell console type cls or clear and press Enter.
- To exit the PowerShell terminal, type exit on the console and hit Enter.
- To stop the execution of any cmdlets, press Ctrl + C.
PowerShell Commands for Intermediate Users
Once you get hold of basic PowerShell commands, you can get major tasks done on your Windows system using the intermediate level Powershell commands.
1. Where-Object
Using the Where-Object PowerShell command, you can select specific property values. It will display only the list with only specified property values. You cannot use the Where-Object cmdlet separately. You need to use it with some other command.
Example
Get-Process | Where-Object WorkingSet -GT (50000*1024)Lists the processes having the Working Set greater than 50000 KB. Here, 1024 is multiplied to convert the data stored in bytes to KB
2. Get-Service
Get-Service cmdlet displays all the running and stopped services on the local and remote computers. You can alter the command attributes to display specific services.
Example
Get-ServiceDisplays all the running and stopped services on your local computer with status, service name, and display name
Get-Service -Displayname "*Windows*"Displays all the running and stopped Windows services
Get-Service | Where-Object {$_.Status -eq "Running"}Displays the services that are currently running on your computer
3. Start-Service
To start a particular service on your local computer, you can use Start-Service cmdlet. This command notifies Windows Service Controller to start the specified service.
Example
Start-Service -Name “AppMgmt”Starts the Application Management services
$s = Get-Service -Name “AppMgmt”Start-Service -InputObject $s -PassThru | Format-List >> services.txtStarts the Application Management services and saves the output in services.txt file
4. Stop-Service
Stop-Service cmdlet notifies Windows Service Controller to stop the specified service which is running.
Example
Stop-Service -Name “AppMgmt”Stops the Application Management services
Stop-Service -DisplayName “Application Management” | Stop-ServiceStops the Application Management services using the Display Name parameter
5. Select-Object
You can filter the list using the Where-Object cmdlet. However, to display only the properties or columns you want, you need to use Select-Object command on your Windows PowerShell console.
Example
Get-Host | Select-Object VersionDisplays the PowerShell version number
Get-Service -Name “AppMgmt” | Select-Object -Property DisplayNameDisplays only the DisplayName of Application Management service
6. Set-Alias
With the Set-Alias cmdlet, you can give another name to any command or any other executables.
Example
Set-Alias -Name host -Value Get-HostThe Get-Host command can now be executed using host command; the host is an alias name for Get-Host
Set-Alias -Name exp -Value C:Windowsexplorer.exeSets exp as the alias name for Windows Explorer executable file.
Set-Alias -Name loc -Value Get-Location -Option ReadOnly -PassThru | Format-List -Property *Makes an unwritable alias to Get-Location; that is, you cannot use loc alias for any other cmdlet. If you wish to change the alias “loc” to some other cmdlet, then you need to use -Force parameter.
Set-Alias -Name loc -Value Get-Host -Option ReadOnly -PassThru -Force| Format-List -Property *-Force parameter used to assign the alias ‘loc’ to Get-Host command
7. Get-Alias
You can get the aliases of the entire session using Get-Alias cmdlet.
Example
Get-AliasLists all the aliases of the current session
Get-Alias -Name locGives the information related to the loc alias
Get-Alias -Definition Get-HostDisplays the alias name for Get-Host
8. Set-Item
Set-Item is one of the Windows PowerShell commands, that is used to change the value of an item, such as variable or registry keys
Example
Set-Item -Path alias:exp -Value "C:Windowsexplorer.exe"Creates an alias named exp to open Windows Explorer
Set-Item -Path function:prompt -Value {'PS '+ (Get-Date -Format t) + " " + (Get-Location) + '> '}Shows time along with the location on the PowerShell console
9. Get-Item
Get-Item cmdlet displays the directory and its contents when specified. You can navigate to different types of data stores with this Windows PowerShell commands.
Example
Get-Item . Displays the path of the current directory along with last access time, mode and name
Get-Item *Displays the contents of the current directory/folder
(Get-Item C:Windows).LastAccessTimeDisplays the last access time of the mentioned drive
Get-Item C:Windows*s* -Exclude “a*”Displays the list of contents in the directory that includes s and excludes ‘a’ in its name
10. Copy-Item
As the name says, Copy-Item cmdlet is used to copy contents from one location to another. You need to specify the location correctly in the command itself.
Example
Copy-Item "C:DesktopExample.png" -Destination "C:Public"Copies Example.png from Desktop to Public folder
Copy-Item "C:DesktopExample*" -Destination "C:DocumentsTesting"The testing folder is created in Document, and all the contents from Example folder are copied to the Testing folder
11. Remove-Item
Remove-Item cmdlets help you to remove the specified item, be it functions, aliases, files, and folders.
Example
Remove-Item “C:DesktopExample*.*”Deletes all the contents from the Example folder
Remove-Item * -Include *.txt -Exclude *a*Deletes files having extension .txt from the current working directory
12. Get-ExecutionPolicy
To get the details about the execution policies of the current session, you can use the Get-ExecutionPolicy command. The execution policies are displayed in a list as per precedence.
Example
Get-ExecutionPolicy -ListDisplays the execution policies of each scope
13. Set-ExecutionPolicy
The execution policies shown above can be modified using the Set-ExecutionPolicy command. The execution policies are the security strategies of PowerShell, hence be careful when you change it.
Example
Set-ExecutionPolicy -ExecutionPolicy RemoteSigned -Scope LocalMachineModifies the execution policy for the local machine
14. Get-Command
Get-Command cmdlet gets all the commands, functions, aliases, applications, and script and displays it for you. You can get a list of imported cmdlets using the ListImported parameter.
Example
Get-CommandDisplays all commands, functions, aliases, applications, and script currently installed on your local computer
Get-Command -ListImportedLists the commands of only the current session
Get-Command -Type Cmdlet | Sort-Object -Property Noun | Format-Table -GroupBy NounGroup the cmdlets by a noun and sort them alphabetically.
You can use the above command as it is to find commands for the specific task.
Get-Command -Module Microsoft.PowerShell.Security, Microsoft.PowerShell.Utility Module parameter list commands of specified modules only
Get-Command Get-AppLockerPolicyImports AppLocker module and displays the information related to Get-AppLockerPolicy command
15. Get-ChildItem
You can get a list of contents available at the specified location using the Get-ChildItem cmdlet. However, when the list of directories and contents is displayed, the empty directory is skipped by the Windows PowerShell commands.
Example
Get-ChildItem -Path C:Displays all the contents under C drive
Get-ChildItem -Path C:Desktop -RecurseDisplays all the child item from all the folders present in the Desktop with the information about the mode and last write time
Get-ChildItem -Path C:Desktop -NameOnly Prints the name of the folder and files saved on Desktop
16. Sort-Object
To get the sorted list of objects or contents for a particular command, you can use the Sort-Object command. It can sort all the objects in ascending or descending order based on the Property value specified in the command.
Example
Get-ChildItem -Path C:Desktop | Sort-ObjectSorts all the contents of the desktop in ascending order
Get-ChildItem -Path C:Desktop | Sort-Object -Property LastWriteTime Sorts the contents based on the last write time and not on the file name
Get-Process | Sort-Object -Property WS | Select-Object -Last 5Displays 5 processes based on the memory usage
17. Invoke-Item
You can open the document in Microsoft Word and pdf in the default pdf reader using the Invoke-Item command. In other words, Invoke-Item performs the default action on the specified file.
Example
Invoke-Item "C:Desktop1.png"Opens 1.png file
Invoke-Item "C:UsersUrviDesktop*.png"Opens all the png files saved on the desktop one after the other
You can use Invoke-Item to open any type of files saved anywhere on your PC
18. Format-Table
You can view any commands output in table format using Format-Table cmdlet. This command allows you to group the output by the GroupBy parameter.
Example
Get-Host | Format-Table -AutoSizeDisplays the properties in the form of rows and columns. The Autosize parameter avoids truncation of the table.
Get-Process | Sort-Object -Property BasePriority | Format-Table -GroupBy BasePriority -WrapGroups the processes using Base Priority and displays them in table format. The Wrap parameter wraps the data to avoid truncation.
19. Write-Host
You can have different options to customize the output by using the Write-Host command. It is a fun command to use and play around with it.
Example
Write-Host "no newline test " -NoNewlineWrite-Host “second string”
Displays both the strings on the same line
Write-Host (2,4,6,8,10,12) -Separator ", +2= "Displays each number with the separator in between
Write-Host "Red on white text." -ForegroundColor red -BackgroundColor whiteDisplays the text in red on the white background using the Foreground and Background parameters
20. Write-Warning
You can write the warning message for some specific actions using the Write-Warning message. This command contains the $WarningPreference and WarningAction for the warning response.
Example
Write-Warning "This is only a test warning."Displays the specified message as a warning
Write-Warning "This is only a test warning." -WarningAction InquireDisplays the warning message and asks whether you want to continue or not.
PowerShell Commands for Advanced Users
Advanced users like Windows admins and developers need some complicated tasks to be covered. Hence, PowerShell has a set of advanced commands to carry out complicated tasks. You can check out the Windows PowerShell commands mentioned below.
1. ForEach-Object
ForEach-Object performs the specified operation on the given set of objects. The object can be in the form of command output as well.
Example
2,4,8 | ForEach-Object {$_/2}Divides 2,4, and 8 by 2
Get-ChildItem $pshome | ForEach-Object -Process {if (!$_.PSIsContainer) {$_.Name; $_.Length; " " }}Gets all the files and folders from the PowerShell folder, passes those to the ForEach-Object cmdlet to loop over. Finally displays all the files with its length.
$Events = Get-EventLog -LogName System -Newest 1000$Events | ForEach-Object -Begin {Get-Date} -Process {Out-File -FilePath Events.txt -Append -InputObject $_.Message} -End {Get-Date}$Events stores the newest 1000 System Event log. This variable is passed to ForEach-Object, where the Begin parameter prints the time and date when the process starts. The Process parameter creates a new file named Events.txt with the help of the Out-File command. The Message property of each of the events is saved in the Events.txt file. Lastly, the End parameter prints the date and time when the process ends.

2. Compare-Object
You can compare two objects using the Compare-Object command. One object is the ‘reference’ object, and the other is the ‘difference’ object.
Example
Compare-Object -ReferenceObject (Get-Content -Path C:Desktoptest1.txt) -DifferenceObject (Get-Content -Path C:Desktoptest2.txt)Compares two files test1.txt and test2.txt, if there is any difference between them, the output is displayed. Otherwise, there is no output.
$objects = @{
ReferenceObject = (Get-Content -Path C:\Desktop\test1.txt)
DifferenceObject = (Get-Content -Path C:\Desktop\test2.txt)
} Compare-Object @objects -IncludeEqual
Compares the specified object and also displays the output if both the files are the same.
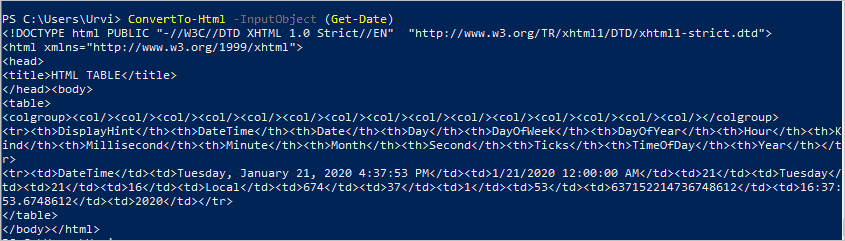
3. ConvertTo-Html
If you wish to see the output of the executed command on the web browser, then you can use the ConvertTo-Html command. This command converts the Microsoft .NET Framework objects into HTML, which can then be displayed on a Web browser.
Example
ConvertTo-Html -InputObject (Get-Date)Converts the output of the Get-Data command into HTML format.
Get-Alias | ConvertTo-Html | Out-File aliases.htmInvoke-Item aliases.htmConverts the output of Get-Alias command into HTML and saves it in the aliases.htm. Uses Invoke-Item command to open the HTML file in the Web browser.
4. ConvertTo-XML
You can convert the specified object into XML format using the ConvertTo-XML PowerShell command.
Example:
Step 1: Converts the Date object into XML
$a = Get-Date | ConvertTo-Xml
Step 2: Displays the XML object in the XML form
$a.InnerXml

ConvertTo-Xml -As "Document" -InputObject (Get-Process) Converts the output of Get-Process in XML format
-Depth Depth parameter represents all the XML objects properties till the specified Depth level
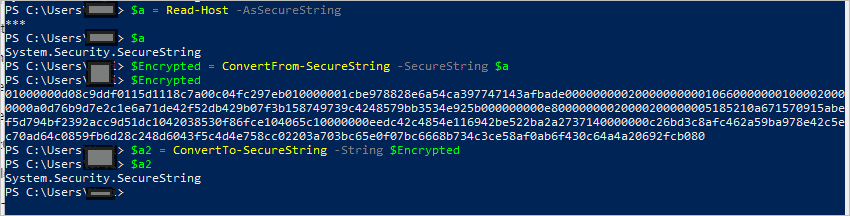
5. ConvertFrom-SecureString
You can convert a secure string to an encrypted standard string using the ConvertFrom-SecureString Windows PowerShell commands. Unlike Secure String, you can read the encrypted string.
Example
Step 1: Asks for input and saves it in the variable as a secure string
$SecureString = Read-Host -AsSecureString
Step 2: Converts the stored secure string in an encrypted format
$StandardString = ConvertFrom-SecureString $SecureString
$Key = (3,4,2,3,56,34,254,222,1,1,2,23,42,54,33,233,1,34,2,7,6,5,35,43)
$StandardString = ConvertFrom-SecureString $SecureString -Key $Key
Encrypts using Advanced Encryption Standard (AES) Algorithm. The key is used for encryption which is a 192-bit key. The final encrypted data is stored in the StandardString variable.
6. ConvertTo-SecureString
If you wish to convert the encrypted standard strings or plain text into a secure string, then you can use the ConvertTo-SecureString PowerShell command. You can use this cmdlet with ConvertFrom-SecureString and Read-Host cmdlets.
Example
Step 1: Takes the input and stores it in ‘a’ variable as Secure String
$a = Read-Host -AsSecureString
Step 2: Displays contents of variable ‘a’
$a
Step 3: Converts the secure string saved in variable ‘a’ to encrypted string and stores this encrypted string in ‘Encrypted variable’
$Encrypted = ConvertFrom-SecureString -SecureString $a
Step 4: Displays the encrypted string stored in the ‘Encrypted variable’
$Encrypted
Step 5: Converts the Encrypted string into a secure string and stores the output in ‘a2’ variable
$a2 = ConvertTo-SecureString -String $Encrypted
$Password = ConvertTo-SecureString "AB@c!" -AsPlainText -Force
Converts the plain text into a secure string. You need to mention AsPlainText and Force parameter to use ConvertTo-SecureString with plain text.
7. New-ItemProperty
With New-ItemProperty, you can create a new item and also add value to it. This command is used to add new registry values. You cannot use it with PowerShell objects.
Example
New-ItemProperty -Path "HKLM:SoftwareMySchool" -Name "NoOfSchool" -Value 800Adds new key named NoOfSchool to the registry key MySchool and the Value parameter gives the value 800.
$newValue = New-ItemProperty -Path "HKLM:SchoolsXYZ" -Name 'MultiString' -PropertyType MultiString -Value ('a','b','c')Add multiple values to the new property named MultiString.
8. New-Object
New-Object cmdlet allows you to create an instance of the Microsoft .NET Framework and COM object.
Example
New-Object -TypeName System.Version -ArgumentList "1.2.3.4"Uses 1.2.3.4 as the constructor and creates a new object System Version
$IE1 = New-Object -COMObject InternetExplorer.Application -Property @{Navigate2="www.microsoft.com"; Visible = $True}Creates an instance of COM object of Internet Explorer. The Property parameter calls the Navigate2 method, and the Visible property of the object is set to True to make the application visible.
9. Export-CSV
If you want to have your PowerShell object in comma-separated value (CSV), then you can use Export-Csv cmdlet. This Windows PowerShell command also saves the output to the mentioned file.
Example
Get-Process -Name WmiPrvSE | Select-Object -Property BasePriority,Id,SessionId,WorkingSet |Export-Csv -Path .WmiData.csvImport-Csv -Path .WmiData.csvGets the process named WmiPrvSE with the property mentioned in the command and export the result to WmiData file in the CSV form. You can see the output because of the Import-CSV command.
Get-Process | Export-Csv -Path .Processes.csv Get-Content -Path .Processes.csvSaves the output of Get-Process command to Processes.csv file in CSV format and then displays the content in CSV form.
10. Find-Module
When you want to find the modules, you can use the Find-Module cmdlet. With the Find-Module PowerShell command, you can specify the criteria to find any specific module in the repository.
Example
Find-Module -Name PowerShellGetFinds and displays the PowerShellGet module from the repository using the -Name parameter
Find-Module -Name PowerShell*Finds the modules with PowerShell prefix
Find-Module -Name PowerShellGet -RequiredVersion 1.6.5Find the module with the version specified version in the RequiredVersion parameter
11. Set-StrictMode
You can enable the strict mode to enforce the best coding practices within the current scope and the child’s scope. This mode is for all the expressions, scripts, and script blocks. You need to turn on the strict mode because it is off by default.
Example
Strict mode disabled by default
Step 1: Output: False
$b -gt 10
Step 2: Strict Mode Turned on
Set-StrictMode -Version 1.0
Step 3: Output: The variable ‘$b’ cannot be retrieved because it has not been set.
$b -gt 10
At line:1 char:1
+ $b -gt 10
+ ~~
    + CategoryInfo          : InvalidOperation: (b:String) [], RuntimeException
    + FullyQualifiedErrorId : VariableIsUndefined
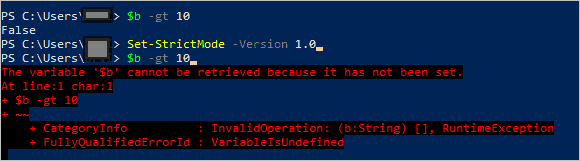
Set-StrictMode -OffTurns off Strict mode
Strict-Mode can be used to enforce good coding practices.
12. Start-Job
You can run any scripts, commands, or other jobs in the background using Start-Job command. It lets you work on the current session without interference from the background running jobs.
Example
Start-Job -ScriptBlock { Get-Process -Name powershell }With the -ScriptBlock parameter, the Get-Process command is executed in the background. The Name parameter is specified to find the PowerShell processes.
Start-Job -FilePath C:ScriptsExample.ps1Runs the script in the background
Start-Job is one of the best Windows PowerShell commands when you need to run long scripts in the background.
13. Receive-Job
If you wish to know about the jobs running in the background, then you can use the Receive-Job command. You can get the details by name, ID, computer name, instance ID, location, or session, or by submitting a job object. You can view the output of the command executed using Start-Job in this Windows PowerShell command.
Example
Step 1: Stores the job details in ‘job’ variable and starts the background job
$job = Start-Job -ScriptBlock {Get-Process}
Step 2: Gets the output of the command executed in the background by using the job parameter
Receive-Job -Job $job
Receive-Job -Id 5
Displays the result about the job having ID 5
14. Wait-Job
When the jobs run in the background, you can suppress the command prompt using the Wait-Job command. Once you execute Wait-Job command, your command prompt access will be stopped. Wait-Job cmdlet is mostly used with Start-Job command.
Example
Wait-Job -Id 5Stops the command prompt till the job ID 5 is executed
15. Write-Progress
You can get a progress bar on your PowerShell console using the Write-Progress command. Well, you need to know the basic scripting language to know how to use this Windows PowerShell commands.
Example
for ($i = 1; $i -le 100; $i++ )
{
    Write-Progress -Activity "Search in Progress" -Status "$i% Complete:" -PercentComplete $i;
}
Shows the progress at the top of the loop execution
$Events = Get-EventLog -LogName system
$Events | ForEach-Object -Begin {
       Clear-Host
       $i = 0
      $out = ""
} -Process {
        if($_.message -like "*bios*")
    {
        # Append the matching message to the out variable.
        $out=$out + $_.Message
    }
       $i = $i+1
       Write-Progress -Activity "Searching Events" -Status "Progress:" -PercentComplete ($i/$Events.count*100)
} -End {
       $out
}
Searches for bios in the Event log and also shows the progress bar for the search performed
16. Set-AuthenticodeSignature
Authenticode is a code-signing technology from Microsoft that identifies the publisher and ensures the integrity of the software by verifying that it has not tampered since it was signed and published.
The Set-AuthenticodeSignature cmdlet can be used to add and Authenticode signature to files.
Example: Sign a PowerShell script using a certificate from the local store
$cert=Get-ChildItem -Path Cert:\CurrentUser\My -CodeSigningCert
Set-AuthenticodeSignature -FilePath PsTestInternet2.ps1 -Certificate $cert
You can also use a certificate from a root authority to sign files.
Conclusion
PowerShell is one of the best command-line utilities. You can carry out any tasks related to administration or development using the different Windows PowerShell commands mentioned above. For the ones new to PowerShell, go through the basic PowerShell commands. Once you understand the basics, it will be easier to get the hang of the advanced ones.


