Notifications can notify you about any new mails, calendar events, and messages. You can also get a glance at cricket and football scores during matches while working on your browser. With this, you don’t miss important updates even when that website tab is not open. Google Chrome notifications can help you manage your notifications the way you want.
You can stay away from spam and advertisement notifications by blocking the sites that bombard you with it. Let’s see how to enable, disable, block, and allow notifications on your Chrome browser.
How to Turn On or Turn Off Chrome Notifications?
You can easily turn on and off notifications via the browser settings menu. Follow the steps mentioned below to turn on chrome notifications.
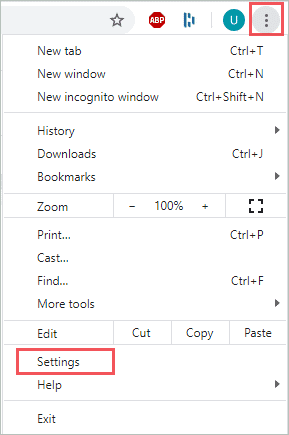
Step 1: Click on the 3 dots on the top-right corner of your Chrome browser and then click on Settings.
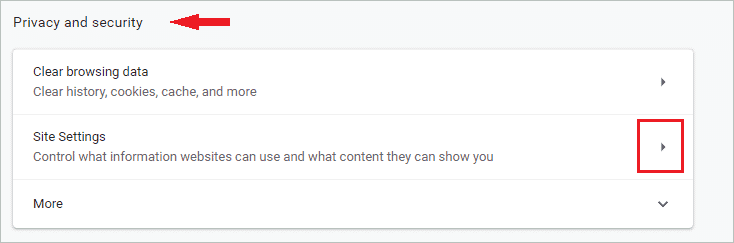
Step 2: Scroll down to find Privacy and security and then click on the arrow next to Site Settings
Step 3: In Site Settings, scroll down and click on the arrow next to Notifications.
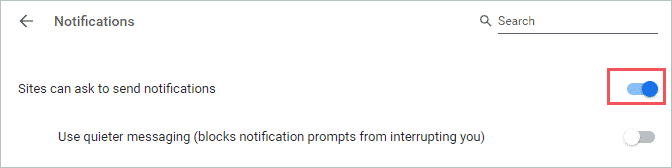
Step 4: Under Notifications settings, toggle the switch next to ‘Sites can ask to send notifications’ towards the right to turn on notifications from the web apps.
If you wish to turn off notifications for all sites and don’t want any site to ask you for notifications, then you can turn off the switch next to ‘Sites can ask to send notifications.’
How to Manage Chrome Notifications for Multiple Sites?
You can add sites to block and allow lists manually. With this approach, you can block the sites that shoot ads and spams you with unwanted content via notifications.
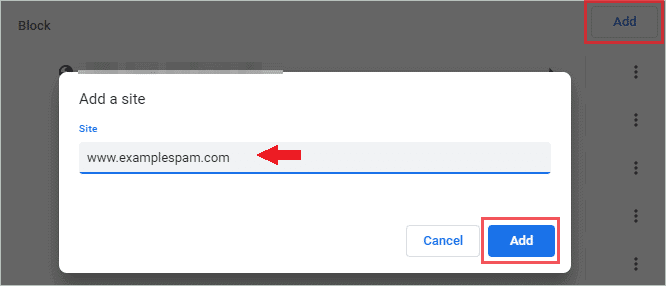
To add sites to the list, you need to go to Notifications settings in Chrome. Go to Settings ➜ Site Settings ➜ Notifications and scroll down to find Block.
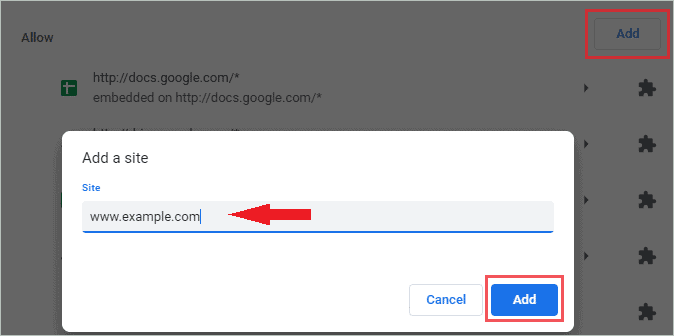
Once you find the Block option, click on the Add button next to it. When the popup box appears, enter the site you wish to block and click on Add to save the site under the blocked list.
In the same way, you can add it under the Allow category by clicking on the Add button next to Allow.
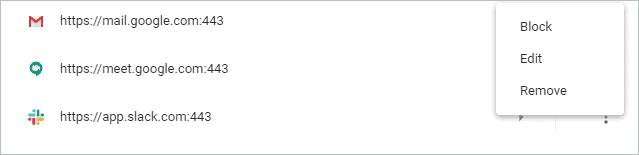
You can remove, edit, or allow notifications for the blocked web app later by clicking on the 3 dots next to the site.
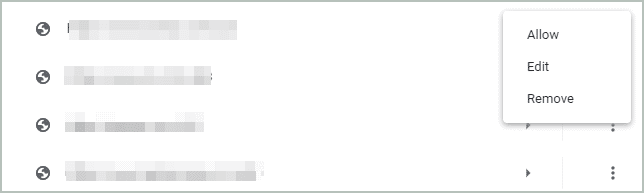
And in the case of an Allowed site, you can block, edit and remove it from the allowed list.
Managing the notification for the sites is very easy with Google Chrome. People without any technical background can easily and conveniently configure notification settings.
How to Block or Allow Notifications for any Specific Site?
You can block or allow notifications for any particular sites. This works when you want to temporarily disable chrome notifications for any site without going to settings and following a lengthy procedure there.
Open the site for which you wish to block or allow the notification. Before the URL, there will be a lock symbol, click on it. Then, next to Notifications, click on the drop-down menu and select Allow or Block as per your choice.
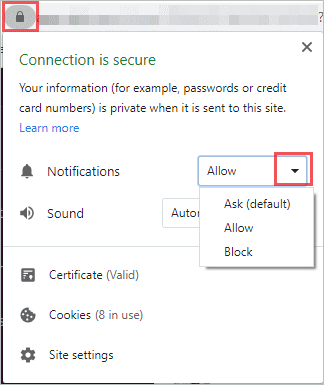
The settings you make here are only applicable to one site. If you wish to disable all notifications, you can turn it off via browser settings, as explained above.
How to Turn On Notifications for Gmail?
Many of us use Gmail for work and need updates about any new mail in our inbox. You need to enable desktop notifications from Gmail to get notified about new emails.
To turn on notifications for Gmail, log in to your account first, and then click on the Settings icon on the top of your Gmail window. Next, click on See all settings.

Now, scroll down to find Desktop notifications and select New mail notifications on to enable notifications for Gmail.

You will now receive notifications for new mails. Make sure you don’t have a Gmail link under block sites in notifications settings. It will prevent Gmail from sending you notifications.
How to Enable/Disable Notifications for Chrome Via Windows 10 Settings?
If you don’t want your Chrome browser to send push notifications, you can easily disable it via Windows 10 Settings app. In case you are not receiving notifications from Chrome even after enabling it, you should check Windows Settings to make sure it isn’t disabled from there.
Use the keyboard shortcuts and open the Setting app by pressing Windows key + I and then click on System. Next, navigate to Notifications & actions from the left panel.
Under, Get notifications from these senders, search for Google Chrome. You can now enable or disable notifications from Google Chrome by toggling the switch next to it.
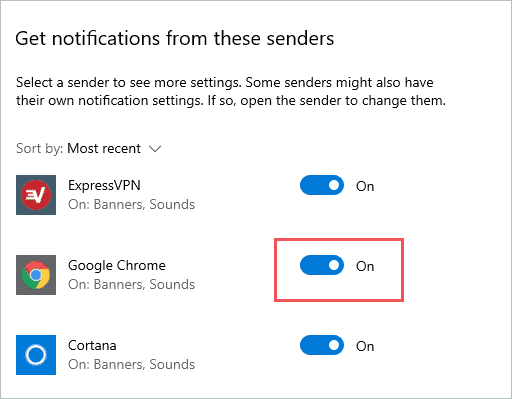
You can enable or disable notifications for any app and software via this setting of Windows 10.
Extensions for Google Chrome Notifications
Google chrome extensions bring ease while using the browser. There are extensions for several purposes. You can find extensions to manage your notifications as well. We have listed some of the best notification managers.
1. Mute Notifications
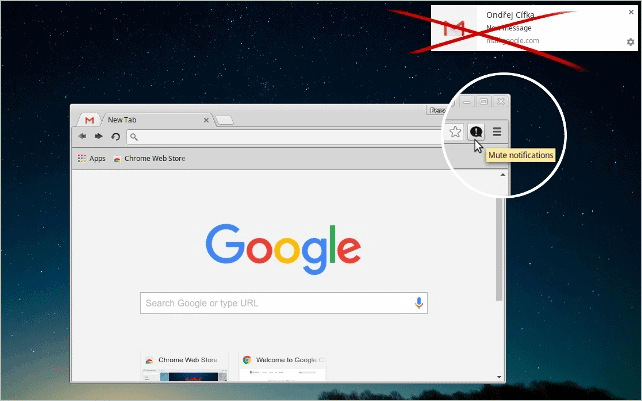
Mute notifications have very simple and straightforward use. Once you add this extension to your Chrome browser, you can mute notifications with one click whenever you want. When you disable notifications, it will be disabled for all web pages irrespective of your settings.
You can click on the extension again to enable the notifications. All your notification settings will be restored once you allow the notifications. It is simple to use this extension and can help you mute notifications during video calls and meetings to avoid any disturbance.
Ratings – 4.3/5
2. Pushline: PC/Mac Desktop Notifications
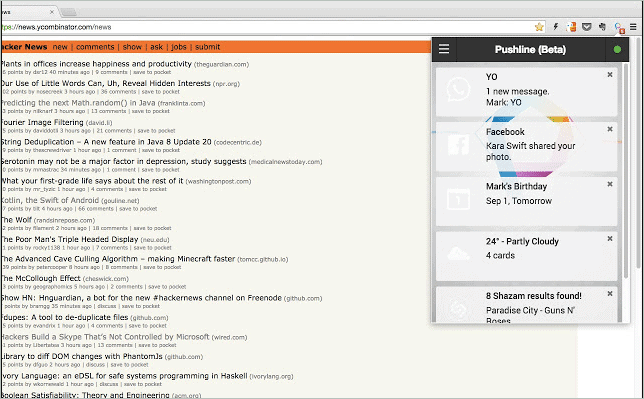
You can now have Android phone notifications on your Mac/PC with Pushline extension. With this extension, you can easily work and access your phone notifications from the same device. You can get notifications even when your Android phone is in another room.
Pushline extension is free and has no ads. You can work peacefully and have your desktop and mobile notifications on your PC.
Ratings – 3.5/5
3. Checker Plus for Gmail
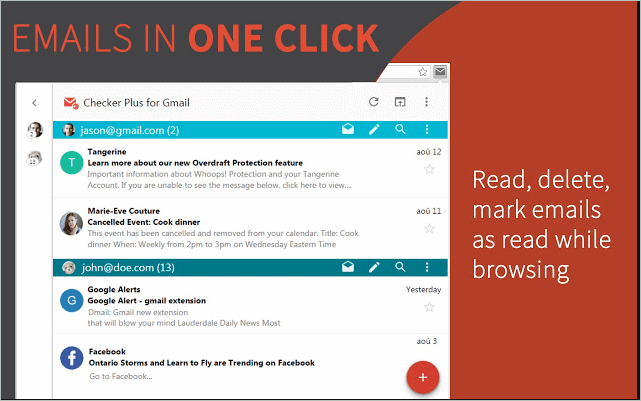
You can read, delete, archive, and get notified about your emails in the Gmail account via Checker Plus for Gmail extension. It is easy to manage your Gmail account with this extension. You can view your mails offline, as this extension supports the offline view.
Checker Plus for Gmail extension can give you access to other extra features when you contribute an amount to them. This extension is used by 1,000,000+ users.
Ratings – 4.7/5
Conclusion
You can manage Chrome notifications with settings or using extensions. With the use of the above guide, you can enable and disable notifications for multiple sites. You can stay updated with new emails, messages, and events without going to those tabs in your browser.
With the extensions listed above, you can manage Gmail notifications, mute notifications for all the sites, and get notifications from your Android phone on your desktop. You can opt for any of the ways to manage Chrome notifications according to your feasibility.
Related: Google Chrome Not Responding? Top 20 Possible Solutions To Fix It


