Many people in our home or office have access to the laptop/desktop we use, and thus privacy is compromised. At times, there are files and folders that you don’t want anyone to open or access. In such cases, you must know how to password protect a folder so that no one can open it.
You can also create a guest account to protect your account privacy, and block others from entering your account and accessing your documents. If you feel a personal account to log in to Windows 10 is not enough to protect your files and folder, then adding password protection can be learned.
Windows 10 does not provide any direct way to add password protection to your files. However, there are many indirect ways to do it. If you want a direct way, the third-party options are always available. The below guide will explain how to password protect a folder using both methods.
How to Password Protect a Folder using Windows tools
There are some indirect ways, as mentioned above, to add passwords to your folders in Windows 10. Some ways may require a bit of technical knowledge, but if the detailed steps are followed, you can easily password protect your folders and files.
Note before Beginning with the Process:
We recommend you to initially try the below process on a folder which is not important. If a step is missed, you won’t lose any important files and folders. And if you wish to try on the main folder directly, ensure that you have a backup of it before proceeding. Also, make sure you save or note down the password in a place where you can access it later if you forget it.
1. Use Script to Password Protect a Folder
You can run a script to add passwords to your folders and files. There is no need for any development knowledge to run this script; the command prompt knowledge is enough. Follow the steps carefully to complete the process successfully.
Step 1: Right-click inside the folder you want to password protect and select New ➜ Text Document.

Step 2: Open the new text document and copy-paste the below script in it.
| cls
@ECHO OFF title Password Protect Folder if EXIST “Control Panel.{21EC2020-3AEA-1069-A2DD-08002B30309D}” goto UNLOCK if NOT EXIST Locker goto MDLOCKER :CONFIRM echo Are you sure u want to Lock the folder(Y/N) set/p “cho=>” if %cho%==Y goto LOCK if %cho%==y goto LOCK if %cho%==n goto END if %cho%==N goto END echo Invalid choice. goto CONFIRM :LOCK ren Locker “Control Panel.{21EC2020-3AEA-1069-A2DD-08002B30309D}” attrib +h +s “Control Panel.{21EC2020-3AEA-1069-A2DD-08002B30309D}” echo Folder locked goto End :UNLOCK echo Enter password to Unlock folder set/p “pass=>” if NOT %pass%==Add-Password-Here goto FAIL attrib -h -s “Control Panel.{21EC2020-3AEA-1069-A2DD-08002B30309D}” ren “Control Panel.{21EC2020-3AEA-1069-A2DD-08002B30309D}” Locker echo Folder Unlocked successfully goto End :FAIL echo Invalid password goto end :MDLOCKER md Locker echo Password protection added successfully goto End :End |
Step 3: Search for ‘Add-Password-Here’ in the script file and replace that line with the password you want to protect your folder with. Avoid using blank spaces in your password, as it can create an issue with running the script.
Step 4: Once the password is added, click on File from the text file’s menu bar and click on Save As.
Step 5: Select the Save as type as ‘All Files’ and name the file as ‘PasswordProtect.bat,’ and when done, click on Save.

Step 6: Now, double click on the PasswordProtect.bat file you saved, the folder named ‘Locker’ will be created. Add all the folder, files, and documents you want to secure in the Locker folder.
Step 7: As we want to password protect the folder, double-click on the PasswordProtect.bat file again.
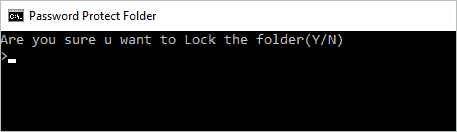
Step 8: A command prompt like terminal will appear on the screen, asking if you want to lock the folder. Type Y in that terminal and hit Enter.
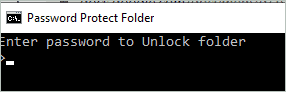
Step 9: The folder and terminal window both will disappear, don’t panic. Double click on PasswordProtect.bat file and enter the password you saved above, followed by pressing Enter. You will see the folder again.
You can follow steps 8 and 9 to unlock and lock the folder again and again. Ensure you remember the password; otherwise, you will lose all your secure data inside the folder. Now, you know how to password protect a folder in an easy way.
2. Encrypt the Folder
You can encrypt the folder and use a password to decrypt it. Using this way, you can stop unauthorized access to your folder. Even if people try to access the folder without a password, they won’t read the contents because of encryption applied to it.
Windows 10 Professional edition lets you encrypt folders very easily. If you have Windows 10 Home Edition, this feature is unfortunately not available for you as yet. Well, this method is only a good option if you are a guest user and don’t want admin or other users to access the folder from their account, even if they have access to the drive where the folder is saved.
Step 1: Go to the folder you wish to encrypt, right-click on it, and select Properties from the context menu.
Step 2: When the Properties window opens, click on the Advanced button.
Step 3: On the Advanced Attributes section, check the checkbox next to ‘Encrypt contents to secure data.’ Click on OK.
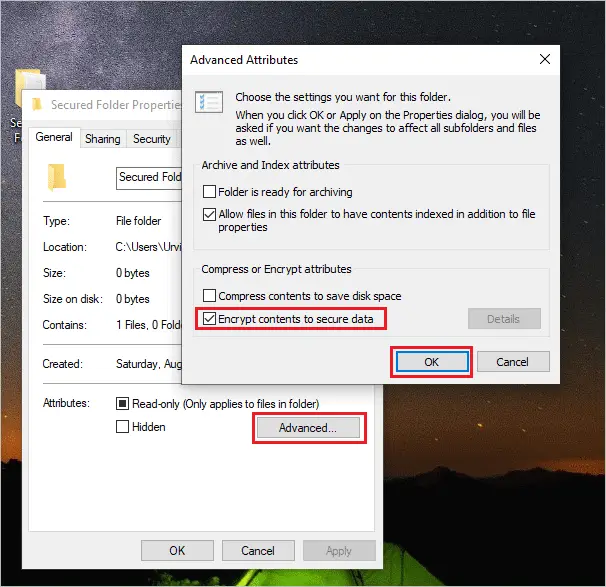
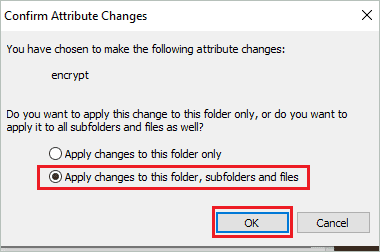
Step 4: When you will be asked if you wish to make changes to the folder only or subfolder and files. We recommend selecting ‘Apply changes to this folder, subfolders, and files’ for a better security level. Click on OK.
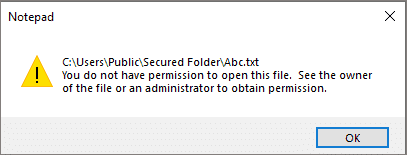
Now, you won’t be able to access this folder from other accounts; if you try to do so, you will see the warning message as shown in the screenshot below.
The key for decryption is your login account. You should not use this way of protecting the folder if many people log in to your account. Once anyone has access to your Windows login account, they can access the encrypted folder. The level of security for this way is very less. You can also encrypt the entire drive in Windows 10 to protect it from unauthorized access.
3. Hide the Folder
One more way to stop others from accessing your files and folders is to hide it. It is not a full-proof way of protecting your files and folders, but it can avoid your private folder’s attention.
Step 1: Right-click on your private folder which you want to hide and click on Properties.
Step 2: Check the checkbox next to the Hidden Attribute. Click on Apply, followed by OK.
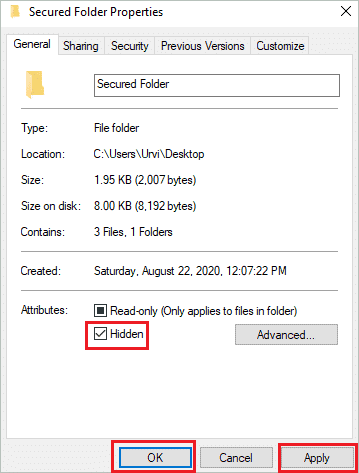
Your folder will go missing post this step, but don’t worry; you can retrieve it easily. To see the hidden folder, type File Explorer Option in the search box and open the same search result.
Next, go to the View tab and enable ‘Show hidden files, folders, and drives’ under Hidden files and folders section. Click on Apply and OK to save the change in settings. You will see the hidden folder simultaneously, but it will be a little lighter in the shade.
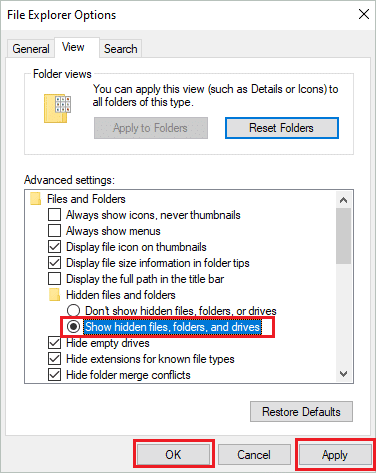
You can access the folder, and when done, change the settings to ‘Don’t show hidden files, folders, or drives.’
How to Password Protect a Folder using Third-party Tools
If you feel the above ways are not full proof or require too many efforts, you can use third-party tools to password protect a folder in Windows 10. Third-party tools are easy to use and don’t need much technical expertise to use them.
1. Use Compression Software
Compression programs like WinZip, 7-Zip, and WinRAR can also be used to password protect a folder if you don’t prefer the inbuilt ways. The flip side to this method is that you have to decompress the folder every time you want to access it.
If you have any compression software present on your computer, you can use that as well, provided it has a password protection feature. Follow the steps mentioned below to password protect your folder using third-party compression software.
Step 1: Select the folder you want to add a password and right-click on the folder and select ‘archive’ or ‘Add to zip’ or ‘compress.’ This depends on which compression program you use.
Step 2: Right-click on the compressed folder and select Properties from the context menu.
Step 3: In the Properties window that opens, click on ‘Set password…’.
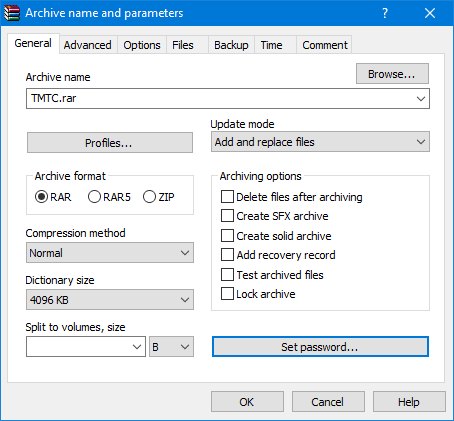
Step 3: Type in your password twice and click on OK.
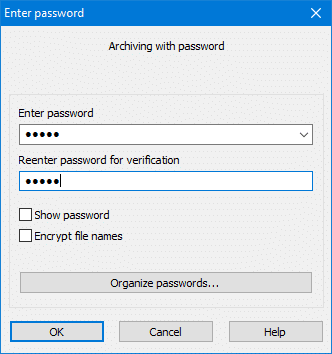
Step 4: You can now delete the original folder and keep the compressed one, which is password protected.
If you don’t wish to decompress the folder every time you wish to use it, then you can use VeraCrypt to password protect a folder. You can use the below download links to download any of the compression software to compress and password protected files.
2. VeraCrypt
VeraCrypt is free encryption software based on TrueCrypt. It is an extremely secure tool that creates a virtual encrypted disk within a file and mounts it as a real disk. It is best for people who want a robust and free tool to protect sensitive data and is the perfect way to password protect a folder.
VeraCrypt can do more than password protecting a folder; it can encrypt an entire partition or a storage device like a USB drive.
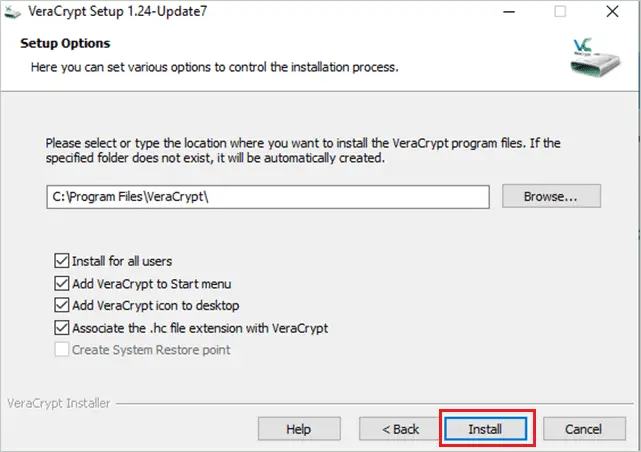
Download VeraCrypt and install it by following the instructions on the screen.
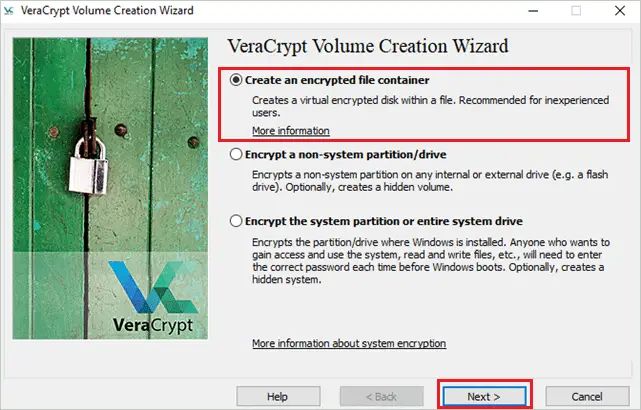
Once VeraCrypt is installed, open it, and click on Create Volume. On the next Window, select ‘Create an encrypted file container’ and click on Next.
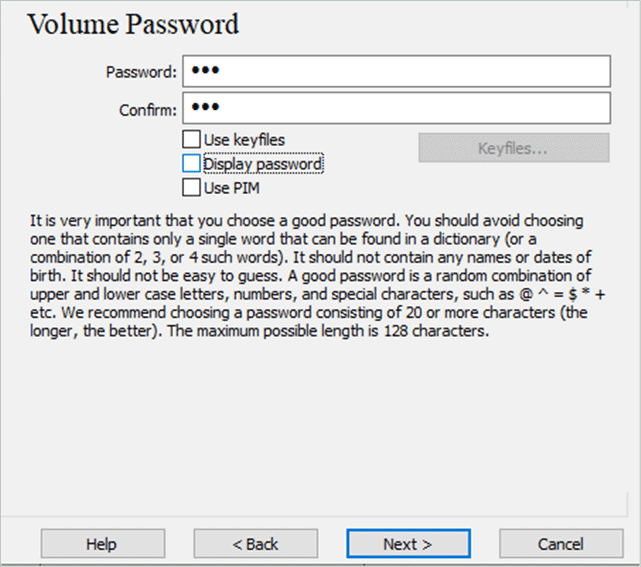
Follow the onscreen instructions and then add a password for the created volume.
If you have an antivirus installed, you need antivirus permission to allow VeraCrypt to change the system. You will need to mount the drive at the end. Check the VeraCrypt documentation if you have any issues encrypting the volume.
Final Thoughts
Protecting sensitive information and data is essential, primarily if you use a shared computer. You can use the traditional Windows 10 approach to password protect a folder or file or use third-party apps/software. The choice depends on your convenience. The article explains the different ways in which anyone can password-protect their folders.
While going through the article, you won’t only know how to password protect a folder, but also know how to hide the folder if the need arises. If you have technical expertise, then you can secure folders using a script is the best option. However, using third-party software is a convenient and straightforward approach for those who want security the easy way.


