We all connect headphones to our Windows 10 PC for entertainment and work purposes. Be it watching movies, listening to music, or attending an online conference; headphones are much needed. Well, sometimes this most used accessory won’t be detected on your computer because of the headphone jack not working issue.
The chances of this type of issue are less, but some Windows users complain about it. It is not as annoying as the audio and video out of sync issues, but it can hamper the overall experience of listening to audio. Sometimes, the fault is in the hardware, and you have to visit the repair shop to get it fixed. But, if you are lucky enough, software-based workarounds can quickly fix your headphone jack.
14 Solutions To Fix Windows 10 Headphone Jack Not Working
The software-based reasons to experience issues with the headphone jack are outdated drives, wrong audio settings, and system errors. You can get rid of all these issues by going through the solutions given below.
1. Make Sure the Headphone is Plugged in Properly and Working
The loose connection can cause trouble while using the headphone, so make sure it is plugged in properly. Also, ensure that the headphone/earphone you are using is working. You can check this by plugging it into another PC or mobile. If it works there normally, it should work on your PC as well.
Once you make sure of both the things mentioned above, you can move on to the set of solutions to get the headphone jack not working issue fixed.
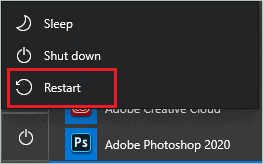
2. Restart the Computer
Sometimes, the temporary glitch can cause the headphone jack to malfunction. In such scenarios, a restart can work wonders for you. Unplug the headphones first and then click on the Windows icon. Click on the power button, followed by the Restart option to restart the PC.
Once the PC restarts, plug your headphone in again and check if your PC can detect it.
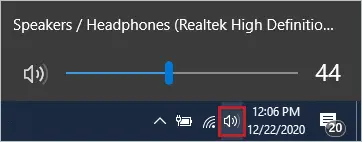
3. Ensure that the Volume is Audible
You may not listen via your headphones if the volume is on mute. You need to check the volume and make sure it is audible. You could do so by clicking on the volume icon and dragging the slider towards the right to increase the volume if it was muted.
Now, check if you can listen to the sound via your headphones. If still, it is inaudible, you need to tweak in the other system settings to get the headphone jack fixed.
4. Run Audio Troubleshooter
If there are any audio issues on your computer, you can run the troubleshooter to let Windows find and fix it. However, in the case of physical damage, Windows will only be able to find it and not fix it.
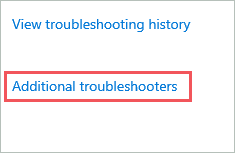
Press Windows key + I to open the Setting app, and there click on the Update & Security option. Navigate to the Troubleshoot section from the left panel and click on the Additional troubleshooters link.
On the next window, click on Playing Audio and then on Run the troubleshooter button.
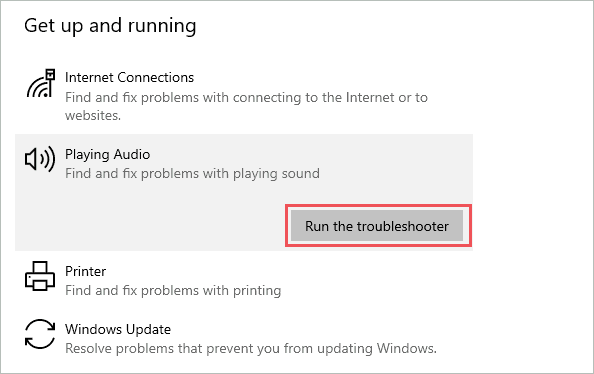
Wait till Windows finish finding and fixing the audio fault. You can then check if the headphone jack not working is fixed by a Windows troubleshooter.
5. Clean Audio Jack
You can check if the audio jack has any dirt or debris in it, as this can prevent your headphones from connecting. Make sure you don’t use any safety pins or sharp objects to remove dust from the headphone jack.
You can make use of an earbud or air vacuum to remove the debris. If you are not confident enough to clean it yourself, you can get it done from the experts at local repair shops nearby.
6. Change Default Format for Sound
Changing the default sound format can help you listen to sound again on your headphones. Before performing the below steps, make sure your headphones are connected to the PC.
Step 1: Search for the Control Panel in the Start menu’s search box and open the same from the search result.
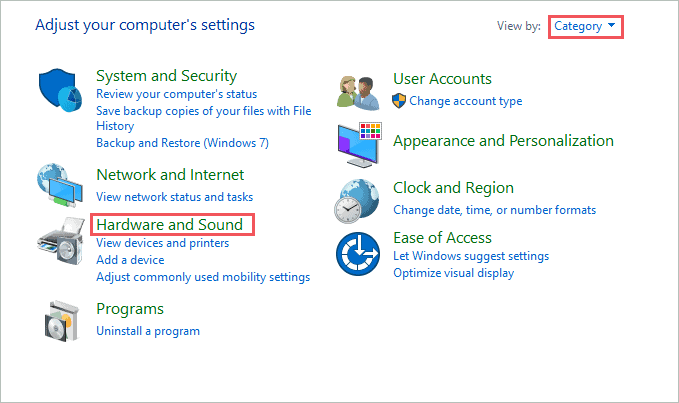
Step 2: Click on Hardware and Sound in the Control Panel. If you have difficulty finding it, change the View by option to Category.
Step 3: Click on Sound on the next window.
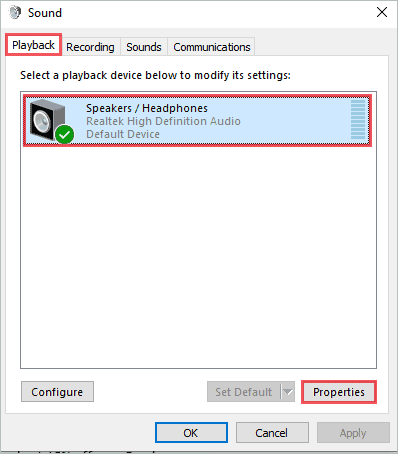
Step 4: In the Sound dialog box, go to the Playback tab and select the currently enabled device. Click on Properties to open the device properties.
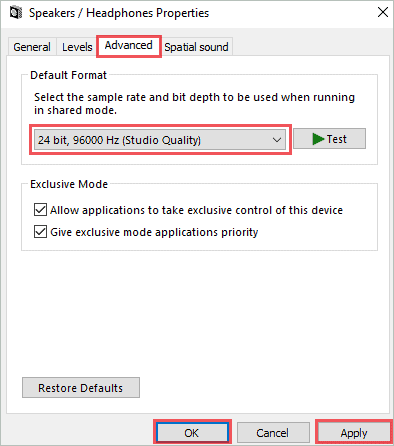
Step 5: Now, go to the Advanced tab and change the Default format to some other number. For a safer side, increase or decrease it by one only.
Step 6: Click on Apply to apply the new settings and OK to close the window.
You can now check if the headphones work or not by playing any video or audio on your PC.
7. Enable Headphones in Playback Device
If the headphones are disabled by default, it won’t work, and you may feel the headphone jack is not working. You need to manually enable the headphone and set it as the default playback device in such cases.
Open Control Panel and go to Hardware and Sound. Next, click on Sound and head to the Playback tab.
Now, right-click on the empty space there and select Show Disabled Devices, such that there is a tick next to it.
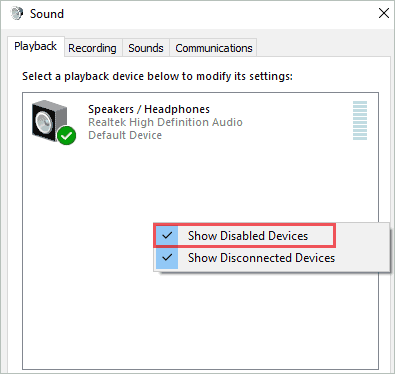
You may now see headphones that are disabled by default—Right-click on it and select the Enable option from the context menu. Also, click on the Set Default option by selecting the newly enabled headphone device so that it functions without any issues.
Once done, restart your PC and check if the headphone jack not working is fixed by this or not.
8. Disable/Enable Front Panel Jack Detection
If you have Realtek sound drivers, you can perform this fix; otherwise, jump to the next solution. You can try enabling/disabling the front panel jack detection. For some users enabling this works, while for others, disabling this fixes their audio jack. So you can try both the ways and check what works for you.
Open Control Panel and go to Realtek HD Audio Manager. Ensure that the View by option is set to Large icons. Now, open Connector Settings. Next, set Disable Front Panel Jack Detection to ON, and click on OK.
Restart the PC and check if this works for you. If not, set Disable Front Panel Jack Detection to OFF and again perform a reboot. You may now hear all the sound from the headphones of yours.
9. Turn Off Sound Enhancement
You can turn off sound enhancement if you still cannot hear any sound from your headphones. To do so, open Control Panel and go to Hardware and Sound ➜ Sound.
Open the headphone device properties by double-clicking on it and then go to the Enhancement tab.
Now, uncheck the checkbox next to Disable all sound effects. If any of the checkboxes are still selected, uncheck them. Click on Apply, followed by OK.
You can now play audio on your computer to test the headphones.
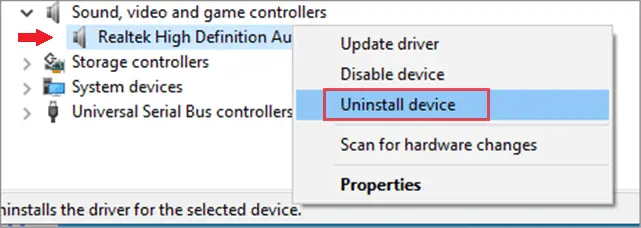
10. Reinstall Sound, Video & Game Controller
The bugs in the sound drivers can cause issues while connecting the headphones to the jack. You can uninstall the sound, video & game controller and then reinstall it to fix the headphone jack not working issue.
Press Windows key + X and click on Device Manager to open it. Now, expand Sound, video and game controllers.
Right-click on the driver below it and click on the Uninstall device option to remove it from your PC.
You can now restart your PC so that Windows can install these drivers again for you.
11. Update Sound Card Drivers
If reinstalling didn’t help fix the bugs in your sound card, you can try updating the driver software. To update the sound card drivers, go to Device Manager and expand Sound, video and game controllers. Right-click on the driver below it and click on Update driver.
Now, you can follow the instructions on your screen to complete the process. If you get stuck, refer to the guide on device drivers for help.
12. Uninstall IDT Audio Device
The Windows users who have an IDT audio device on their PC can try out this solution. All you need to do is uninstall the IDT audio device to fix the headphone jack issue.
Press Windows key + R to open Run and type appwiz.cpl there. Click OK to open the control panel window to uninstall the apps.
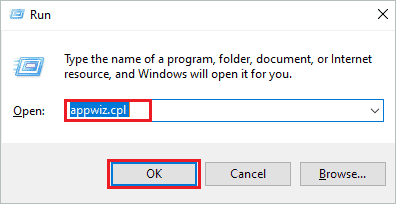
Now, search for IDT in the list of apps. When found, right-click on it and click on Uninstall to remove it from your PC.
Once done, reboot your PC and check whether this fixed your headphone jack not working issue or not.
13. Reinstall Audio inputs and outputs drivers
You can reinstall the audio driver to fix the issues with the headphones you are facing.
Open Device Manager and expand Audio inputs and outputs. Now, right-click on the Speakers / Headphones driver and click on Uninstall device.
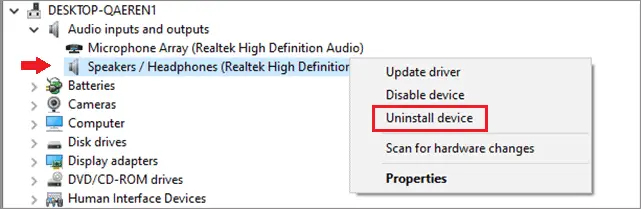
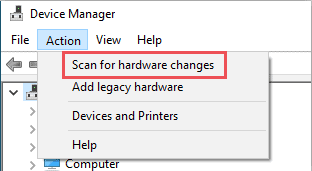
Once you uninstall the device, click on Action in the menu bar of Device Manager and then click on Scan for hardware changes.
Windows will reinstall the audio driver for you.
14. Change Laptop Audio Board
If the laptop audio board is having problems, the above methods won’t work for you. In such a case, you need to replace the laptop audio board. This board is different from the motherboard and is present in most of the laptops.
You can replace it on your own or take help from the expert, as doing it wrongly can damage your laptop beyond repair. This will permanently fix the headphone jack not working in Windows 10 PC for you.
Conclusion
If you are used to working with headphones connected to your PC, working without them can be an issue. With technological advancement, there are Bluetooth headphones and earphones available, but many old systems still don’t support it. In such cases, you need to find the solution to fix the headphone jack not working problem.
The above article explains all the working solutions that can help you fix the headphone jack issues caused by software-based reasons. However, if the issue is because of a fault in the hardware, you need to get it fixed by a technician at the local repair shop or manufacturer’s store.


