We all have saved WiFi networks that connect automatically whenever in range. You don’t need to put in any effort or add credentials when you wish to connect to the saved network. All you need to do is click on the WiFi network when it shows up. However, many users complain about WiFi not showing up in Windows 10.
Well, this can be annoying as it prevents you from connecting to the network in range. It can be because of network drivers, disabled Wi-Fi features, incorrect settings, and temporary glitches. Whatever the reason behind the Wi-Fi issue is, there are workable solutions to fix WiFi network that can help you get rid of it.
20 Solutions To Fix WiFi not Showing up in Windows 10
We have listed 20 solutions that can help you fix the WiFi problem. You can go through the list of solutions given below in chronological order. Once the Wi-fi issue is resolved, you will connect to the internet again using the wireless network.
1. Restart the Computer
You can reboot the computer to fix WiFi network not showing up. If the error is just because of a temporary glitch, restart can fix it quickly.
Click on the Windows logo on the taskbar and then click on the Power icon. Click on the Restart option.
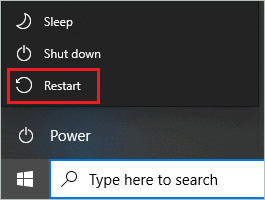
After the restart, check if you can see the WiFi network you wish to connect to.
2. Try Connecting to the WiFi Network from Locked Screen
You can lock your PC and then try connecting to the WiFi network of your choice.
Press Windows key + L; this will lock your PC. Now, click on the WiFi symbol on the locked screen and check if the network shows up or not.
If it shows up, connect to it and then log in to your system again. You will be able to use the internet via WiFi without any issues.
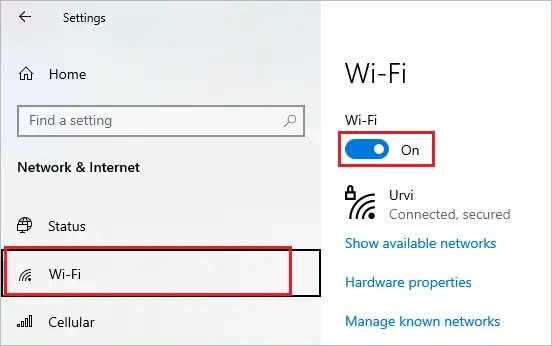
3. Enable WiFi
If the WiFi option is disabled, you won’t see any available network when you click on the WiFi icon. There are three ways to enable WiFi on your computer.
You can check all three ways to know if Wi-Fi is enabled on your computer or not.
Enable WiFi via Settings App
Press Windows key + I to open the Settings app and go to Network & Internet. Click on the Wi-Fi in the left panel of the window.
Now, toggle the switch below the Wi-Fi to turn it on.
Enable WiFi via Control Panel
You can enable WiFi via Control Panel as well. Navigate to Settings ➜ Network & Internet ➜ Wi-Fi and click on Change adapter options under Related settings.
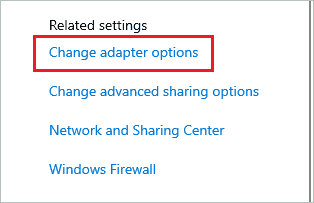
When the Control Panel window opens, right-click on the Wi-Fi network and select Enable from the context menu.
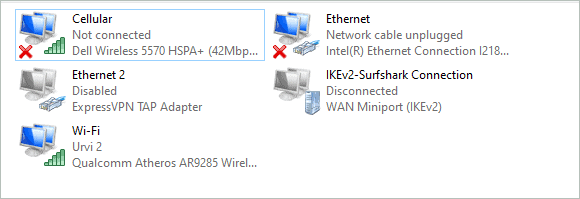
You will be prompted to enter the administrator credential, enter it to enable WiFi.
Enable WiFi via Switch
The last option is to enable Wi-Fi via a physical switch available on your laptop. Well, this option is not available on all models. You can check in the manufacturer manual and enable WiFi using the WiFi switch.
Once the WiFi is enabled, check if the required network shows up or not.
4. Run Network Troubleshooters
You can use inbuilt troubleshooters to fix WiFi not showing up in Windows 10. There are many troubleshooters available that can help you fix network-related issues.
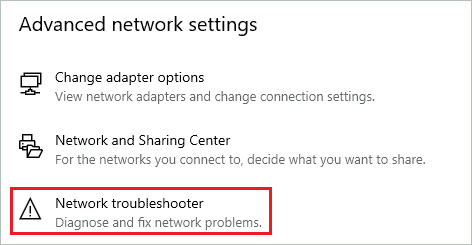
Go to the Settings app ➜ Network & Internet and make sure you are in the Status section. Now, scroll down and click on Network troubleshooter under Advanced network settings.
Let Windows run the troubleshooter. If your WiFi network is still not showing up after running the network troubleshooter, you can run some more troubleshooters, as shown below.
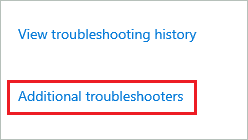
Go to Settings ➜ Update & Security and then navigate to Troubleshoot section from the left frame of the window.
Click on the Additional troubleshooters link.
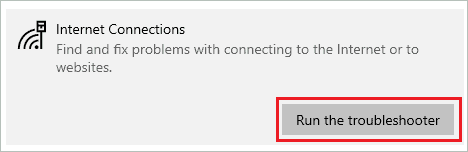
There are 2 troubleshooters here that can help you fix issues with the WiFi networks. Click on the Internet Connection and then click on the Run the troubleshooter button.
You can similarly run the troubleshooter for Network Adapter.

Once you run both the troubleshooter, check if the issue with the WiFi connection is resolved with this or not.
5. Update Windows
The driver updates are part of Windows updates. If the WiFi is not showing up in Windows 10 because of outdated network drivers, updating Windows can be helpful.
Open the Settings app and click on Update & Security. Click on the Check for updates button.

Download and install the latest updates available. You can connect to the internet using the Ethernet cable for downloading the update.
6. Modify WLAN AutoConfig Service
The WLAN AutoConfig service is related to wireless connectivity. You need to start this service and make the necessary changes so that WiFi networks can show up on your PC.
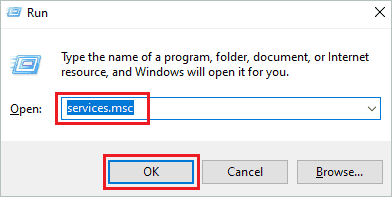
Press Windows key + R to open the Run and type Services there. Click OK to open the Services app.
Search for WLAN AutoConfig service in the Services window and double-click on it to open its Properties dialog box.
Make sure you are in the General tab and then change the Startup type to Automatic. If the service is not running, click on the Start button. Click on Apply and OK to save the changes.
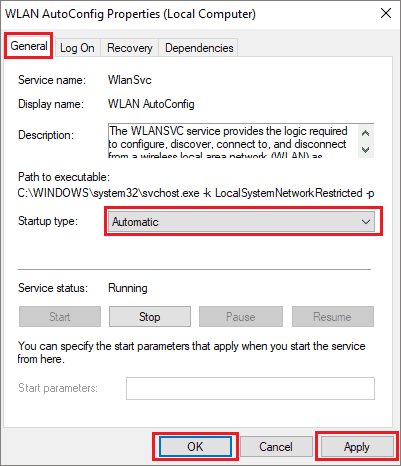
You can close the Services app and check if the WiFi not showing up issue resolves with this fix. If the network is still not showing up, reboot your PC and check again.
7. Restart the WiFi Router
If you are experiencing issues with only one particular network, you can try restarting the router and modem. Sometimes, there can be a glitch that prevents the network from showing up.
Firstly, unplug the router and modem from the power source.
You now need to wait for 30 seconds or so and then connect the router and modem back to the power source.
Now, check if you can see the network on your computer.
You can also get in touch with ISP to check if there is any network fault from their side.
8. Update WiFi Network Driver
If Windows update didn’t update the Wi-Fi driver, you could do so manually. You can update the driver manually via Device Manager.
Press Windows key + X and click on Device Manager to open it. In the Device Manager window, expand the Network adapters section and right-click on the wireless network driver. Click on Update driver from the context menu.
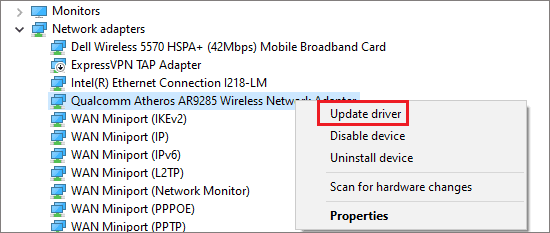
You can then follow the instructions on your screen to complete the update process. If you don’t wish to update the drivers manually, you can use third-party software like Driver Booster to do it.
9. Check if Services are Running
You can connect to WiFi conveniently if the required services are running. If there is an issue with these services, you can experience WiFi not showing up in Windows 10.
Open the Services app on your computer and then check if the below services are running or not. You can check it in the Status column.
Windows EventLogRemote Procedure Call (RPC)Windows UpdateDHCP ClientNetwork Connected Devices Auto-SetupNetwork Connection BrokerNetwork ConnectionsNetwork Connectivity AssistantNetwork List ServiceNetwork Location AwarenessNetwork Setup ServiceNetwork Store Interface ServiceIf any service is not running, right-click on it and select Start from the context menu. Once all the services are started, check if you can see the required network and connect with it without any issues.
10. Turn on Network Discovery
Many users fix WiFi not showing up in Windows 10 issue by turning on network discovery via the Control Panel.
Open Control Panel by searching for it in the Start menu. Click on the Network and Internet section. Make sure the View by option is selected to Category.
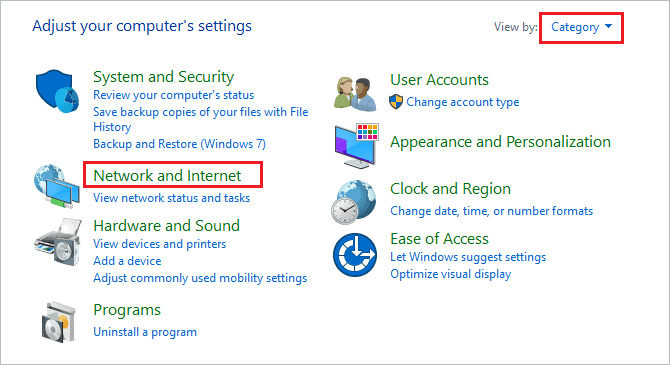
On the next screen, click on Network and Sharing Center.
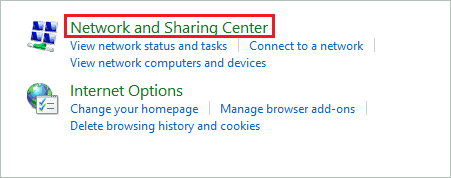
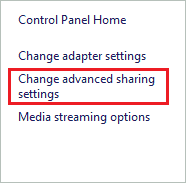
Now, from the left panel of the window, click on the Change advanced sharing settings.
Select Turn on network discovery and click on the Save changes button.
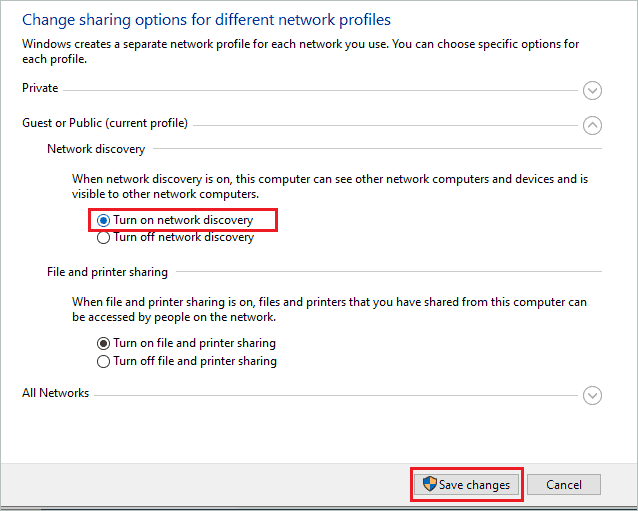
If you are prompted to add an administrator password, enter it and click OK.
Once done, click on the Wi-Fi icon on the taskbar and check if the network is visible or not.
11. Reset TCP/IP via Command Prompt
If the WiFi is not showing up because of some TCP/IP settings issues, you can reset it using commands.
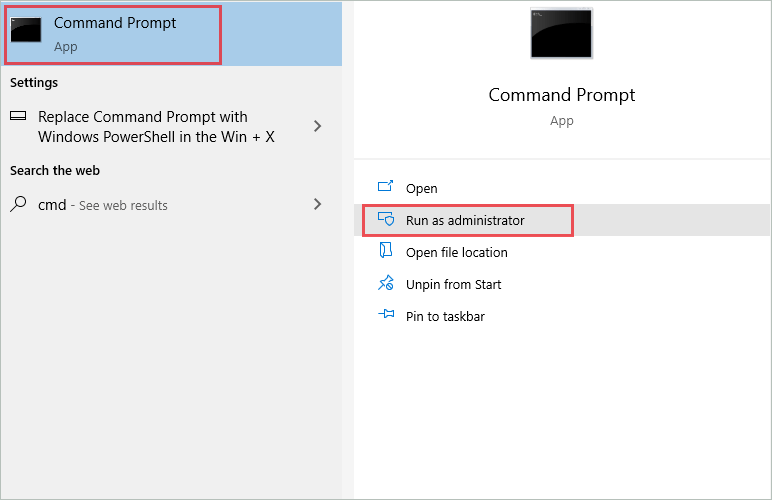
Type cmd in the Start menu’s search box and click on Run as administrator for Command Prompt app.
When the Command Prompt terminal opens, type in the below commands one by one and press Enter after each command to execute it.
netsh int ip resetnetsh int tcp set heuristics disablednetsh int tcp set global autotuninglevel=disablednetsh int tcp set global rss=enabled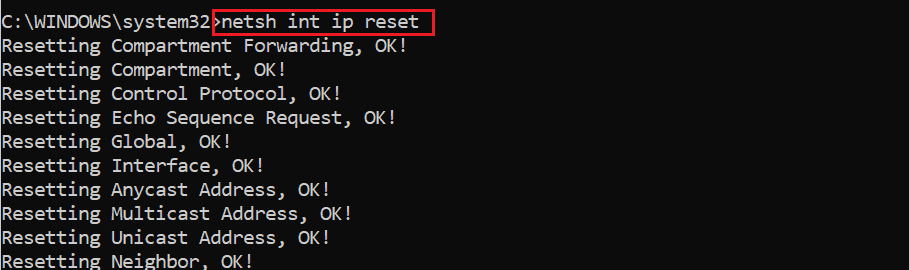
Once the commands are executed, reboot your computer and check if WiFi not showing up in Windows 10 issue is resolved or not.
12. Reinstall Wireless Network Driver
If the WiFi is not showing up in Windows 10 because of temporary issues with the wireless network driver, you can try reinstalling it.
Open Device Manager and expand Network adapters. Right-click on the wireless adapter and click on Uninstall device from the context menu.
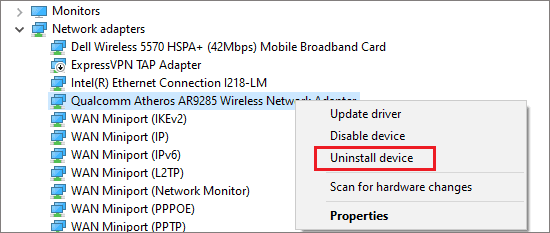
Once the driver is uninstalled, wait for some time and then click on Action in the menu bar. Click on Scan for hardware changes to reinstall the driver.
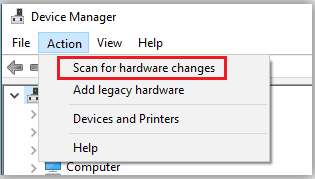
Alternatively, you can restart your computer to install the removed driver again.
After the driver is reinstalled, check if you can see the WiFi network you wish to connect to.
13. Delete Registry Entries via Command Prompt
If a particular network is not showing up, you need to remove entries from the registry. We recommend backing up your registry before proceeding with this fix.
Open Command Prompt terminal with administrator privileges and execute the below commands one by one.
reg delete HKCRCLSID{988248f3-a1ad-49bf-9170-676cbbc36ba3} /va /fnetcfg -v -u dni_dneOnce both commands are executed, reboot the PC and check if the WiFi not showing up in Windows 10 is fixed or not.
14. Delete the wlansvc File and Folder
You can remove the wlansvc folder from your computer to fix WiFi not showing up in Windows 10. The process of doing so is longer, so make sure you follow the steps given below correctly.
Step 1: Open the Services app and search for the WLAN AutoConfig service there.
Step 2: When found, right-click on it and click on Stop from the context menu. This will stop the service from running.
Step 3: Now, open File Explorer by press Windows key + E and go to –
C:\ProgramData\Microsoft\Wlansvc\Profiles\InterfacesStep 4: Select all the files in the Interfaces folder and delete them.
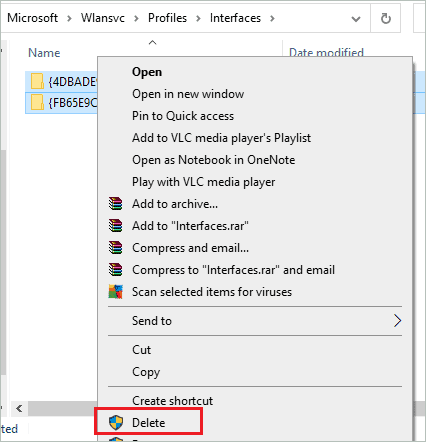
If asked for administrator credentials, enter them and proceed.
Step 5: Open the Services app again and double-click on WLAN AutoConfig to open the Properties window.
Step 6: Change the Startup type of WLAN AutoConfig to Automatic and click on Apply to save the changes.
Close the Services app and reboot your computer.
After the PC restarts, check if the Wi-Fi problem is fixed or not.
15. Roll Back Wireless Driver
If you started experiencing issues with WiFi not showing up in Windows 10 after updating the network adapter driver, there might be some issues with the update. The unstable version of device driver software can cause many troubles on your computer.
It is recommended to download the stable and compatible driver software when you wish to update the driver.
Open Device Manager and right-click on the wireless network driver you recently updated—select Properties from the context menu.
In the Properties window, go to the Driver tab and click on the Rollback driver. If the option is greyed out, there is no way to roll back the driver to the previous version.
However, if you were able to roll back the driver, the home network will show up in the WiFi.
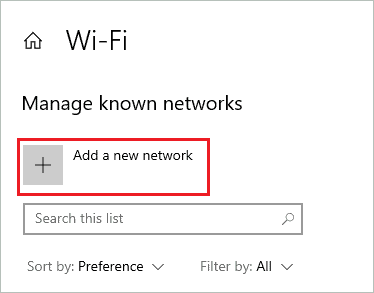
16. Add Wi-Fi Network Manually
If the WiFi network is still not showing up on Windows 10 PC, you can add it manually. Follow the instructions below to add your Wi-Fi network.
Step 1: Open the Settings app and click on Network & Internet.
Step 2: From the left panel, go to the Wi-Fi section.
Step 3: Click on Manage known networks.
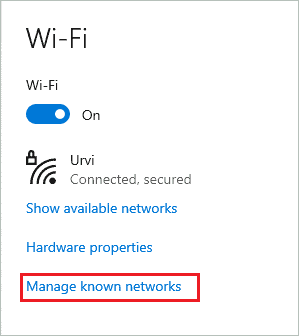
Step 4: On the next window, click on Add a new network.
Step 5: Add the required details and then click on Save.
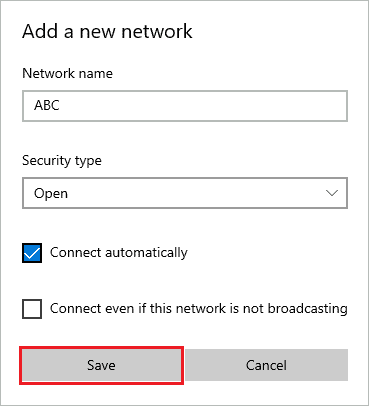
If you are not sure about the details, you can get in touch with ISP (Internet Service Provider). After adding the Wi-Fi network, you will be able to use it without any issues.
17. Enable Broadcast SSID
You can enable broadcast SSID by logging in to the router gateway. Many Windows users fixed WiFi not showing in Windows 10 by enabling broadcast SSID.
Every router will have a different way to enable this setting; you can refer to the manual that came with the router.
Login to your router and go to Setup ➜ WLAN ➜ Advanced settings. Now, select Enabled next to Broadcast SSID. Click on Apply Changes.
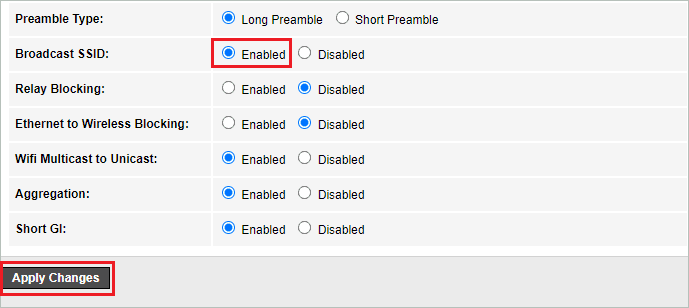
There can be differences in the name and the sections in which the broadcast SSID settings are present. Therefore, if you don’t find the settings at the above mentioned section, explore all other sections related to wireless settings.
18. Disable Microsoft WiFi Direct Virtual adapter
You can try disabling Microsoft WiFi Direct Virtual Adapter to see the WiFi network you wish to connect to on your computer.
Open Device Manager and click on View from the menu bar. Click on Show hidden devices so that you can see WiFi Direct Virtual Adapter.

Now, expand Network adapters and right-click on the Microsoft WiFi Direct Virtual adapter. Select Disable device from the context menu.
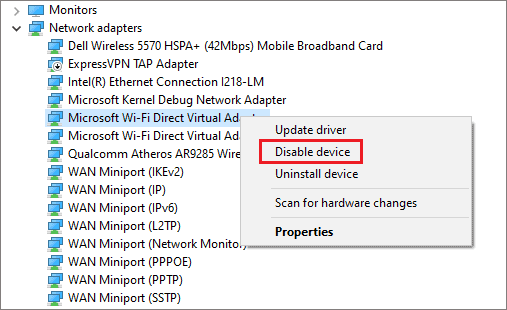
Restart your PC and check if WiFi not showing up in Windows 10 is fixed with this or not.
19. Turn Off Other Wireless Devices
Sometimes the other wireless devices like cordless phones, Bluetooth earphones/speakers, and Alexa/Google Home can interfere with your WiFi signals. You can temporarily turn off all other devices to fix WiFi not showing up in Windows 10
Make sure you unplug the devices from the power source after turning them off. Now, reboot your router and then check if the network name shows up on your computer.
20. Try Changing Channel Width
You can try changing the channel width to fix WiFi not showing up in Windows 10.
Open Device Manager and right-click on the Wireless Network Adapter. Select Properties from the context menu.
Go to the Advanced tab and select another Channel Width under the Property option. You can also try changing the Value associated with the Channel Width property.
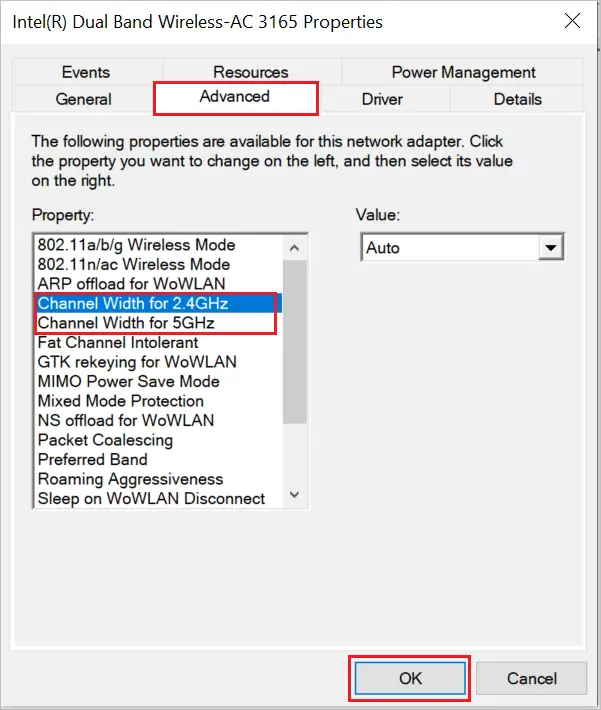
The Channel Width can be Channel Region or Channel on your computer. You can check the manual to know the correct word. Many PCs don’t have this option as well, so a manual will help you know it better. If your router does not support 5GHz, you can keep the Channel Width to 2.4GHz.
Conclusion
It can be difficult to work without WiFi, as you need to sit right next to the Ethernet cable and your movement is restricted. With Windows 10, you can easily connect to the WiFi network most of the time. However, sometimes the WiFi network you wish to connect does not show up in the accessible networks.
This issue can be because of network drivers, settings, services, and many different reasons. The above list of solutions can help you fix the WiFi not showing up in Windows 10 conveniently. You may find the list of solutions long as there are multiple reasons to experience this issue on Windows 10 PCs.


