You use an ISP (Internet Service Provider) provided DNS server to connect to the Internet. It is not always reliable, fast, and secure. And therefore, people opt for more reliable and fast DNS servers. You can know how to change DNS server in Windows 10 without any issues.
The need to change DNS server often arises when there are DNS-related issues in the network. Before moving onto changing the DNS server, let’s see what a DNS server is and how it helps you connect to the Internet.
What is DNS
We all know that the language understood by computers and machines is of numbers, and humans can’t interact in that language. So, DNS acts as a middleman between your computer and you.
When you type – www.technorms.com on your browser, the request goes to the DNS server, where it is converted to 122.186.212.153. In short, Windows uses a DNS server to convert the domain name to the IP address understood by computers.
It won’t be possible to browse the Internet without a DNS service, as you have to type the IP addresses of the websites you want in the browser.
How to Change DNS Server in Windows 10
Windows makes it reasonably easy to learn how to change DNS server. You can find some reliable DNS servers which you can use instead of the default one. Once you shortlist the DNS server you want to use, you can change it in Windows 10 network settings.
There are three options to change DNS server in Windows 10 – by using the Settings app, Control Panel, and Command Prompt. We have listed all three ways to resolve the DNS issue. You can go through them all and choose the one you are comfortable with!
1. Use Control Panel
The most common way to change DNS server in Windows 10 is to use the Control Panel. Follow the detailed steps mentioned below to change the DNS configuration using the Control Panel.
Step 1: Type Control Panel in the Start menu search box and open the same from the search results.
Step 2: In the Control Panel window, click on Network and Internet. Make sure the View by option is set to Category.

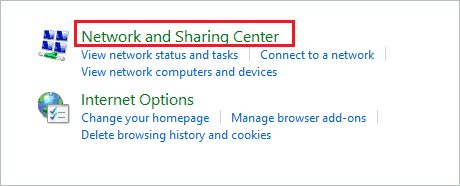
Step 3: On the next window, click on Network and Sharing Center.
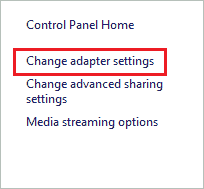
Step 4: Click on Change adapter settings from the left pane.
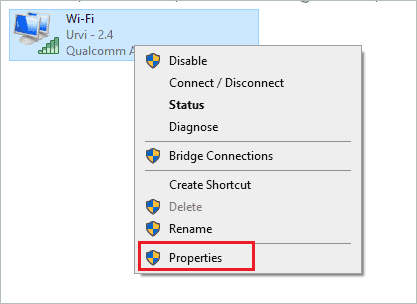
Step 5: Now, right-click on the network adapter that is currently used to connect to the Internet; it can be Wi-Fi or Ethernet network. Select Properties from the contextual menu. In our case, the current network was Wi-Fi.
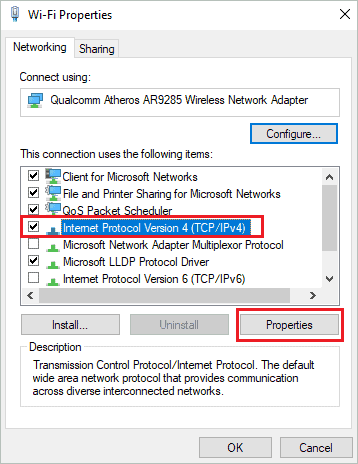
Step 6: In the Network Properties dialog box, select Internet Protocol Version 4 (TCP/IPv4) and click on the Properties button.
Step 7: Go to the General tab and select ‘Use the following DNS server addresses.’ Enter the DNS address you want in the boxes next to the Preferred DNS server and Alternate DNS server.
The preferred DNS is the primary DNS server, and the alternate is the secondary DNS server.
We have used Google Public DNS.
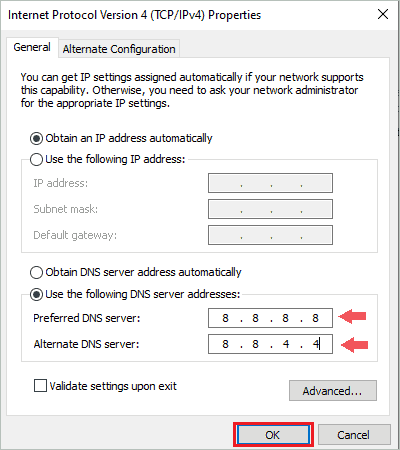
Click on OK to save the changes. You will have to click on the OK button on every dialog box that is opened. Your device will now use the DNS server you entered in the IPv4 Properties dialog box.
2. Use the Settings App
You can also use the Settings app to change DNS settings in Windows 10. The Settings app is where basic Windows 10 settings are available, so it is a convenient way to change DNS servers for many users.
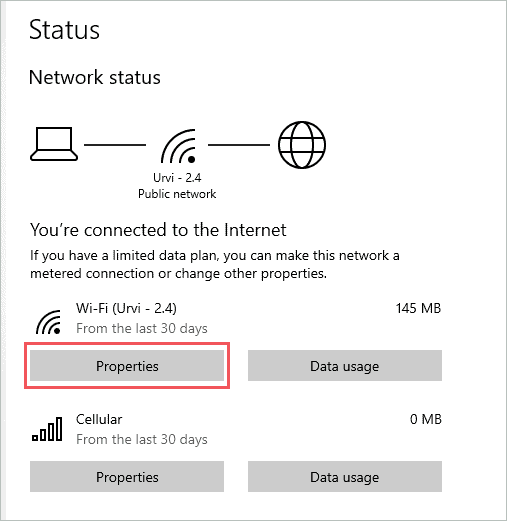
Step 1: Press Windows key + I to open the Settings app and then go to the Network & Internet section.
Step 2: Click on the Properties button below the network that is currently used to connect to the Internet. In our case, it is Wi-Fi.
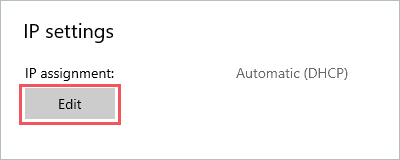
Step 3: Click on the Edit button below the IP settings.
Step 4: Now, select Manual from the drop-down menu and toggle the switch below IPv4.
Add the Preferred DNS field as 1.1.1.1 and the Alternate DNS field as 1.0.0.1 if you wish to use Cloudflare DNS.
If you have opted for some other DNS setting, you can enter the values accordingly.
Click on Save to save the change in the DNS server settings.
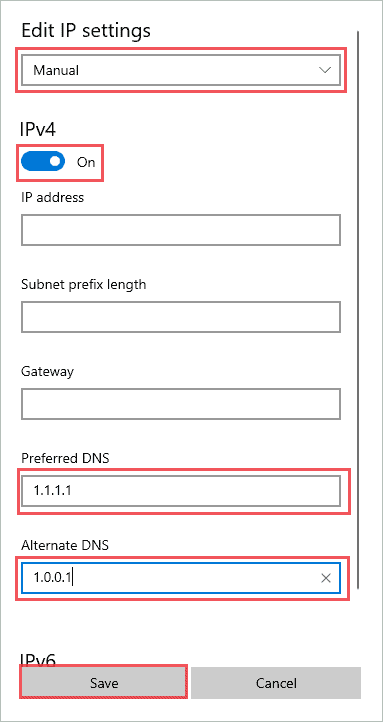
You can now connect to the Internet using the new DNS server.
3. Use Command Prompt
If you like working with command lines, you can use Command Prompt to change DNS server in Windows 10. This way is confusing for normal users, so we recommend using Command Prompt only if you are comfortable with commands. If something goes wrong, you can mess up with your Internet connection.
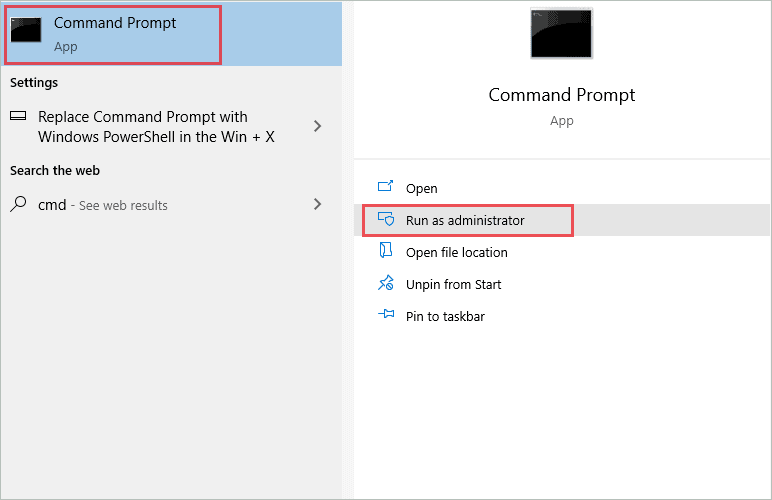
Type cmd in the start menu and click on Run as administrator for Command Prompt.
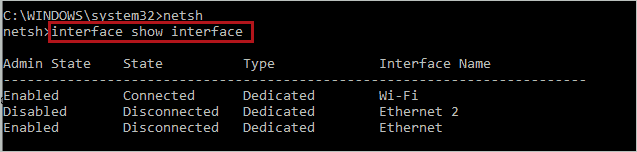
In the terminal window, type the netsh command and press Enter key to execute it.
Once you enter netsh, execute the interface show interface command. You will know which is the active network connection.
Make a note of Interface Name, which is Enabled as well as Connected.
You can then execute the below command in the Command Prompt window.
interface ip set dns name="Interface Name" source="static" address="a.b.c.d"Here, change the Interface name, which was noted above, along with the DNS server address you wish to use.
In our case the command was –
interface ip set dns name="Wi-Fi" source="static" address="8.8.8.8"You need to add the preferred DNS server address in the above command. Now, to add an alternate DNS address execute the below command. It is essential to add a secondary DNS server to have a backup if your preferred DNS server fails.
interface ip add dns name="Interface Name" addr="a.b.c.d" index=2Again, add the same interface name along with the alternate DNS server address. So, the command will look like this –
interface ip add dns name="Wi-Fi" addr="8.8.4.4" index=2We have used Google Public DNS in the above command. You need to make changes in the command as per your selected DNS server.
Conclusion
We need reliability and speed when it comes to using the Internet on our computers. Unfortunately, the default DNS server provided by ISP is not that good when it comes to speed and reliability. Windows 10 gives you the freedom to change the DNS server address as per your wish.
There are many options available in the market for third-party DNS servers, paid and unpaid. You can opt for any DNS server as per your requirement and then change it on your Windows 10 PC. It is easy to change DNS server in Windows 10; you don’t need to be tech-savvy to make that change. However, selecting the correct DNS server is essential, so make sure you do it correctly.


