An issue with the DNS server can interrupt your internet service. You are probably here because of DNS issues. It could be the message “DNS_PROBE_FINISHED_NO_INTERNET” while using the internet or “The DNS server isn’t responding” shown by Windows Network Diagnostics while troubleshooting.
Both the error messages related to Windows 10 DNS issues and the solution is within reach. The DNS error messages are not limited to these two messages; there are many other error messages like “DNS_PROBE_FINISHED_NXDOMAIN,” ”DNS_PROBE_FINISHED_BAD_CONFIG,” “Your DNS server might be unavailable” and many more.
What is DNS Server and Why Internet Services are affected by it?
DNS is an acronym of Domain Name System. It is used to translate the domain names of websites to IP address because the internet only understands IP addresses and not the alphabetic name of websites. The IP address of a particular website is difficult to remember for a human being. For example, the website has the domain name technorms.com is having IP address 13.126.192.45.
Such lengthy IP addresses are difficult to remember for us but essential for internal communication between browser and web server. DNS is a middle man who does the translation for the smooth functioning of the internet. Therefore, an issue with the DNS server halts the internet service.
Solutions to Fix DNS issues in Windows 10
Whatever the DNS issues, there are various ways you can handle and learn how to fix the DNS server. Let’s check the various issues that you may face and the solutions related to it.
1. Check your DNS Server settings
Change in DNS server settings can be the main cause of your DNS issues. You can have a quick look at that before proceeding with other solutions.
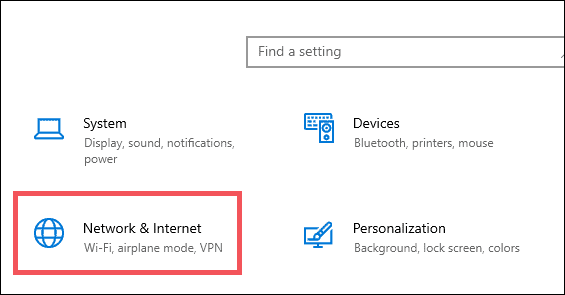
To check whether your DNS server settings are proper, press Windows key + I to open Settings.
Next, click on Network and Internet.
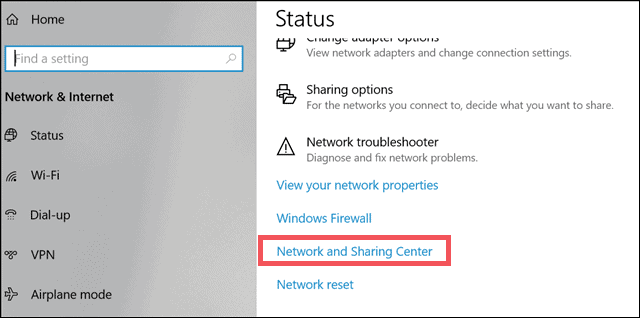
Scroll down and click on Network and Sharing Center.
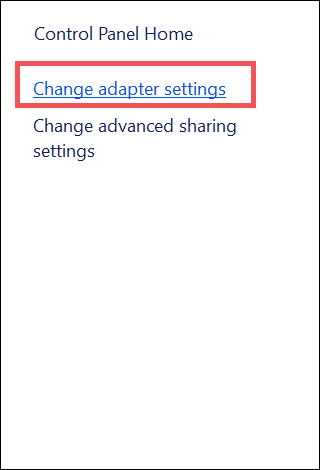
In the left pane of Network and Sharing Center, click on Change adapter settings.
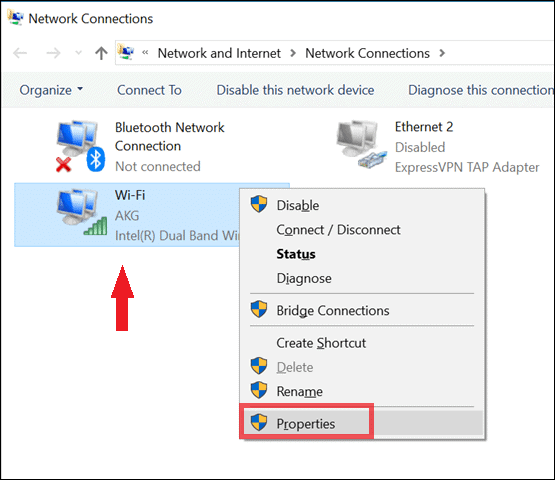
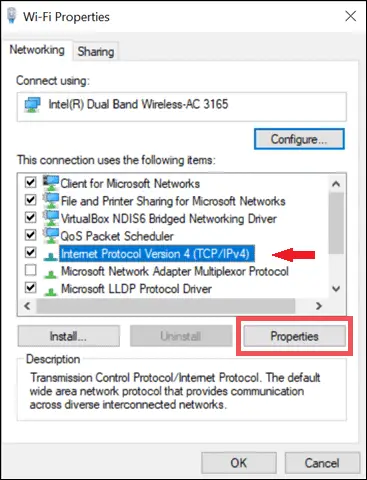
Now, right-click on the connected network. Then select Properties from the context menu.
When a new window appears on the screen, select Internet Protocol Version 4 (IPv4) and then click on Properties.
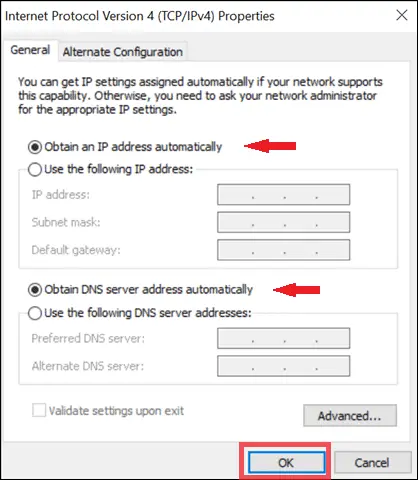
Check whether the radio buttons for Obtain an IP address automatically and Obtain DNS server address automatically are selected.
If it is not selected, then make the required changes and click on OK.
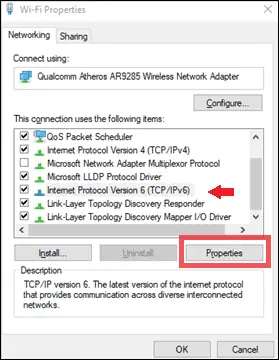
Now check the same thing for Internet Protocol Version 6 (IPv6).
Click on Properties after selecting Internet Protocol Version 6.
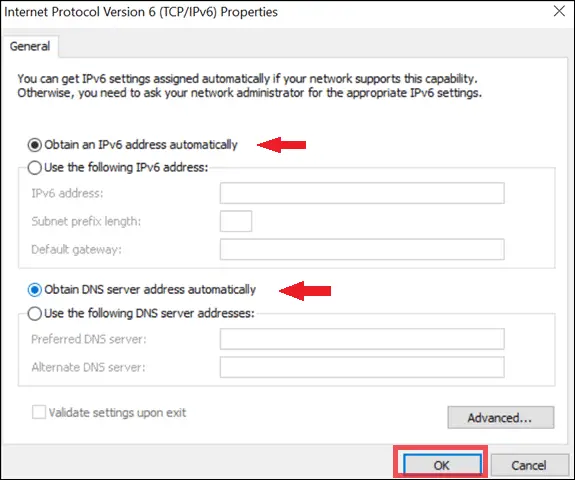
Select the same radio buttons selected as in IPv4, that is, Obtain an IP address automatically and Obtain DNS server address automatically respectively.
Click on OK.
If you are still facing the DNS error, or if you have the same DNS settings, then you can try from the different solutions listed below.
2. Use other DNS servers
If your DNS server’s setting matches the above-shown settings, then there might be an issue with your ISP’s DNS server. Try shifting to another one temporarily.
You can use Google’s public DNS server or Cloudfare’s DNS server.
To manually configure the DNS server, navigate to Settings ➞ Network and Internet ➞ Network and Sharing Center ➞ Change adapter settings.
Right-click on the network connection and then click on Properties.
When network properties open, select Internet Protocol Version 4 and then click on Properties.
When the Internet Protocol Version 4 Properties window appears on the screen, choose to Use the following DNS server addresses and manually enter 8.8.8.8 for the Preferred DNS server and 8.8.4.4 for Alternate DNS server.
Click on OK to save the changes.
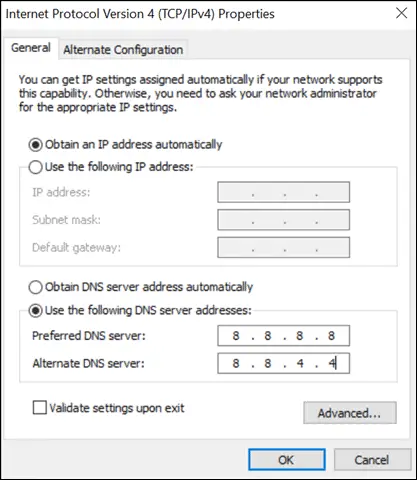
Reconnect your internet and check if the DNS server error resolves after manually changing the DNS server.
The address used above is Google’s public DNS server. If you wish to use Cloudflare’s DNS, then add 1.1.1.1 for preferred DNS address and 1.0.0.1 for alternate DNS addresses.
3. Configure the MAC (Media Access Control) Address
If you still have DNS failure, you can try changing the MAC address of your PC manually. This solution has helped many users to solve DNS issues. MAC address or physical address is uniquely assigned to every network adapter.
To manually configure the MAC address, you need to know the physical address of the network adapter.
Follow the steps to get the physical address.
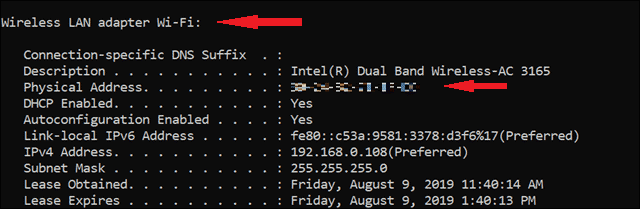
Open the command prompt, type command ipconfig /all and hit Enter.
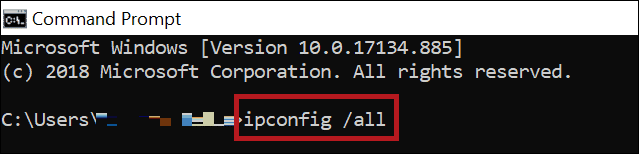
After executing the command, you get the long list of details, find out the connected network, and note down the physical address.
Once you know the physical address, you can configure it.
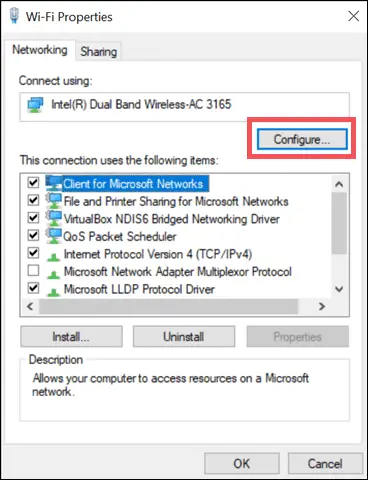
Open Settings ➞ Network and Internet ➞ Network and Sharing Center ➞ Change adapter settings, right-click on the connected network and select Properties.
The following procedure is for Windows Professional users.
However, if you are a Windows home version users follow the procedure written separately for Home users.
When the properties window opens, click on Configure.
Next, go to the Advanced tab, select Network Address and write down the noted physical address in the textbox below Value.
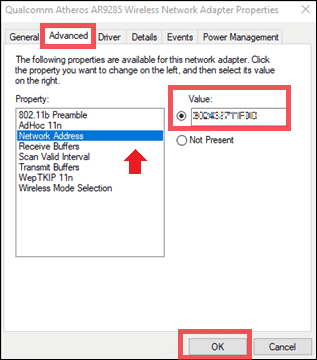
Click on OK to save the changes.
Windows Home Users
Type device manager in the start menu, and open Device Manager, search for Network adapters and right-click on the appropriate option below it and choose Properties from the context menu.
Next, go to the Advanced tab and add noted physical address to the Value of Network Address. If you get stuck somewhere or need any assistance, you can check the details on how to find and change MAC address in Windows 10
4. Clear DNS cache
Sometimes just clearing the cache may help you get rid of DNS error. To flush the DNS cache in Windows 10, there are some commands to execute.
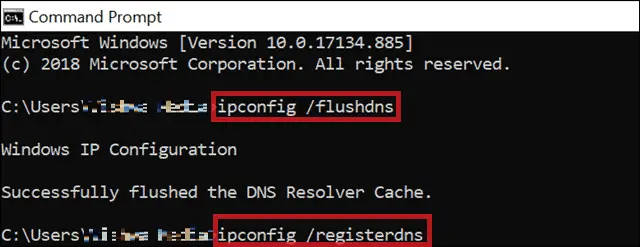
Open the command prompt, and execute the following commands listed below.
ipconfig /flushdns
ipconfig /registerdns
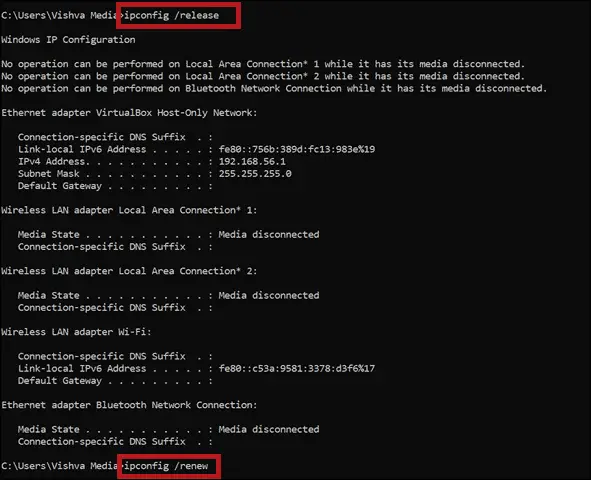
ipconfig /release
ipconfig /renew
You can visit some websites to check if ipconfig command in Windows 10 resolves your DNS server unavailable problem
5. Update your Network Drivers
The outdated network drivers can be a reason for your no DNS server error. You can update them manually or use a third-party tool to do it for you.
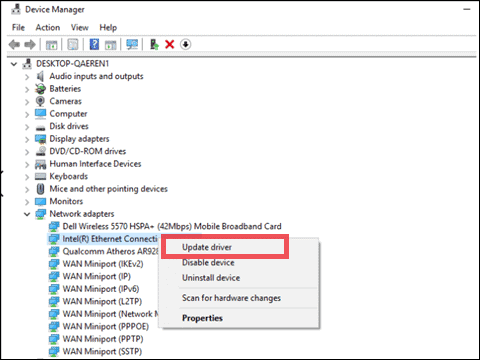
To manually update your network drivers, press Windows key + X and open Device Manager.
Now, search for Network adapters, right-click on the related driver and click on Update driver.
Restart the computer and check if you can browse the web pages.
6. Work on Winsock keys from Registry
You can follow the below steps to work on Winsock keys. It may help you to resolve DNS issues, as it did work for many users. However, before you begin, you can backup the registry in Windows 10.
Open Registry Editor by typing registry in the start menu and navigate
HKEY_LOCAL_MACHINESYSTEMCurrentControlSetServices from the left pane of the registry editor.
Search for Winsock and WinsSock2.
Right-click on it and click on Export from the context menu.
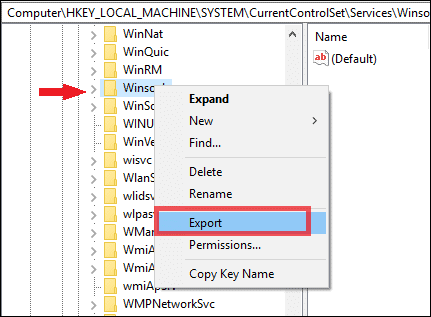
Save them as Winsock and WinSock2 respectively in any location you wish.
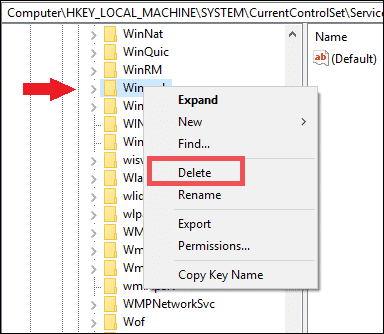
Then, delete both the Winsock registry keys from the registry editor.
Restart your PC and head back to the Registry Editor.
Click on File from the menu bar of the registry editor and then click on Import.
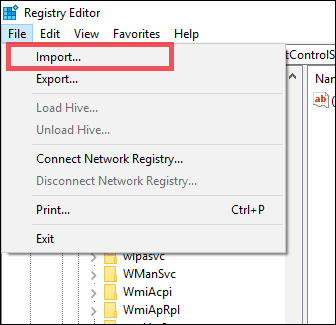
Import the Winsock keys exported in the steps before.
Again restart your PC, open the browser to check if DNS error resolved.
7. Restart Modem and Router
If none of the solutions mentioned above work for you, then you can try restarting your Modem or Router, as that can be helpful in some cases.
Simply power off your router or unplug the power cord from the router. Leave it for one to two minutes and then power on your router. If you have unplugged the router plug it again.
Restarting your router may help you solve DNS failure.
8. Restart PC in Safe Mode
Safe mode has limited software and drivers, so if some third-party software like antivirus is troublemakers, your issue can be solved in safe mode.
To enable safe mode, keep pressing the Shift key while clicking on the Restart option.
When the blue screen appears with three options, click on Troubleshoot ➞ Advanced Options ➞ Startup Settings and then click on Restart.
Now use the function key (F1-F12) to Enable safe mode.
Check your internet connectivity once the PC starts.
However, if the DNS error resolves, it was some third-party application or some other driver/software which is enabled in normal mode.
9. Disable Microsoft Virtual WiFi Miniport Adapter
You can try to disable the Microsoft Virtual WiFi Miniport Adapter if it is present in your Network Adapters list.
To disable it, go to the Device Manager and click on View in the menu bar.
Choose Show hidden devices from the list.

Once all the devices are visible, search for Virtual WiFi Miniport Adapter in Network adapters.
If found right-click on it and disable it. Check out if the DNS problems resolve.
10. Reinstall Network Adapter Drivers
If you still have a DNS probe finished no internet or no DNS server type error, then uninstall your Network adapter drivers and reinstall them.
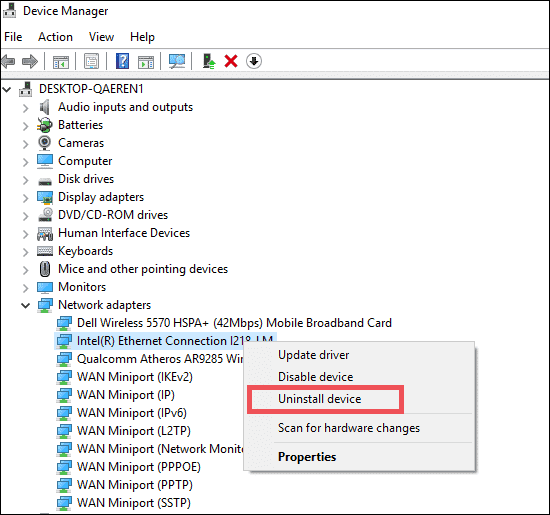
To uninstall the network drivers, press Windows key + X and click on Device Manager.
Search for Network adapters and Uninstall the relevant network driver.
Restart the PC and reinstall the network driver again.
11. Enable Microsoft LLDP Protocol Driver
If your LLDP Protocol driver is not enabled, then you can run into DNS failure issues. Check if it is enabled, if not, enable it using the following procedure.
Go to Settings ➞ Network and Internet ➞ Network and Sharing Center ➞ Change adapter settings, right-click on the connected network and click on Properties.
When Properties open and check if there is a tick besides Microsoft LLDP Protocol Driver.

If it is disabled, enable it by clicking on the checkbox.
12. Update the firmware in the router
Note: Update your router’s firmware only if you are well aware of it, as a failure in the upgrade can cause permanent damage to the router.
Updates are always a vital part of any device, so an outdated firmware of router can also give you errors like “DNS server unavailable.” Update your router’s firmware using the instruction manual as every router has different procedure to do it
After upgrading firmware, reconnect to the internet and check if there is no DNS failure anymore.
13. Disable Antivirus and Firewall
An antivirus is a much-needed software with an increase in the number of viruses and malware. However, sometimes, this antivirus can affect DNS servers, giving you different DNS related problems.
Uninstall your antivirus, restart your PC and check if you can connect to the internet.
If you are again connected to the internet after uninstallation finds a replacement for your antivirus or contact the customer support reporting the issue.
14. Disable Downloads from other PC’s
Windows has this amazing feature in which you are allowed to download the updates from other users in the same network. This is a good option if you have an unreliable internet connection.
However, this can also cause DNS issues.
To disable it, press Windows key + I to open Settings, navigate to Update & Security ➞ Advanced Options ➞ Delivery Optimization.
In Delivery Optimization window, slide the trigger below Allow downloads from other PC’s
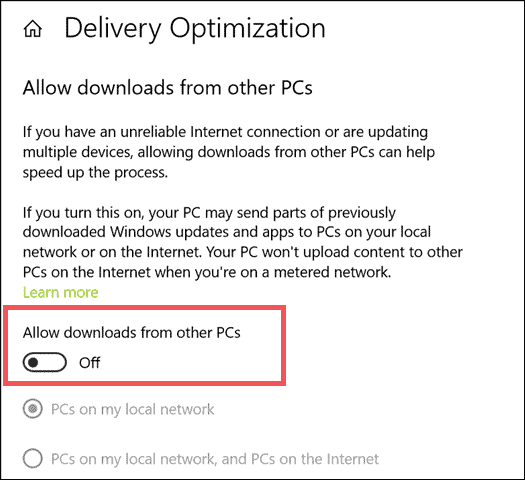
Check if this resolves no DNS server error.
15. Disable Internet Protocol Version 6 (IPv6)
Disabling IPv6 wouldn’t cause any other trouble and may also help you solve DNS error.
To disable IPv6 service, navigate to Settings ➞ Network and Internet ➞ Network and Sharing Center ➞ Change adapter settings.
Right-click on the connected network and select Properties.
Once the Properties window.
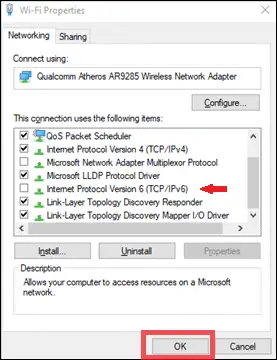
Open search for Internet Protocol Version 6 and untick the checkbox next to it.
16. Disable all other Network Connections
There might be multiple network connections on your PC which might be the reason for your unavailable DNS server.
You can disable all other active connections by going to
Settings ➞ Network and Internet ➞ Network and Sharing Center ➞ Change adapter settings.
Right-click on other connections besides the internet and click on Disable from the context menu.
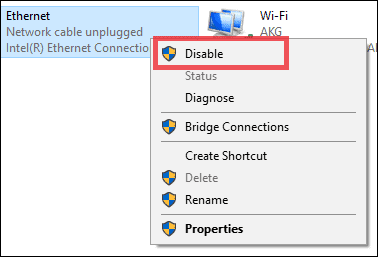
Check out if you still see any DNS server not available error on your PC
17. Check newly installed extension and third-party applications
If you have recently installed some networking related applications or extensions and later faced DNS issue, then these applications/extensions may be the culprit.
Try uninstalling those applications and check your DNS settings in Windows 10 to ensure if the application did not change them. Restart your PC and check if internet connectivity is normal.
If removing the third-party applications does not solve the error, then you can later disable extensions from the Chrome browser and check if that works for you.
18. Perform Clean Boot
Sometimes the DNS issues are easily solved by performing a clean boot. To perform a clean boot type msconfig in the start menu and open System Configuration.
When System Configuration’s window opens, click on Hide all Microsoft services.
Once the Microsoft services are hidden, click on Disable all to disable the third party services.
Now, click on Apply and OK
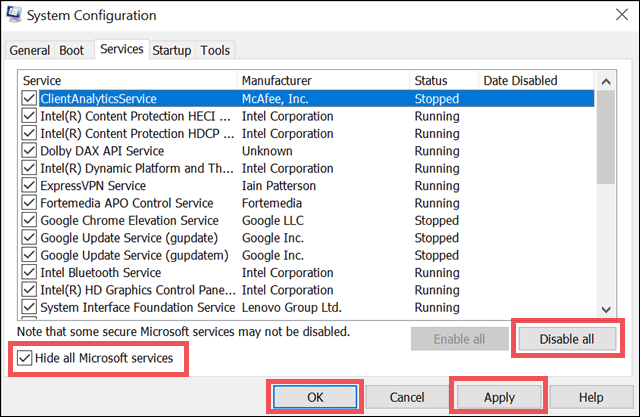
Restart your PC and check if the issue is resolved. Enable third-party services one by one to find the culprit.
19. Use NETSH commands
You can also try using the list of netsh commands mentioned below. It works for many users who face DNS issues. These commands will reset your IP and then even flush the DNS cache for you in Windows 10.
Open the command prompt and execute the following commands one after the other.
netsh int ip reset
netsh winsock reset
ipconfig /flushdns
ipconfig /renew
Restart your PC and check if this solution fixes DNS failure.
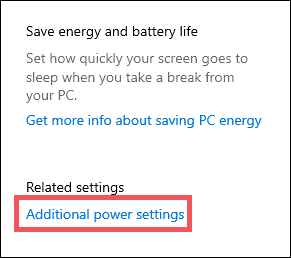
20. Change Power Settings for Network Adapters
Your DNS server unavailable issue can be solved by keeping the maximum performance parameter for the wireless adapter. To change this setting, you need to go to power settings and change the plan.
Type power in the start menu and open Power & sleep settings.
Once the setting window opens, click on Additional power settings.
Now, click on Change plan settings.

To edit the settings for the wireless adapter, click on Change advanced power settings.

When the power options window appears, search for Wireless Adapter Settings and click on the plus sign(+) next to it.
Next, click on + sign next to Power Saving Mode.
The drop-down menu has different options select Maximum Power Saving, even if the default one says Medium Power Savings.
Apply the changes by clicking on Apply
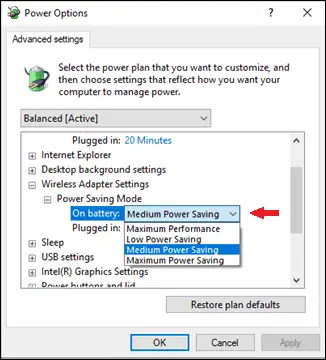
Restart the PC, and check your internet connectivity. You will be able to see if this change in power settings worked for you and solved your DNS issues.
21. Check out with your ISP for the issue
If the above solutions are not solving the DNS problem, then for once try contacting your ISP and ask if the issue is from their side. Sometimes, the DNS issues are from the ISP itself, which in turn gives problems at our end.
22. Use another Router
The last solution to your DNS failure is to change your router. A faulty router can also cause DNS issues. Connect different router and check if you can connect to the internet.
DNS_PROBE_FINISHED_NO_INTERNET Solutions
Note: The below-mentioned solution may also work for your other DNS issues.
23. Clear DNS cache in Google Chrome
If you see DNS_PROBE_FINISHED_NO_INTERNET error on the Google Chrome browser, then you can specifically jump to simple solutions like just clearing cache.
First, you need to clear browsing history and then move to DNS cache
To clear browsing history press Ctrl + H in your Chrome browser.
Once the history page opens, click on Clear browsing history.
To clear DNS cache, type “chrome://net-internals/#dns” in your Chrome browser and click on the Clear host cache button.
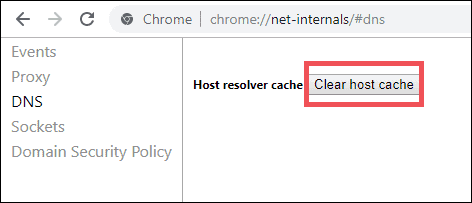
Check if the error resolves.
24. Disable Preload pages in Chrome
Disabling preload pages can also solve your DNS_PROBE_FINISHED_NO_INTERNET error.
To disable preload pages in Chrome, click on the 3 dots in the right corner of the Chrome browser and click on Settings.
Scroll down to the end of the page and click on Advanced and toggle the switch next to Preload pages for faster browsing and searching to disable it.
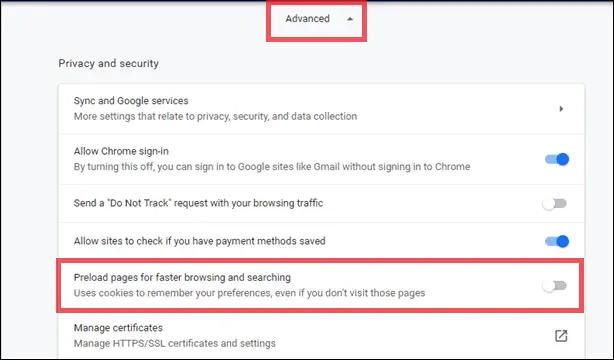
Close your Chrome browser and reopen it to check if this solution resolved your error.
Conclusion
The above solutions will undoubtedly help you to get your DNS issues solved. If there is a minor error in settings of DNS server then simply changing the settings as mentioned in the first solution would have you get rid of DNS failures. However, if the issue is with the router, then you need to change it completely or even reinstall your browser. The solution depends on the complexity of the issue. Do let us know the solution which worked for you.
Also, check:


