Windows 10 File Explorer shows recently opened files in the Quick access section. It is a convenient way to access files that are recently opened or edited. However, if you want to start afresh and clear recent files in Windows 10, you can do so easily.
Clearing the recent files is easy and can be done when the files shown are no longer required. In addition, Windows 10 allows ways and means to use File Explorer as per your wish, be it adding Google Drive to File Explorer or changing the icons.
How to Clear Recent Files in Windows 10
There are different ways to clear recent files in Windows 10. You can either remove single files or clear the entire history of recent files. Let’s check out what are the ways to clear recent files in Windows 10.
1. Use File Explorer Options
The simplest way to clear all the files under the recent files section is to use File Explorer Options. This will remove all the files and give you a fresh start with recent files.
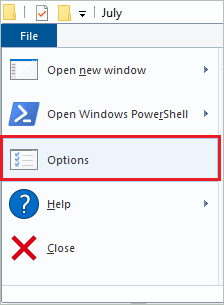
Press Windows key + E to open File Explorer and click on File from the menu bar. Select Options from the File menu. It can also be ‘Change folder and search options’ for some users.
Alternatively, you can search for File Explorer Options in the Start menu and open it from there.
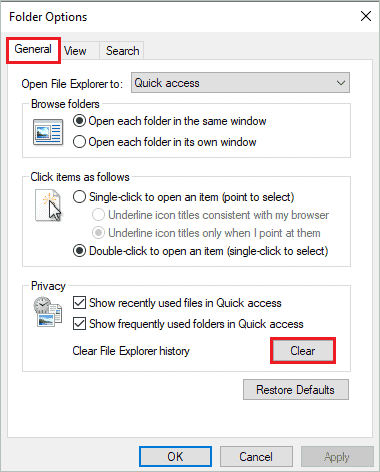
Now, go to the General tab in the Folder Options dialog box and click on the Clear button under the Privacy section.
When you return to File Explorer’s Quick access section, you will see the Recent files section empty. It will also clear the frequent folders from the left panel. In other words, it will clear Quick access history.
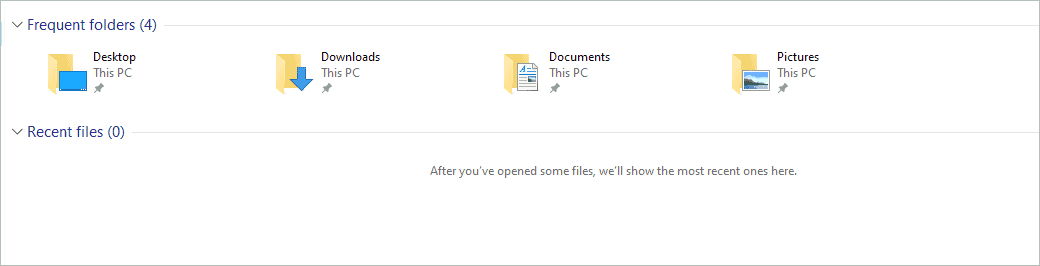
Whenever you open any new image, document, or other files, you will see it under Recent files in Quick access.
2. Clear Specific Recent Files
If you just want to remove one or two files from the Recent files lists, you can directly remove them via File Explorer itself. This can be useful when you want to hide a specific file and don’t want it to show up in Quick access.
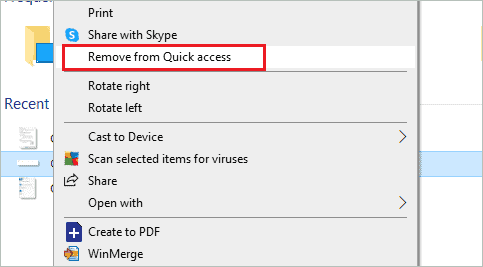
Open File Explorer on your computer and go to Quick access from the left panel. Now, right-click on the recent file you want to remove and click on Remove from Quick access from the context menu.
Once you remove an individual file from Quick access, you will no longer see it. The file won’t be deleted, but it won’t be seen in Recent files.
3. Use Registry Editor
You can use the Registry Editor to clear recent files in Windows 10. However, make sure you back up the registry before making any changes to it, as it stores crucial Windows settings.
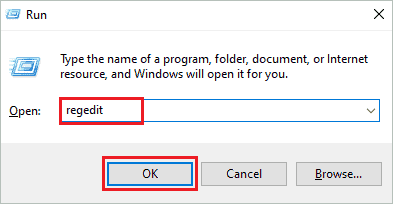
Press Windows key + R to open the Run and type regedit there. Press Enter or click OK to open the Registry Editor.
In the Registry Editor, navigate to the below-mentioned path.
HKEY_CURRENT_USER\Software\Microsoft\Windows\CurrentVersion\Explorer\TypedPathsOnce you reach TypePaths, see the right panel of the Registry Editor window, there will be url1, url2, and so on with URLs of the files in the Recent files section.
You can check the URLs and right-click on the one you wish to remove from Quick access. Select Delete from the contextual menu.
Similarly, remove all the URLs you don’t want to have in Recent files.
4. Use Recent Files Folder
You can use the recent files folder to remove multiple or all files from the Quick access area.
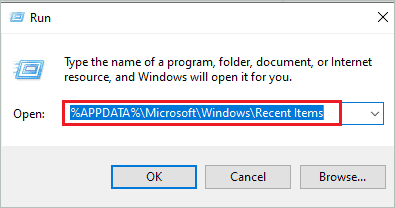
Open Run by pressing Windows key + R and type –
%APPDATA%\Microsoft\Windows\Recent ItemsPress Enter to open the Recent folder.
You can also navigate to the path mentioned below using the File Explorer address bar, as it is the default location of this folder.
C:\Users\Username\AppData\Roaming\Microsoft\Windows\Recent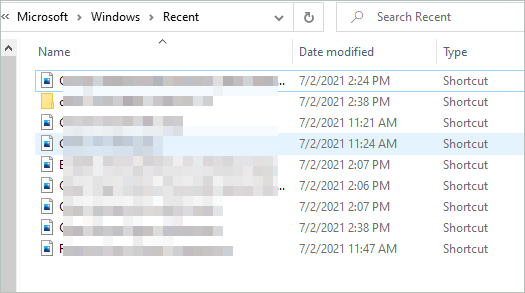
You can delete the files you want from this Folder. If you wish to delete entire contents, select everything and press the Delete button from your keyboard.
Note: Deleting the contents from the Recent folder won’t delete it from your computer; it will only clear it from the Quick access/Recent files section.
How to Clear Recent Files on Shutdown
If you want the Recent files section cleared every time you shut down your PC, then you can make changes in the Group Policy Editor and Registry Editor.
1. Group Policy Editor
Windows Enterprise and Professional users can use Group Policy Editor to clear recent files in Windows 10 on every shutdown. If you are a Home user, you can use the Registry Editor way mentioned below to clear recent files.
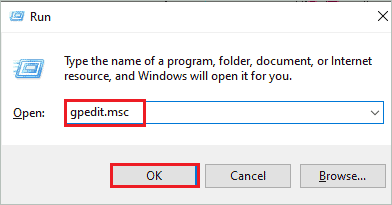
Open Run by pressing Windows key + R and type gpedit.msc. Click OK to open Group Policy Editor.
In the Group Policy Editor, go to User Configuration ➜ Administrative Templates ➜ Start Menu and Taskbar and double-click on ‘Clear history of recently opened documents on exit.’
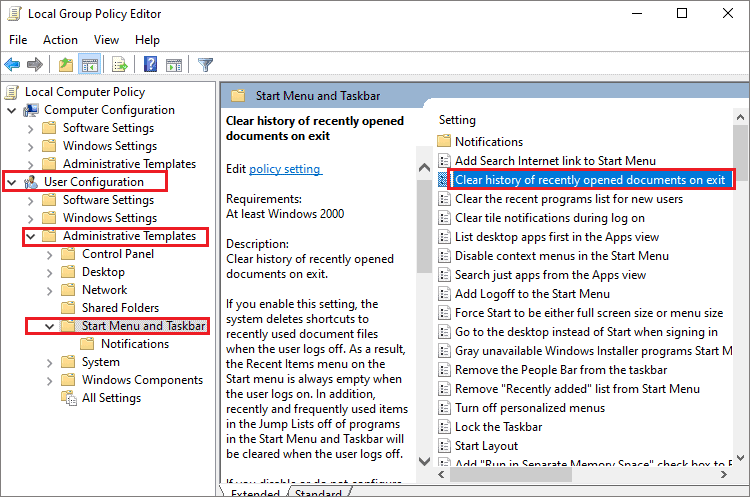
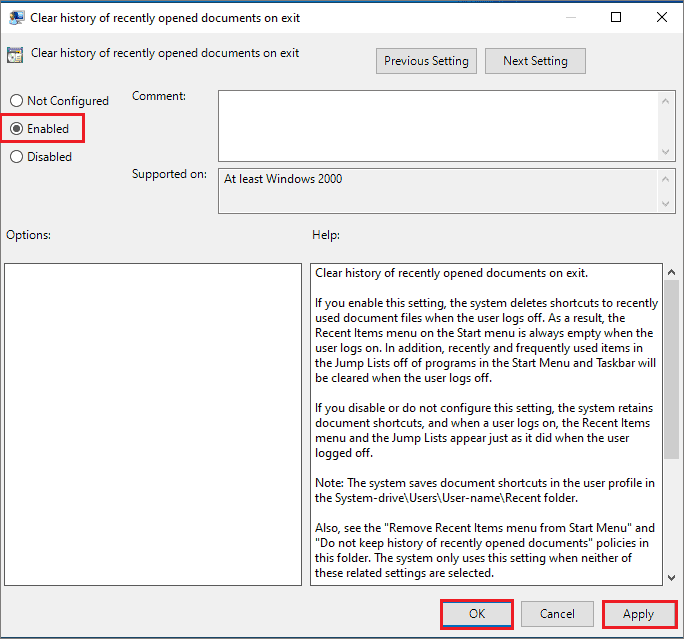
Now, in the opened window, select Enabled and click on Apply, followed by OK.
Now, all the recent files and Quick access contents will be cleared automatically whenever you shut down.
2. Registry Editor
If you are a Home user or don’t want to tweak the Group Policy Editor, you can also make changes in the Registry Editor.
Open Registry Editor via the Run or Start menu and go to the below path.
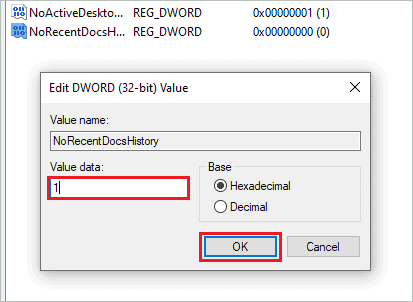
HKEY_LOCAL_MACHINE\SOFTWARE\Microsoft\Windows\CurrentVersion\Policies\ExplorerIn the Explorer, check for the NoRecentDocsHistory on the right side of the window. When found, double-click on it.
Next, change the Value data to 1 and click on OK to save the changes.
Close the Registry Editor and restart your PC. Now on whenever you shut down or restart your computer, the recent files will be cleared.
How to Clear Address Bar History of File Explorer
You can clear the File Explorer address bar history as well.
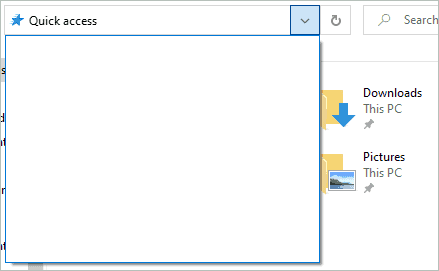
Open File Explorer on your computer and right-click on the address bar. Select Delete history from the context menu.

Now, you will see the address bar history empty when you click on the down arrow on the address bar.
Well, this can be useful when you don’t want other people using your system to know which files you accessed. So, along with the process to clear recent files in Windows 10, this is also a way to clear whereabouts in File Explorer.
How to Hide Recent Files and Quick Access in File Explorer
If you don’t want a Quick access area in File Explorer, you can disable it from File Explorer Options.
Open File Explorer Options by searching for it in the Start menu. In the File Explorer Options dialog box, go to the General tab.
Now, uncheck the checkboxes next to ‘Show recently used files in Quick access’ and ‘Show frequently used folders in Quick access.’
Click on Apply and OK.
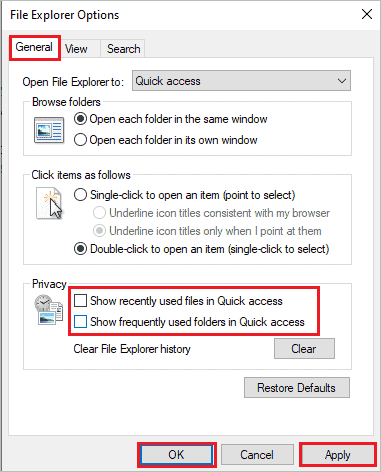
You have to relaunch File Explorer for the change to take effect. There will still be a Quick access area in the File Explorer, but you will no longer see Recent Files and frequent folders there. You don’t need to clear recent files in Windows 10 once it is disabled. You can revert the changes from File Explorer Options whenever required.
How to Hide Jump List in Windows 10
Jump Lists are the recently opened files that show up when you right-click on the application pinned to the taskbar.
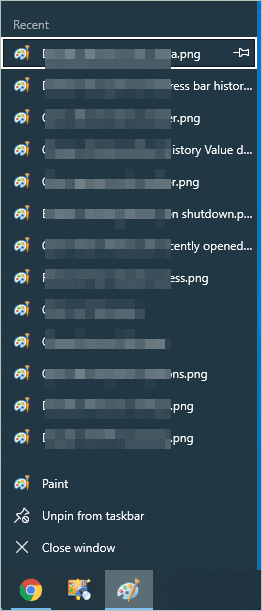
Well, clearing recent files won’t hide the Jump Lists of the applications. You can see recently accessed files via application in the Jump Lists.
To disable the Jump Lists, follow the detailed instructions given below.
Step 1: Press Windows key + I to open the Settings app and go to the Personalization section there.
Step 2: In the Personalization, navigate to the Start from the left panel.
Step 3: Now, toggle the switch below ‘Show recently opened items in Jump Lists on Start or the taskbar and in File Explorer Quick Access’.
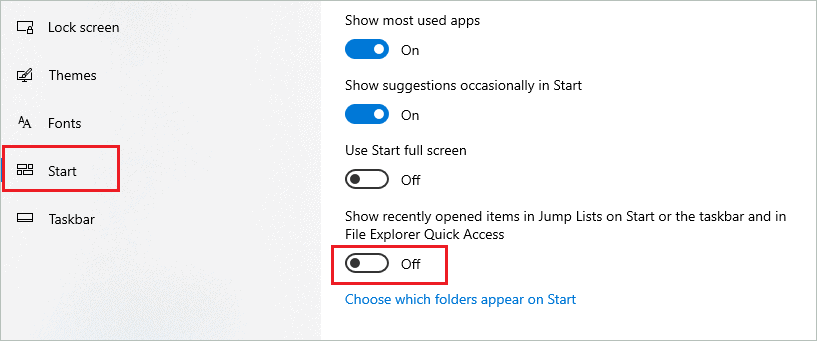
The Quick access area in the File Explorer window will also be disabled along with the Jump Lists. The changes will immediately take effect in the taskbar. However, for changes to take place in File Explorer, you may need to relaunch it.
You can enable the Jump Lists again using the same settings whenever you need them.
Final Thoughts On How To Clear Recent Files In Windows 10
The recent files in File Explorer make it easy to access them quickly. However, at times Windows users need to clear their recent files and start afresh. In addition, some users also need to clear their traces before anyone else uses the same PC. Therefore, windows also allow you to disable recent files in the Quick access area.
There are different ways to clear recent files in File Explorer; you can use the folder option, Registry Editor, files log, and File Explorer window. Whatever option you choose, the process to clear recent files in Windows 10 is pretty straightforward.


