Most Windows users use a dynamic IP address assigned by the DHCP (Dynamic Host Configuration Protocol) server. Your Internet Service Provider mostly configures the dynamic IP settings, which serve to connect to the Internet. However, at times we need to set static IP in Windows 10 due to network requirements.
The port forwarding or connecting to another device in the network won’t work with a dynamic IP address as it keeps on changing. So you need a static, fixed IP address to do such things on the network. Many file-sharing applications also need your PC to have static IP to share files without any issues in the network. You can also renew the IP address on your computer if the need arises.
Why Use a Static IP Address
The static IP is a fixed IP address assigned to your computer, so the same IP address is used every time for port forwarding. Now, when it comes to dynamic IP addresses, you will be able to connect to a printer in the network or perform port forwarding once, but when the IP address changes, the connection will no longer work. Therefore, one needs to set static IP in Windows 10 computers.
How To Set Static IP in Windows 10
Windows 10 provides a variety of ways to do one task. In this case, the user can change dynamic IP to static one using four different ways. You can also change the DNS settings to static one with the help of the below guide. So let’s get started on how to set static IP in Windows 10 and change the IP configuration of your PC.
1. Use Control Panel
The most common way used by many to change the IP address is Control Panel. Follow the steps given below to set a static IP in Windows 10.
Step 1: Type Ctrl + S and type Control Panel in the Start menu’s search bar. Open the same from the search results.
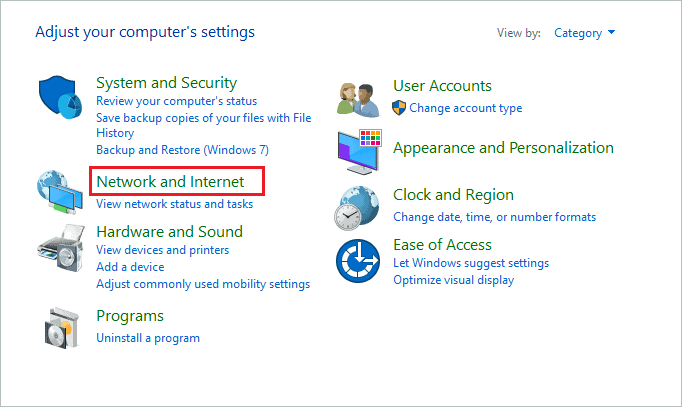
Step 2: In the Control Panel window, click on Network and Internet to open it.
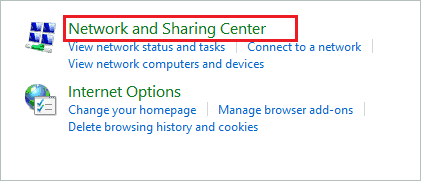
Step 3: On the next window, click on Network and Sharing Center.
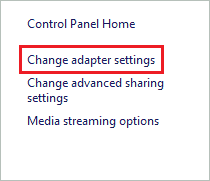
Step 4: Now, from the left panel, click on Change adapter settings.
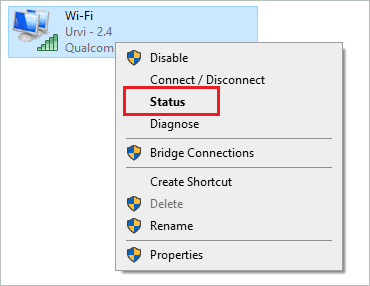
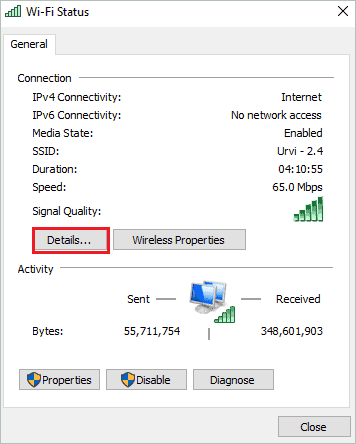
Step 5: Right-click on the currently active network and click on Status from the context menu.
Step 6: Click on the Details button.
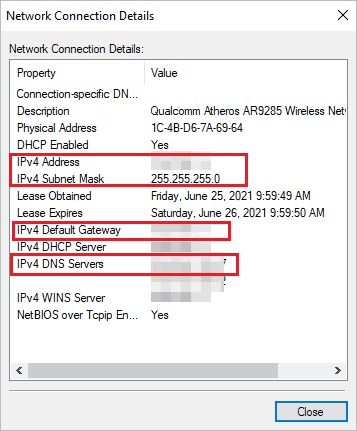
Step 7: Note down the computer’s IPv4 Address, IPv4 Subnet Mask, IPv4 Default Gateway, and IPv4 DNS address for further reference.
Step 8: Close the details window and come back to the Network Connection window of the Control Panel. Now, right-click on the active network again and this time click on Properties.
Step 9: Click on the Internet Protocol Version 4 (TCP/IPv4) and click on Properties.
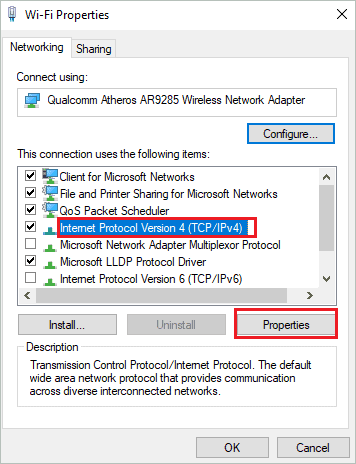
Step 10: Add the details to the Properties dialog box. Firstly, select the radio button next to ‘Use the following IP address’ and add the new IP address, Subnet masks, and Default gateway.
IP Address: You can change the IP address option based on what was noted in Step 7. For example, if your IP address was 192.168.1.7, you can change the last number of the IP address to any number between 1 to 254. If the IP address was 10.0.0.1, change it to 10.0.0.X, where X can be any number from 1 to 254.
Subnet Mask: The Subnet Mask is mostly the same for every device, that is, 255.255.255.0.
Default gateway: It is the access point for your router, so keep it as was in Step 7.
Step 11: You can also change the DNS address if required to any fast and reliable options. There are many DNS servers available online.
We have used Google Public DNS and set Preferred and Alternate DNS servers as 8.8.8.8 and 8.8.4.4, respectively.

Step 12: Click on OK to save the changes and close the Properties window as well.
Once you close the Control Panel window, you’ll be able to set the static IP in Windows 10. The changes will take effect immediately.
2. Use Command Prompt
Command Prompt is another way to set a static IP address in Windows 10. If you are comfortable with command lines, you can go through this way of making changes to the network. You can use the netsh command to set a static IP address in Windows 10.
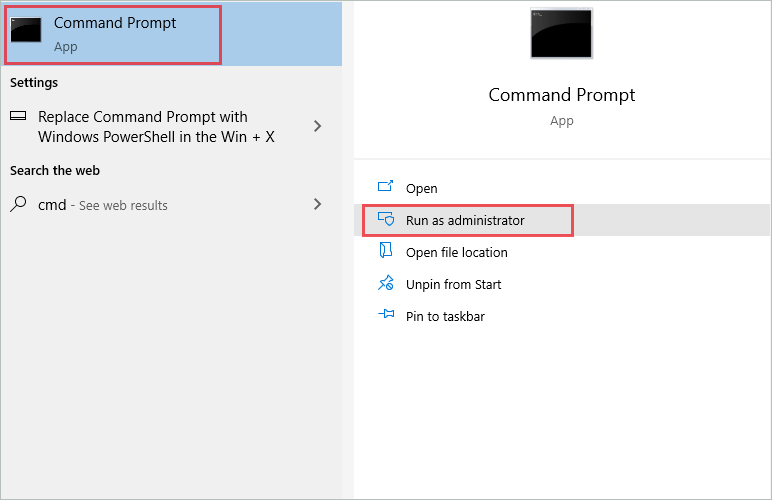
Type cmd in the Start menu and click on Run as administrator under Command Prompt to launch it as administrator.
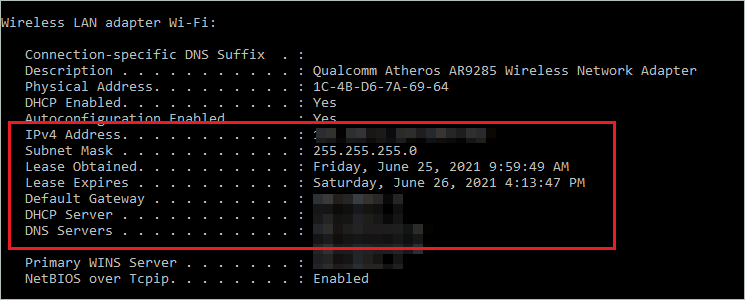
In the Command Prompt window, type ipconfig /all and press Enter. You will see detailed information about the network connection.
Navigate to the network adapter currently used for the Internet connection and note down IPv4 address, Subnet Mask, Default Gateway, and DNS Server.
You will need all these details for changing the IP address.
Now, in the same terminal, execute the below command to set static IP in Windows 10.
netsh interface ip set address name="Wi-Fi" static 192.168.1.2 255.255.255.0 192.168.1.1You can change the address name to the currently active network adapter; it can be Ethernet0, Ethernet1, or Wi-Fi, depending on your configuration. The next in the command is the IP address, subnet mask, and default gateway, respectively. Again, you can change them as per your requirements.
You can refer to Step 9 of the ‘Use Control Panel’ section to help change the IP address and other addresses.
If you want to change the DNS address as well, use the following command.
netsh interface ip set dns name="Wi-Fi" static 8.8.8.8Here, 8.8.8.8 is the DNS server address; you can change it as per your needs. Also, change the DNS name to the active adapter name.
To add an alternate DNS server address, use the below command and change the command as mentioned above. But, make sure you keep index=2 as it is.
netsh interface ip add dns name="Wi-Fi" 8.8.4.4 index=2Once the changes are made, use the ping command to check if everything is working correctly or not—for example, ping www.technorms.com.
You will receive successful replies if the connection is successful; otherwise, there might be a request time out error.
3. Use Settings App
Windows is migrating all its settings from the Control Panel network to the Settings app. So although you can set a Static IP address in Windows 10 from the Control Panel, it is good to know how to do it via the Settings app.
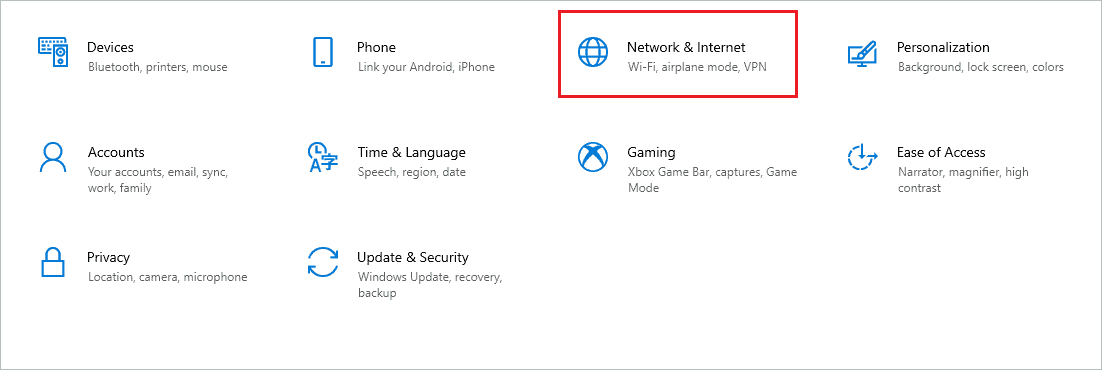
Step 1: Press Windows key + I to open the Settings app and click on Network & Internet.
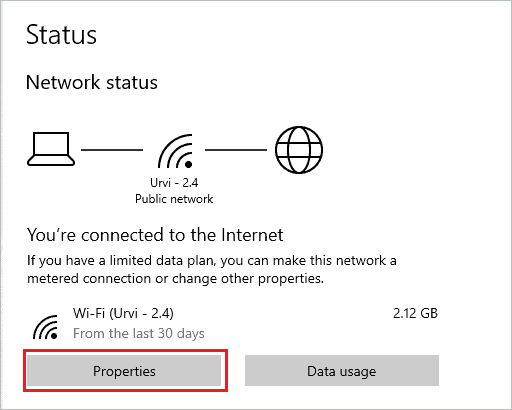
Step 2: In Network & Internet settings, click on the Properties button under the active network connection.
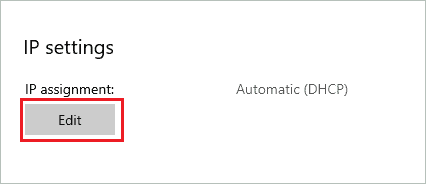
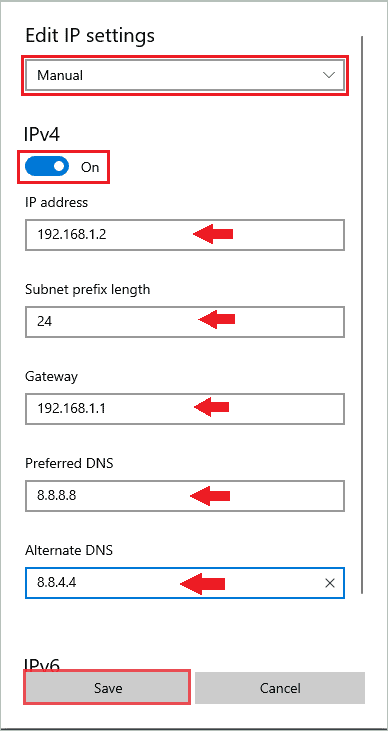
Step 3: Scroll down and click on the Edit button under IP settings.
Step 4: Select Manual from the drop-down menu and move the toggle switch below IPv4 to enable it. Now, assign static IP address, Gateway, Preferred DNS, and Alternate DNS.
If your subnet mask is 255.255.255.0, the Subnet prefix length will be 24. You can get the details about your network connection using the ipconfig /all command and the control panel. Please refer to the above sections for instructions.
Step 5: Click on Save to save the changes.
Now, close the Settings app and open the browser to check if the Internet is working or not.
4. Use PowerShell
You can use the PowerShell script as well to set static IP in Windows 10. You need to run a few commands, and the private IP address settings will be changed from dynamic to static.
Press Windows key + X and click on Windows PowerShell (Admin) from the quick link menu.
In the PowerShell window, type the below command and press Enter to get your active network connection details.
Get-NetIPConfiguration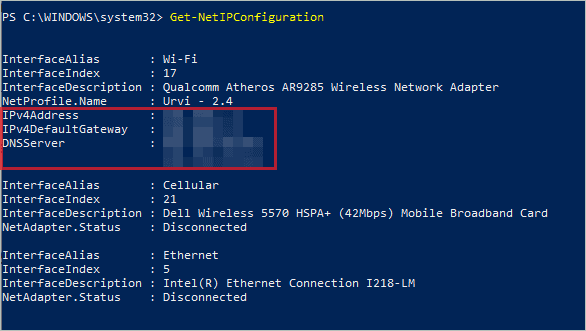
Note down the IPv4Address, IPv4DefaultGateway, and DNSServer for further reference.
Now, assign the static IP address by using the following command in PowerShell.
New-NetIPAddress -InterfaceIndex 17 -IPAddress 192.168.1.2 -PrefixLength 24 -DefaultGateway 192.168.1.1In the above command, change the InterfaceIndex number as per the active connection you see in the Get-NetIPConfiguration command output. Also, change the IP address and Default gateway address as per your connection details noted above.
If you wish to change the DNS server address as well, execute the below command.
Set-DnsClientServerAddress -InterfaceIndex 17 -ServerAddresses 8.8.4.4Here, again change the IntefaceIndex number and ServerAddress as per your chosen DNS server.
The above command will only set a preferred DNS server for you. If you wish to have an alternate DNS server as well, use the below command.
Set-DnsClientServerAddress -InterfaceIndex 17 -ServerAddresses 8.8.8.8, 8.8.4.4First, add the preferred DNS address, and then after a comma, add the alternate DNS address.
You now have a static IP address configuration for your Windows 10 computer. You can use the ping command or navigate to a website in the browser to check if the change was successful or not.
Conclusion
We often want to share files from one computer to another, and the better way to do this is to use network file sharing. However, we need a static IP address to share or connect to another computer using a network. By default, all connected devices use dynamic IPs assigned by the DHCP server, and every time you log in to the system, the IP changes.
You can switch easily to a fixed IP address in Windows 10 to avoid this problem. There are different ways to set static IP in Windows 10. You can use the Control Panel, Settings app, PowerShell, and Command Prompt to change the network configuration.


