Action Center in Windows 10 is a distinct feature that collects and stores notifications in a sidebar of the system tray. Although it keeps you updated with all the current Windows and apps notifications, some people find it annoying. A simple solution here is to disable action center in Windows 10.
3 Easy Ways to Disable Action Center in Windows 10
There are various ways to turn off action center in Windows 10. Let’s go through each method one by one. Once you disable the Windows Action Center, you can see the pop-up notification on the right side of the screen. But, the plus point here is, it does not get accumulated for you to check later.
1. How to turn off Action Center in Windows 10 using Settings App
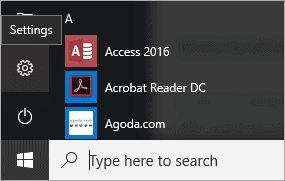
The easiest way to disable Action Center Windows 10 is using the Settings app. Go to the Start Menu and select the Settings app (the gear icon on the left).
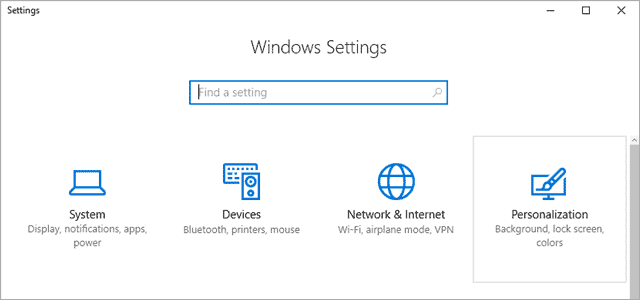
From Settings, you can navigate to Personalization, as shown in the screenshot below.
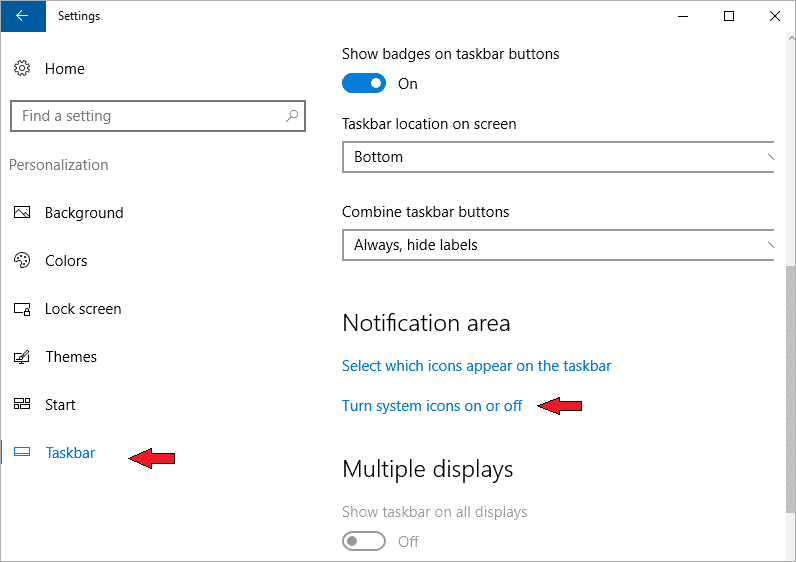
After clicking on Personalization, you will see the Taskbar.
Click on it and you can now see the option Turn system icons On or Off.
Go ahead and click on it.
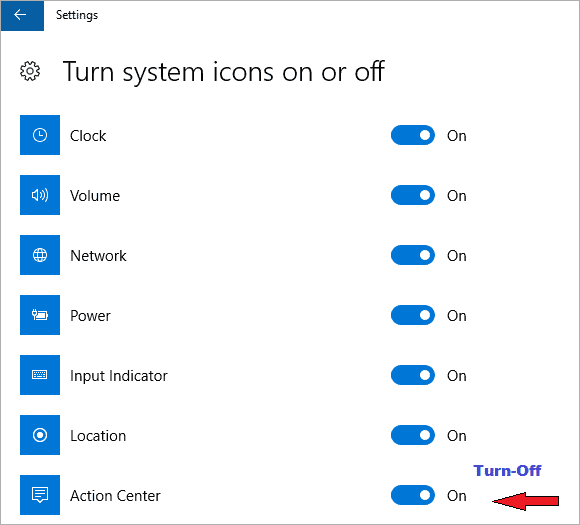
Scroll down to the Action Center.
If it is On, turn it Off.
Turning this off will disable the Action Center icon in Windows 10 from the system tray, and no notification will be waiting for your acknowledgment.
You can anytime toggle this button between ON and OFF from the Settings app.
2. Turn off Action Center using Local Group Policy Editor
If you are on Windows Pro or Enterprise, you can get more control over Action Center. It is more comfortable and convenient to disable Action Center Windows 10 using Local Policy Editor. And if you do so, you will also prevent other users from using it.
Disabling Action Center using Group Policy Editor will lock/dim the toggle button for Action Center in the Settings app. That means, now, someone can not Enable/Disable Action Center from within the Settings app. However, you can enable it anytime using the Local Group Policy Editor.
One might wonder why is this even needed?
Well, the reason is all up to you why you want to do that. By doing this, you can disable Action Center windows 10 for all/specific users of your laptop. This method may not work if you are in a company or a restricted network. However, if you really want to do that, you should check with your admin or the laptop owner.
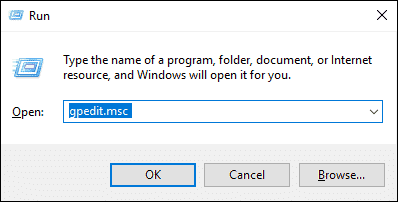
To disable Action Center Windows 10 using Local Policy Group Editor, first open Run box using Windows key + R.
Now, type gpedit.msc in it and press Enter.
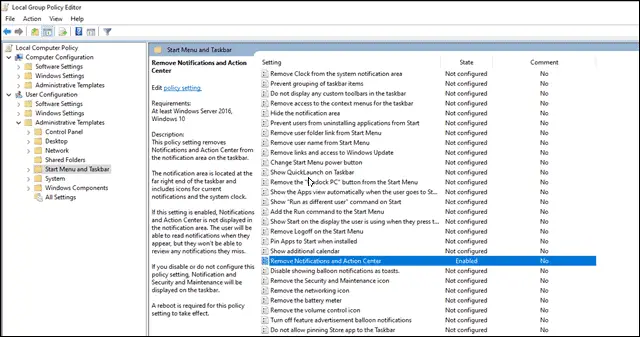
Now, within Local Group Policy Editor, navigate to User Configuration > Administrative Templates > Start Menu and Taskbar.
Scroll up-down to find Remove Notifications and Action Center in the right window pane.
Once you find it, double-click on it.
A new window opens up which is called Remove Notification and Action Center.
As you have confirmed that you want to get rid of the Action Center, select Enable and click on OK to apply the changes.
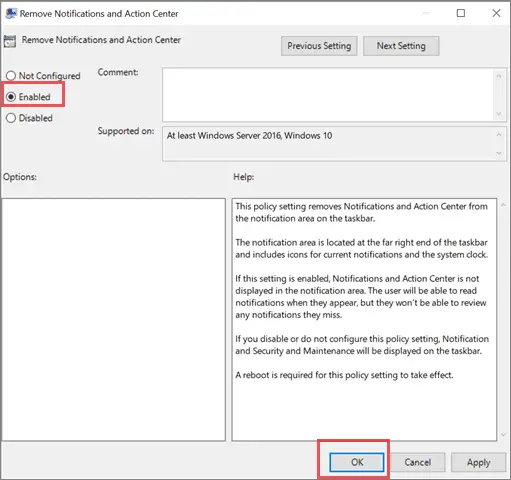
Your PC will need a Reboot because the system needs to bring the changes in effect. Once restarted, you will not find the Action Center icon in the system tray.
Also, the Action Center toggle button, in Settings > Personalization > Taskbar > Turn system icons on or off, is grayed out.
It means now you cannot Enable/Disable Action Center from Settings app until you disable that feature in Local Group Policy Editor. You need to follow the same steps to enable the action center.
3. Disable Action Center in Windows 10 through Registry Editor
If you are not a Pro or Enterprise Windows user, you cannot use Group Policy Editor. If you don’t want to disable the Action Center using the Settings app, you can do it using the Registry editor.
Tweaking Registry can cause your PC to run into unsafe conditions. It is highly recommended, before entering into the Registry Editor, make sure you have back up for your PC files.
If not that, create a System Restore Point before playing around Registry Editor.
Note: You can take a backup of your files by going into Registry Editor, right-clicking on File and then Export. Choose a safe and easily accessible location. In case you experience something weird about your PC after tweaking the Registry key, you can immediately run that Registry Backup file.
To disable action center in Windows 10 Home version, open Registry edit first, using Windows Key + R.
Now, type regedit and hit Enter.
It opens up the window of the Registry Editor.
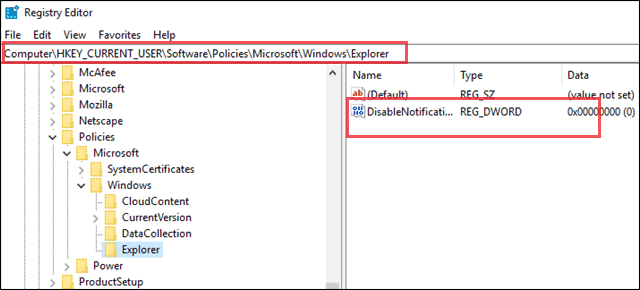
Next, navigate to HKEY_CURRENT_USER\Software\Policies\Microsoft\Windows\Explorer.
In my case, I couldn’t find the Explorer folder under Windows. If you run into the same issue, we have a solution for that as well.
Create a Folder named “Explorer.”
If you don’t find the Explorer folder, you will have to create it first. If you can see Explorer, jump to the next subsection.
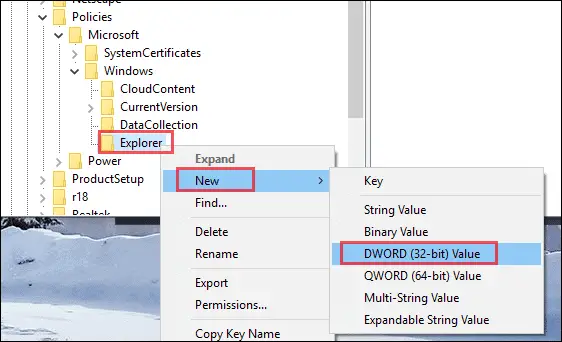
To create an Explorer folder, right-click on Windows, and then New > Key.

Now, name the new key as Explorer.

Once the folder is created, right-click on it.
Move to New > DWORD (32-bit) Value and name this value as DisableNotificationCenter.
To disable Action Center Windows 10, you have to tweak the value for DisableNotificationCenter.
The next section helps you do that.
Note: Tweaking Registry keys need Admin access. If your account doesn’t have enough privileges, you will not find this solution helpful.
Tweak the Value for DisableNotificationCenter
Once you are in HKEY_CURRENT_USER\Software\Policies\Microsoft\Windows\Explorer, double-click DisableNotificationCenter.
Now change its value to 1.
Make sure the Base is Hexadecimal and to apply the changes, click on OK.
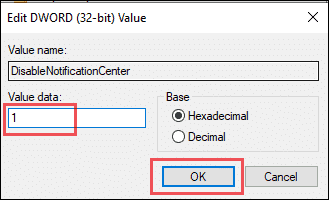
Now, restart your PC, and you will see the Action Center icon is no longer visible on the System Tray.

But, if you find that your PC is not working properly or behaving oddly after you made the Registry edit, Run the Registry Backup file. You can also get back to the Restore Point that you created earlier.
Conclusion
Action Center is essential if you are particular about going through every single notification. But if it is not useful to you, it takes only a few steps to disable Action Center in Windows 10, and it won’t annoy you in the future. But what if you change your mind and want all the notifications back in the list waiting for you to view it later?
Well, you can enable the action center again by following the same procedure as mentioned above. Also, if you don’t want to disable the action center itself, you can still tweak the functionality and customize the Notification Area.
If you are facing issues to manage the user accounts, then you can check our complete guide to managing user accounts in Windows 10.
Related:
- Reset vs Refresh in Windows 10: What’s the Difference?
- Take a complete backup of Your PC by making a Windows 10 system image.


